1.简介
heartbeat是人所众知高可用软件。但是在以前,heartbeat是Linux-ha项目里一大堆提供高可用组件的集合体:
- Messaging Layer(消息传递层)
- local resource manager(LRM,本地资源管理,cluster glue的一个功能)
- stonith(爆头,cluster glue的一个功能)
- Resource Agent(RA,资源代理)、
- cluster resource manager(CRM,集群资源管理器,现在独立出去的pacemaker)。
现在,由于linux-ha将很多这些组件都分离为一个个单独的软件,heartbeat已经只代表消息层(取代它的是corosync)。而且linux-ha项目团队已经不再维护heartbeat,目前能从官方获取到的最新版本是Heartbeat 3.0.6,在epel中可获取到"Heartbeat 3.0.4"版本的rpm包。
虽然Heartbeat只代表高可用集群的消息传递层,但它结合cluster glue和resource agent也可以提供高可用服务,这正是本文的内容。相比于corosync+pacemaker,heartbeat要轻量级的多,配置起来也简单许多。相应的,它的功能和完整性要简陋的多,它只支持两个heartbeat节点(结合pacemaker可多于两节点),且加载资源的速度比较慢。
当然,既然heartbeat是消息传递层,它也能配合pacemaker,但是不建议如此。而且这样搭配时,各个组件的版本要求很严格。
2.安装heartbeat
如果使用yum安装,可以配置epel源。注意,在centos7的epel上,已经没有heartbeat了。
release=`grep -o "[0-9]" /etc/redhat-release | head -1`
cat <<eof>/etc/yum.repos.d/epel.repo
[epel]
name=epelrepo
baseurl=https://mirrors.aliyun.com/epel/${release}Server/$basearch
gpgcheck=0
enable=1
eof

yum -y install heartbeat
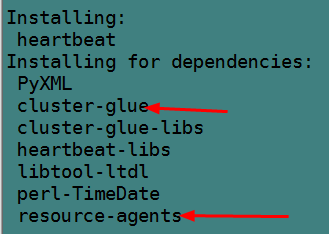
可以看到,安装heartbeat的时候,同时还会安装cluster-glue和resource-agent。

然后提供配置文件。
cp -a /usr/share/doc/heartbeat-3.0.4/{ha.cf,haresources,authkeys} /etc/ha.d/
chmod 600 /etc/ha.d/authkeys
2.1 编译安装heartbeat
不建议编译安装heartbeat,heartbeat这个程序本身附带的很多脚本在路径指定上很混乱,安装后很可能需要到处修改脚本中关于路径的变量。
如果要编译安装heartbeat,则必须先安装cluster-glue和resource-agent,建议这3个程序安装在同一路径下。
(1).安装依赖包。
yum -y install gcc gcc-c++ autoconf automake libtool glib2-devel libxml2-devel bzip2 bzip2-devel e2fsprogs-devel libxslt-devel libtool-ltdl-devel asciidoc
创建好所需组和所有者,在编译cluster-glue会设置一些文件的属组和属主分别为haclient、hacluster,因此名称必须为这两个。
groupadd -g 65 haclient
useradd -g 65 -u 17 hacluster
(2).编译cluster-glue。
tar xf Cluster Glue 1.0.12.bz2
cd Reusable-Cluster-Components-glue--0a7add1d9996/
./autogen.sh
./configure --prefix=/usr/local/heartbeat LIBS=/lib64/libuuid.so.1
make
make install
如果make时有如下错误:
./.libs/libplumb.so: undefined reference to `uuid_parse'
./.libs/libplumb.so: undefined reference to `uuid_generate'
./.libs/libplumb.so: undefined reference to `uuid_copy'
./.libs/libplumb.so: undefined reference to `uuid_is_null'
./.libs/libplumb.so: undefined reference to `uuid_unparse'
./.libs/libplumb.so: undefined reference to `uuid_clear'
./.libs/libplumb.so: undefined reference to `uuid_compare'
collect2: ld returned 1 exit status
gmake[2]: *** [ipctest] Error 1
gmake[2]: Leaving directory `/root/Reusable-Cluster-Components-glue--0a7add1d9996/lib/clplumbing'
gmake[1]: *** [all-recursive] Error 1
gmake[1]: Leaving directory `/root/Reusable-Cluster-Components-glue--0a7add1d9996/lib'
make: *** [all-recursive] Error 1
解决方法:在configure中使用LIBS指向正确的库文件,64位使用/lib64,32位使用/lib
./configure LIBS=/lib64/libuuid.so.1
如果是如下错误:
gmake[2]: a2x: Command not found
解决方法:yum install asciidoc
可以看下cluster-glue提供了哪些命令。
[root@xuexi ~]# ls /usr/local/heartbeat/sbin/
cibsecret   ha_logger   hb_report   lrmadmin    meatclient  stonith
从此不难看出,cluster-glue是整个ha的核心组件,除了crm、messageing layer、resource agent,所有的功能包括最基本的功能都是它提供的。例如,日志记录,stonith,lrm等。
(3).编译resource-agent。
tar xf  resource-agents-3.9.6.tar.gz
cd resource-agents-3.9.6
./autogen.sh
./configure --prefix=/usr/local/heartbeat
make
make install
(4).编译heartbeat。
tar xf heartbeat 3.0.6.bz2
cd Heartbeat-3-0-958e11be8686/
./bootstrap
export CFLAGS="$CFLAGS -I/usr/local/heartbeat/include -L/usr/local/heartbeat/lib"
./configure --prefix=/usr/local/heartbeat --with-daemon-user=hacluster --with-daemon-group=haclient LIBS=/lib64/libuuid.so.1
make
make install
如果出现如下错误:
【configure时错误:】
configure: error: in `/root/Heartbeat-3-0-958e11be8686':
configure: error: Core development headers were not found

解决方法:
export CFLAGS="$CFLAGS -I/usr/local/heartbeat/include -L/usr/local/heartbeat/lib"

【make时错误:】
/usr/local/heartbeat/include/heartbeat/glue_config.h:105:1: error: "HA_HBCONF_DIR" redefined
In file included from ../include/lha_internal.h:38,
                 from strlcpy.c:1:
../include/config.h:390:1: error: this is the location of the previous definition
gmake[1]: *** [strlcpy.lo] Error 1
gmake[1]: Leaving directory `/root/Heartbeat-3-0-958e11be8686/replace'
make: *** [all-recursive] Error 1

解决方法1:
删除/usr/local/heartbeat/include/heartbeat/glue_config.h 中的第105行
#define HA_HBCONF_DIR "/etc/ha.d/"
sed -i '105d' /usr/local/heartbeat/include/heartbeat/glue_config.h

解决方法2:configure上加上忽略错误选项
./configure --prefix=/usr/local/heartbeat --with-daemon-user=hacluster --with-daemon-group=haclient LIBS=/lib64/libuuid.so.1 --enable-fatal-warnings=no
(5).编译后配置。
mkdir -p /usr/local/heartbeat/usr/lib/ocf/lib/heartbeat
cp -a /usr/lib/ocf/lib/heartbeat/ocf-* /usr/local/heartbeat/usr/lib/ocf/lib/heartbeat/
ln -s /usr/local/heartbeat/lib64/heartbeat/plugins/RAExec/* /usr/local/heartbeat/lib/heartbeat/plugins/RAExec/
ln -s /usr/local/heartbeat/lib64/heartbeat/plugins/* /usr/local/heartbeat/lib/heartbeat/plugins/
ln -s /usr/local/heartbeat/share/heartbeat /usr/share/heartbeat
提供配置文件:
cd /usr/local/heartbeat
cp -a share/doc/heartbeat/{ha.cf,haresources,authkeys} etc/ha.d/
chmod 600 etc/ha.d/authkeys
加入服务器启动列表:
chkconfig --add heartbeat
chkconfig --level 2345 heartbeat on
设置环境变量PATH:
echo 'export PATH=/usr/local/heartbeat/sbin:/usr/local/heartbeat/bin:$PATH' >/etc/profile.d/ha.sh
chmod +x /etc/profile.d/ha.sh
source /etc/profile.d/ha.sh
设置man PATH:
echo 'MANPATH /usr/local/heartbeat/share/man' >>/etc/man.config3.heartbeat相关配置文件
heartbeat配置文件有3个:
- 密钥文件authkeys,用在messaging layer下各节点之间的认证,防止外界主机随意加入节点(600权限);
- heartbeat核心配置文件,ha.cf;
- 资源管理配置文件:haresources;
它们的生效位置在/etc/ha.d/目录下,但是初始时在此目录下并没有这3个文件,它们的样例配置文件在/usr/share/docs/heartbeat-$$version/目录下,可以将它们复制到/etc/ha.d目录下。
#以下是yum安装,非编译安装的操作
cp /usr/share/doc/heartbeat-3.0.4/{authkeys,ha.cf,haresources} /etc/ha.d/
3.1 配置文件ha.cf
ha.cf的部分内容如下。该文件看起来很多,但如果不结合pacemaker,其实要修改的就几项,包括node和bcast/mcast以及auto_failback,有时还配置下ping和log。注意该文件从上往下读取,指令的配置位置很重要,因此一般不要修改它们的出现顺序。
#   如果logfile/debugfile/logfacility都没有设置,则等价于设置了"use_logd yes"
#   且use_logd设置为yes后,logfile/debugfile/logfacility的设置都失效
#
#       Note on logging:
#       If all of debugfile, logfile and logfacility are not defined,
#       logging is the same as use_logd yes. In other case, they are
#       respectively effective. if detering the logging to syslog,
#       logfacility must be "none".
#
#       File to write debug messages to
#debugfile /var/log/ha-debug
#
#
#       File to write other messages to
#
#logfile        /var/log/ha-log
#
#
#       Facility to use for syslog()/logger
#
logfacility     local0
#
#
#       A note on specifying "how long" times below...
#
#       The default time unit is seconds
#               10 means ten seconds
#
#       You can also specify them in milliseconds
#               1500ms means 1.5 seconds
#
#
#       keepalive: how long between heartbeats?
#  发送心跳信息的时间间隔,默认每两秒发送一次心跳信息
#keepalive 2
#
#       deadtime: how long-to-declare-host-dead?
#
#               If you set this too low you will get the problematic
#               split-brain (or cluster partition) problem.
#               See the FAQ for how to use warntime to tune deadtime.
#  指定若备节点在30秒内未收到主节点心跳信号,则判定主节点死亡,并接管主服务器资源
#deadtime 30
#
#       warntime: how long before issuing "late heartbeat" warning?
#       See the FAQ for how to use warntime to tune deadtime.
#  指定心跳延迟的时间为10秒,10秒内备节点不能接收主节点心跳信号,即往日志写入警告日志,但不会切换服务
#warntime 10
#
#
#       Very first dead time (initdead)
#
#       On some machines/OSes, etc. the network takes a while to come up
#       and start working right after you've been rebooted.  As a result
#       we have a separate dead time for when things first come up.
#       It should be at least twice the normal dead time.
#  定义第一次死亡判定时间,即第一个heartbeat启动后等待第二个heartbeat启动,
#  第二个启动后才会启动高可用服务、启动VIP等。若在此时间内第二个节点未启动则
#  判定其dead,然后才启动高可用服务和VIP,这是双方为形成高可用群集的等待时间。
#  此时间至少要是deadtime的两倍
#initdead 120
#
#
#       What UDP port to use for bcast/ucast communication?
#  心跳信息端口
#udpport        694
#
#       Baud rate for serial ports...
#  支持两种方式发送心跳信息,一是以太网(广播组播单播),一是串行线,在heartbeat3中,baud已经废弃
#baud   19200
#
#       serial  serialportname ...
#serial /dev/ttyS0      # Linux
#serial /dev/cuaa0      # FreeBSD
#serial /dev/cuad0      # FreeBSD 6.x
#serial /dev/cua/a      # Solaris
#
#
#       What interfaces to broadcast heartbeats over?
#
#bcast  eth0            # Linux
#bcast  eth1 eth2       # Linux
#bcast  le0             # Solaris
#bcast  le1 le2         # Solaris
#
#       Set up a multicast heartbeat medium
#       mcast [dev] [mcast group] [port] [ttl] [loop]
#
#       [dev]           device to send/rcv heartbeats on
#       [mcast group]   multicast group to join (class D multicast address
#                       224.0.0.0 - 239.255.255.255)
#       [port]          udp port to sendto/rcvfrom (set this value to the
#                       same value as "udpport" above)
#       [ttl]           the ttl value for outbound heartbeats.  this effects
#                       how far the multicast packet will propagate.  (0-255)
#                       Must be greater than zero.
#       [loop]          toggles loopback for outbound multicast heartbeats.
#                       if enabled, an outbound packet will be looped back and
#                       received by the interface it was sent on. (0 or 1)
#                       Set this value to zero.
#
#
#mcast eth0 225.0.0.1 694 1 0
#
#       Set up a unicast / udp heartbeat medium
#       ucast [dev] [peer-ip-addr]
#
#       [dev]           device to send/rcv heartbeats on
#       [peer-ip-addr]  IP address of peer to send packets to
#
#  单播心跳,需指定对方心跳接口地址
#ucast eth0 192.168.1.2
#
#
#       About boolean values...
#
#       Any of the following case-insensitive values will work for true:
#               true, on, yes, y, 1
#       Any of the following case-insensitive values will work for false:
#               false, off, no, n, 0
#
#
#
#       auto_failback:  determines whether a resource will
#       automatically fail back to its "primary" node, or remain
#       on whatever node is serving it until that node fails, or
#       an administrator intervenes.
#
#       The possible values for auto_failback are:
#               on      - enable automatic failbacks
#               off     - disable automatic failbacks
#               legacy  - enable automatic failbacks in systems
#                       where all nodes do not yet support
#                       the auto_failback option.
#
#       auto_failback "on" and "off" are backwards compatible with the old
#               "nice_failback on" setting.
#
#       See the FAQ for information on how to convert
#               from "legacy" to "on" without a flash cut.
#               (i.e., using a "rolling upgrade" process)
#
#       The default value for auto_failback is "legacy", which
#       will issue a warning at startup.  So, make sure you put
#       an auto_failback directive in your ha.cf file.
#       (note: auto_failback can be any boolean or "legacy")
#  主节点恢复重新上线后,是否自动接管服务
auto_failback on
#
#  以下是fence设备相关
#       Basic STONITH support
#       Using this directive assumes that there is one stonith
#       device in the cluster.  Parameters to this device are
#       read from a configuration file. The format of this line is:
#
#         stonith <stonith_type> <configfile>
#
#       NOTE: it is up to you to maintain this file on each node in the
#       cluster!
#
#stonith baytech /etc/ha.d/conf/stonith.baytech
#
#       STONITH support
#       You can configure multiple stonith devices using this directive.
#       The format of the line is:
#         stonith_host <hostfrom> <stonith_type> <params...>
#         <hostfrom> is the machine the stonith device is attached
#              to or * to mean it is accessible from any host.
#         <stonith_type> is the type of stonith device (a list of
#              supported drives is in /usr/lib/stonith.)
#         <params...> are driver specific parameters.  To see the
#              format for a particular device, run:
#           stonith -l -t <stonith_type>
#
#
#       Note that if you put your stonith device access information in
#       here, and you make this file publically readable, you're asking
#       for a denial of service attack ;-)
#
#       To get a list of supported stonith devices, run
#               stonith -L
#       For detailed information on which stonith devices are supported
#       and their detailed configuration options, run this command:
#               stonith -h
#
#stonith_host *     baytech 10.0.0.3 mylogin mysecretpassword
#stonith_host ken3  rps10 /dev/ttyS1 kathy 0
#stonith_host kathy rps10 /dev/ttyS1 ken3 0
#
#
#  看门狗是一个计时器。如果自身60秒不心跳了,则本节点会重启
#       Watchdog is the watchdog timer.  If our own heart doesn't beat for
#       a minute, then our machine will reboot.
#       NOTE: If you are using the software watchdog, you very likely
#       wish to load the module with the parameter "nowayout=0" or
#       compile it without CONFIG_WATCHDOG_NOWAYOUT set. Otherwise even
#       an orderly shutdown of heartbeat will trigger a reboot, which is
#       very likely NOT what you want.
#
#watchdog /dev/watchdog   #看门狗fence设备,Linux自带的软watchdog
#
#       Tell what machines are in the cluster
#       node    nodename ...    -- must match uname -n
#  必须配置的node,必须和uname -n的结果一致
#node   ken3
#node   kathy
#
#       Less common options...
#
#       Treats 10.10.10.254 as a psuedo-cluster-member
#       Used together with ipfail below...
#       note: don't use a cluster node as ping node
#
#  通过ping参考ip检测本节点对外的网络连通性,需要配合ipfail进程。当ping不通时将down掉本节点
#  ping_group是通过ping一组ip来检查ip的连通性,防止因对方节点故障而误以为自己坏了。
#  只有当组中所有节点都ping不通才认为自己坏了。和ping只能使用二选一
#  不要使用集群节点作为ping的参考ip,一般ping的对象都是网关
#ping 10.10.10.254
#ping_group group1 172.16.103.254 172.16.103.212

#  随heartbeat启动、停止而启动停止的进程,它是pacemaker在heartbeat中的实现
#respawn hacluster   /usr/local/lib/heartbeat/ipfail

#  指定哪个用户、组可以连通使用某进程,此处为ipfail
#apiauth ipfail gid=haclient uid=hacluster
综上,必须要配置的就是三项:node、bcast/mcast、auto_failback。它们在文件中的位置顺序是先bcast/mcast/ucast,再auto_failback,最后才是node。偶尔还需配置ping来检测自身网络。
例如,以下是两个heartbeat节点,分别两个网卡,使用广播方式从eth0发送心跳信息的配置。
logfile /var/log/ha-log
logfacility local0
bcast eth0
#mcast eth1 225.0.0.193 694 1 0
auto_failback yes
node node1.longshuai.com
node node2.longshuai.com
ping 192.168.100.1
respawn hacluster   /usr/local/lib/heartbeat/ipfail
apiauth ipfail gid=haclient uid=hacluster
因为使用的是广播,两台服务器上的ha.cf文件是完全一样的。如果是通过多播或单播的方式发送心跳信息,则两台服务器的ha.cf在mcast/ucast指令配置参数上是不一样的。
另外需注意,heartbeat主节点重启heartbeat或重启系统,当前正运行的heartbeat会发出通告给备节点,使其快速接管资源,而不是按照配置文件中定义的deadtime来获取资源的。同理,当再次启动的时候,如果设置了failback,会发送通告迅速收回资源。
3.2 配置文件authkeys
chmod 600 authkeys
以下为authkeys的内容。两个节点上该文件的内容一致。
#auth 1
#1 crc
#2 sha1 HI!
#3 md5 Hello!
auth 3
3 md5 6hy6Y6NCdVInax1PlGlvFyIMm/k
使用的是md5格式,使用sha1更安全。后面的是一段随机数,这里用随机数来做md5加密。随机数的生成方式有很多种。如:
openssl rand -base64 20
3.3 配置文件haresources
在此配置文件内配置资源代理(resource agent)参数。heartbeat自身支持两种风格的RA:一种是LSB类型的程序,它的路径在/etc/init.d/下;一种是heartbeat自带的haresource,它的路径在ha.d/resource.d/目录下。
以下是heartbeat自带的RA。
[root@xuexi ~]# ls /etc/ha.d/resource.d/
apache  db2  Filesystem  ICP  IPaddr  IPsrcaddr  LinuxSCSI  MailTo  portblock  SendArp  WAS  Xinetd
AudibleAlarm  Delay  hto-mapfuncs  ids  IPaddr2  IPv6addr  LVM  OCF  Raid1  ServeRAID  WinPopup
需要记住其中几个:
- apache:管理httpd,需指定httpd配置文件作为该RA的参数。
- IPaddr和IPaddr2:设置IP别名(注意,是别名),IPaddr2是IPaddr的升级版,但两者可以通用。
- Filesystem:挂载文件系统。
自带的RA类似于LSB,只是它能接受参数(如start/stop/status),而LSB不能,LSB的start、stop和status参数由heartbeat自行发送。
它们都必须能接受start/stop/status参数,且必须具有幂等性。例如running状态的再次start,返回状态码为0,还是继续running,stop状态的再次stop不会报错,且状态码为0。除了对stop状态的资源进行status时返回状态码3,其他任意参数的状态码都必须为0。
如果结合pacemaker,则还支持ocf风格的程序来管理资源。
通过以下5行来说明该配置文件的配置方法。
#node-name resource1 resource2 ... resourceN
#IPaddr::135.9.8.7/24/eth0
#just.linux-ha.org 135.9.216.110 httpd
#node1  10.0.0.170 Filesystem::/dev/sda1::/data1::ext2
#node1  10.0.0.170 apache::/etc/apache/httpd.conf
- 第一行是配置语法说明,首先指定节点名,节点名必须和
uname -n一致。后面指定在此节点上运行的资源,多个资源使用空格隔开。 - 第二行中的"IPaddr"是资源代理程序,该程序在/etc/ha.d/resource.d/目录下,如果该目录下找不到就会去找/etc/init.d/目录下的程序。IPaddr后面的双冒号"::"是参数分隔符,多个参数之间使用双冒号分割,参数是传递给资源代理程序的。这一行说明的是设置在某节点上设置ip为135.9.8.7,掩码为24位,配置在eth0的别名上。它实现的是
resource.d/IPaddr 135.9.8.7/24/eth0 start|stop|status。 - 第三行说明在节点just.linux-ha.org上启用ip 135.9.216.110(IPaddr程序可省略)和httpd服务。
- 第四行说明节点node1上启用IP 10.0.0.170,成功后运行资源代理程序Filesystem,向其传入运行3个参数"/dev/sda1"、"/data1"、"ext2"。
如果不知道某个RA接什么样的参数实现怎样的功能,可以去查看ha.d/resource.d/下对应RA的程序用法(一般都是shell脚本,前几行就会写Usage)。例如,IPaddr2的前几行:
[root@xuexi ~]# vim /etc/ha.d/resource.d/IPaddr2
#!/bin/sh
#
#
# Description:  wrapper of OCF RA IPaddr2, based on original heartbeat RA.
#               See OCF RA IPaddr2 for more information.
#
# Author:       Xun Sun <xunsun@cn.ibm.com>
# Support:      linux-ha@lists.linux-ha.org
# License:      GNU General Public License (GPL)
# Copyright:    (C) 2005 International Business Machines
#
#       This script manages IP alias IP addresses
#
#       It can add an IP alias, or remove one.
#
#       usage: $0 ip-address[/netmaskbits[/interface[:label][/broadcast]]]
#           {start|stop|status|monitor}
#
#       The "start" arg adds an IP alias.
#
#       Surprisingly, the "stop" arg removes one.       :-)
例如,以下是只管理两个节点VIP资源的haresources文件内容。两个服务器上的内容相同时表示:这是一个主主模型,节点1初始时只设置20.16这个IP,节点2初始时只设置20.14这个IP,当某节点故障后,另一节点接管其上VIP。
node1.longshuai.com IPaddr2::192.168.20.16/24/eth0
node2.longshuai.com IPaddr2::192.168.20.14/24/eth0
注意:
- heartbeat只支持两个节点,没有主从之分,只能根据haresources中的节点名称来决定是否设置某资源。
- VIP这种配置在别名接口上的地址,必须要和它所在接口同网段,否则它没有对应的路由。即使它通过默认路由出去了,如果它的下一跳是Linux主机,由于Linux主机默认设置了rp_filter=1的源地址严格检查,会直接丢弃这样的数据包。如果真这样,将其设置为2(也可以设置为0,但不推荐)。
- 如果采用广播发送心跳信息,建议心跳接口地址不要和VIP所在接口主地址同网段,否则心跳信息会被各节点的对外通信接口接收,从而影响性能。
4.示例:heartbeat为httpd提供高可用
这是一个没有实际意义的示例,只是为了演示heartbeat提供高可用时需要配置哪些必要的东西,以及如何提供VIP漂移(即IP资源高可用)。
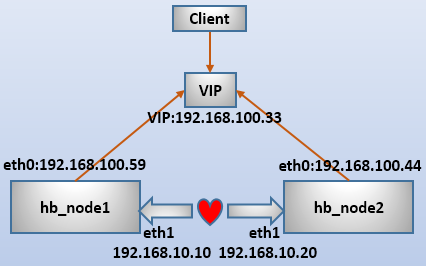
环境如下:

需要说明的是,httpd有两种管理方式:
- heartbeat只管理vip的漂移,不管理httpd的启动。这种情况要求httpd要事先在两节点启动好。
- heartbeat同时管理VIP和httpd,这时httpd不能事先启动,也不能设置开机自启动。
本文测试采用第二种方案。
(1).配置节点主机名。
# node1上执行
hostname node1.longshuai.com
sed -i "/HOSTNAME/Is/=.*$/=node1.longshuai.com/" /etc/sysconfig/network

# node2上执行
hostname node2.longshuai.com
sed -i "/HOSTNAME/Is/=.*$/=node2.longshuai.com/" /etc/sysconfig/network
(2).配置主机名解析。
# 两节点都执行
cat >>/etc/hosts<<eof
192.168.100.59 node1.longshuai.com node1
192.168.100.44 node2.longshuai.com node2
eof
(3).为心跳线接口配置主机路由。
# 在node上执行:
route add -host 192.168.10.20 dev eth1
route -n

# 在node2上执行:
route add -host 192.168.10.10 dev eth1
route -n
(4).将两节点进行时间同步。
# 两节点都执行
ntpdate ntp1.aliyun.com
(5).两节点安装httpd,并设置不同页面内容以方便测试。
# node1上执行:
yum -y install httpd
echo "response from node1" >/var/www/html/index.html

# node2上执行:
yum -y install httpd
echo "response from node2" >/var/www/html/index.html
(6).提供配置文件ha.cf。由于此处采用广播方式,两节点ha.cf内容完全一致。
cp /etc/ha.d/ha.cf /etc/ha.d/ha.cf.bak
cat <<eof>/etc/ha.d/ha.cf
logfile        /var/log/ha-log
logfacility     local0
keepalive 2
deadtime 30
warntime 10
initdead 120
udpport        694
bcast  eth1
auto_failback on
node   node1.longshuai.com
node   node2.longshuai.com
ping 192.168.100.1    # 虚拟机网关
respawn hacluster   /usr/local/lib/heartbeat/ipfail
apiauth ipfail gid=haclient uid=hacluster
eof
(7).提供配置文件authkeys。两节点authkeys内容完全一致。
# 在node1上执行:
chmod 600 /etc/ha.d/authkeys
echo -e "auth 3
3 md5 `openssl rand -base64 20`" >>/etc/ha.d/authkeys
scp /etc/ha.d/authkeys node2:/etc/ha.d/
(8).提供配置文件haresources,两节点内容一致。
# 在node1上执行:
cp /etc/ha.d/haresources /etc/ha.d/haresources.bak
echo "node1.longshuai.com IPaddr2::192.168.100.33/24/eth0 httpd" >/etc/ha.d/haresources
scp /etc/ha.d/haresources node2:/etc/ha.d/
最后,启动两端heartbeat节点,并通过访问VIP的web页面进行测试。可以查看日志/var/log/ha-log,看看heartbeat节点之间是如何等待对方并工作的。