1. 前言
用Sublime Text 2 配置Python运用环境,有简单配置还有像IDLE一样的配置,本文分成第一部分和第二部分。
2. 配置
第一部分(简单配置)
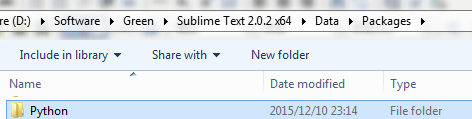
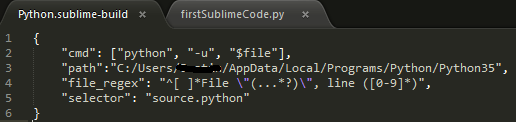
1.只需要打开Preferences 的 Browse Packages找到Python 文件夹中的Python.sublime-build文件。
2.在Python.sublime-build文件中加入”path“:Python安装路径(要注意是“/”)
注意:Sublime Text 3在此目录下没有Python文件夹。则跳转到第二部分,直接安装SublimeREPL插件,然后此时ctrl+b运行就会有效了。

3.Sublime Text 2会自动的判断类型build按ctrl + b即可运行
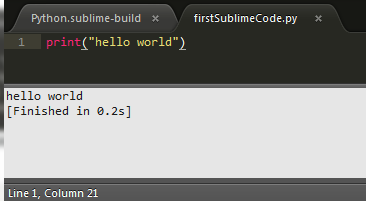
输出在自身的控制台中,部署到这一步,就可以正常使用了。
p.s.
如果执行ctrl + b提示提示 can't find '__main__' module in ' ',说明你这个文件没有保存,哈哈哈[3]
但是这里就会有一个问题,不能像IDLE一样输入,此时我们可以使用一个插件SublimeREPL 。
-------------------------------------------------------------------------------------------------------------------
第二部分(像IDLE一样使用)
如果你的ST2还没有安装‘安装包管理器’简单的安装方法:
使用Ctrl+`快捷键或者通过View->Show Console菜单打开命令行,粘贴如下代码:
如果是Sublime Text 2:
import urllib2,os; pf='Package Control.sublime-package'; ipp = sublime.installed_packages_path(); os.makedirs( ipp ) if not os.path.exists(ipp) else None; urllib2.install_opener( urllib2.build_opener( urllib2.ProxyHandler( ))); open( os.path.join( ipp, pf), 'wb').write( urllib2.urlopen( 'http://sublime.wbond.net/' +pf.replace( ' ','%20' )).read()); print( 'Please restart Sublime Text to finish installation')
如果是Sublime Text 3,代码如下:
import urllib.request,os; pf = 'Package Control.sublime- package'; ipp = sublime.installed_packages_path(); urllib.request.install_opener( urllib.request.build_opener( urllib.request.ProxyHandler()) ); open(os.path.join(ipp, pf), 'wb').write(urllib.request.urlopen( 'http://sublime.wbond.net/' + pf.replace(' ','%20')).read())
4.首先安装这个插件,安装过程也就是ctrl+shift+p,install packag,等repo信息出现,输入SublimeREPL,如下图:

在Preference->Package Settings里能看到SublimeREPL,就说明安装成功了。
5.运行
由于每次运行程序都要执行:Tools -> SublimeREPL -> Python -> RUN current file 菜单有点麻烦,所以现在可以考虑给他创建个快捷键;
Perferences -- Key Bindings User 中粘贴如下代码:
[{"keys":["f5"],
"caption": "SublimeREPL: Python - RUN current file",
"command": "run_existing_window_command", "args":
{
"id": "repl_python_run",
"file": "config/Python/Main.sublime-menu"
}}]
这样以后你打开你要运行的Python程序,就可以直接按快捷键F5 build执行了。
但是每次运行都出新建*REPL*[Python]输出文件,感觉不是很方便。
而且如果不是Python文件或者是不合法文件按快捷方式编译,也会新建*REPL*[Python]输出文件

或者

其实我们可以像IDLE一样运行Python,也设置一个快捷方式如下
[
{"keys":["f5"],
"caption": "SublimeREPL: Python - RUN current file",
"command": "run_existing_window_command", "args":
{
"id": "repl_python_run",
"file": "config/Python/Main.sublime-menu"
}},

{"keys":["f4"],
"caption": "SublimeREPL: Python",
"command": "run_existing_window_command",
"args":
{
"id": "repl_python",
"file": "config/Python/Main.sublime-menu"
}}
]