最近做项目,在和user 洽谈时,在输内容时提示数据库已存在的相似内容,也就是模糊匹配。怎么实现这个功能呢?
当然现在软件开发都是讲究高效,开发周期短,第一个想的是又没相似的控件可以实现这种效果,在搜索的时候,发现百度搜、google搜不是正是我需要的效果的吗?本着专业的思想,按下了F12。
发现了这个:

想去百度的同学,抓紧了,我也要赶紧准备准备了。。。
1 <span class="bg s_ipt_wr"><input id="kw" name="wd" class="s_ipt" value="" maxlength="255" autocomplete="off"></span><span class="bg s_btn_wr"><input type="submit" id="su" value="百度一下"/>
看到这我比较懒,不愿意在找相应的js了,自己写吧。
本人是做Asp.net 开发的,无奈国内很少有大公司招.net.(伤心啊)
我的思路是这样的。
1》 首先必须有个输入框<input>
2》 把输入的内容ajax到后台。(我使用的一般处理程式接收前台的数据)(jquery)
3》 把数据显示在一个DIV框中
4》点击选择数据放到Input中,在然后提交。(submit)
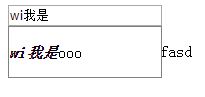
看我做的效果图:

好看吧,其实。。。,效果是这样的
希望大家要学好CSS 啊。。。。
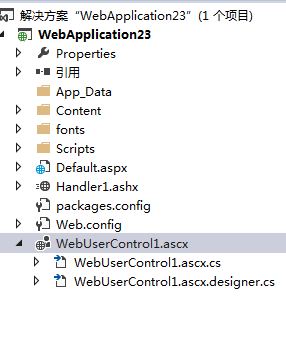
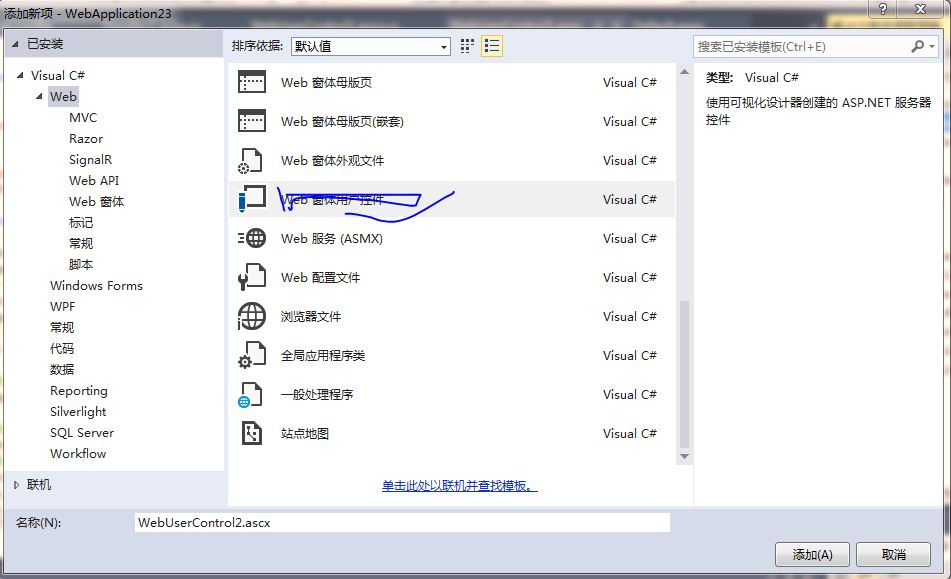
不要忘记创建一般处理程式。
控件前端代码:
<%@ Control Language="C#" AutoEventWireup="true" CodeBehind="WebUserControl1.ascx.cs" Inherits="WebApplication23.WebUserControl1" %>
<script src="Scripts/jquery-1.7.1.min.js"></script>
<style type="text/css">
    .mouseover{
        background-color: gray;
    }

</style>
<div  class="row" id="wrapdiv">


    <asp:TextBox runat="server" ID="txtInput" Width="150px" EnableViewState="false"></asp:TextBox>

</div>
<div style=" background-color:white;  ">
    <p>测试测试测试</p>
</div>
<script type="text/javascript">
    $(function () {
        var $txtinput = $("#<%=txtInput.ClientID %>");
        var $NumberHandle;//生执行的事件时间的句柄。
        //创建一个div
        var $div = $("<div style='border:solid 1px gray;z-index:1; position:absolute;background-color:white; padding:0 0;'></div>");
        $div.appendTo($("#wrapdiv"));
        //创建一个ul
        var $ul = $("<ul style='list-style-type:none;cursor:pointer; text-align:left; padding:0 0; list-style-position:hanging;'></ul>");

        //将此$ul添加到$div中去
        $div.append($ul);

        //将此$div显示在$inputTxt下面位置
        var $txtinputlocation = $txtinput.offset();
        //设置$div的位置及宽度
        var $divObj = new Object();
        $divObj.Top = $txtinputlocation.top + $txtinput.outerHeight();
        $divObj.left = $txtinputlocation.left;
        var $divOuterWidth = $txtinput.outerWidth();
        $div.offset($divObj);
        $div.width(parseInt($divOuterWidth) - 2);
        $div.hide();
        $txtinput.keyup(function () {
            $div.slideDown("slow");
            $NumberHandle = setTimeout(auoTip("Handler1.ashx"), 30000);
            //设置下拉样式。
        });
        function auoTip(url) {
            $.getJSON(url, { "inputValue": $txtinput.val() }, function (data) {

                //清除以前绑定的数据
                $("ul li").each(function (index, element) {
                    $(element).remove();
                });
                //to-do 写下后台数据绑定的代码
                var $li = $(("<li style='margin: 1px 0px;'>" + data + "<li>").replace($txtinput.val(), "<em><b>" + $txtinput.val() + "</b></em>"));
                $ul.append($li);
                //为li便签添加鼠标和点击事件
                $("ul li").each(function (index, element) {
                    $(element).mouseover(function () {
                        $(this).addClass("mouseover");
                    });
                    $(element).mouseleave(function () {
                        $(this).removeClass("mouseover");
                    });
                    $(element).bind("click", null, function () {
                        $txtinput.val($(this).text().replace("<em><b>" + $txtinput.val() + "</b></em>", $txtinput.val()));
                        $div.slideUp("show");
                    });
                });
            });
        }
        $txtinput.keypress(function () {

            clearTimeout($NumberHandle);
        });
    });

</script>
User控件后端代码:
其实什么都没哟写,都是Microsoft 创建的。看下吧
using System;
using System.Collections.Generic;
using System.Linq;
using System.Web;
using System.Web.UI;
using System.Web.UI.WebControls;

namespace WebApplication23
{
    public partial class WebUserControl1 : System.Web.UI.UserControl
    {
        protected void Page_Load(object sender, EventArgs e)
        {

        }
    }
}
看一般处理程式的代码:
using System;
using System.Collections.Generic;
using System.Linq;
using System.Web;
using System.Web.Script.Serialization;
namespace WebApplication23
{
    /// <summary>
    /// Handler1 的摘要说明
    /// </summary>
    public class Handler1 : IHttpHandler
    {

        public void ProcessRequest(HttpContext context)
        {
            context.Response.ContentType = "text/plain";
            string value = context.Request.Params["inputValue"].ToString()+"ooo";

            JavaScriptSerializer js = new JavaScriptSerializer();
            string Jsonvalue = js.Serialize(value);
            context.Response.Write(Jsonvalue);
        }

        public bool IsReusable
        {
            get
            {
                return false;
            }
        }
    }
}
这里只是模拟,你可以把操作数据的代码放到这里面来。
好了,准备工作已经做完了,现在应该使用我们自己创建的代码了。
<%@ Page Language="C#" AutoEventWireup="true" CodeBehind="Default.aspx.cs" Inherits="WebApplication23._Default" %>

<%@ Register Src="~/WebUserControl1.ascx" TagPrefix="uc1" TagName="WebUserControl1" %>


<!DOCTYPE html PUBLIC "-//W3C//DTD XHTML 1.0 Transitional//EN" "http://www.w3.org/TR/xhtml1/DTD/xhtml1-transitional.dtd">

<html xmlns="http://www.w3.org/1999/xhtml">
<head runat="server">
    <title></title>
</head>
<body>
    <form id="form1" runat="server">
    <div>
        <uc1:WebUserControl1 runat="server" id="WebUserControl1" />
    </div>
    </form>
</body>
</html>
最后一步,也是关键的一步,一定不要忘记运行啊,不然你怎么知道效果。。。。呢。