
创建控制器
模块
nest g mo user
控制器
nest g co user
服务
nest g s user
@Request() |
req |
@Res() |
res |
@Next() |
next |
@Session() 这个不懂 |
|
@Param(key?:string) |
req.params/req.params 动态id :id |
@Body(key?:string) |
req.body/req.body[key] post参数 |
@Query(key?string) |
req.query/req.query[key] 问号参数 |
@Headers(name?:string) |
req.headers/req.headers[name] 请求头 |
@Ip() |
req.ip |
  @Get('home')
  findOne(@Query() query,@Res() res): string {
    console.log(query);
    res.send('ssssss') //跟上面类似
    // return 'findOne';
  }
如果不是用Res 记得要去掉

import { Request,Response } from 'express';

@Controller('cats')
export class CatsController {
  @Get()
    			// 请求头
  findAll(@Req() request: Request): string {
    return 'This action returns all cats';
  }
}

//响应头
 @Get('home/:id')
  findOne(@Res() res: Response): string {
    res.status(HttpStatus.OK).json([]);
  }
Session
https://www.codenong.com/cs106637304/
路由通配符
* / ? / + / () [a-z]
  @Get('getThree*')
  findThree() {
    return '成功1';
  }
// 我们发现 getThree12123 也能匹配上
设置响应信息
设置状态码
@HttpCode(201)
  @Get('codeNum')
  @HttpCode(201)
  codeThree() {
    return { sex:21 };
  }
通常状态码不是固定,可以通过@Res 注入对象
设置响应头
@header() 通过 res.header()直接调用
重定向
使用 @Redirect()装饰器或特定于库的响应对象(并直接调用 res.redirect()
没思考到使用场景
子域路由
限定特别的子域名路由访问
Async/await
每个异步函数都必须返回 Promise。这意味着您可以返回延迟值, 而 Nest 将自行解析它
两种方式
@Get()
async findAll(): Promise<any[]> {
  return [];
}
==========
@Get()
findAll(): Observable<any[]> {
  return of([]);
}
定义数据
它定义了如何通过网络发送数据。我们可以通过使用 TypeScript接口或简单的类来完成。但是我们推荐使用类
确定 DTO(数据传输对象)模式
xxx.dto.ts
export class CreateCatDto{
  readonly name:string
  readonly age:number
  readonly breed:string
}
服务
类型
还是用ts的
新建一个interface文件夹
xxx.interface.ts

export interface Cat{
  name:string,
  age:number,
  breed:string
}
可选依赖
参考angular
import { Injectable, Optional, Inject } from '@nestjs/common';

@Injectable()
export class TestTwoService {
  constructor() { }
}


constructor(@Optional() private two?:TestTwoService) {
    console.log(this.two);//null
  }
服务, 试了下,具体可以全部参考angular的写的,基本一样
模块
| providers | 由 Nest 注入器实例化的提供者,并且可以至少在整个模块中共享 |
|---|---|
| controllers | 必须创建的一组控制器 |
| imports | 导入模块的列表,这些模块导出了此模块中所需提供者 |
| exports | 由本模块提供并应在其他模块中可用的提供者的子集。 |
每个模块都是一个共享模块。一旦创建就能被任意模块重复使用
这个还是跟angular一样,对新手比较友好
导出
@Module({
  controllers: [CatsController],
  providers: [CatsService],
  exports: [CatsService]
})
导出当前模块的服务
可以这样
@Module({
  controllers: [CatsNumController],
  providers: [CatsNumService],
  exports:[CatsNumModule,CatsNumService],
})
export class CatsNumModule {}

其他模块
@Module({
  imports: [CatsNumModule], //导入当前的
  controllers: [CatsTwoController],
})
就可以使用 CatsNumService啦
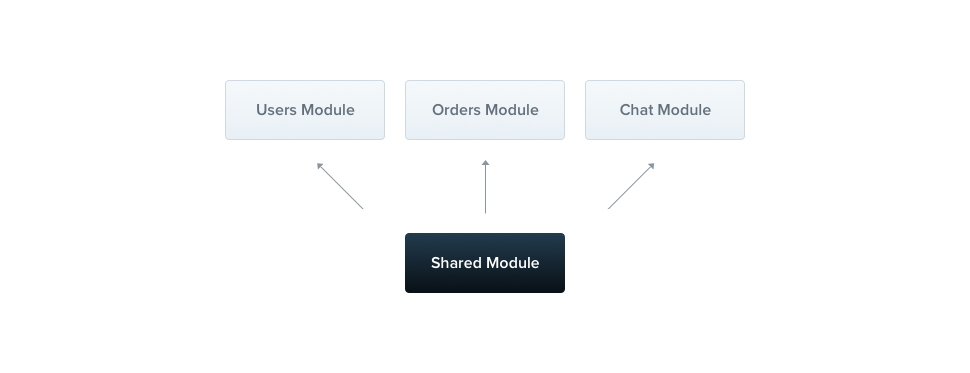
共享模块
可以把很多东西放在同一个模块的,仅在需要时导入该模块
@NgModule({
 imports:      [ CommonModule ],
 declarations: [ CustomerComponent, NewItemDirective, OrdersPipe ],
 exports:      [ CustomerComponent, NewItemDirective, OrdersPipe,
                 CommonModule, FormsModule ]
})
export class SharedModule { }
把需要的导出来,然后其他模块引入这个模块就可以啦
全局模块
@Global()
@Module({
  controllers: [CatsController],
  providers: [CatsService],
  exports: [CatsService],
})
export class CatsModule {}
@Global 装饰器使模块成为全局作用域。 全局模块应该只注册一次,最好由根或核心模块注册。
动态模块
如果修改成全局
{
  global: true,
  module: DatabaseModule,
  providers: providers,
  exports: providers,
}
import { Module, DynamicModule } from '@nestjs/common';

@Module({})
export class OneModule {
  static forRoot(baseConfigPath: string): DynamicModule {
    const providers = [{ provide: 'Config', useValue: baseConfigPath }];

    return {
      module: OneModule,
      providers,
      exports: providers,
    };
  }
}
模块使用
@Module({
  imports: [OneModule.forRoot('333')],
  controllers: [DatebaseController],
  ...
})

使用
export class DatebaseController {
  constructor(@Inject('Config') config) {
    console.log(config);//拿到啦
  }
}
中间件
nest g mi 文件名 文件夹
也可以这样
nest g mi ./xxx/xxx
xxx.middleware.ts
支持依赖注入
中间件通过constructor 注入
应用中间件
- 新建的中间件
@Injectable()
export class LoggerOneMiddleware implements NestMiddleware {
  use(req: any, res: any, next: () => void) {
    console.log('我这是一个中间件-----------');
    next();
  }
}
-
添加到模块中, 使用模块类的
configure()方法来设置它们。包含中间件的模块必须实现NestModule -
import { MiddlewareBuilder } from '@nestjs/core';
import { Module, NestModule } from '@nestjs/common';
// 中间件
import { LoggerOneMiddleware } from '../middleware/logger-one.middleware';
export class CatsTwoModule implements NestModule{
configure(consumer:MiddlewareBuilder){
// apply函数中使用逗号分隔我们需要使用的多个中间件
// forRoutes函数中指定的是针对哪个路由。
// forRoutes() 可接受一个字符串、多个字符串、对象、一个控制器类甚至多个控制器类。在大多数情况下,可能只会传递一个由逗号分隔的控制器列表
// 如果我们使用空值,那么这里会将模块中定义的路由全部使用中间件
consumer.apply(LoggerOneMiddleware).forRoutes('')
}
}
* 中间件作用特定的路由

```js
    consumer.apply(LoggerOneMiddleware).forRoutes({ path: 'cats-two/three', method: RequestMethod.POST });
多个特定的值,用逗号分隔
-
exclude 排除不期望的路由,多个也是逗号的形式分割
consumer.apply(LoggerOneMiddleware) .exclude({ path: 'cats-two/three', method: RequestMethod.POST }) .forRoutes(CatsTwoController); -
通配符配置
forRoutes({ path: 'ab*cd', method: RequestMethod.ALL }); -
全局使用
main.ts中使用use方法:
app.use(LogMiddleware);
异常
默认响应
{
  "statusCode": 500,
  "message": "Internal server error"
}
抛出异常
throw new HttpException('描述的数据', HttpStatus.FORBIDDEN);
HttpException 两个参数
- 该
response参数定义JSON响应体。可以是astring或aobject,如下所述。 - 该
status参数定义HTTP状态代码。
自定义异常
export class ForbiddenException extends HttpException {
  constructor() {
    super('Forbidden', HttpStatus.FORBIDDEN);
  }
}

使用
@Get()
async findAll() {
  throw new ForbiddenException();
}
管道
nest g pipe validation pipe
- 转换:将输入数据转换为所需的形式(例如,从字符串到整数)
- 验证:评估输入数据,如果有效,只需将其原样传递即可;否则,当数据不正确时抛出异常
内置管道
ValidationPipeParseIntPipe参数转换为JavaScript整数(如果转换失败,则抛出异常)ParseBoolPipebooleanParseArrayPipearrayParseUUIDPipe仅需要特定版本的UUIDDefaultValuePipe设置默认值
它们是从@nestjs/common包装中导出的。
@Injectable()
export class ValidationOnePipe implements PipeTransform {
  transform(value: any, metadata: ArgumentMetadata) {
    return value;
  }
}
使用
 // id
  @Post('three/:id')
  postThree(@Param('id',ParseIntPipe) id:number) {
    console.log(id);
    return 'three';
  }

如果接受的参数是数字则正常返回结果
如果需要编写报错信息
async findOne(
  @Param('id', new ParseIntPipe(
      { errorHttpStatusCode: HttpStatus.NOT_ACCEPTABLE }
  ))
  id: number,
)

输入的类型
export interface ParseIntPipeOptions {
    errorHttpStatusCode?: ErrorHttpStatusCode;
    // 我感觉是拿到操作的信息进行的某些操作
    exceptionFactory?: (error: string) => any;
}
自定义管道
需要传参数,管道才能接受到值@Query/@Params/@Body
参数
- value 是当前处理的参数
- metadata 是其元数据。
export interface ArgumentMetadata {
  type: 'body' | 'query' | 'param' | 'custom';
  metatype?: Type<unknown>;
  data?: string;
}
| 参数 | 描述 |
|---|---|
| type | 告诉我们该属性是一个 body @Body(),query @Query(),param @Param() 还是自定义参数 在这里阅读更多。 |
| metatype | 属性的元类型,例如 String。 如果在函数签名中省略类型声明,或者使用原生 JavaScript,则为 undefined。 |
| data | 传递给装饰器的字符串,例如 @Body('string')。 如果您将括号留空,则为 undefined。 |
yarn add joi -S
yarn add @types/joi -D
joi很强大,我会单独出一篇博客介绍
创建一个过滤器
创建一个过滤器
nest g pipe xxx

import { ArgumentMetadata, BadRequestException, Injectable, PipeTransform } from '@nestjs/common';
import { Schema } from 'joi';

@Injectable()
export class ValidationOnePipe implements PipeTransform {
                            // 要求是joi模式实例
    					// ObjectSchema对象实例
  constructor(private readonly schema: Schema) {
  }

  // value 是传进来的值, 从metadata中可以取出 相关类型 Body Query 等
  transform(value: any, metadata: ArgumentMetadata) {
    const { error } = this.schema.validate(value);
    if (error) {
      throw new BadRequestException(error.message || 'Validation failed');
    }
    return value;
  }
}
校验条件
// cat.ts
const Joi = require('joi');
// 下面这种方式引入会报错的
// import Joi from 'joi'
export const Cat = Joi.object({
  color: Joi.string().required(),
});
// 如果将方法参数的类型声明为接口而不是类,则该metatype值为Object。
export class CreateCatDto {
  color: string;
}
使用
import { Body, Controller, Get, HttpStatus, Param, ParseIntPipe, Post, UsePipes } from '@nestjs/common';
import { ValidationOnePipe } from 'src/validation-one.pipe';
import { Cat, CreateCatDto } from './cat';

@Controller('cats-two')
export class CatsTwoController {
  // 第一种方式
  @Post('cat')
  @UsePipes(new ValidationOnePipe(Cat)) // 此处会直接把body 或者 query 传到transform 里 也就是value
  cat(@Body() body:CreateCatDto) {
    return body;
  }
  //第二种方式
  @Get('cats')
  catAll(@Body(new ValidationOnePipe(Cat)) body:CreateCatDto) {
    return body;
  }
}
类校验
yarn add class-validator class-transformer -S
类的接口
import { IsInt, IsString } from 'class-validator';

export class CreateCatDet {
  @IsString({message:'报错信息'})
  name: string;
  @IsInt()
  age: number;
  @IsString()
  breed: string;
}
  @Post('three')
		 // 校验器                      // 类的接口
  threeAll(@Body(new CommondityPipe()) body:CreateCatDet){
    return body
  }
类管道
import { ArgumentMetadata, BadRequestException, Injectable, PipeTransform } from '@nestjs/common';
import { validate } from 'class-validator';
import { plainToClass } from 'class-transformer';
@Injectable()
export class CommondityPipe implements PipeTransform {
  async transform(value: any, { metatype }: ArgumentMetadata) {
    // 转化处理
    value.age = +value.age;
    // plainToClass()将普通的JavaScript参数对象转换为类型对象
    const object = plainToClass(metatype, value);
    const errors = await validate(object);
    if (errors.length > 0)
      throw new BadRequestException('报错啦');
    return value;
  }
}
全局管道
async function bootstrap() {
  const app = await NestFactory.create(AppModule);
  app.useGlobalPipes(new ValidationPipe());
  await app.listen(3000);
}
bootstrap();
是不是类似于微服务
也可以把管道放在全局
import { Module } from '@nestjs/common';
import { APP_PIPE } from '@nestjs/core';

@Module({
  providers: [
    {
      provide: APP_PIPE,
      useClass: ValidationPipe,
    },
  ],
})
export class AppModule {}
设置默认值
  @Get('four')
  async findAll(
    @Query('activeOnly', new DefaultValuePipe(false), ParseBoolPipe) activeOnly: boolean,
    @Query('page', new DefaultValuePipe(0), ParseIntPipe) page: number,
  ) {
    return { page, activeOnly };
  }