网上11g rac安装文档大多不详细,今天来一个详细的!
纯操作文档,不喜勿喷!!
环境:
系统:rhel5.5
oracle:11.2.03
双网卡
共享磁盘
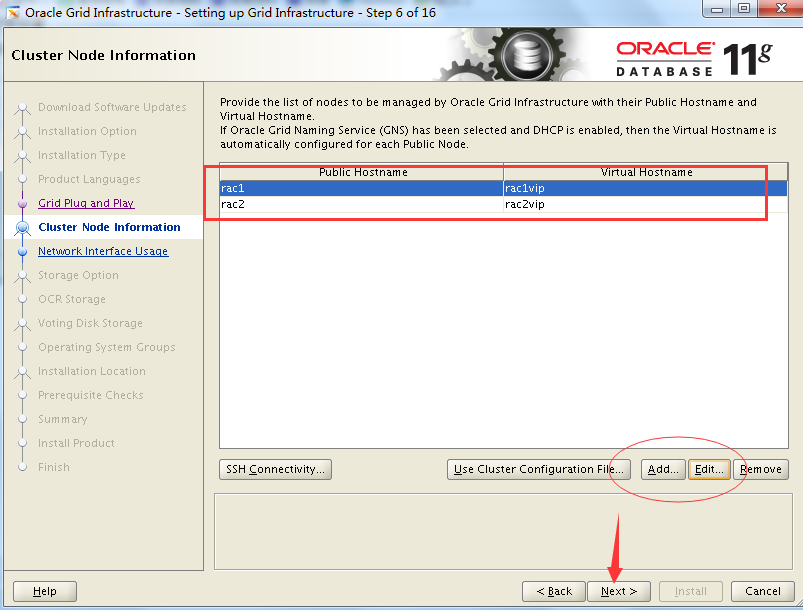
ip地址和主机名规划:
#节点1 主机名:rac1
#节点2 主机名:rac2
192.168.56.11 rac1
192.168.56.22 rac2
10.10.10.11 rac1priv
10.10.10.22 rac2priv
192.168.56.123 rac1vip
192.168.56.124 rac2vip
192.168.56.125 racscanip
操作系统基本环境配置:
1、配置yum源:
mount /dev/cdrom /mnt
cat /etc/yum.repos.d/yum.repo
[server]
name=server
baseurl=file:///mnt/Server
gpgcheck=0
enable=1
2、安装依赖包:
yum install -y binutils compat-libstdc++-33 elfutils-libelf elfutils-libelf-devel
gcc gcc-c++ glibc glibc-common glibc-devel glibc-headers ksh libaio
libaio-devel libgcc libstdc++ libstdc++-devel make sysstat unixODBC unixODBC-devel
3、配置hosts文件:
cat /etc/hosts
192.168.56.11 rac1
192.168.56.22 rac2
10.10.10.11 rac1priv
10.10.10.22 rac2priv
192.168.56.123 rac1vip
192.168.56.124 rac2vip
192.168.56.125 racscanip
4、修改系统参数:
修改系统参数
vi /etc/sysctl.conf
fs.aio-max-nr = 1048576
fs.file-max = 6815744
kernel.shmall = 2097152
kernel.shmmax = 636870912
kernel.shmmni = 4096
kernel.sem = 250 32000 100 128
net.ipv4.ip_local_port_range = 9000 65500
net.core.rmem_default = 262144
net.core.rmem_max = 4194304
net.core.wmem_default = 262144
net.core.wmem_max = 1048586
sysctl -p
5、修改用户资源限制:
vim /etc/security/limits.conf
oracle soft nproc 2047
oracle hard nproc 16384
oracle soft nofile 1024
oracle hard nofile 65536
grid soft nproc 2047
grid hard nproc 16384
grid soft nofile 1024
grid hard nofile 65536
vim /etc/profile
if [ $USER = "oracle" ]; then
if [ $SHELL = "/bin/ksh" ]; then
ulimit -p 16384
ulimit -n 65536
else
ulimit -u 16384 -n 65536
fi
fi
6、创建用户
groupadd -g 1000 oinstall
groupadd -g 1100 asmadmin
groupadd -g 1200 dba
groupadd -g 1300 asmdba
groupadd -g 1301 asmoper
useradd -u 1100 -g oinstall -G asmadmin,asmdba,asmoper -d /home/grid grid
useradd -u 1101 -g oinstall -G dba,asmdba -d /home/oracle oracle
echo grid | passwd --stdin grid
echo oracle | passwd --stdin oracle
7、创建目录:
mkdir -p /oracle/app/oraInventory
chown -R grid:oinstall /oracle/app/oraInventory
chmod -R 775 /oracle/app/oraInventory
mkdir -p /oracle/11.2.0/grid
mkdir -p /oracle/app/grid
chown -R grid:oinstall /oracle/app/grid
chown -R grid:oinstall /oracle/11.2.0/grid
chmod -R 775 /oracle/11.2.0/grid
mkdir -p /oracle/app/oracle
mkdir /oracle/app/oracle/cfgtoollogs
chown -R oracle:oinstall /oracle/app/oracle
chmod -R 775 /oracle/app/oracle
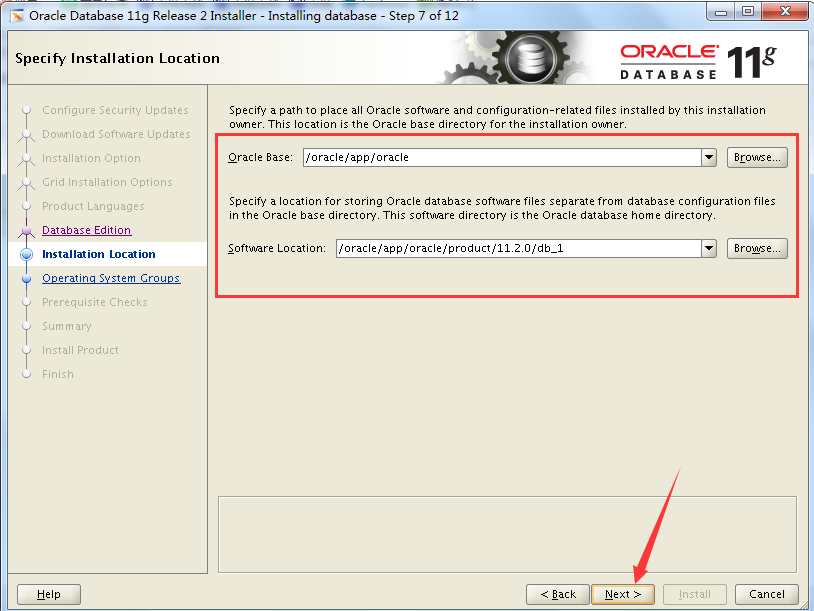
mkdir -p /oracle/app/oracle/product/11.2.0/db_1
chown -R oracle:oinstall /oracle/app/oracle/product/11.2.0/db_1
chmod -R 775 /oracle/app/oracle/product/11.2.0/db_1
8、设置用户环境变量:
su - grid
vi .bash_profile
export ORACLE_SID=+ASM1 #另外一边是export ORACLE_SID=+ASM2
export ORACLE_BASE=/oracle/app/grid
export ORACLE_HOME=/oracle/11.2.0/grid
export PATH=$ORACLE_HOME/bin:$PATH
su - oracle
vim .bash_profile
export ORACLE_SID=racdb1 #另外一边是 export ORACLE_SID=racdb2
export ORACLE_BASE=/oracle/app/oracle
export ORACLE_HOME=$ORACLE_BASE/product/11.2.0/db_1
export PATH=$ORACLE_HOME/bin:$PATH
9、解压grid软件:(集群软件)
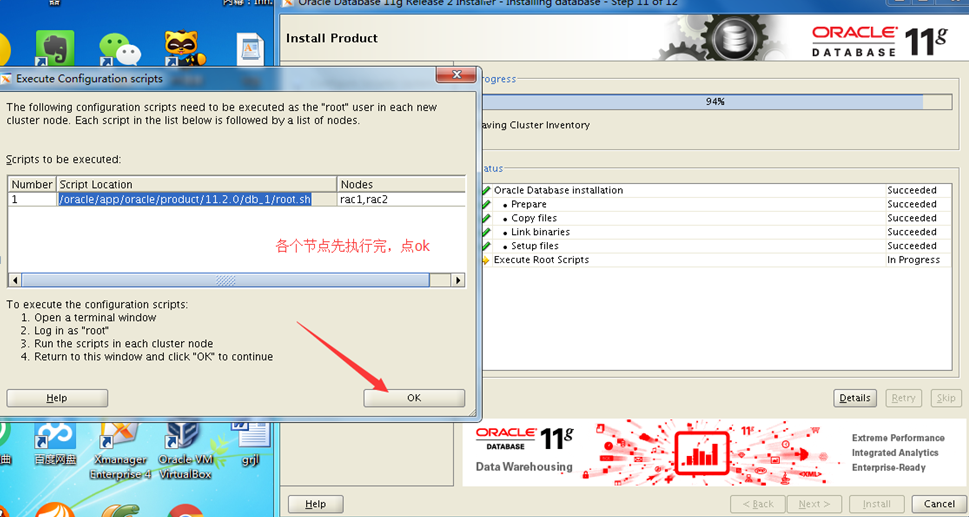
10、root用户执行(配置互信)
/software/grid/sshsetup/sshUserSetup.sh -user grid -hosts "rac1 rac2" -advanced -noPromptPassphrase
/software/grid/sshsetup/sshUserSetup.sh -user oracle -hosts "rac1 rac2" -advanced -noPromptPassphrase
测试互信:
rac1和rac2
su - grid
ssh rac1 date
ssh rac2 date
ssh rac1priv date
ssh rac2priv date
su - oracle
ssh rac1 date
ssh rac2 date
ssh rac1priv date
ssh rac2priv date
11、配置裸设备:
vim /etc/udev/rules.d/60-raw.rules
ACTION=="add", KERNEL=="sdb1",RUN+="/bin/raw /dev/raw/raw1 %N"
ACTION=="add", KERNEL=="sdb2",RUN+="/bin/raw /dev/raw/raw2 %N"
ACTION=="add",KERNEL=="raw*", OWNER="grid", GROUP="asmadmin", MODE="660"
start_udev
partprobe
ls -l /dev/raw
到此基础环境配置完成!
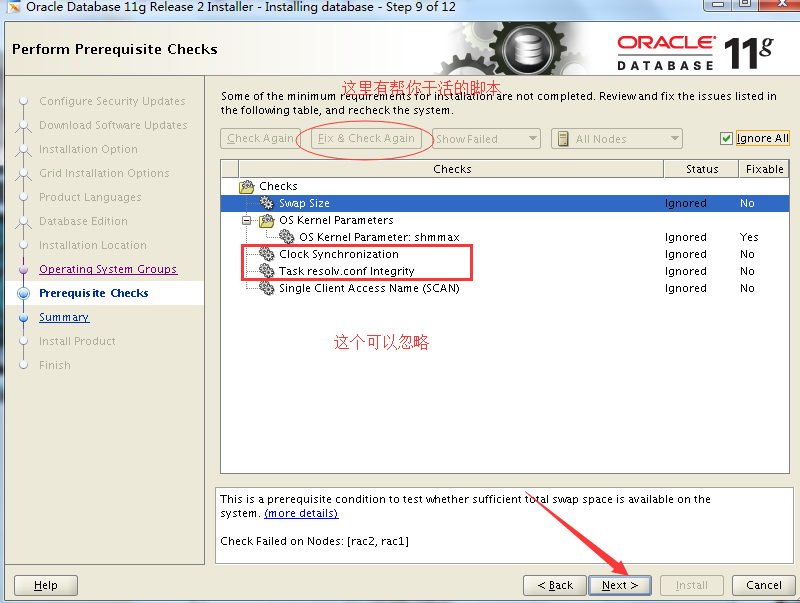
安装集群软件:
grid用户
[grid@rac1 grid]$ ./runInstaller

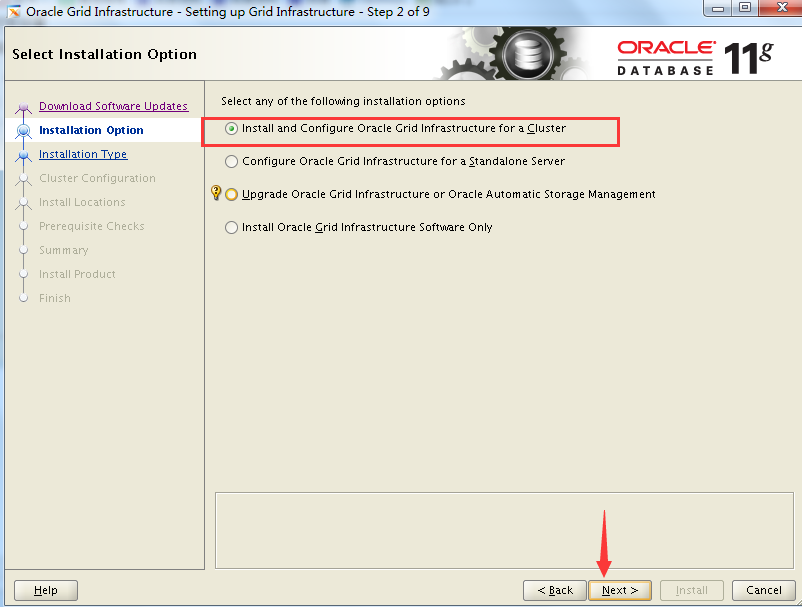
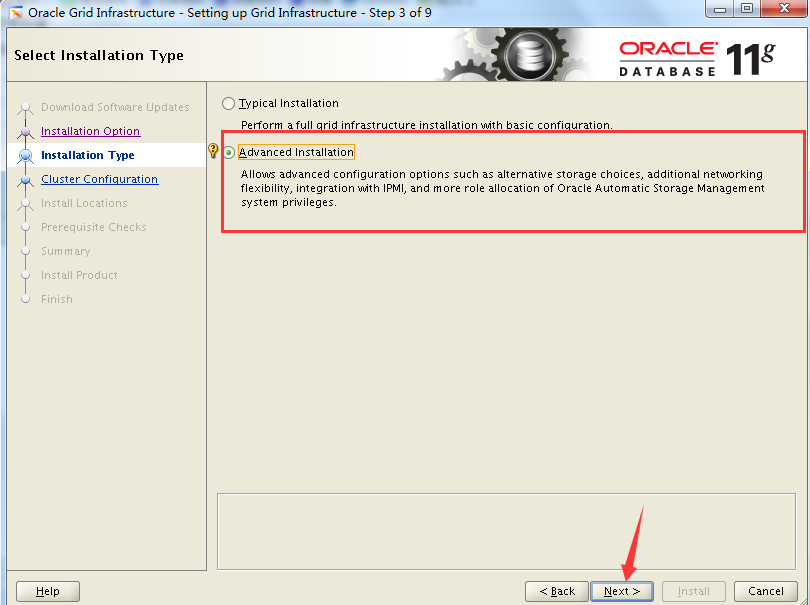


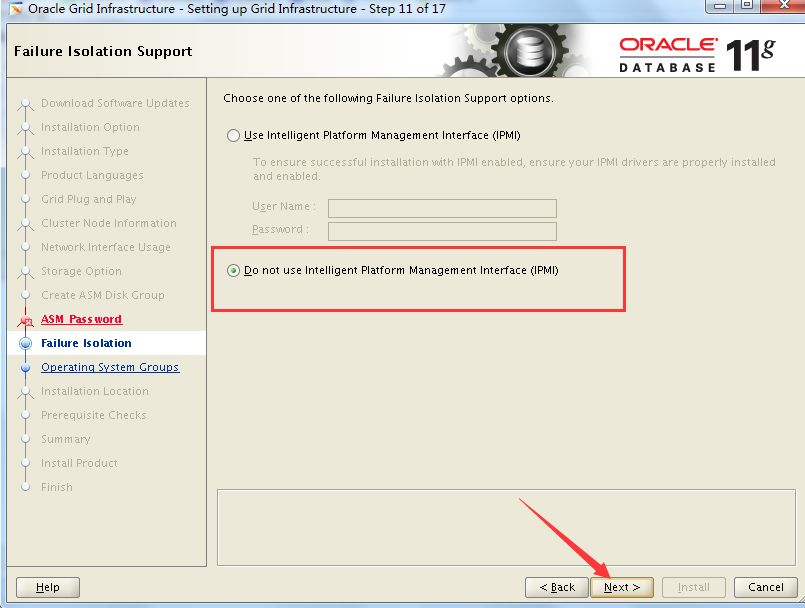
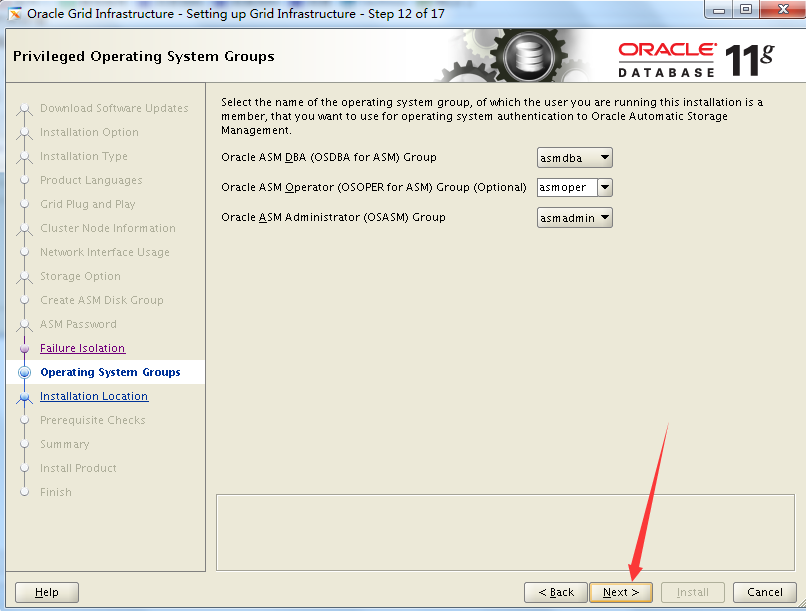
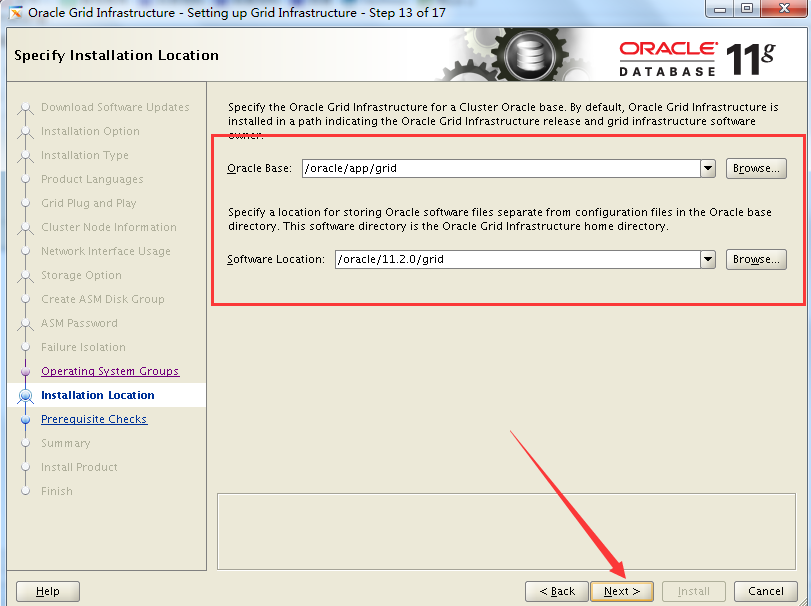


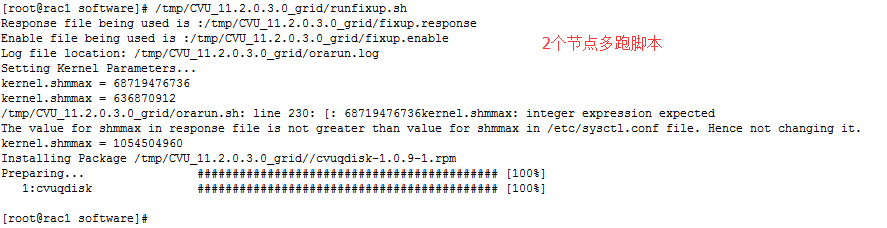
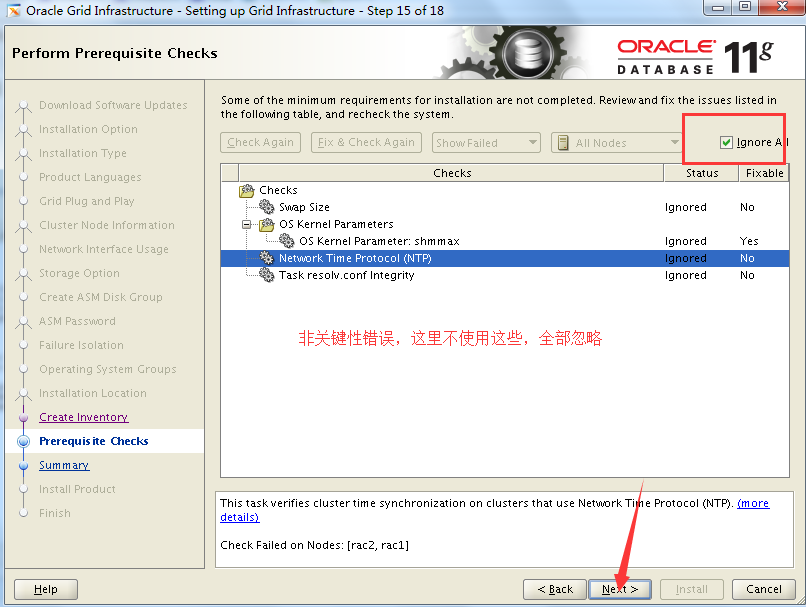
#先跑完脚本再点OK

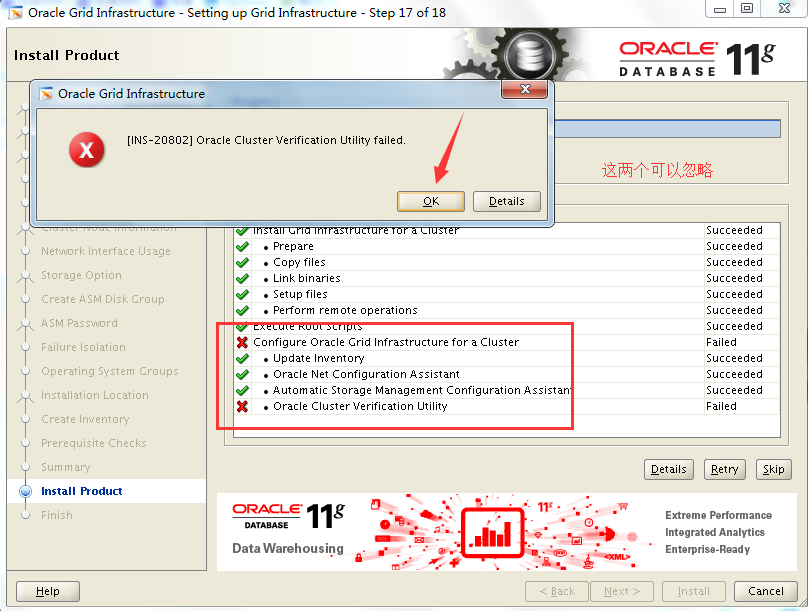
到此集群软件安装完毕!
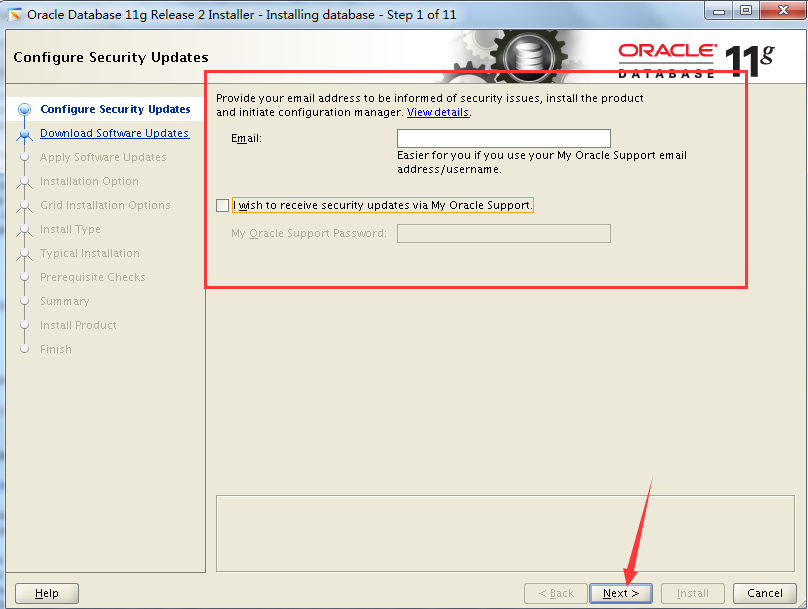
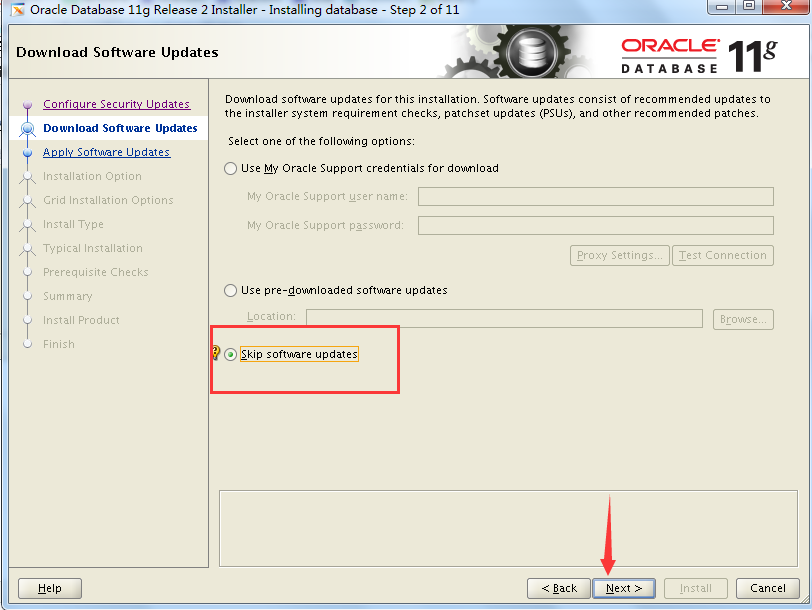
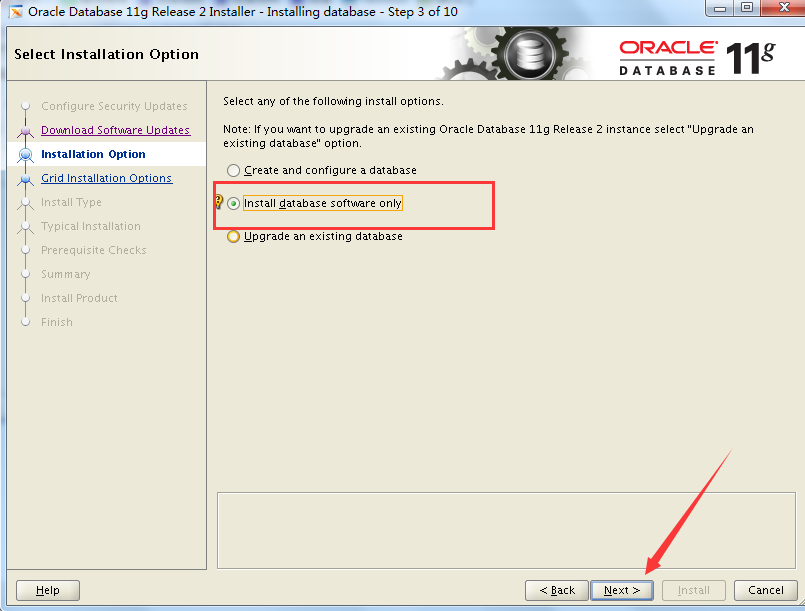
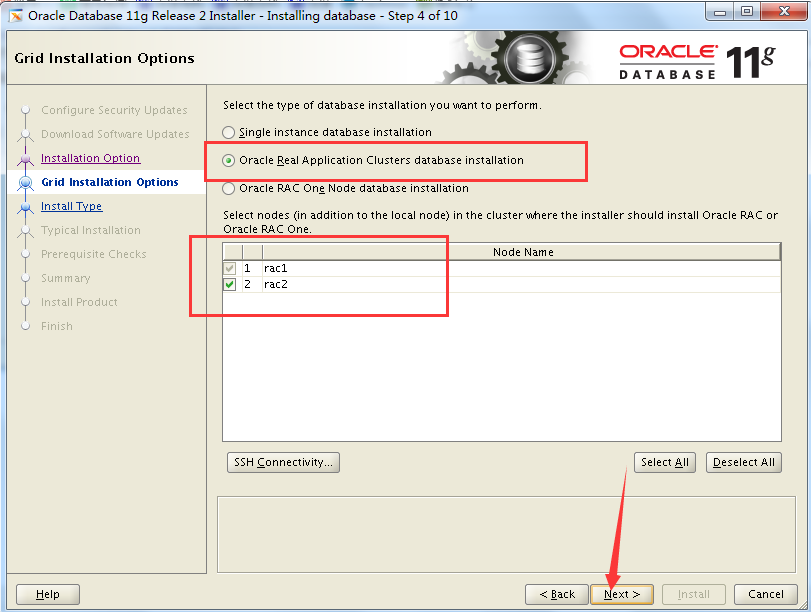
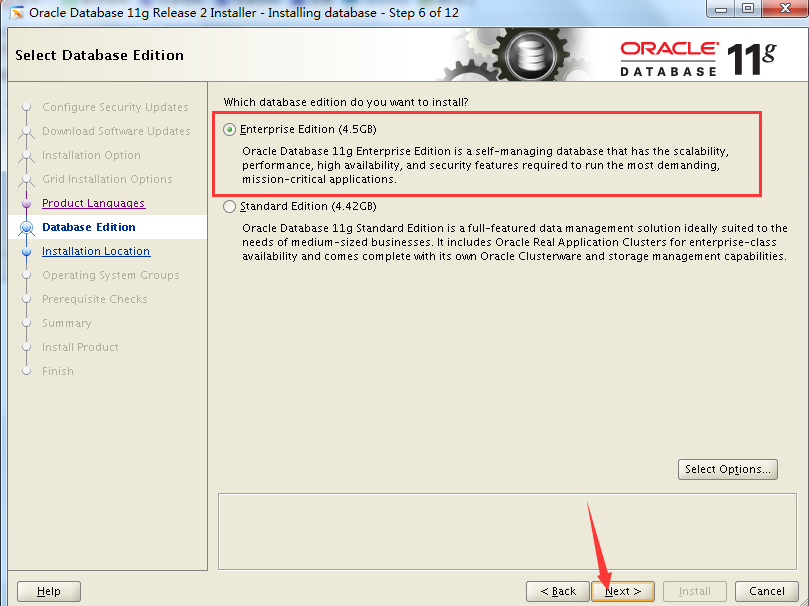
安装数据库软件:
使用oracle用户
[oracle@rac1 database]$ ./runInstaller

Oracle官方资料解释说。这个GSD是用在9.2库上的,如果没有9.2的库,该服务是可以OFFLINE的。
5.3.4 Enabling The Global Services Daemon (GSD) for Oracle Database Release 9.2
By default, the Global Services daemon (GSD) is disabled. If you install Oracle Database 9i release 2 (9.2) on Oracle Grid Infrastructure for a Cluster 11g release 2 (11.2), then you must enable the GSD. Use the following commands to enable the GSD before you install Oracle Database release 9.2:
到此数据库软件安装完成!
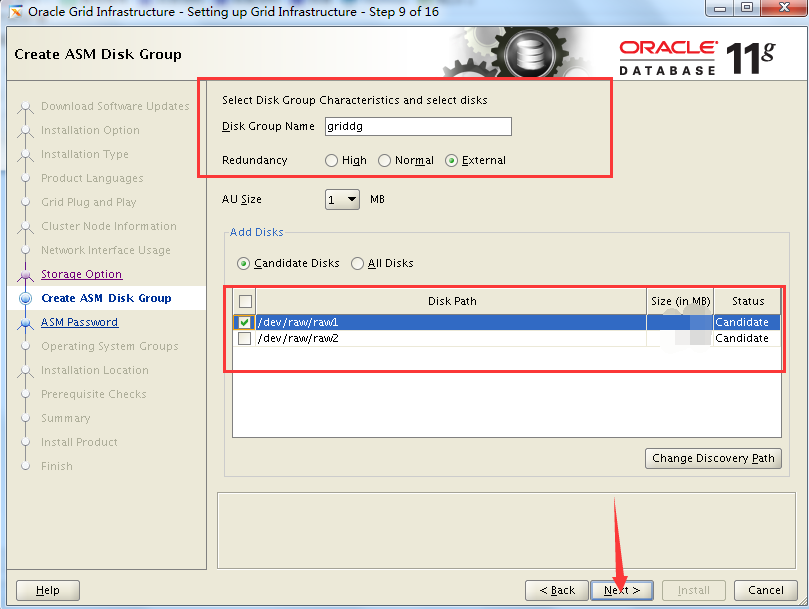
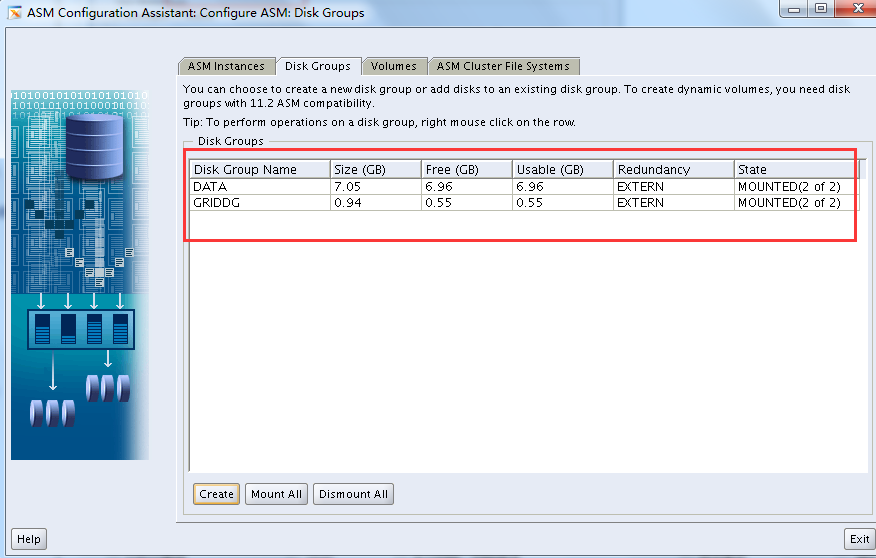
创建ASM磁盘:
使用grid用户
[grid@rac1 ~]$ asmca


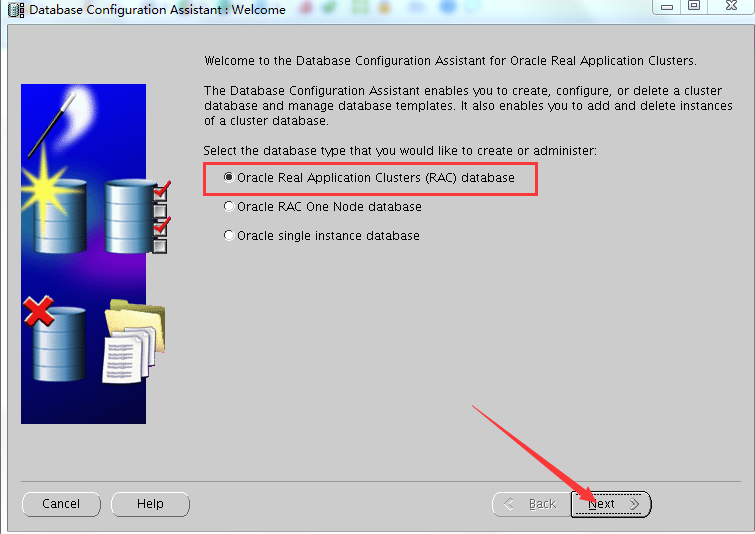
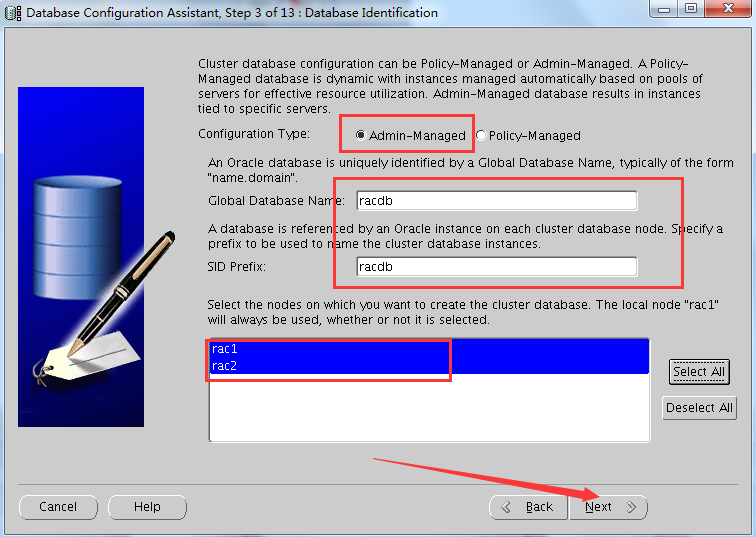
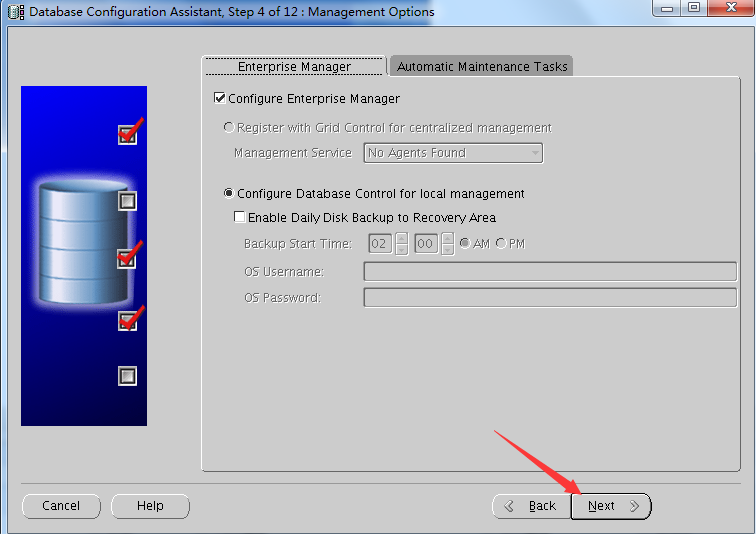
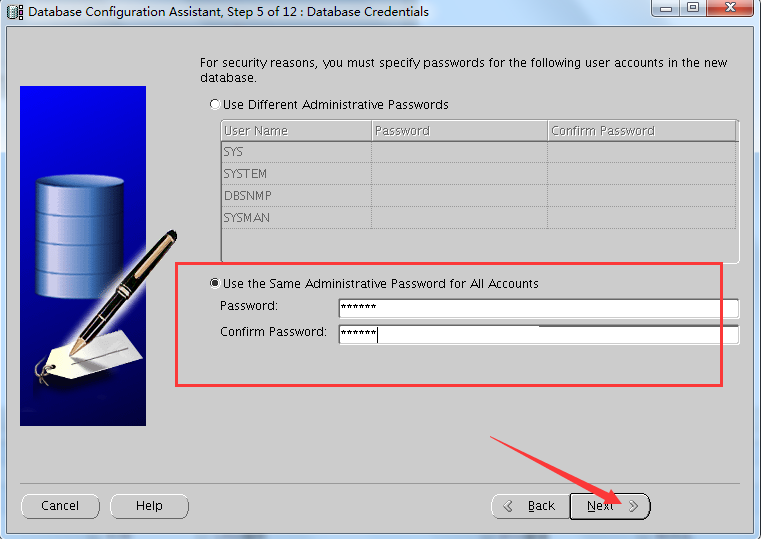
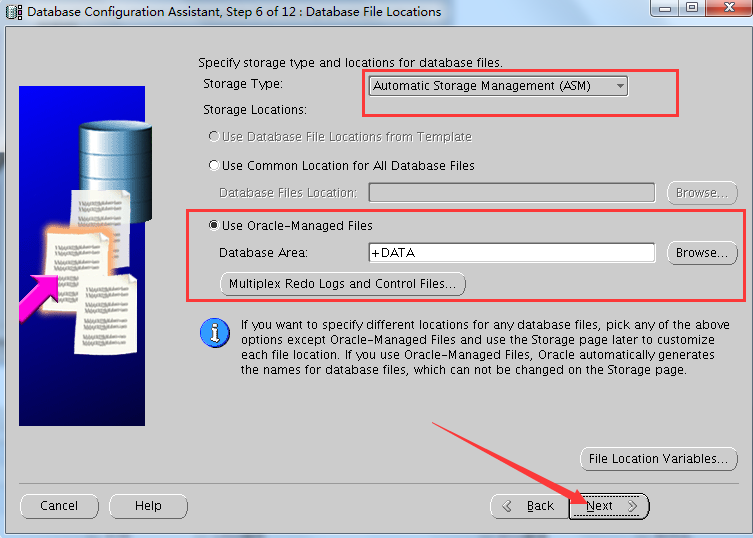
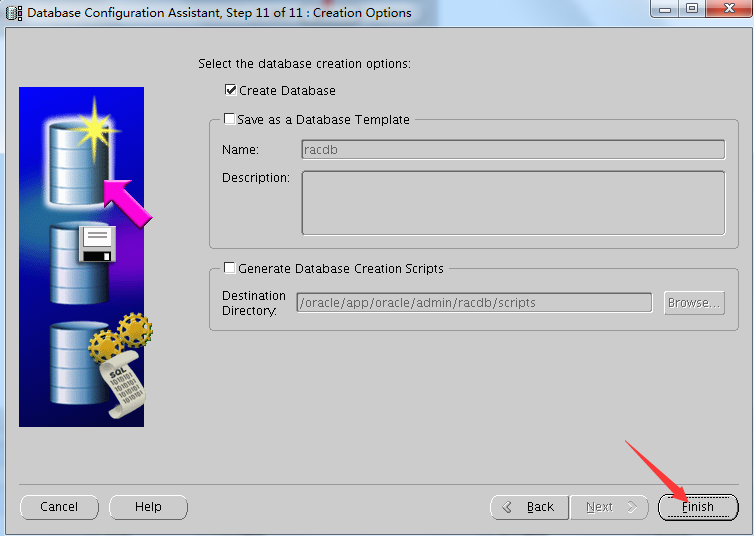
创建数据库:
使用oracle用户


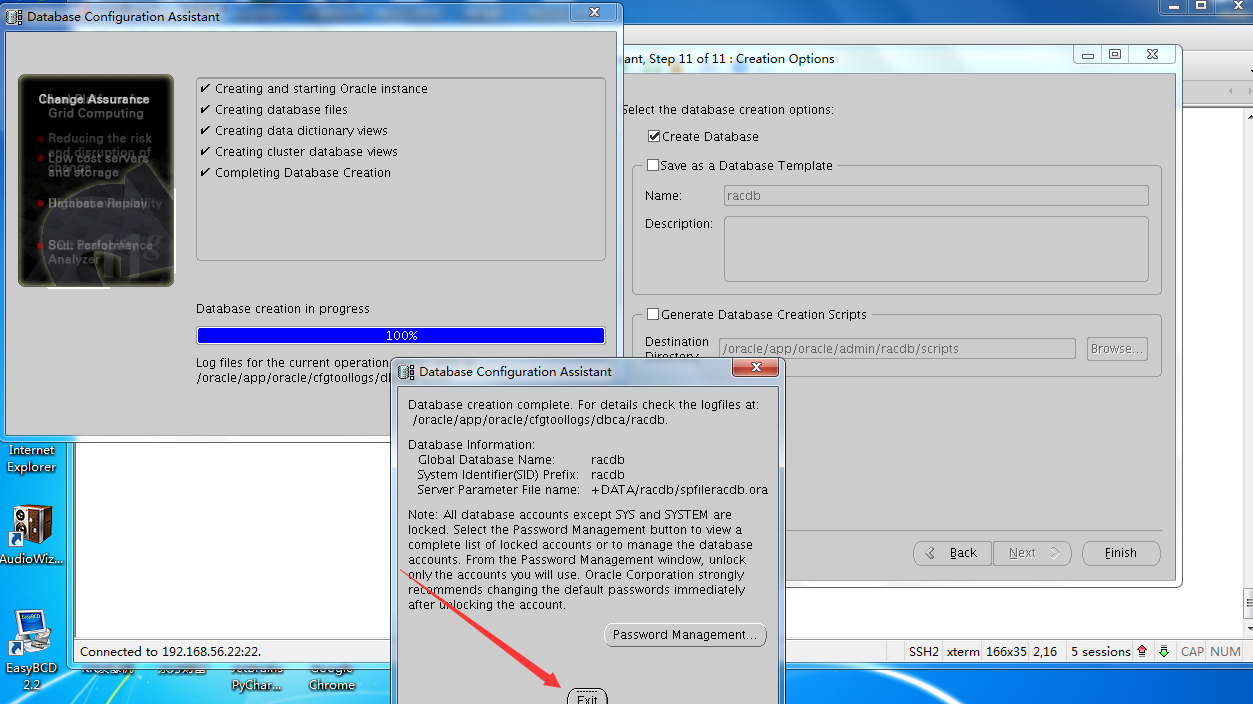
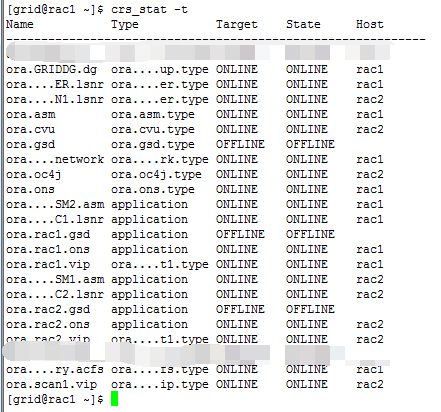
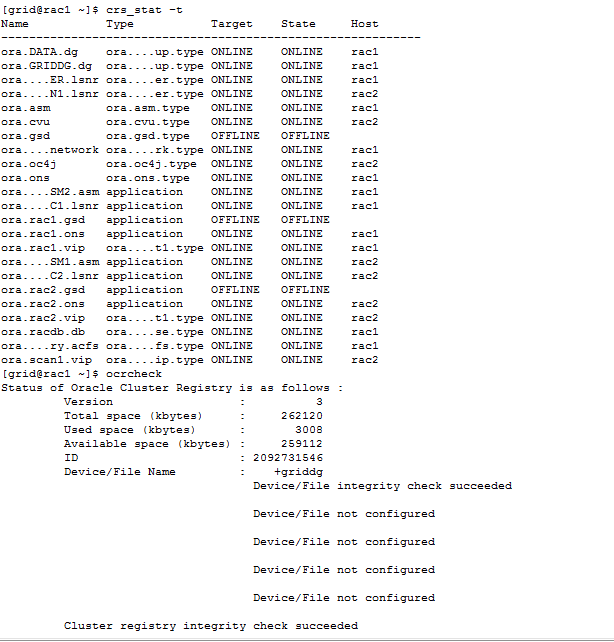
资源已经全部OK
到此数据也建立完成!