P2 + P3 + P4 + P5 - 基础:
1. Houdini中使用Python的地方
2. Textport:可使用cd、ls等路径操作的命令(命令前加%,可在python中使用)
3. Source Editor
在Source Editor中定义函数
在其他地方调用
hou.session.getChildren(hou.node("/"))
4. Python Shell
示例
p2
obj = hou.node("/obj")
obj.createNode("geo")

hou.cd("/obj/geo")

# 返回当前路径
hou.pwd()

file1 = hou.node("./file1")
file1.destory()


hou.pwd().createNode("shpere")
shpere = hou.node("shpere1")
hou.pwd().createNode("box1")
box = hou.node("box")
hou.pwd().createNode("merge")
merge = hou.node("merge1")

# 将box和shpere联合起来
merge.setFirstInput(sphere, 0)
merge.setNextInput(box)
p3
# 返回merge联合的节点
merge.inputs()

# 将merge联合的box去除
merge.setInput(1,None)

# 返回父节点及子节点
merge.parent()
obj.children()

# 返回子节点元组的函数
def getChildren(node):
    childList = []
    for n in node.children():
         childList.append(n)
    return childList
# 调用函数
getChildren("/obj/geo1")
getChildren("/")

# 返回场景中所有节点的元组的函数
def getChildren(node):
    childList = []
    for n in node.children():
         childList.append(n)
         if n.children():
             childList += getChildren(n)
    return childList
p4
# 操作节点的参数

# 获得参数
parm = hou.parm("./shpere1/radx")
# 取参数值
parm.eval()
# 修改值
parm.set(5.0)

parmtuple = hou.parmTuple("./shpere1/rad")
parmtuple.eval()
parmtuple.set((5.0, 5.0, 5.0))
p5
可通过将界面元素(节点、参数、工具)拖进Python Shell获得其代码定义
# 取得节点的name
hou.pwd().name()

# 取得帮助
help(hou.pwd())
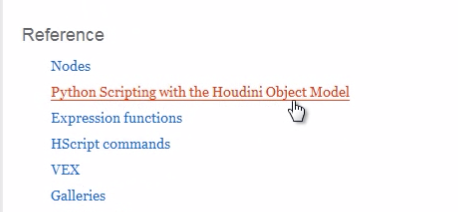
Python文档:Houdini - Help
# 将多个节点布局好
hou.pwd().layoutChildren()

sphere.setParms({"radx": 3.0 , "tx": 2.0})
P6 - 创建工具栏工具:
1. New Shelf
Name - 小写 加 下划线
Label - 首字母大写
2. New Tool
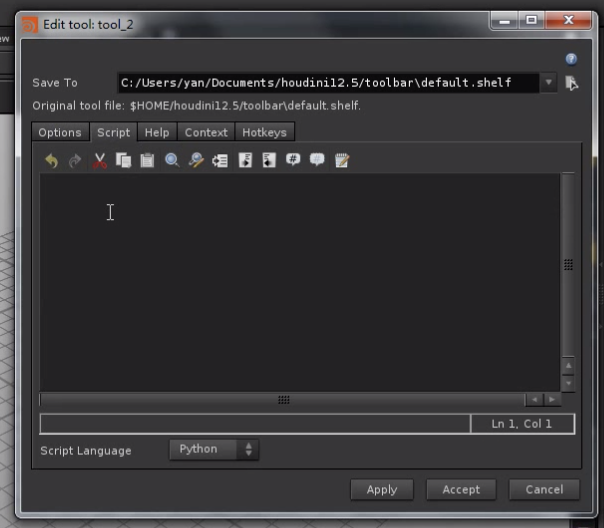
Options中指定Name和Label
Script中写代码
# 点击工具得到对话框
hou.ui.displayMessage("Hello Houdini !")


# box_tool 创建一个box节点
geoNet = hou.ui.paneTabOfType(hou.paneTabType.NetworkEditor)

position = geoNet.selectPosition()

box = geoNet.pwd().createNode("box")

box.setPosition(position)
P7 + P8 - 创建螺旋线工具:
1. 工具栏 kwargs参数(世界列表)
包含:按键信息、pane信息、View信息
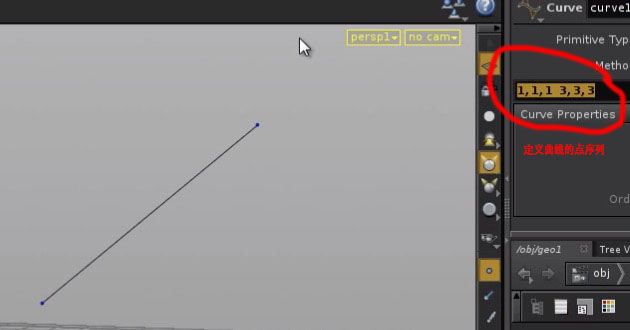
2. 自定义工具-螺旋线
from math import sin, cos

geoNet = hou.ui.paneTabOfType(hou.paneTabType.NetworkEditor)

spiral = geoNet.pwd().createNode("curve")

coordsParm = spiral.parm("coords")

inputParms = readMultiInput(message = "Enter parameters:" , input_labels = ["height", "lRadius", "uRadius", "frequency"], initial_contents = ["20", "10", "5", "3"])

height = float(inputParms[1][0])
lRadius = float(inputParms[1][1])
uRadius = float(inputParms[1][2])
frequency = float(inputParms[1][3])

coordsStr = ""

radius = lRadius
step = (lRadius - uRadius) / (height * frequency)

for i in range(int(height * frequency)):
    px = str(radius * sin(i))
    py = str(i / frequency)
    pz = str(radius * cos(i))

    coordsStr += px + ", " + py + ", " + pz + " "

    radius -= step

coordsParm.set(coordsStr)
P9 - P15 - 创建sop节点:
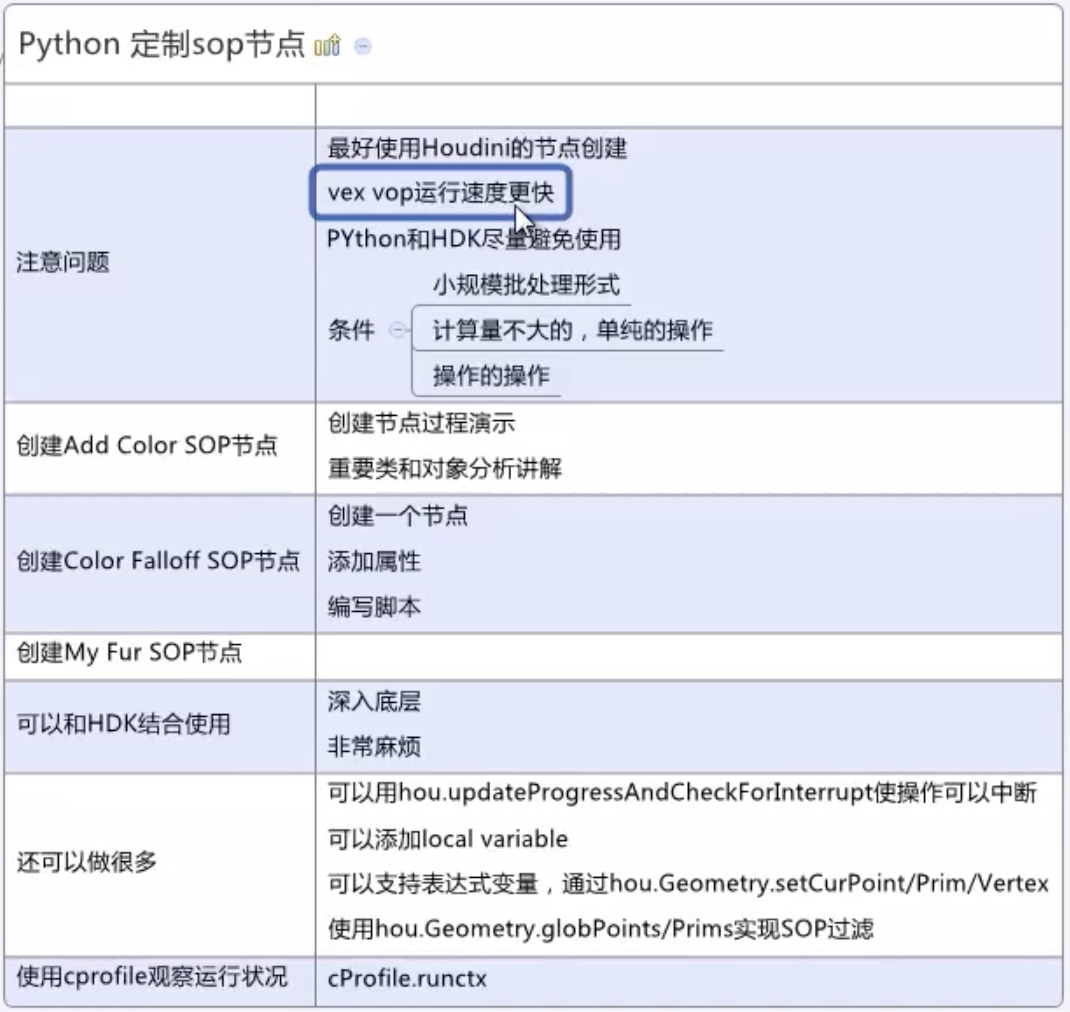
创建 “Add Color SOP” 节点
1. New Operator Type
2. 代码
import hou
import random

node = hou.pwd()
geo = node.geometry()

# 给定种子 保证每次运行otl得到的结果相同
random.seed(123)

colorAttrib = geo.addAttrib(hou.attribTypr.Point, "Cd", (1.0, 1.0, 1.0))

color = hou.Color()

pointsNum = len(geo.points())

for point in geo.points():
    pos = point.position()

    px = pos[0]
    py = pos[1] + random.random() * random.choice([-1,1])
    pz = pos[2]

    point.setPosition((px, py, pz))

    value = float(point.number()) / pointsNum
    color.setHSV((value * 255, 1.0, 1.0))
    point.setAttribValue(colorAttrib, color.rgb())
创建 “Color Falloff SOP” 节点
1. 添加节点,并为节点添加两个参数
2. Color Falloff 效果 - 代码
import hou
import random

node = hou.pwd()
geo = node.geometry()

# 给定种子 保证每次运行otl得到的结果相同
random.seed(123)

colorAttrib = geo.addAttrib(hou.attribTypr.Point, "Cd", (1.0, 1.0, 1.0))

color = hou.Color()

position = hou.Vector3(node.parmTuple("position").eval())
falloff = max( node.parm("falloff").eval(), 0.0001)

for point in geo.points():
    pos = point.position()

    px = pos[0]
    py = pos[1] # + random.random() * random.choice([-1,1])
    pz = pos[2]

    point.setPosition((px, py, pz))

    distance = (pos - position)

    value = min(distance / falloff , 1.0)
    color.setHSV((value * 255, 1.0, 1.0))
    point.setAttribValue(colorAttrib, color.rgb())
3. Color Wave 效果 - 代码
import hou
import random

node = hou.pwd()
geo = node.geometry()

# 给定种子 保证每次运行otl得到的结果相同
random.seed(123)

colorAttrib = geo.addAttrib(hou.attribTypr.Point, "Cd", (1.0, 1.0, 1.0))

color = hou.Color()

position = hou.Vector3(node.parmTuple("position").eval())
falloff = max( node.parm("falloff").eval(), 0.0001)
frequency = max( node.parm("frequency").eval(), 0.0001)
height =  node.parm("height").eval()

for point in geo.points():
    pos = point.position()

    distance = (pos - position)

    value = abs(sin( min(distance / falloff , 1.0) ) * frequency)
    color.setHSV((value * 255, 1.0, 1.0))
    point.setAttribValue(colorAttrib, color.rgb())

    px = pos[0]
    py = pos[1]  + height * color.rgb()[1]
    pz = pos[2]

    point.setPosition((px, py, pz))
P13 动画
4. Color Falloff基础上 添加 法线 - 代码
#primitive type : mesh || NURBS

import hou
import random

node = hou.pwd()
geo = node.geometry()

# 给定种子 保证每次运行otl得到的结果相同
random.seed(123)

colorAttrib = geo.addAttrib(hou.attribTypr.Point, "Cd", (1.0, 1.0, 1.0))

color = hou.Color()

position = hou.Vector3(node.parmTuple("position").eval())
falloff = max( node.parm("falloff").eval(), 0.0001)
u_div = hou.evalParm("u_div")
v_div = hou.evalParm("v_div")
threshHold = hou.evalParm("threshHold")
height = hou.evalParm("height")

surface = geo.iterPrims()[0]

for point in geo.iterPoints():
    pos = point.position()

    px = pos[0]
    py = pos[1]
    pz = pos[2]

    point.setPosition((px, py, pz))

    distance = (pos - position)

    value = min(distance / falloff , 1.0)
    color.setHSV((value * 255, 1.0, 1.0))
    point.setAttribValue(colorAttrib, color.rgb())

for uNum in xrange(u_div + 1):
    u = float(uNum) / u_div
    for vNum in xrange(v_div + 1):
        v = float(vNum) / v_div
        uvColor = surface.attribValueAt("Cd", u, v)
        pos0 = surface.positionAt(u, v)

        pos1 = pos0 + surface.normalAt(u, v) * height

        ploy = geo.createPolygon()
        poly.setIsClosed(false)

        if uvColor[2] > threshHold:    # 只给绿色的地方添加法线(0.9)

            for p in [pos0, pos10:
                point = geo.createPoint()
                point.setPosition(p)
                point.setAttribValue(colorAttrib, uvColor)
                poly.addVertex(point)
5. 将4完成的sop连接到 Add Color sop下
部分变量重复
修改4的代码为
#primitive type : mesh || NURBS

import hou
import random

node = hou.pwd()
geo = node.geometry()

# 给定种子 保证每次运行otl得到的结果相同
random.seed(123)

colorAttrib = geo.findPointAttrib("Cd")


position = hou.Vector3(node.parmTuple("position").eval())
falloff = max( node.parm("falloff").eval(), 0.0001)
u_div = hou.evalParm("u_div")
v_div = hou.evalParm("v_div")
threshHold = hou.evalParm("threshHold")
height = hou.evalParm("height")

surface = geo.iterPrims()[0]


for uNum in xrange(u_div + 1):
    u = float(uNum) / u_div
    for vNum in xrange(v_div + 1):
        v = float(vNum) / v_div
        uvColor = surface.attribValueAt("Cd", u, v)
        pos0 = surface.positionAt(u, v)

        pos1 = pos0 + surface.normalAt(u, v) * height

        ploy = geo.createPolygon()
        poly.setIsClosed(false)

        if uvColor[2] > threshHold:    # 只给绿色的地方添加法线(0.9)

            for p in [pos0, pos10:
                point = geo.createPoint()
                point.setPosition(p)
                point.setAttribValue(colorAttrib, uvColor)
                poly.addVertex(point)
再增加一个sop 来控制法线的粗细(width)
PS:
查看渲染过程中的点的信息 Details View(P12 19min)
可在Parameters中限制参数的取值范围 (P11 3min)
P16 - P19 - 表达式:
教程地址:https://www.bilibili.com/video/av33143116/?p=1
PS:程序员看这个教程代码的讲解过程,真的要急死。。。