重装系统之后,一切又要重新开始折腾,这次把一些操作记下来,以后或许还会用到。
·MySQL
在 Windows10 上安装好了 MySQL5.5,然后就会出现配置窗口,用于配置 MySQL 的一些信息。弄好之后,点击开始菜单,找到 MySQL 5.5 命令行客户端,打开这个就可以直接进入 MySQL 控制台了。当然也可以将 bin 目录添加到系统环境变量 PATH 中,直接在命令行里操作。
打开 MySQL 命令行工具,直接输入密码(默认root用户),出现 mysql> 就表示连接上的 MySQL 服务器。
显示当前版本,当前时间看看:
1 mysql> select version(),current_date,now();
2
3 +-----------+--------------+---------------------+
4 | version() | current_date | now()               |
5 +-----------+--------------+---------------------+
6 | 5.5.20    | 2016-04-21   | 2016-04-21 15:47:55 |
7 +-----------+--------------+---------------------+
找出当前服务器上存在的数据库:
 1 mysql> show database;
 2
 3 +--------------------+
 4 | Database           |
 5 +--------------------+
 6 | information_schema |
 7 | mysql              |
 8 | performance_schema |
 9 | test               |
10 +--------------------+
创建数据库:
mysql> create databases feinotes;
选择数据库:
1 mysql> use feinotes;
2 Database changed
创建表
此时数据库是空的,
1 mysql> show tables;
2 Empty set
需要创建一个 user 表和一个 note 表
user表:
int id;(主键)
String name;
String username;
String password;
note表
int id;(主键)
String title;
text content;
Timestamp createTime;
int userId;(外键)
创建 user 表
1 mysql> create table user(
2        -> id int unsigned not null auto_increment primary key,
3        -> name varchar(100) not null,
4        -> username varchar(100) not null,
5        -> password varchar(100) not null);
创建表错了,删除表重新创建
1 mysql> drop table user;
创建成功查看一下表结构:
 1 mysql> describe user;
 2
 3 +----------+------------------+------+-----+---------+----------------+
 4 | Field    | Type             | Null | Key | Default | Extra          |
 5 +----------+------------------+------+-----+---------+----------------+
 6 | id       | int(10) unsigned | NO   | PRI | NULL    | auto_increment |
 7 | name     | varchar(100)     | NO   |     | NULL    |                |
 8 | username | varchar(100)     | NO   |     | NULL    |                |
 9 | password | varchar(100)     | NO   |     | NULL    |                |
10 +----------+------------------+------+-----+---------+----------------+
创建 note 表
 1 mysql> create table note(
 2     -> id int unsigned not null auto_increment primary key,
 3     -> title varchar(100) not null,
 4     -> content text,
 5     -> createTime timestamp ,
 6     -> userId int unsigned,
 7     -> foreign key(unsigned int userId)references user(id));
添加外键有可能会出现 ERROR 1005 (HY000)错误,这通常是主键和外键字段类型不一致导致的。
创建成功后查看一下表:
 1  mysql> describe note;
 2 +------------+------------------+------+-----+-------------------+-----------------------------+
 3 | Field      | Type             | Null | Key | Default           | Extra                       |
 4 +------------+------------------+------+-----+-------------------+-----------------------------+
 5 | id         | int(10) unsigned | NO   | PRI | NULL              | auto_increment              |
 6 | title      | varchar(100)     | NO   |     | NULL              |                             |
 7 | content    | text             | YES  |     | NULL              |                             |
 8 | createTime | timestamp        | NO   |     | CURRENT_TIMESTAMP | on update CURRENT_TIMESTAMP |
 9 | userId     | int(10) unsigned | YES  | MUL | NULL              |                             |
10 +------------+------------------+------+-----+-------------------+-----------------------------+
导入数据
暂时先使用一个工具:MySQL Query Browser,连接上数据库,直接输入数据,即可。
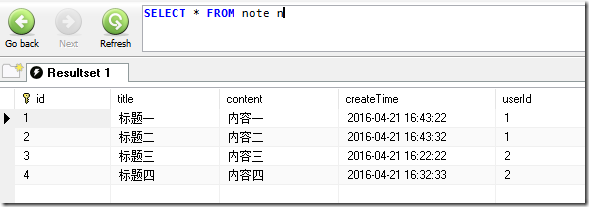
导入完查询一下:
在命令行下中文会显示乱码(不造为什么),不过似乎不影响实际使用
1 mysql> select * from note;
2 +----+-----------+-----------+---------------------+--------+
3 | id | title     | content   | createTime          | userId |
4 +----+-----------+-----------+---------------------+--------+
5 |  1 | 鏍囬�涓€    | 鍐呭�涓€    | 2016-04-21 16:43:22 |      1 |
6 |  2 | 鏍囬�浜?   | 鍐呭�浜?   | 2016-04-21 16:43:32 |      1 |
7 |  3 | 鏍囬�涓?   | 鍐呭�涓?   | 2016-04-21 16:22:22 |      2 |
8 |  4 | 鏍囬�鍥?   | 鍐呭�鍥?   | 2016-04-21 16:32:33 |      2 |
9 +----+-----------+-----------+---------------------+--------+
·写一个简单的Java 程序,连接到数据库并输出查询信息
新建一个 Java Project,把jdbc驱动包包括进项目 Build Path
新建一个Hello.java
内容如下:
 1 import java.sql.Connection;
 2 import java.sql.DriverManager;
 3 import java.sql.ResultSet;
 4 import java.sql.SQLException;
 5 import java.sql.Statement;
 6
 7 public class Hello {
 8
 9     public static void main(String[] args) throws ClassNotFoundException, SQLException {
10         Class.forName("com.mysql.jdbc.Driver");
11         Connection con = DriverManager.getConnection("jdbc:mysql://localhost:3306/feinotes","root","123");
12         Statement stmt = con.createStatement();
13         String query = "select * from user";
14         ResultSet rs = stmt.executeQuery(query);
15         while(rs.next()){
16             System.out.println("id:"+rs.getInt(1)+" name:"+rs.getString(2));
17         }
18     }
19
20 }
运行结果达到预期:
id:1 name:sff2013
id:2 name:sff2014
稍微改一下,查询note表
1 String query = "select * from note";
2
3 System.out.println("title:"+rs.getString(2)+" content:"+rs.getString(3));
结果如下,之前的显示乱码并没有影响显示
title:标题三 content:内容三
title:标题四 content:内容四
