第一步:引入axis2相关jar包,如果是pom项目,直接在pom文件中引入依赖就好
<dependency>
<groupId>org.apache.axis2</groupId>
<artifactId>axis2</artifactId>
<version>1.6.2</version>
<type>pom</type>
<scope>compile</scope>
</dependency>
<dependency>
<groupId>org.apache.axis2</groupId>
<artifactId>axis2-adb</artifactId>
<version>1.6.2</version>
<type>jar</type>
<scope>compile</scope>
</dependency>
<dependency>
<groupId>org.apache.axis2</groupId>
<artifactId>axis2-kernel</artifactId>
<version>1.6.2</version>
<type>jar</type>
<scope>compile</scope>
<exclusions>
<exclusion>
<groupId>javax.ws.rs</groupId>
<artifactId>jsr311-api</artifactId>
</exclusion>
</exclusions>
</dependency>
<dependency>
<groupId>org.apache.axis2</groupId>
<artifactId>axis2-transport-local</artifactId>
<version>1.6.2</version>
</dependency>
<dependency>
<groupId>org.apache.axis2</groupId>
<artifactId>axis2-transport-http</artifactId>
<version>1.6.2</version>
</dependency>
第二步:在web.xml增加servlet映射
<servlet>
<servlet-name>AxisServlet</servlet-name>
<servlet-class>org.apache.axis2.transport.http.AxisServlet</servlet-class>
<load-on-startup>5</load-on-startup>
</servlet>
<servlet-mapping>
<servlet-name>AxisServlet</servlet-name>
<url-pattern>/services/*</url-pattern>
</servlet-mapping>
<servlet>
第三步:在WEB-INF下增加service.xml接口文件,此service.xml文件路径和第二步web.xml下配置的映射路径相关,我这里放在/WEB-INF/services/dzsd/META-INF/services.xml
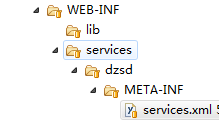
services.xml文件内容,此处定义接口:
<?xml version="1.0" encoding="UTF-8" ?>
<serviceGroup>
<service name="zxswSqService" scope="application">
<description>zxswService</description>
<parameter name="ServiceClass">com.utils.webservice.WebServiceServer
</parameter>
<operation name="test">
<messageReceiver class="org.apache.axis2.rpc.receivers.RPCMessageReceiver" />
</operation>
</service>
</serviceGroup>
第四步:写服务端接口,第三步定义的接口对应的类为com.utils.webservice.WebServiceServer,在此类下定义方法

这样一个简单的WebService服务端接口就成功了,接下来我们发布接口,测试一下。
第五步:启动tomcat,发布接口
启动成功后,我们在浏览器输入wsdl地址:http://localhost:8080/wssd/services/zxswSqService?wsdl
如果浏览器输出这样的xml,那么恭喜,接口发布成功。

第六步:测试
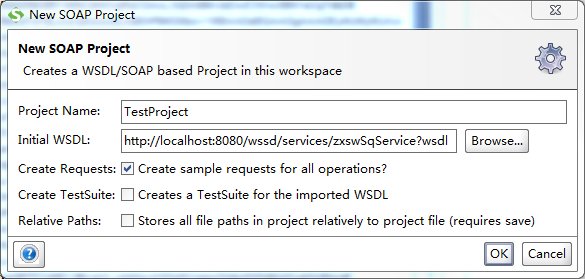
测试我们可以通过工具来测试,这里使用比较强大的工具SoupUI,打开SoupUI新建 SOAP Project,输入项目名称wsdl地址,如图所示:
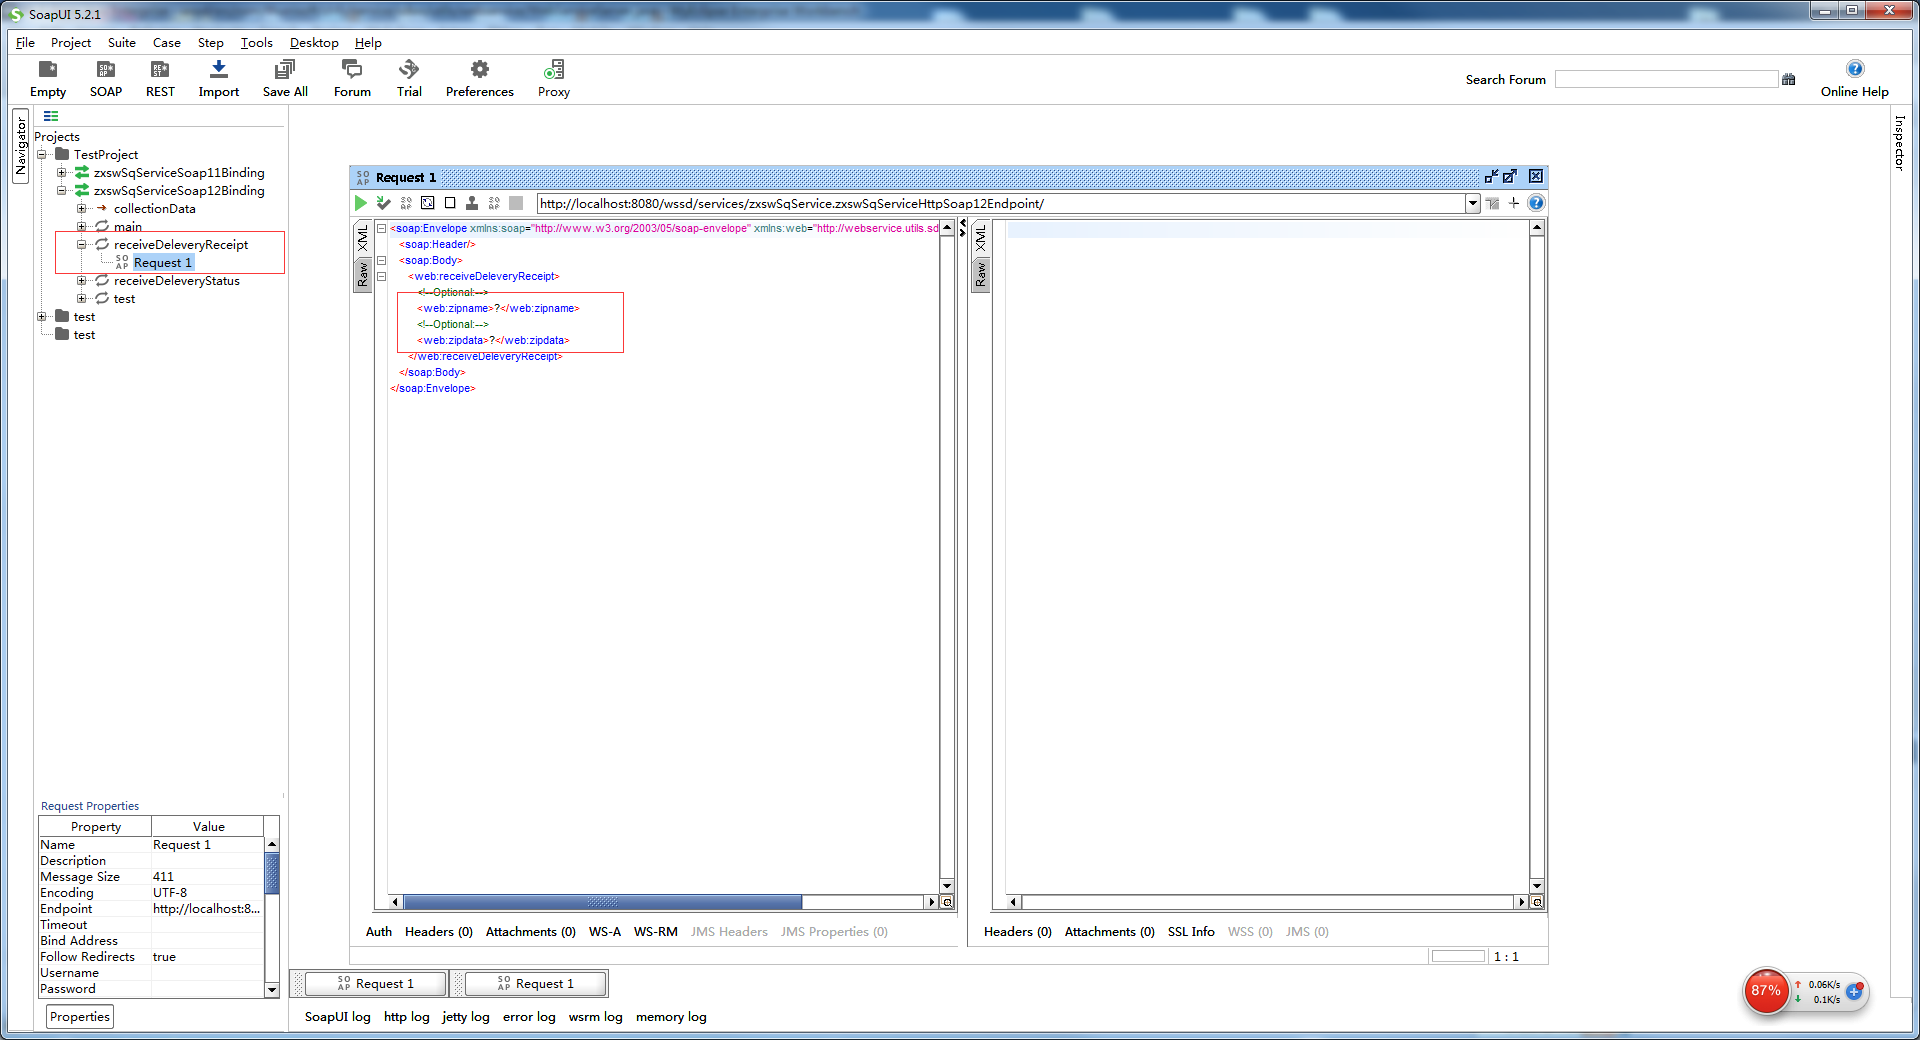
ok之后,找到我们刚刚的接口方法,就可以测试了,加入你想要的参数,点击绿色三角进行运行就好,这里就不测试结果了。
也可以自己写个client端的demo进行测试,这里我直接贴上代码
RPCServiceClient serviceClient = null;
try {
serviceClient = new RPCServiceClient();
} catch (Exception e1) {

e1.printStackTrace();
}
Options options = serviceClient.getOptions();
EndpointReference targetEPR = new EndpointReference(
"http://localhost:8080/wssd/services/zxswSqService");
options.setTo(targetEPR)
Object[] requestParam = new Object[] { "abc",“123” };
Class[] responseParam = new Class[] { String.class,String.class };
QName requestMethod = new QName(
"http://webservice.utils.com",//ns,这里使用wsdl地址下xml的ns
"receiveDeleveryReceipt");//方法名
String result = null;

try {
result = (String) serviceClient.invokeBlocking(requestMethod,
requestParam, responseParam)[0];
} catch (AxisFault e) {

e.printStackTrace();
}
}
至此,一个axis2,WebService服务端接口开发以及调用就完成了