刚接触SpringMVC,对它的xml文件配置一直比较模模糊糊,最近花了一点时间稍微看了下源代码,再加上调试,开始逐渐理解它,网上的类似的内容有很多,写本文主要是自己加深一下理解。本文适合用过SpringMVC的开发者,言归正传,首先搭建一个最简单的工程体验一下。
该工程是基于maven的,pom配置不再说明,所使用的spring版本4.0.5。
首先是web.xml文件配置,最简单的配置
<!DOCTYPE web-app PUBLIC
 "-//Sun Microsystems, Inc.//DTD Web Application 2.3//EN"
 "http://java.sun.com/dtd/web-app_2_3.dtd" >

<web-app>
  <display-name>Archetype Created Web Application</display-name>
  <servlet>
		<servlet-name>mvc</servlet-name>
		<servlet-class>org.springframework.web.servlet.DispatcherServlet</servlet-class>
		<load-on-startup>1</load-on-startup>
	</servlet>

	<servlet-mapping>
		<servlet-name>mvc</servlet-name>
		<url-pattern>/*</url-pattern>
	</servlet-mapping>
</web-app>
然后是mvc-servlet.xml文件的配置,上面配置DispatcherServlet会默认加载[servlet-name]-servlet.xml文件。对于我的配置,会去加载mvc-servlet.xml文件。
mvc-servlet.xml文件的内容:
<?xml version="1.0" encoding="UTF-8" ?>
<beans xmlns="http://www.springframework.org/schema/beans" xmlns:xsi="http://www.w3.org/2001/XMLSchema-instance" xmlns:mvc="http://www.springframework.org/schema/mvc" xmlns:util="http://www.springframework.org/schema/util" xmlns:context="http://www.springframework.org/schema/context"
	xsi:schemaLocation="http://www.springframework.org/schema/beans
	http://www.springframework.org/schema/beans/spring-beans-3.1.xsd
	http://www.springframework.org/schema/mvc
	http://www.springframework.org/schema/mvc/spring-mvc-3.1.xsd
	http://www.springframework.org/schema/util
	http://www.springframework.org/schema/util/spring-util-2.0.xsd
	http://www.springframework.org/schema/context
	http://www.springframework.org/schema/context/spring-context-3.2.xsd">

	<bean name="/index" class="com.lg.mvc.HomeAction"></bean>
	<bean class="org.springframework.web.servlet.view.freemarker.FreeMarkerConfigurer">
		<property name="templateLoaderPath" value="/WEB-INF/views" />
		<property name="defaultEncoding" value="utf-8" />
		<property name="freemarkerSettings">
			<props>
				<prop key="locale">zh_CN</prop>
			</props>
		</property>
	</bean>
	<bean class="org.springframework.web.servlet.view.freemarker.FreeMarkerViewResolver">
		<property name="suffix" value=".html" />
		<property name="contentType" value="text/html;charset=utf-8" />
		<property name="requestContextAttribute" value="request" />
		<property name="exposeRequestAttributes" value="true" />
		<property name="exposeSessionAttributes" value="true" />
	</bean>
</beans>
在该配置中定义了一个HomeAction的Bean。内容为:
package com.lg.mvc;

import javax.servlet.http.HttpServletRequest;
import javax.servlet.http.HttpServletResponse;

import org.springframework.web.servlet.ModelAndView;
import org.springframework.web.servlet.mvc.Controller;

public class HomeAction implements Controller{

	@Override
	public ModelAndView handleRequest(HttpServletRequest request,
			HttpServletResponse response) throws Exception {
		return new ModelAndView("hello");
	}
}
这是最原始的mvc做法,要继承Controller接口,先从原始的说起,最后再过渡到@Controller和@RequestMapping注解式的配置。它在mvc-serlet.xml文件中的配置有一个关键的属性name="/index"。
WEB-INF/view目录下有一个简单的hello.html,内容为:
<html>
	<head>

	</head>
	<body>
		hello lg !
	</body>
</html>
至此该工程就写完了,部署到tomcat中,项目路径为/,运行一下。
访问 http://localhost:8080/index 
至此整个工程就算搭建成功了。
下面就要说说原理了。
用过python Django框架的都知道Django对于访问方式的配置就是,一个url路径和一个函数配对,你访问这个url,就会直接调用这个函数,简单明了。对于java的面向对象来说,就要分两步走。第一步首先要找到是哪个对象,即handler,本工程的handler则是HomeAction对象。第二步要找到访问的函数,即HomeAction的handleRequest方法。所以就出现了两个源码接口 HandlerMapping和HandlerAdapter,前者负责第一步,后者负责第二步。借用网上的SpringMVC架构图。 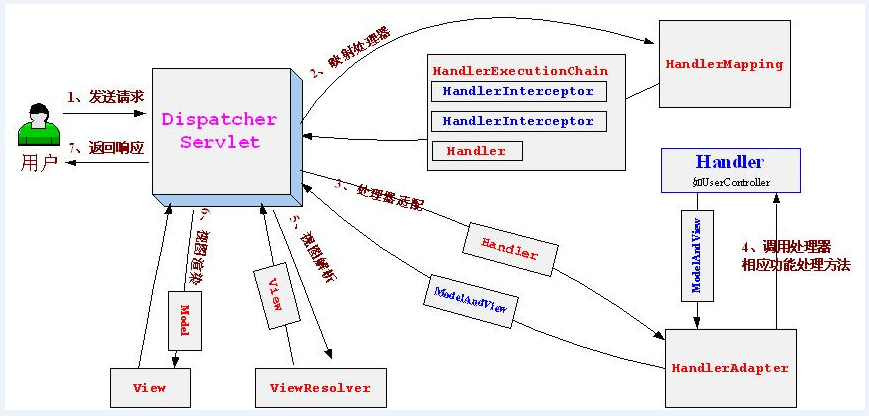
HandlerMapping接口的实现(只举了我认识的几个) :
- BeanNameUrlHandlerMapping :通过对比url和bean的name找到对应的对象
- SimpleUrlHandlerMapping :也是直接配置url和对应bean,比BeanNameUrlHandlerMapping功能更多
- DefaultAnnotationHandlerMapping : 主要是针对注解配置@RequestMapping的,已过时
- RequestMappingHandlerMapping :取代了上面一个
HandlerAdapter 接口实现:
- HttpRequestHandlerAdapter : 要求handler实现HttpRequestHandler接口,该接口的方法为 void handleRequest(HttpServletRequest request, HttpServletResponse response)也就是 handler必须有一个handleRequest方法
- SimpleControllerHandlerAdapter:要求handler实现Controller接口,该接口的方法为ModelAndView handleRequest(HttpServletRequest request, HttpServletResponse response),也就是本工程采用的
- AnnotationMethodHandlerAdapter :和上面的DefaultAnnotationHandlerMapping配对使用的,也已过时
- RequestMappingHandlerAdapter : 和上面的RequestMappingHandlerMapping配对使用,针对@RequestMapping
先简单的说下这个工程的流程,访问http://localhost:8080/index首先由DispatcherServlet进行转发,通过BeanNameUrlHandlerMapping(含有 /index->HomeAction的配置),找到了HomeAction,然后再拿HomeAction和每个adapter进行适配,由于HomeAction实现了Controller接口,所以最终会有SimpleControllerHandlerAdapter来完成对HomeAction的handleRequest方法的调度。然后就顺利的执行了我们想要的方法,后面的内容不在本节中说明。
https://my.oschina.net/pingpangkuangmo/blog/376293