iOS 10 最重要的变化可能就是通知 API 的重构了。本文用一个简单闹钟的例子介绍了 User Notification 的 API 变化和新功能。
简介
很久以前,开发者就可以在 iOS 里预约本地通知了,但是之前的 API 缺乏细粒度的控制能力。幸运的是,苹果在 iOS 10 中改善了这一点,发布了新的 UserNotifications 框架。这个框架在处理本地通知及远程推送方面的 API 丰富了许多,同时写法更加简便。
本地通知(local notification)是用 app 来预约的通知,例如:提醒你带午饭的闹钟。而远程推送(remote notification)一般是服务器发起的,传到苹果的 APNS 服务器上,APNS 再推送到用户手机上。例如:推送给所有用户,告诉他们 app 发布新版本了。
实例工程
工程是用 Xcode 8 Beta 6 建的
我们用一个简单的闹钟 app 来介绍新的 UserNotification 框架,一个用户可以预约提醒的 to do list。到时间后,闹钟每 60 秒提醒一次,直到用户手动取消为止。跟之前一样,代码放在 github 上。
https://github.com/shinobicontrols/iOS10-day-by-day/tree/master/05%20-%20User%20Notifications
每个小喇叭的图标表示一个预约好的提醒,而被红色斜杠划掉的小喇叭表示这个事项不需要提醒。

取消提醒
UI 部分
UI 界面上就是一个简单的 tableView,显示用户的 to do list。没什么可说的。
提醒事项的数据类型是这样定义的:
class NagMeTableViewController: UITableViewController {
typealias Task = String
let tasks: [Task] = [
"Wash Up",
"Walk Dog",
"Exercise"
]
// 待续
我们的 tableView 就是一个提醒事项的列表,点击 cell 上的小喇叭按钮会调用一个闭包。
// 续上
override func tableView(_ tableView: UITableView, cellForRowAt indexPath: IndexPath) -> UITableViewCell {
let cell = tableView.dequeueReusableCell(withIdentifier: "TaskCell", for: indexPath) as! TaskCell
let task = tasks[indexPath.row]
cell.nameLabel.text = task
// 显示 cell 上提醒/不提醒的图标
retrieveNotification(for: task) {
request in
request != nil ? cell.showReminderOnIcon() : cell.showReminderOffIcon()
}
// 点击按钮时调用闭包
cell.onButtonSelection = {
[unowned self] in
self.toggleReminder(for: task)
}
return cell
}
override func tableView(_ tableView: UITableView, numberOfRowsInSection section: Int) -> Int {
return tasks.count
}
}
为了判断用户是不是当前『正在被提醒』,我们要调一个 retrieveNotification(for: task) 方法,待会再详细说。如果存在 notification 对象,说明用户要求提醒这个事项。
当点击 cell 上喇叭按钮的时候,会调用一个 toggleReminder(for: task) 方法,我们也放在后文介绍。这个方法里就是预约提醒的神奇魔法。
请求用户授权
在预约提醒之前,需要先向用户请求通知的授权。在 app 启动时调用如下代码:
func application(_ application: UIApplication, didFinishLaunchingWithOptions launchOptions: [UIApplicationLaunchOptionsKey: Any]?) -> Bool {
UNUserNotificationCenter.current().requestAuthorization(options: [.sound, .alert]) {
granted, error in
if granted {
print("Approval granted to send notifications")
}
}
}
调用的结果是会显示一个弹窗,询问用户是否允许我们的 app 发送通知。闭包的 granted 参数表示我们是否取到了权限。这个弹窗只会显示一次,不过之后用户也可以在设置里进行更改。
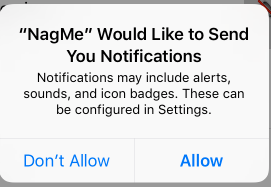
请求授权
你会发现,User Notification框架大量的 API 使用了 completion block。这是因为向 UNUserNotificationCenter 发出的请求大部分都是在后台线程上异步执行的。调用 current() 方法会让框架返回一个供我们 app 使用的 notification center 单例对象,而我们所有的预约通知、取消通知都要通过这个单例对象来实现。
创建通知
创建、添加通知的过程实在有些冗长,我们把代码分解成几部分,一步一步来看:
/// 为 task 创建一个 notification,每分钟重复一次
func createReminderNotification(for task: Task) {
// 配置 notification 的 content
let content = UNMutableNotificationContent()
content.title = "Task Reminder"
content.body = "(task)!!"
content.sound = UNNotificationSound.default()
content.categoryIdentifier = Identifiers.reminderCategory
我们使用一个 UNMutableNotificationContent 对象来配置 notification 的外观和内容。设好 title 和 content,这是后面用户在通知 banner 里看到的标题和内容。另外,我们指定了通知出现时播放的声音为默认声音。当然你也可以指定一个自己想要的声音。
最后,我们设置 categoryIdentifier,待会为通知添加自定义操作的时候会用到。
// 我们希望能每 60 秒提醒我们一次 (这也是苹果允许的最小通知间隔)
let trigger = UNTimeIntervalNotificationTrigger(timeInterval: 60, repeats: true)
通知中心会根据这个 trigger 来决定什么时候展示通知。如果没提供 trigger,通知就会立即发出去。
有几种不同的 trigger:
-
UNTimeIntervalNotificationTrigger : 能让通知在一段指定长度的时间间隔后发出。如果需要,后面可以按这个时间间隔周期性重复通知。
-
UNCalendarNotificationTrigger : 在特定的时刻进行通知,例如:早上 8 点通知。也可以周期重复。
-
UNLocationNotificationTrigger : 在用户进入/离开某个地点的时候进行通知。
对我们目前的需求而言,我们选择 UNTimeIntervalNotificationTrigger,设定为每分钟重复一次。
let identifier = "(task)"
我们的 app 能让用户为 tasks 数组里的每一项 task 添加通知。而这个 identifier 能让我们(没错,你猜对了)确定跟通知相关联的是哪一项 task。
// 用上面写好的部分来组建一个 request
let request = UNNotificationRequest(identifier: identifier, content: content, trigger: trigger)
使用上面讲过的 identifier、content、trigger,我们创建了一个 UNNotificationRequest 对象,它含有通知所需的所有信息。我们再把这个对象传给通知中心:
UNUserNotificationCenter.current().add(request) {
error in
if let error = error {
print("Problem adding notification: (error.localizedDescription)")
}
else {
// 设置喇叭图标
DispatchQueue.main.async {
if let cell = self.cell(for: task) {
cell.showReminderOnIcon()
}
}
}
}
}
如果添加通知没有问题,我们就更新那个 task 对应的 cell 上显示的喇叭图标,表示提醒已经打开了。注意 UI 操作需要回到主线程来进行,这是因为添加通知的 completion block 是在后台线程上调用的。
取消通知
上面提到过,我们写了一个 retrieveNotification 方法来取消之前预约的通知。使用新的通知 API 实现这个功能非常简单:
func retrieveNotification(for task: Task, completion: @escaping (UNNotificationRequest?) -> ()) {
UNUserNotificationCenter.current().getPendingNotificationRequests {
requests in
DispatchQueue.main.async {
let request = requests.filter { $0.identifier == task }.first
completion(request)
}
}
}
为了照顾到之前写的 completion block,我们要把回调切回主线程。
把通知操作与界面关联起来
前面配置 tableViewCell 的时候,用过一个 toggleReminder 方法,来为点击的 task 添加或移除通知提醒。下面我们实现这个方法:
func toggleReminder(for task: Task) {
retrieveNotification(for: task) {
request in
guard request != nil else {
// 之前并没有通知,所以该添加通知
self.createReminderNotification(for: task)
return
}
// 移除通知
UNUserNotificationCenter.current().removePendingNotificationRequests(withIdentifiers: [task])
// 我们已经把通知取消了,下面更新 cell 上的喇叭图标来显示这一点
if let cell = self.cell(for: task) {
cell.showReminderOffIcon()
}
}
}
如果 request 是 nil,说明之前没有设置通知,因此我们就设置一个。否则,就把 task 的 identifier (例如 “锻炼”或者“遛狗”)传给通知中心,移除之前的通知;之后更新 cell 上的喇叭图标,表示通知已经被禁了。
大功告成!现在我们有了一个每 60 秒提醒一次的通知,直到用户回到 app 里、找到对应的 task ,把提醒关掉才会停止。
然而,如果用户能在通知弹出时直接关掉后续的提醒,就更好了……
添加通知的操作
我们可以给通知添加操作来实现这个功能。用户在通知的 banner 下划,或者在锁屏界面的通知上左划,都能看到可以点击的 action 按钮。
最多可以增加 4 种操作(虽然苹果表示在某些设备上只能显示前两种操作,因为屏幕空间太小),一种操作就是一个“category”。
func addCategory() {
// 添加操作
let cancelAction = UNNotificationAction(identifier: Identifiers.cancelAction,
title: "Cancel",
options: [.foreground])
// 创建 category
let category = UNNotificationCategory(identifier: Identifiers.reminderCategory,
actions: [cancelAction],
intentIdentifiers: [],
options: [])
UNUserNotificationCenter.current().setNotificationCategories([category])
}
我们把 action 的选项设置为UNNotificationActionOptions 的 .foreground,意思是点击 action 按钮时会把应用打开到前台。其他可用的选项包括可以表示这项操作要谨慎进行(例如删除类操作),或者在执行前要先解锁。我们在 application(_:didFinishLaunchingWithOptions:) 里调用 addCategory() 方法。
现在 identifier 只是简单的字符串,一旦拼错几个字母就没法正常工作了。我曾经一边写成了 “cancel”、另一边写成了 “Cancel”,花了好一会儿才排查出来。所以我觉得应该写一个简单的结构体,安放所有 identifier。
struct Identifiers {
static let reminderCategory = "reminder"
static let cancelAction = "cancel"
}
为了处理通知 banner 被点击的事件,我们需要实现 UNUserNotificationCenterDelegate 接口。为简洁起见,我们就让 AppDelegate 来当处理事件的 delegate,在 application(_:didFinishLaunchingWithOptions:) : 里设置:
UNUserNotificationCenter.current().delegate = self
然后我们来实现点击事件:
public func userNotificationCenter(_ center: UNUserNotificationCenter,
didReceive response: UNNotificationResponse,
withCompletionHandler completionHandler: @escaping () -> Void) {
if response.actionIdentifier == Identifiers.cancelAction {
let request = response.notification.request
print("Removing item with identifier (request.identifier)")
UNUserNotificationCenter.current().removePendingNotificationRequests(withIdentifiers: [request.identifier])
}
completionHandler()
}
首先判断这个方法的调用来源是用户点击了通知上的 action 按钮(也可能是用户直接点击通知调用的,这种情况下我们不进行任何处理)。如果是,那么我们就直接移除 identifier 对应的通知。
最后调用 completionHandler 来通知系统我们已经处理完成,它可以该干什么干什么去了。
好,我们快说完了。但是如果我们的 app 正在前台的时候,通知就来了,会怎么办呢?如果不做任何处理的话,通知就会被系统默认丢弃了。我们简单改一下吧。
当 app 在前台时接收通知
这是 iOS 10 新加的一个很有用的功能:你可以选择当 app 在前台时是否显示通知。只需实现 delegate 方法,添加一句代码:
func userNotificationCenter(_ center: UNUserNotificationCenter,
willPresent notification: UNNotification,
withCompletionHandler completionHandler: @escaping (UNNotificationPresentationOptions) -> Void) {
completionHandler(.alert)
}
上面的写法就是告诉系统,应该用 alert 显示通知。
扩展阅读
本文介绍了新的 UserNotifications 框架在预约本地通知方面的强大功能。看起来苹果终于听取了开发者的抱怨,推出了可读易用的 API。
虽然我们没有篇幅详细探讨远程推送的通知,新的框架在这方面也有所改进,它让本地和远程推送的通知能用相同的 API 统一处理,因此减少了代码冗余。
要了解更多,可以观看 WWDC 2016 的视频 Introduction to Notifications。同时,欢迎来戳我们在 Github 上的样例工程。
http://t.cn/RV8PnTB