如果你曾经试过做多 target 的项目,到了测试人员要测试包的时候,你就会明白什么叫“生不如死”。虽然 Xcode 打包很方便,但是当你机械重复打 N 次包的时候,就会觉得这纯粹是浪费时间的工作。所以这时候自动化打包就显得尤为重要(其实就算只有一个 target,就算使用 Xcode 打包很方便,也应该构建自动化打包,因为你可以节省大量时间)。
构建自动化打包脚本
xcodebuild
使用 xcodebuild -h 来看看 xcodebuild 到底是干啥的
Usage: xcodebuild [-project ] [[-target ]...|-alltargets] [-configuration ] [-arch ]... [-sdk [|]] [-showBuildSettings] [=]... []...
xcodebuild [-project ] -scheme [-destination ]... [-configuration ] [-arch ]... [-sdk [|]] [-showBuildSettings] [=]... []...
xcodebuild -workspace -scheme [-destination ]... [-configuration ] [-arch ]... [-sdk [|]] [-showBuildSettings] [=]... []...
xcodebuild -version [-sdk [|] [] ]
xcodebuild -list [[-project ]|[-workspace ]] [-json]
xcodebuild -showsdks
xcodebuild -exportArchive -archivePath -exportPath -exportOptionsPlist
xcodebuild -exportLocalizations -localizationPath -project [-exportLanguage ...]
xcodebuild -importLocalizations -localizationPath -project
这里我只截取了 usage 部分,option 部分太多没有截取。
这里介绍几条毕竟常用的命令
1. xcodebuild -list …
xcodebuild -list [[-project ]|[-workspace ]] [-json]
usage: 输出 project 中的 targets 和 configurations,或者 workspace 中 schemes。
-project 和 -workspace 是输出指定内容,不输入默认输出当前目录下。-json 是以 json 格式输出。
example:
$ xcodebuild -list
Information about project "XX":
Targets:
XX
XXTests
Build Configurations:
Debug
Release
If no build configuration is specified and -scheme is not passed then "Release" is used.
Schemes:
XX
2. xcodebuild -project …
xcodebuild [-project ] [[-target ]...|-alltargets] [-configuration ] [-arch ]... [-sdk [|]] [-showBuildSettings] [=]... []...
usage:
-project: 指定 project 名字,默认首个 project。
-target: 指定对应的 target ,默认首个 target。
-configuration: 选择Debug 或 Release,默认 Release,当然如果你有自定义的配置的,就应该选你配置的,上面 -list 中有输出。
-showBuildSettings: 显示工程的配置。
=: 修改工程的配置文件。
buildaction ... : 如下,默认为 build
Specify a build action (or actions) to perform on the target.
Available build actions are:
build Build the target in the build root (SYMROOT). This is
the default build action.
installsrc Copy the source of the project to the source root
(SRCROOT).
install Build the target and install it into the target's
installation directory in the distribution root
(DSTROOT).
clean Remove build products and intermediate files from the
build root (SYMROOT).
example:
-
$ xcodebuild -project 你的项目名字.xcodeproj -target 你的 target 名字 -configuration release
这行命令表示编译 xx.xcodeproj 的 xx target。在 terminal 中会看到编译过程,如果成功最后会输出 ** BUILD SUCCEEDED **。最后会在当前目录下生成 build/Release-iphoneos/xx.app
-
$ xcodebuild -project 你的项目名字.xcodeproj -target 你的 target 名字 -configuration release -showBuildSettings
这行命令使用 -showBuildSettings 是不会 build 项目的,只是输出工程的配置。这里输出的的内容有(内容过多,只截取部分)
Build settings for action build and target XX:
ACTION = build
AD_HOC_CODE_SIGNING_ALLOWED = NO
ALTERNATE_GROUP = staff
ALTERNATE_MODE = u+w,go-w,a+rX
ALTERNATE_OWNER = TsuiYuenHong
ALWAYS_EMBED_SWIFT_STANDARD_LIBRARIES = NO
ALWAYS_SEARCH_USER_PATHS = NO
ALWAYS_USE_SEPARATE_HEADERMAPS = NO
APPLE_INTERNAL_DEVELOPER_DIR = /AppleInternal/Developer
APPLE_INTERNAL_DIR = /AppleInternal
APPLE_INTERNAL_DOCUMENTATION_DIR = /AppleInternal/Documentation
APPLE_INTERNAL_LIBRARY_DIR = /AppleInternal/Library
APPLE_INTERNAL_TOOLS = /AppleInternal/Developer/Tools
APPLICATION_EXTENSION_API_ONLY = NO
APPLY_RULES_IN_COPY_FILES = NO
ARCHS = armv7 arm64
...
如果要修改配置文件,就直接最命令最后加上你要修改的内容。
例如在这行命令最后加上指定证书
-
$ xcodebuild -project 你的项目名字.xcodeproj -target 你的 target 名字 -configuration release PROVISIONING_PROFILE="你证书的id"
其中的字段是上面 -showBuildSettings 显示的字段,也可以看官网介绍
3. xcodebuild -workspace …
xcodebuild -workspace -scheme [-destination ]... [-configuration ] [-arch ]... [-sdk [|]] [-showBuildSettings] [=]... []...
除了 workspace 和 scheme 之外其余选项都和上条命令相同。
-workspace: 指定 workspace 名字,默认首个 workspace
-scheme: 指定对应的 scheme ,默认首个 scheme
4 . xcodebuild -exportArchive …
这里顺便介绍一下 archive 命令,因为在下面使用 PackageApplication 会出一个警告说推荐使用 -exportArchive。所以我们就来尝试一下使用 archive 来生成 app。
首先使用一下命令来生成 .xcarchive 文件
xcodebuild archive -workspace xx.xcworkspace -scheme xx -archivePath xx.xcarchive
可以看出添加上 archive 命令和最后加入 -archivePath 生成archivePath的路径即可。
然后该路径下会生成一个 xx.archivePath,里面包括三个文件,xx.app.dsym文件(可用于bugly等监控bug的平台),info.plist(保存打包的一些信息),还有我们的 xx.app 文件。
其次使用 -exportArchive 生成 ipa 包
xcodebuild -exportArchive -archivePath xx.xcarchive -exportPath xx -exportFormat ipa
-archivePath: xx.archivePath 的路径
-exportPath: 输出路径
-exportFormat: 生成类型,这里选择我们需要的 ipa
这样就利用我们的 xcodebuild 命令来生成 ipa 包
xcrun
这里也使用 xcrun 来生成 ipa 包即可
xcrun -sdk iphoneos PackageApplication build/Release-iphoneos/xx.app -o ~/Desktop/xx.ipa
但是,在 macos10.12 和 Xcode8 的环境下会出现一个警告
warning: PackageApplication is deprecated, use xcodebuild -exportArchive instead.
说明 PackageApplication 已经被弃用了。
不过其实这一步可以几乎等价于将 xx.app 放入一个 payload 的文件夹下然后压缩文件夹为 xx.ipa,当然这样做缺失一些信息,不过并不影响程序的运行。
初步小结
综上,我们有两种方法来生成我们需要的 ipa 包。
-
使用 xcodebuild 命令来编译我们的项目生成 app,然后再用 xcrun 将 app 转 ipa。
-
使用 xcodebuild archive 命令来直接生成我们需要的 ipa。
虽然现在网上几乎都是使用 xcodebuild + xcrun 来来生成 ipa 包,不过既然官方说 PackageApplication is deprecated,那还是推荐使用第二种方法,一步到位。
自动化打包正式开始
这里从我工作室的一个项目切入,这个项目需要最终生成 18 个 ipa 包,但是他们几乎是共用一套代码的,不同的地方在于bundleName/bundleDisplayName/bundleid 等,以及一些资源文件的不同,例如 icon 等。所以可想而知如果选择手动打包的痛苦,并且当你打包到一半发现某个地方错了要重新打包 ……
这里说一下自动化打包1.0解决思路:
-
使用命令 defaults write 来修改项目中的 plist 文件,来达到修改 bundleName/bundleDisplayName/bundleid… 的目的。
-
使用命令 cp 来替换资源文件。
-
使用 xcodebuild -workspace .. 编译出 app 包。
-
使用 xcrun ... 生成 ipa 。
这是我最开始想到的思路,最终运行时间大概为每个包2.5m(时间主要浪费在编译),然后一套下来也要半个多小时。虽然比起手动打快了不少,但还是太慢了。毕竟自动化的目的不仅仅是自动,还要速度。
既然问题出在编译上,那我的思路就往编译一次多次使用这个方向上面思考。然后想到了既然只是资源文件和plist的不同,没有涉及到代码的更换(不过这个项目后期不同 app 会执行不同一套代码,不过也有解决办法),这里就出现了自动化打包2.0的版本。
-
使用 xcodebuild -workspace .. 编译出 app 包。
-
使用命令 defaults write 来修改项目中的 plist 文件,来达到修改 bundleName/bundleDisplayName/bundleid… 的目的。
-
使用命令 cp 来替换资源文件。
-
重签名 codesign -f -s "iPhone Distribution: xx co., LTD" --entitlements $Entitlements $ipaPath/Payload/YouXiaoYun.app
-
使用 xcrun ... 生成 ipa 。
和1.0大致相似,不过并不是每次生成 ipa 都需要编译一次。而是编译一次,然后直接修改 app 下内容,不过这里会出现签名错误的问题,因为在编译的最后会用证书帮 app 签名,如果你直接替换资源然后就生成 ipa 的话会导致 ipa 无法安装。
那这时候神奇的重签名技术就出来(重签名用在正途上的真少见…hhhh,关于重签名的文章 google 一下就会很多),使用 codesign 命令就可以帮修改过资源的 app 重签名。
最终使用2.0的时间基本是在5-6分钟左右。果然能机器完成的工作绝对不要手动完成,从半天到30分钟到最后的6分钟,节省下来的时间可以让你学习到更多。
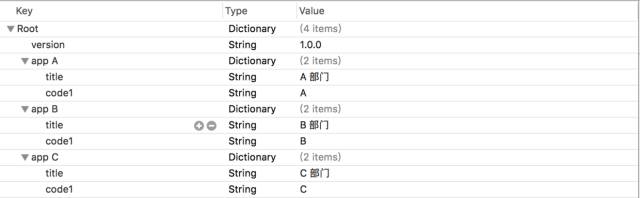
上面说到如果不同 app 间会用到不同的代码。例如 app A 里面的 title 叫 A 部门,app B 里面 title 又叫 B 部门,这样就不会通过命令行直接修改到代码,不过我想到的是维护一个 plist 文件,plist 文件可以这样设计的,每个不同 app 的 bundleName 都设置字典的键,然后字典下就可以是你自定义的内容。然后每次启动 app 就根据 bundleName 来寻找对应的字典,然后 title 就赋值为 plist 下 title 的值。如果不同代码就根据 code1 里面的值来 switch 不同的代码。
最终代码
以下是完整的脚本文件,部分信息需要自己替换。
以下脚本适用于一次打 N 个包,适用情况:
-
可以替换 bundle 信息
-
替换音频图片资源
-
可以执行不同代码
-
生成相应的plist文件
-
上传到蒲公英分发平台
当然也可以打一个包,适当删除某些代码即可。
# 1.Configuration Info
# 项目路径 需修改
projectDir="你的项目路径"
# 打包生成路径 需修改
ipaPath="ipa生成路径"
# 图标路径 需修改
iconPath="~/Desktop/icon"
# Provisioning Profile 需修改 查看本地配置文件
PROVISIONING_PROFILE="xxxxxxx-xxxx-4bfa-a696-0ec7391b24d8"
############# 重签名需要文件
# 以下文件需放在 ipaPath 路径下
Entitlements=$ipaPath/entitlements.plist
#############
# 版本号
bundleVersion="2.0.0"
# 选择打包序号 多选则以空格隔开 如("1" "2" "3")
appPackNum=("1 2")
# 蒲公英分发参数 不分发可忽略 默认不分发 下面的两个KEY是默认测试的网址对应KEY
ISUPLOAD=0
USERKEY="xxx"
APIKEY="xxx"
# ---------------------------可选 如果需要替换 app 的 icon --------------------------------- #
# 配置App信息数组 格式:"AppName(和工程中appInfo.Plist对应)" "icon"
#Schemes:
# 1.app1 app1Icon
# 2.app2 app2Icon
# 3.app3 app3Icon
# --------------------------------------------------------------------------------------- #
# 打包个数
appPackNumLength=${#appPackNum[*]}
appInfos=(
"app1" "app1Icon" "xxxx"
"app2" "app2Icon" "xxxx"
"app3" "app3Icon" "xxxx"
)
appInfosLength=${#appInfos[*]}
# Scheme Name
schemeName="xx"
# Code Sign ID
CODE_SIGN_IDENTITY="xx co., LTD"
# 生成 APP 路径
buildDir="build/Release-iphoneos"
# 开始时间
beginTime=`date +%s`
# 创建打包目录
mkdir ${ipaPath}/AllPack
# 本地存放全部 IPA 的路径
allIPAPackPath="${ipaPath}/allPack"
# 清除缓存
rm -rf $projectDir/$buildDir
# Build 生成 APP
xcodebuild -workspace ${projectDir}/xx.xcworkspace -scheme ${schemeName} -configuration Release clean -sdk iphoneos build CODE_SIGN_IDENTITY="${CODE_SIGN_IDENTITY}" PROVISIONING_PROFILE="${PROVISIONING_PROFILE}" SYMROOT="${projectDir}/build"
if [[ $? = 0 ]]; then
echo "�33[31m 编译成功 �33[0m"
else
echo "�33[31m 编译失败 �33[0m"
fi
# 先创建 payload 文件夹
mkdir ~/Desktop/Payload
# 移动编译生成的 app 到桌面的 Payload 文件夹下
cp -Rf ${projectDir}/${buildDir}/${schemeName}.app $ipaPath/Payload
# 以下二选一
# 1.----全部打包----
#for (( i=0; i $plist_path
itemsassetskindsoftware-packageurlhttps://xxxxxxxxxxxx/$appDownloadName.ipakinddisplay-imageurlhttps://xxxxxxxxxxxx/${appIconName}.pngkindfull-size-imageurlhttps://xxxxxxxxxxxx/${appIconName}.pngmetadatabundle-identifier你的bundidbundle-version$bundleVersionkindsoftwaretitle$appDownloadName
EOF
# 移动
mv ${ipaPath}/$appDownloadName.ipa ${allIPAPackPath}/$appName
# 6.上传蒲公英分发平台
if [[ $ISUPLOAD = 1 ]]; then
echo "正在上传蒲公英..."
curl -F "file=@$allIPAPackPath/$appName/$appDownloadName.ipa" -F "uKey=$USERKEY" -F "_api_key=$APIKEY" http://www.pgyer.com/apiv1/app/upload
fi
done
# 清除无关文件
rm -rf $ipaPath/Payload
# 结束时间
endTime=`date +%s`
echo -e "打包时间$[ endTime - beginTime ]秒"