一开始是没有打算写这一篇博客的,但是看见好多朋友问关于elasticsearch的坑,决定还是写一份详细的安装说明与简单的测试demo,只要大家跟着我的步骤一步步来,100%是可以测试成功的。
一. docker安装
本人使用的是centos6,安装命令如下:
1.首先使用epel库安装docker
yum install -y http://mirrors.yun-idc.com/epel/6/i386/epel-release-6-8.noarch.rpm
yum install -y docker-io
安装完成后,使用命令 service docker start 启动docker
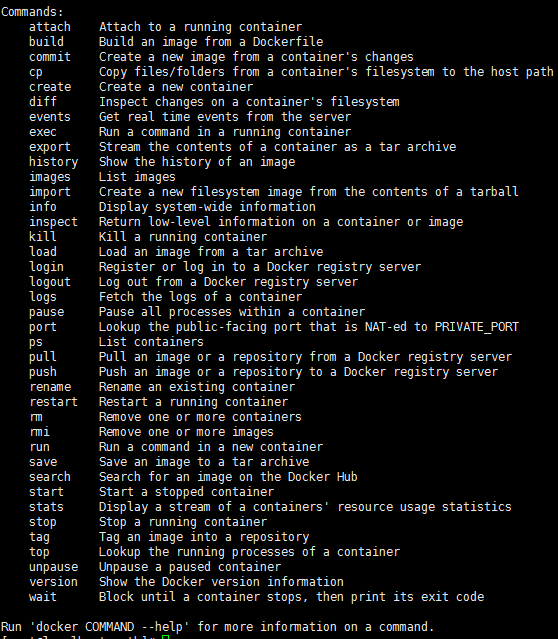
控制台输入docker ,出现如下界面表示安装成功

如果提示检查软件失败什么的,是因为之前先装了docker,再装了docker-io,直接使用命令 yum remove docker 删除docker,再执行
yum install -y docker-io 即可。
如果仍然提示 no package avalible...
使用rpm安装docker:
rpm -ivh docker源的方式 yum install
Ubuntu/Debian: curl -sSL https://get.docker.com | sh
Linux 64bit binary: https://get.docker.com/builds/Linux/x86_64/docker-1.7.1
Darwin/OSX 64bit client binary: https://get.docker.com/builds/Darwin/x86_64/docker-1.7.1
Darwin/OSX 32bit client binary: https://get.docker.com/builds/Darwin/i386/docker-1.7.1
Linux 64bit tgz: https://get.docker.com/builds/Linux/x86_64/docker-1.7.1.tgz
Windows 64bit client binary: https://get.docker.com/builds/Windows/x86_64/docker-1.7.1.exe
Windows 32bit client binary: https://get.docker.com/builds/Windows/i386/docker-1.7.1.exe
Centos 6/RHEL 6: https://get.docker.com/rpm/1.7.1/centos-6/RPMS/x86_64/docker-engine-1.7.1-1.el6.x86_64.rpm
https://get.docker.com/rpm/1.7.1/centos-6/RPMS/x86_64/docker-engine-1.7.1-1.el6.x86_64.rpm
Centos 7/RHEL 7: https://get.docker.com/rpm/1.7.1/centos-7/RPMS/x86_64/docker-engine-1.7.1-1.el7.centos.x86_64.rpm
Fedora 20: https://get.docker.com/rpm/1.7.1/fedora-20/RPMS/x86_64/docker-engine-1.7.1-1.fc20.x86_64.rpm
Fedora 21: https://get.docker.com/rpm/1.7.1/fedora-21/RPMS/x86_64/docker-engine-1.7.1-1.fc21.x86_64.rpm
Fedora 22: https://get.docker.com/rpm/1.7.1/fedora-22/RPMS/x86_64/docker-engine-1.7.1-1.fc22.x86_64.rpm
2.下载elasticsearch 镜像
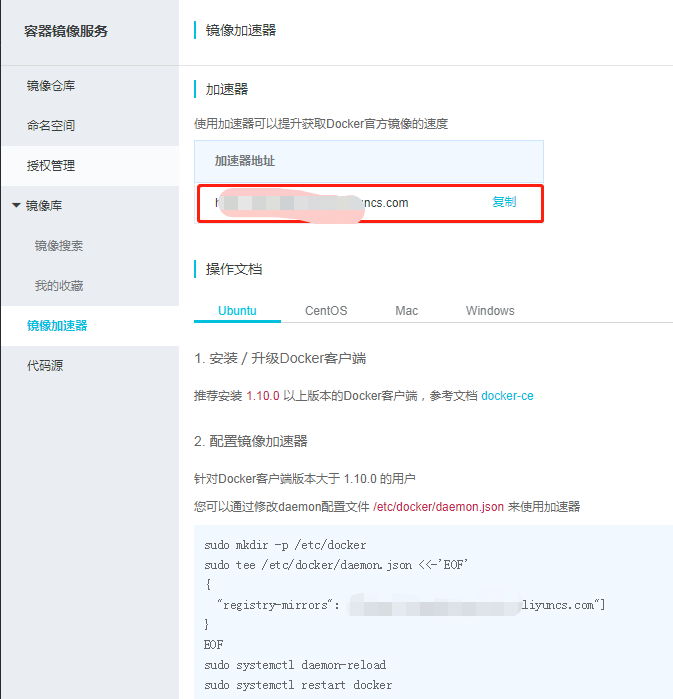
在下载elasticsearch镜像之前,可以先改一下docker的镜像加速功能,我是用的阿里云的镜像加速,登录阿里云官网,产品-->云计算基础-->容器镜像服务, 进入管理控制台,如下图所示,复制加速器地址。
进入虚拟机,vim /etc/sysconfig/docker,加入下面一行配置
other_args="--registry-mirror=https://xxxx.aliyuncs.com"
:wq 保存退出
service docker restart 重启docker服务
ps -aux|grep docker 输入如下命令查看docker信息,出现如下信息则加速器配置成功

然后就可以快速pull镜像了。
docker pull elasticsearch
docker pull kibana
docker pull mobz/elasticsearch-head:5
将我们需要的三个镜像拉取下来
mkdir -p /opt/elasticsearch/data
vim /opt/elasticsearch/elasticsearch.yml


docker run --name elasticsearch -p 9200:9200 -p 9300:9300 -p 5601:5601 -e "discovery.type=single-node" -v /opt/elasticsearch/elasticsearch.yml:/usr/share/elasticsearch/config/elasticsearch.yml -v /opt/elasticsearch/data:/usr/share/elasticsearch/data -d elasticsearch
elasticsearch.yml 配置文件内容:
cluster.name: elasticsearch_cluster
node.name: node-master
node.master: true
node.data: true
http.port: 9200
network.host: 0.0.0.0
network.publish_host: 192.168.6.77
discovery.zen.ping.unicast.hosts: ["192.168.6.77","192.168.6.78"]
http.host: 0.0.0.0
http.cors.enabled: true
http.cors.allow-origin: "*"
bootstrap.memory_lock: false
bootstrap.system_call_filter: false
# Uncomment the following lines for a production cluster deployment
#transport.host: 0.0.0.0
discovery.zen.minimum_master_nodes: 1
注意我的elasticsearch 是在两台服务器上的,所以集群部署的时候可以省略端口号,因为都是9300,如果你的集群是部署在同一台os上,则需要区分出来端口号。
cluster.name: elasticsearch_cluster 集群名字,所有集群统一。
node.name: node-master 你的节点名称,所有集群必须区分开。
http.cors.enabled: true
http.cors.allow-origin: "*"  支持跨域
discovery.zen.minimum_master_nodes: 1 可被发现作为主节点的数量
network.publish_host: 192.168.6.77 对外公布服务的真实IP
network.host: 0.0.0.0 开发环境可以设置成0.0.0.0,真正的生产环境需要指定IP地址。
我们启动elasticsearch容器多加了一个端口映射 -p 5601:5601 目的是让kibana使用该容器的端口映射,无需指定kibana容器的映射了。
启动kibana:
docker run --name kibana -e ELASTICSEARCH_URL=http://127.0.0.1:9200 --net=container:elasticsearch -d kibana
--net=container:elasticsearch 命令为指定使用elasticsearch的映射
这个时候,一般elasticsearch是启动报错的,我们需要修改一下linux的文件配置,如文件描述符的大小等。
需要修改的文件一共两个:
切换到root用户
1、vi /etc/security/limits.conf 修改如下配置
* soft nofile 65536
* hard nofile 131072

2、vi /etc/sysctl.conf 添加配置
vm.max_map_count=655360
运行命令 sysctl -p
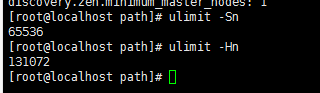
这个时候配置完了输入命令
ulimit -Sn
ulimit -Hn
出现如下信息即配置成功。
可是这个时候重启容器依然是报错的,没报错是你运气好,解决办法是重启一下docker就OK了。
service docker restart
然后重启elasticsearch 容器
docker restart elasticsearch
访问ip:9200
出现如下信息,则elasticsearch 启动成功
{
  "name" : "node-master",
  "cluster_name" : "elasticsearch_cluster",
  "cluster_uuid" : "QzD1rYUOSqmpoXPYQqolqQ",
  "version" : {
    "number" : "5.6.12",
    "build_hash" : "cfe3d9f",
    "build_date" : "2018-09-10T20:12:43.732Z",
    "build_snapshot" : false,
    "lucene_version" : "6.6.1"
  },
  "tagline" : "You Know, for Search"
}
接着同样的操作,在另外一台os上启动elasticsearch,两台不同的地方一是第二台我们不需要做-p 5601:5601的端口映射,第二是elasticsearch.yml配置文件的一些不同:
cluster.name: elasticsearch_cluster
node.name: node-slave
node.master: false
node.data: true
http.port: 9200
network.host: 0.0.0.0
network.publish_host: 192.168.6.78
discovery.zen.ping.unicast.hosts: ["192.168.6.77:9300","192.168.6.78:9300"]
http.host: 0.0.0.0
http.cors.enabled: true
http.cors.allow-origin: "*"
bootstrap.memory_lock: false
bootstrap.system_call_filter: false
# Uncomment the following lines for a production cluster deployment
# #transport.host: 0.0.0.0
# #discovery.zen.minimum_master_nodes: 1
#
两台os中的elasticsearch都启动成功后,便可以启动kibana和head了。
重启kibana
docker restart kibana
访问http://ip:5601
出现如下页面则kibana启动成功
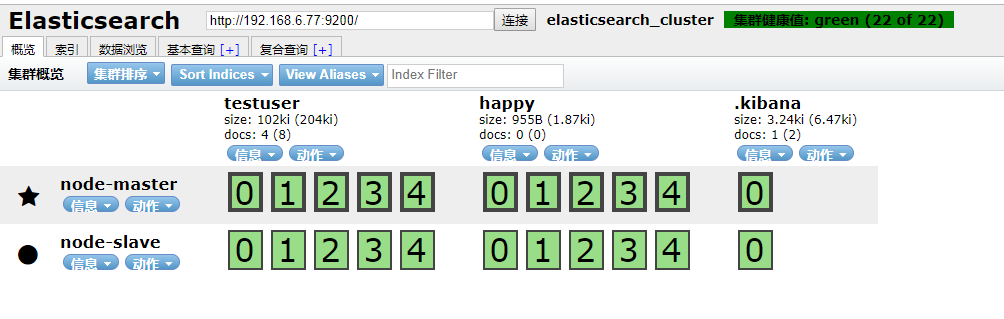
启动elasticsearch-head监控es服务
docker run -d -p 9100:9100 mobz/elasticsearch-head:5
访问ip:9100
出现如下界面即启动head成功
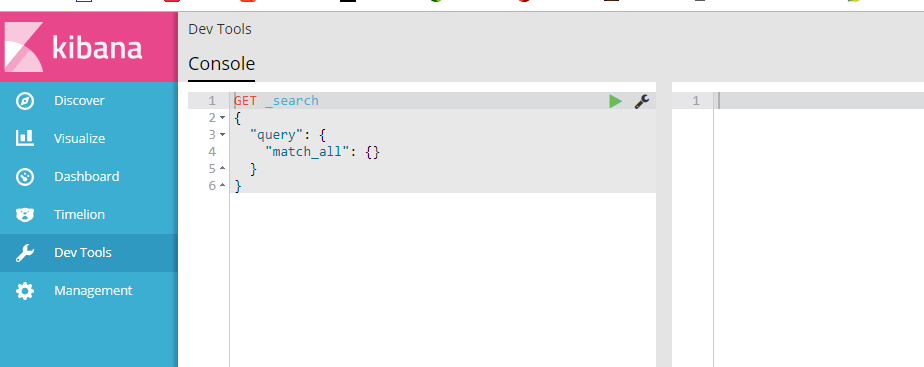
到此我们的准备工作算是完成了,接下来新建springboot项目,pom引入
<dependency>
<groupId>org.springframework.boot</groupId>
<artifactId>spring-boot-starter-data-elasticsearch</artifactId>
</dependency>
其他mvc mybatis配置在此不再赘述,application.yml配置如下:
spring:
  data:
   elasticsearch:
    cluster-nodes: 192.168.6.77:9300
    repositories.enabled: true
    cluster-name: elasticsearch_cluster
编写仓库测试类 UserRepository:
package com.smkj.user.repository;

import org.springframework.data.elasticsearch.repository.ElasticsearchRepository;
import org.springframework.stereotype.Component;

import com.smkj.user.entity.XymApiUser;

/**
 * @author dalaoyang
 * @Description
 * @project springboot_learn
 * @package com.dalaoyang.repository
 * @email yangyang@dalaoyang.cn
 * @date 2018/5/4
 */
@Component
public interface UserRepository extends ElasticsearchRepository<XymApiUser,String> {
}
实体类中,加上如下注解:
@SuppressWarnings("serial")
@AllArgsConstructor
@NoArgsConstructor
@Data
@Accessors(chain=true)
@Document(indexName = "testuser",type = "XymApiUser")
最后一个注解是使用elasticsearch必加的,类似数据库和数据表映射
上边的几个就是贴出来给大家推荐一下lombok这个小东东,挺好用的,具体使用方法可以自行百度,不喜欢的同学可以直接删掉。
然后编写controller:
package com.smkj.user.controller;

import java.util.List;

import org.elasticsearch.action.get.GetResponse;
import org.elasticsearch.client.transport.TransportClient;
import org.elasticsearch.index.query.QueryBuilder;
import org.elasticsearch.index.query.QueryBuilders;
import org.elasticsearch.index.query.functionscore.FunctionScoreQueryBuilder;
import org.elasticsearch.index.query.functionscore.ScoreFunctionBuilders;
import org.springframework.beans.factory.annotation.Autowired;
import org.springframework.data.domain.Page;
import org.springframework.data.domain.PageRequest;
import org.springframework.data.domain.Pageable;
import org.springframework.data.elasticsearch.core.query.NativeSearchQueryBuilder;
import org.springframework.data.elasticsearch.core.query.SearchQuery;
import org.springframework.data.web.PageableDefault;
import org.springframework.http.HttpStatus;
import org.springframework.http.ResponseEntity;
import org.springframework.web.bind.annotation.GetMapping;
import org.springframework.web.bind.annotation.PathVariable;
import org.springframework.web.bind.annotation.RestController;

import com.google.common.collect.Lists;
import com.smkj.user.entity.XymApiUser;
import com.smkj.user.repository.UserRepository;
import com.smkj.user.service.UserService;

@RestController
public class UserController {
    @Autowired
    private UserService userService;
    @Autowired
    private UserRepository userRepository;
     @Autowired
        private TransportClient client;
@GetMapping("user/{id}")
    public XymApiUser getUserById(@PathVariable String id) {
    XymApiUser apiuser = userService.selectByPrimaryKey(id);
    userRepository.save(apiuser);
    System.out.println(apiuser.toString());
    return apiuser;

    }
/**
 * @param title   搜索标题
 * @param pageable page = 第几页参数, value = 每页显示条数
 */
@GetMapping("get/{id}")
public ResponseEntity  search(@PathVariable String id,@PageableDefault(page = 1, value = 10) Pageable pageable){
       if (id.isEmpty()) {
           return new ResponseEntity(HttpStatus.NOT_FOUND);
       }

    // 通过索引、类型、id向es进行查询数据
       GetResponse response = client.prepareGet("testuser", "xymApiUser", id).get();
       if (!response.isExists()) {
           return new ResponseEntity(HttpStatus.NOT_FOUND);
       }

       // 返回查询到的数据
       return new ResponseEntity(response.getSource(), HttpStatus.OK);
}


/**
 * 3、查   +++:分页、分数、分域(结果一个也不少)
 * @param page
 * @param size
 * @param q
 * @return
 * @return
 */
@GetMapping("/{page}/{size}/{q}")
public Page<XymApiUser> searchCity(@PathVariable Integer page, @PathVariable Integer size, @PathVariable String q) {

    SearchQuery searchQuery = new NativeSearchQueryBuilder()
            .withQuery( QueryBuilders.prefixQuery("cardNum",q))
            .withPageable(PageRequest.of(page, size))
            .build();
    Page<XymApiUser> pagea = userRepository.search(searchQuery);
    System.out.println(pagea.getTotalPages());
    return pagea;

}


}
访问 http://localhost:8080/0/10/6212263602070571344

到此结束,不明白的朋友可以留言。