本教程基于子龙山人翻译的cocos2d的IPHONE教程,用cocos2d-x for XNA引擎重写,加上我一些加工制作。教程中大多数文字图片都是原作者和翻译作者子龙山人,还有不少是我自己的理解和加工。感谢原作者的教程和子龙山人的翻译。本教程仅供学习交流之用,切勿进行商业传播。
子龙山人翻译的Iphone教程地址:http://www.cnblogs.com/andyque/archive/2011/05/07/2039481.html
Iphone教程原文地址:http://geekanddad.wordpress.com/2010/06/22/enemies-and-combat-how-to-make-a-tile-based-game-with-cocos2d-part-3/
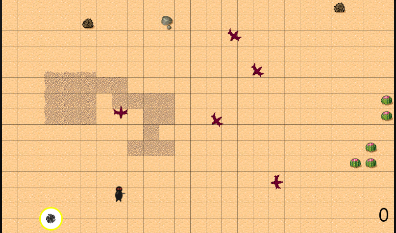
程序截图:

这篇教程是《使用cocos2d-x制作基于Tile地图的游戏》系列教程的后续。如果你还没有看过前面两部分的教程,可以在我的博客上找到另外两篇教程。
增加敌人
敌人出现的位置点
对象组(对象层中的所有对象组成一个对象组)中的对象被存储在一个List<Dictionary>中,同时使用对象名字作为value。这意味着每一个位置点必须有一个唯一的名字。尽管我们可以遍历所有的Dictionary是否有value是以“EnemySpawn”开头,但是这样做效率很低下。相反,我们采用的做法是,使用一个属性来表示,每个给定的对象代表一个敌人出现的位置点。


开始创建敌人
        void addEnemyAtXY(int x, int y)
        {
            CCSprite enemy = CCSprite.spriteWithFile("images/enemy1");
            enemy.position = new CCPoint(x, y);
            this.addChild(enemy);
        }
并且在init里面的添加player的if语句后面添加:
                    if (item.ContainsValue("EnemySpawn1"))
                    {
                        int ex =  Convert.ToInt32(item["x"]);
                        int ey = Convert.ToInt32(item["y"]);
                        this.addEnemyAtXY(ex, ey);
                    }

使它们移动
        /// <summary>
        /// callback, starts another iteration of enemy movement
        /// </summary>
        /// <param name="sender"></param>
        void enemyMoveFinished(object sender)
        {
            CCSprite enemy = sender as CCSprite;
            this.animateEnemy(enemy);
        }

        /// <summary>
        /// a method to move enemy 10 pixls toward the player
        /// </summary>
        /// <param name="enemy"></param>
        void animateEnemy(CCSprite enemy)
        {
            //speed of the enemy
            float acturalDuration = 0.3f;
            var actionMove = CCMoveBy.actionWithDuration(acturalDuration, CCPointExtension.ccpMult(
                CCPointExtension.ccpNormalize(
                CCPointExtension.ccpSub(player.position, enemy.position)), 10));
            var actionMoveDone = CCCallFuncN.actionWithTarget(this, enemyMoveFinished);
            enemy.runAction(CCSequence.actions(actionMove, actionMoveDone));
        }
并且在addEnemyAtXY方法最后添加:
this.animateEnemy(enemy);
animateEnemy:方法创建两个action。第一个action使之朝敌人移动10个像素,时间为0.3秒。你可以改变这个时间使之移动得更快或者更慢。第二个action将会调用enemyMoveFinished:方法。我们使用CCSequence action来把它们组合起来,这样的话,当敌人停止移动的时候就立马可以执行enemyMoveFinished:方法就可以被调用了。在addEnemyAtX:Y:方法里面,我们调用animateEnemy:方法来使敌人朝着玩家(player)移动。(其实这里是个递归的调用,每次移动10个像素,然后又调用enemyMoveFinished:方法)
很简洁!但是,但是,如果敌人每次移动的时候面部都对着player那样是不是更逼真呢?只需要在animateEnemy:方法中加入下列语句即可:
            //immediately before creating the actions in animateEnemy
            //rotate to face the player
            CCPoint diff = CCPointExtension.ccpSub(player.position, enemy.position);
            double angleRadians = Math.Atan((double)(diff.y / diff.x));
            float angleDegrees = MathHelper.ToDegrees((float)angleRadians);
            float cocosAngle = -1 * angleDegrees;
            if (diff.x < 0)
            {
                cocosAngle += 180;
            }
            enemy.rotation = cocosAngle;
这个代码计算每次玩家相对于敌人的角度,然后旋转敌人来使之面朝玩家。

满屏的怪物,似乎怪物设置得有点多了。。
忍者飞镖
        int _mode = 0;
        public int mode {
            get {
                return _mode;
            }
        }
        /// <summary>
        /// callback for the button
        /// mode 0 = moving mode
        /// mode 1 = ninja star throwing mode
        /// </summary>
        /// <param name="sender"></param>
        void projectileButtonTapped(object sender)
        {
            if (_mode == 1)
            {
                _mode = 0;
            }
            else
                _mode = 1;
        }

    //in the init method
         CCMenuItem on = CCMenuItemImage.itemFromNormalImage(@"images/projectile-button-on", @"images/projectile-button-on");
            CCMenuItem off = CCMenuItemImage.itemFromNormalImage(@"images/projectile-button-off", @"images/projectile-button-off");
            CCMenuItemToggle toggleItem = CCMenuItemToggle.itemWithTarget(this, projectileButtonTapped, on, off);
            CCMenu toggleMenu = CCMenu.menuWithItems(toggleItem);
            toggleMenu.position = new CCPoint(100, 32);
            this.addChild(toggleMenu);
上面我们做了什么呢,就是添加了一个变量mode作为判断所用。另外添加一个button。
编译并运行。这时会在左下角出现一个按钮,并且你可以打开或者关闭之。但是这并不会对游戏造成任何影响。我们的下一步就是增加飞镖的发射。

发射飞镖
if (hud.mode ==0) {
// old contents of ccTouchEnded:withEvent:
} else {
// code to throw ninja stars will go here
}
这样可以使得移动模式下,玩家只能移动。下一步就是要添加代码使忍者能够发射飞镖。在else部分增加,在增加之前,先在TileMapLayer类中添加一些清理代码:
        void projectileMoveFinished(object sender)
        {
            CCSprite sprite = sender as CCSprite;
            this.removeChild(sprite, true);
        }
// code to throw ninja stars will go here
//code to throw ninja stars will go here
                //Find where the touch is
                CCPoint touchLocation = touch.locationInView(touch.view());
                touchLocation = CCDirector.sharedDirector().convertToGL(touchLocation);
                touchLocation = this.convertToNodeSpace(touchLocation);

                //Create a projectile and put it at the player's location
                CCSprite projectile = CCSprite.spriteWithFile(@"images/Projectile");
                projectile.position = new CCPoint(player.position.x, player.position.y);
                this.addChild(projectile);

                //Determine where we wish to shoot the projectile to
                float realX;

                //Are we shooting to left or right?
                CCPoint diff = CCPointExtension.ccpSub(touchLocation, player.position);
                if (diff.x > 0)
                {
                    realX = tileMap.MapSize.width * tileMap.TileSize.width + projectile.contentSize.width / 2;
                }
                else
                    realX = -tileMap.MapSize.width * tileMap.TileSize.width - projectile.contentSize.width / 2;
                float ratio = diff.y / diff.x;
                float realY = (realX - projectile.position.x) * ratio + projectile.position.y;
                CCPoint realDest = new CCPoint(realX, realY);

                //Determine the length of how far we're shooting
                float offRealX = realX - projectile.position.x;
                float offRealY = realY - projectile.position.y;
                double length = Math.Sqrt((double)(offRealX * offRealX + offRealY * offRealY));
                float velocity = 480 / 1;//480pixls/1sec
                float realMoveDuration = (float)length / velocity;

                //Move projectile to actual endpoint
                var actionMoveDone = CCCallFuncN.actionWithTarget(this, projectileMoveFinished);
                projectile.runAction(CCSequence.actions(CCMoveTo.actionWithDuration(realMoveDuration,realDest),actionMoveDone));
碰撞检测
        public GameOverScene(bool isWin)
        {
            string winMsg;
            if (isWin)
            {
                winMsg = "YOU WIN!";
            }
            else
                winMsg = "YOU LOSE!";
            CCLabelTTF label = CCLabelTTF.labelWithString(winMsg, "Arial", 32);
            label.position = new CCPoint(400, 300);
            this.addChild(label);
            this.runAction(CCSequence.actions(CCDelayTime.actionWithDuration(3.0f), CCCallFunc.actionWithTarget(this, gameOverDone)));
        }

        void gameOverDone()
        {
            TileMapScene pScene = new TileMapScene();
            CCDirector.sharedDirector().replaceScene(pScene);
        }
    }
这样,就完成了GameOverScene了。上面的代码很清楚了。就是添加一个label,并且在延时3秒后跳转到游戏界面。
PART1:BOX2D检测
这个部分,我们用BOX2D来做碰撞检测,如果你对BOX2D不了解,可以看我博客里面的<cocos2d-x for wp7>在cocos2d-x里面使用BOX2D和<cocos2d-x for wp7>使用box2d来做碰撞检测(且仅用来做碰撞检测)。
具体添加代码方法看<cocos2d-x for wp7>使用box2d来做碰撞检测(且仅用来做碰撞检测)。其实是差不多的。我在这里大概说下我做了什么,后面也会提供一个示例代码。
首先,我添加了和碰撞检测文章中一样的声明,世界的创建等操作,为player,projectile,enemy都添加了tag以便碰撞检测,并且也添加了一样的addBoxBodyForSprite方法。tick方法。在碰撞检测上面做了一样的操作。当player和enemy碰撞的时候跳转到GameOverScene显示YOU LOSE。在setPlayerPosition里面搜集食物处添加检测,如果搜集数为8,就跳转显示YOU WIN。(我数了下我地图上的个数为8)。
这样,就完成了。BOX2D做检测还真是方便。示例代码下载:http://dl.dbank.com/c0rr5l1b7p
PART2:普通方式检测
普通方式就是指用精灵的position和contentSize生成一个矩形做检测。
那么,先往TileMapLayer类里面添加变量声明:
        List<CCSprite> enemies;
        List<CCSprite> projectiles;
然后在init里面初使化list:
            //init the list
            enemies = new List<CCSprite>();
            projectiles = new List<CCSprite>();
然后在addEnemyAtXY方法的结尾添加如下代码:
enemies.Add(enemy);
接着,在TileMapLayer类中添加如下代码:
        void testCollision(float dt)
        {
            List<CCSprite> projectilesToDelete = new List<CCSprite>();
            List<CCSprite> targetToDelete = new List<CCSprite>();
            //iterate through projectiles
foreach (var projectile in projectiles)
            {
                CCRect projectileRect = new CCRect(
                    projectile.position.x - projectile.contentSize.width / 2,
                    projectile.position.y - projectile.contentSize.height / 2,
                    projectile.contentSize.width,
                    projectile.contentSize.height);

                //iterate through enemies,see if any intersect with current projectile
                foreach (var target in enemies)
                {
                    CCRect targetRect = new CCRect(
                        target.position.x - target.contentSize.width / 2,
                        target.position.y - target.contentSize.width / 2,
                        target.contentSize.width,
                        target.contentSize.height);
                    if (CCRect.CCRectIntersetsRect(projectileRect,targetRect))
                    {
                        targetToDelete.Add(target);
                    }
                }

                //delete all hit enemies
                foreach (var target in targetToDelete)
                {
                    enemies.Remove(target);
                    this.removeChild(target,true);
                }
                if (targetToDelete.Count > 0)
                {
                    //add the projectile to the list of ones to remove
                    projectilesToDelete.Add(projectile);
                }
                targetToDelete.Clear();
            }

            //remove all the projectiles that hit
            foreach (var projectile in projectilesToDelete)
            {
                projectiles.Remove(projectile);
                this.removeChild(projectile, true);
            }
            projectilesToDelete.Clear();
        }
然后添加以下代码:
// at the end of the launch projectiles section of ccTouchEnded:withEvent:
projectiles.Add(projectile);

// at the end of projectileMoveFinished:
projectiles.Remove(sprite);

//in the init
this.schedule(testCollision);
        void gameOver(bool isWin)
        {
            GameOverScene gameOverScene = new GameOverScene(isWin);
            CCDirector.sharedDirector().replaceScene(gameOverScene);
        }
然后在setPlayerPosition里面搜集食物处添加检测,如果搜集数为8,就跳转显示YOU WIN。(我数了下我地图上的个数为8)。
                        if (numCollected == 2)
                        {
                            gameOver(true);
                        }
就这个教程而言,我们的玩家只要有一个敌人碰到他,游戏是结束了。在类的testCollision方法中添加以列循环:
            foreach (var target in enemies)
            {
                CCRect targetRect = new CCRect(
                    target.position.x - target.contentSize.width / 2,
                    target.position.y - target.contentSize.width / 2,
                    target.contentSize.width,
                    target.contentSize.height);
                if (CCRect.CCRectContainsPoint(targetRect, player.position))
                {
                    gameOver(false);
                }
            }
编译并运行,得到预期效果。
示例代码:http://dl.dbank.com/c0xy82fc3w
接下来怎么做?
- 增加多个关卡
- 增加不同类型的敌人
- 在Hud层中显示血条和玩家生命
- 制作更多的道具,比如加血的,武器等等
- 一个菜单系统,可以选择关卡,关闭音效,等等
- 使用更好的用户界面,来使游戏画面更加精美,投掷飞镖更加潇洒。
另外,继续:<cocos2d-x for wp7>使用cocos2d-x制作基于Tile地图的游戏:不一样的战斗(回合制战斗)(四)。