文章较长,建议推荐,建议转发,建议收藏,建议关注公众号哈。
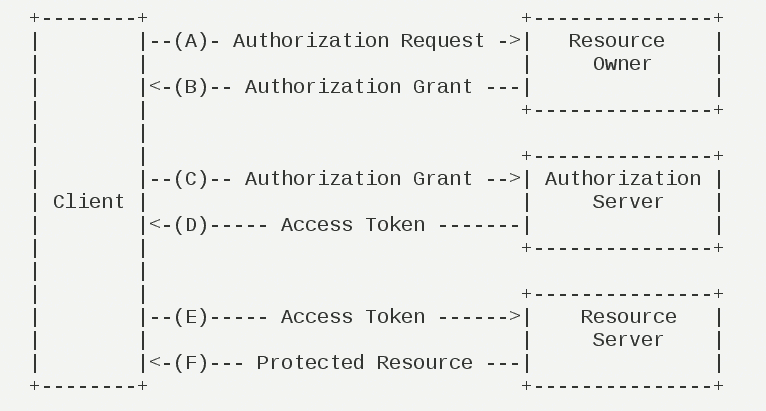
OAuth 2 有四种授权模式,分别是授权码模式(authorization code)、简化模式(implicit)、密码模式(resource owner password credentials)、客户端模式(client credentials),具体 OAuth2 是什么,可以参考这篇文章。(http://www.ruanyifeng.com/blog/2014/05/oauth_2_0.html)
本文我们将使用授权码模式和密码模式两种方式来实现用户认证和授权管理。
OAuth2 其实是一个关于授权的网络标准,它制定了设计思路和运行流程,利用这个标准我们其实是可以自己实现 OAuth2 的认证过程的。今天要介绍的 spring-cloud-starter-oauth2 ,其实是 Spring Cloud 按照 OAuth2 的标准并结合 spring-security 封装好的一个具体实现。
什么情况下需要用 OAuth2
首先大家最熟悉的就是几乎每个人都用过的,比如用微信登录、用 QQ 登录、用微博登录、用 Google 账号登录、用 github 授权登录等等,这些都是典型的 OAuth2 使用场景。假设我们做了一个自己的服务平台,如果不使用 OAuth2 登录方式,那么我们需要用户先完成注册,然后用注册号的账号密码或者用手机验证码登录。而使用了 OAuth2 之后,相信很多人使用过、甚至开发过公众号网页服务、小程序,当我们进入网页、小程序界面,第一次使用就无需注册,直接使用微信授权登录即可,大大提高了使用效率。因为每个人都有微信号,有了微信就可以马上使用第三方服务,这体验不要太好了。而对于我们的服务来说,我们也不需要存储用户的密码,只要存储认证平台返回的唯一ID 和用户信息即可。
以上是使用了 OAuth2 的授权码模式,利用第三方的权威平台实现用户身份的认证。当然了,如果你的公司内部有很多个服务,可以专门提取出一个认证中心,这个认证中心就充当上面所说的权威认证平台的角色,所有的服务都要到这个认证中心做认证。
这样一说,发现没,这其实就是个单点登录的功能。这就是另外一种使用场景,对于多服务的平台,可以使用 OAuth2 实现服务的单点登录,只做一次登录,就可以在多个服务中自由穿行,当然仅限于授权范围内的服务和接口。
实现统一认证功能
本篇先介绍密码模式实现的单点登录,下一篇再继续说授权码模式。
在微服务横行的今天,谁敢说自己手上没几个微服务。微服务减少了服务间的耦合,同时也在某些方面增加了系统的复杂度,比如说用户认证。假设我们这里实现了一个电商平台,用户看到的就是一个 APP 或者一个 web 站点,实际上背后是由多个独立的服务构成的,比如用户服务、订单服务、产品服务等。用户只要第一次输入用户名、密码完成登录后,一段时间内,都可以任意访问各个页面,比如产品列表页面、我的订单页面、我的关注等页面。
我们可以想象一下,自然能够想到,在请求各个服务、各个接口的时候,一定携带着什么凭证,然后各个服务才知道请求接口的用户是哪个,不然肯定有问题,那其实这里面的凭证简单来说就是一个 Token,标识用户身份的 Token。
系统架构说明
认证中心:oauth2-auth-server,OAuth2 主要实现端,Token 的生成、刷新、验证都在认证中心完成。
订单服务:oauth2-client-order-server,微服务之一,接收到请求后会到认证中心验证。
用户服务:oauth2-client-user-server,微服务之二,接收到请求后会到认证中心验证。
客户端:例如 APP 端、web 端 等终端
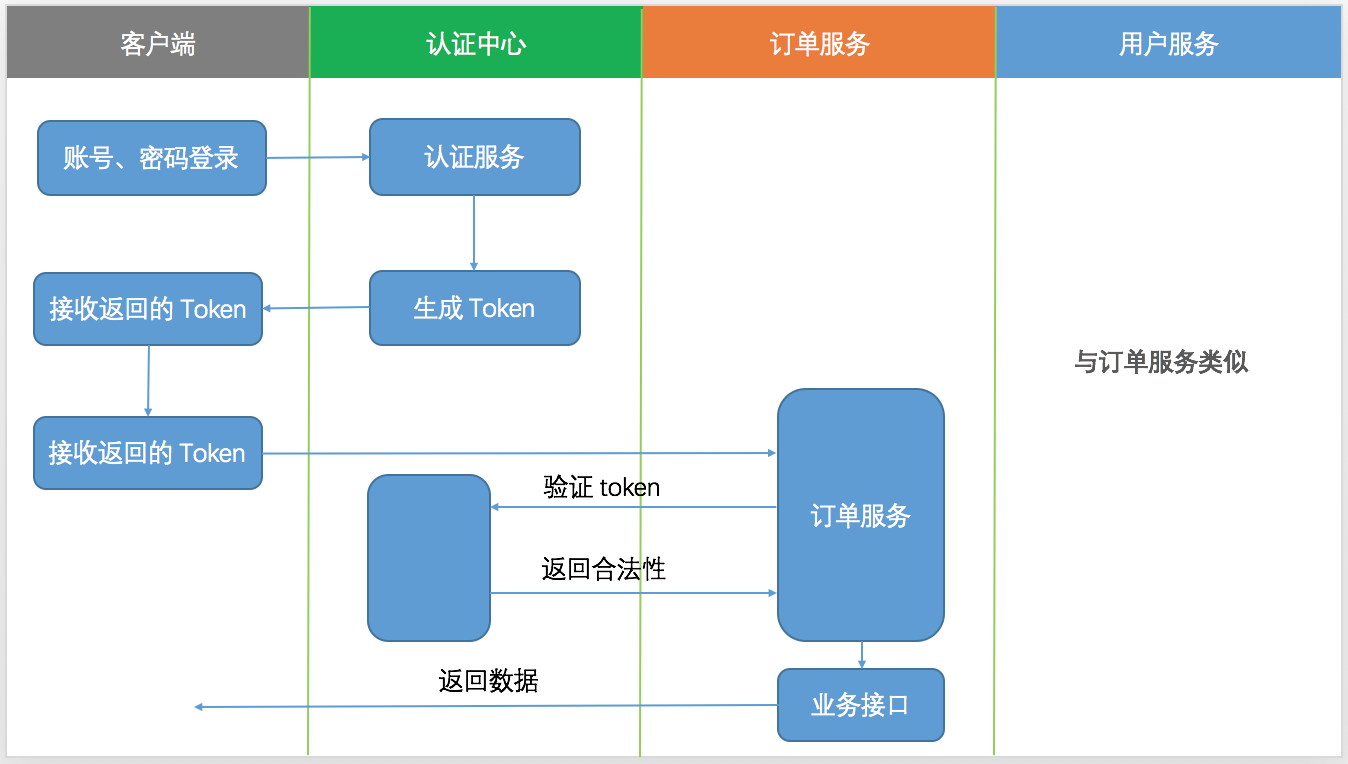
上图描述了使用了 OAuth2 的客户端与微服务间的请求过程。大致的过程就是客户端用用户名和密码到认证服务端换取 token,返回给客户端,客户端拿着 token 去各个微服务请求数据接口,一般这个 token 是放到 header 中的。当微服务接到请求后,先要拿着 token 去认证服务端检查 token 的合法性,如果合法,再根据用户所属的角色及具有的权限动态的返回数据。
创建并配置认证服务端
配置最多的就是认证服务端,验证账号、密码,存储 token,检查 token ,刷新 token 等都是认证服务端的工作。
1、引入需要的 maven 包
<dependency>
    <groupId>org.springframework.boot</groupId>
    <artifactId>spring-boot-starter-web</artifactId>
</dependency>
<dependency>
    <groupId>org.springframework.cloud</groupId>
    <artifactId>spring-cloud-starter-oauth2</artifactId>
</dependency>
<dependency>
    <groupId>org.springframework.boot</groupId>
    <artifactId>spring-boot-starter-data-redis</artifactId>
</dependency>
<dependency>
    <groupId>org.springframework.boot</groupId>
    <artifactId>spring-boot-starter-actuator</artifactId>
</dependency>
spring-cloud-starter-oauth2包含了 spring-cloud-starter-security,所以不用再单独引入了。之所以引入 redis 包,是因为下面会介绍一种用 redis 存储 token 的方式。
2、配置好 application.yml
将项目基本配置设置好,并加入有关 redis 的配置,稍后会用到。
spring:
  application:
    name: auth-server
  redis:
    database: 2
    host: localhost
    port: 32768
    password: 1qaz@WSX
    jedis:
      pool:
        max-active: 8
        max-idle: 8
        min-idle: 0
    timeout: 100ms

server:
  port: 6001

management:
  endpoint:
    health:
      enabled: true
3、spring security 基础配置
@EnableWebSecurity
public class WebSecurityConfig extends WebSecurityConfigurerAdapter {

    @Bean
    public PasswordEncoder passwordEncoder() {
        return new BCryptPasswordEncoder();
    }

    @Bean
    @Override
    public AuthenticationManager authenticationManagerBean() throws Exception {
        return super.authenticationManagerBean();
    }

    /**
     * 允许匿名访问所有接口 主要是 oauth 接口
     * @param http
     * @throws Exception
     */
    @Override
    protected void configure(HttpSecurity http) throws Exception {
        http.authorizeRequests()
                .antMatchers("/**").permitAll();
    }
}
使用@EnableWebSecurity注解修饰,并继承自WebSecurityConfigurerAdapter类。
这个类的重点就是声明 PasswordEncoder 和 AuthenticationManager两个 Bean。稍后会用到。其中 BCryptPasswordEncoder是一个密码加密工具类,它可以实现不可逆的加密,AuthenticationManager是为了实现 OAuth2 的 password 模式必须要指定的授权管理 Bean。
4、实现 UserDetailsService
如果你之前用过 Security 的话,那肯定对这个类很熟悉,它是实现用户身份验证的一种方式,也是最简单方便的一种。另外还有结合 AuthenticationProvider的方式,有机会讲 Security 的时候再展开来讲吧。
UserDetailsService的核心就是 loadUserByUsername方法,它要接收一个字符串参数,也就是传过来的用户名,返回一个 UserDetails对象。
@Slf4j
@Component(value = "kiteUserDetailsService")
public class KiteUserDetailsService implements UserDetailsService {


    @Autowired
    private PasswordEncoder passwordEncoder;

    @Override
    public UserDetails loadUserByUsername(String username) throws UsernameNotFoundException {
        log.info("usernameis:" + username);
        // 查询数据库操作
        if(!username.equals("admin")){
            throw new UsernameNotFoundException("the user is not found");
        }else{
            // 用户角色也应在数据库中获取
            String role = "ROLE_ADMIN";
            List<SimpleGrantedAuthority> authorities = new ArrayList<>();
            authorities.add(new SimpleGrantedAuthority(role));
            // 线上环境应该通过用户名查询数据库获取加密后的密码
            String password = passwordEncoder.encode("123456");
            return new org.springframework.security.core.userdetails.User(username,password, authorities);
        }
    }
}
这里为了做演示,把用户名、密码和所属角色都写在代码里了,正式环境中,这里应该是从数据库或者其他地方根据用户名将加密后的密码及所属角色查出来的。账号 admin ,密码 123456,稍后在换取 token 的时候会用到。并且给这个用户设置 "ROLE_ADMIN" 角色。
5、OAuth2 配置文件
创建一个配置文件继承自 AuthorizationServerConfigurerAdapter.
@Configuration
@EnableAuthorizationServer
public class OAuth2Config extends AuthorizationServerConfigurerAdapter {

    @Autowired
    public PasswordEncoder passwordEncoder;

    @Autowired
    public UserDetailsService kiteUserDetailsService;

    @Autowired
    private AuthenticationManager authenticationManager;

    @Autowired
    private TokenStore redisTokenStore;

    @Override
    public void configure(final AuthorizationServerEndpointsConfigurer endpoints) throws Exception {
        /**
         * redis token 方式
         */
        endpoints.authenticationManager(authenticationManager)
                .userDetailsService(kiteUserDetailsService)
                .tokenStore(redisTokenStore);

    }

    @Override
    public void configure(ClientDetailsServiceConfigurer clients) throws Exception {
        clients.inMemory()
                .withClient("order-client")
                .secret(passwordEncoder.encode("order-secret-8888"))
                .authorizedGrantTypes("refresh_token", "authorization_code", "password")
                .accessTokenValiditySeconds(3600)
                .scopes("all")
                .and()
                .withClient("user-client")
                .secret(passwordEncoder.encode("user-secret-8888"))
                .authorizedGrantTypes("refresh_token", "authorization_code", "password")
                .accessTokenValiditySeconds(3600)
                .scopes("all");
    }

    @Override
    public void configure(AuthorizationServerSecurityConfigurer security) throws Exception {
        security.allowFormAuthenticationForClients();
        security.checkTokenAccess("isAuthenticated()");
        security.tokenKeyAccess("isAuthenticated()");
    }
}
有三个 configure 方法的重写。
AuthorizationServerEndpointsConfigurer参数的重写
endpoints.authenticationManager(authenticationManager)
                .userDetailsService(kiteUserDetailsService)
                .tokenStore(redisTokenStore);
authenticationManage() 调用此方法才能支持 password 模式。
userDetailsService() 设置用户验证服务。
tokenStore() 指定 token 的存储方式。
redisTokenStore Bean 的定义如下:
@Configuration
public class RedisTokenStoreConfig {

    @Autowired
    private RedisConnectionFactory redisConnectionFactory;

    @Bean
    public TokenStore redisTokenStore (){
        return new RedisTokenStore(redisConnectionFactory);
    }
}
ClientDetailsServiceConfigurer参数的重写,在这里定义各个端的约束条件。包括
ClientId、Client-Secret:这两个参数对应请求端定义的 cleint-id 和 client-secret
authorizedGrantTypes 可以包括如下几种设置中的一种或多种:
- authorization_code:授权码类型。
- implicit:隐式授权类型。
- password:资源所有者(即用户)密码类型。
- client_credentials:客户端凭据(客户端ID以及Key)类型。
- refresh_token:通过以上授权获得的刷新令牌来获取新的令牌。
accessTokenValiditySeconds:token 的有效期
scopes:用来限制客户端访问的权限,在换取的 token 的时候会带上 scope 参数,只有在 scopes 定义内的,才可以正常换取 token。
上面代码中是使用 inMemory 方式存储的,将配置保存到内存中,相当于硬编码了。正式环境下的做法是持久化到数据库中,比如 mysql 中。
具体的做法如下:
- 在数据库中增加表,并插入数据
create table oauth_client_details (
    client_id VARCHAR(256) PRIMARY KEY,
    resource_ids VARCHAR(256),
    client_secret VARCHAR(256),
    scope VARCHAR(256),
    authorized_grant_types VARCHAR(256),
    web_server_redirect_uri VARCHAR(256),
    authorities VARCHAR(256),
    access_token_validity INTEGER,
    refresh_token_validity INTEGER,
    additional_information VARCHAR(4096),
    autoapprove VARCHAR(256)
);
INSERT INTO oauth_client_details
    (client_id, client_secret, scope, authorized_grant_types,
    web_server_redirect_uri, authorities, access_token_validity,
    refresh_token_validity, additional_information, autoapprove)
VALUES
    ('user-client', '$2a$10$o2l5kA7z.Caekp72h5kU7uqdTDrlamLq.57M1F6ulJln9tRtOJufq', 'all',
    'authorization_code,refresh_token,password', null, null, 3600, 36000, null, true);

INSERT INTO oauth_client_details
    (client_id, client_secret, scope, authorized_grant_types,
    web_server_redirect_uri, authorities, access_token_validity,
    refresh_token_validity, additional_information, autoapprove)
VALUES
    ('order-client', '$2a$10$GoIOhjqFKVyrabUNcie8d.ADX.qZSxpYbO6YK4L2gsNzlCIxEUDlW', 'all',
    'authorization_code,refresh_token,password', null, null, 3600, 36000, null, true);
注意: client_secret 字段不能直接是 secret 的原始值,需要经过加密。因为是用的 BCryptPasswordEncoder,所以最终插入的值应该是经过 BCryptPasswordEncoder.encode()之后的值。
- 然后在配置文件 application.yml 中添加关于数据库的配置
spring:
  datasource:
    url: jdbc:mysql://localhost:3306/spring_cloud?characterEncoding=UTF-8&useSSL=false
    username: root
    password: password
    hikari:
      connection-timeout: 30000
      idle-timeout: 600000
      max-lifetime: 1800000
      maximum-pool-size: 9
Spring Boot 2.0 之后默认使用 hikari 作为数据库连接池。如果使用其他连接池需要引入相关包,然后对应的增加配置。
- 在 OAuth2 配置类(OAuth2Config)中增加 DataSource 的注入
@Autowired
private DataSource dataSource;
- 将
public void configure(ClientDetailsServiceConfigurer clients)重写方法修改为如下:
@Override
public void configure(ClientDetailsServiceConfigurer clients) throws Exception {
	JdbcClientDetailsServiceBuilder jcsb = clients.jdbc(dataSource);
	jcsb.passwordEncoder(passwordEncoder);
}
还有一个重写的方法 public void configure(AuthorizationServerSecurityConfigurer security),这个方法限制客户端访问认证接口的权限。
security.allowFormAuthenticationForClients();
security.checkTokenAccess("isAuthenticated()");
security.tokenKeyAccess("isAuthenticated()");
第一行代码是允许客户端访问 OAuth2 授权接口,否则请求 token 会返回 401。
第二行和第三行分别是允许已授权用户访问 checkToken 接口和获取 token 接口。
完成之后,启动项目,如果你用的是 IDEA 会在下方的 Mapping 窗口中看到 oauth2 相关的 RESTful 接口。
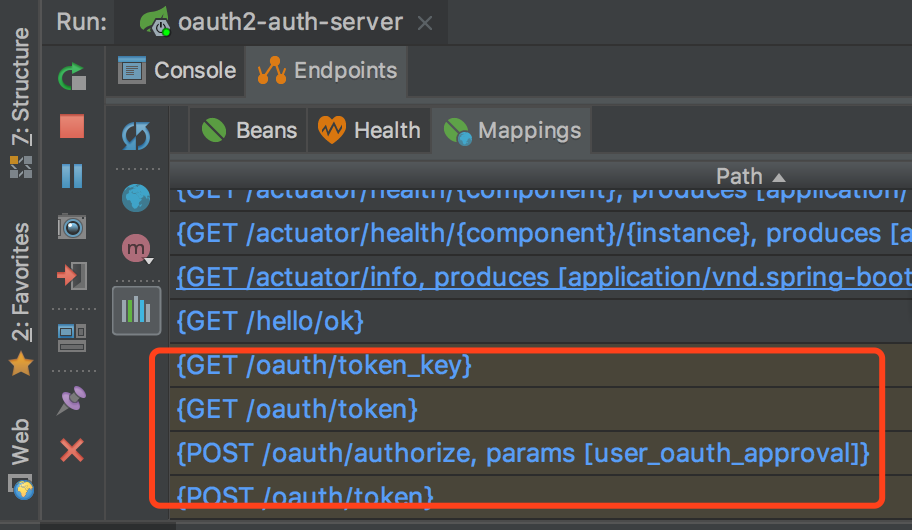
主要有如下几个:
POST /oauth/authorize  授权码模式认证授权接口
GET/POST /oauth/token  获取 token 的接口
POST  /oauth/check_token  检查 token 合法性接口
创建用户客户端项目
上面创建完成了认证服务端,下面开始创建一个客户端,对应到我们系统中的业务相关的微服务。我们假设这个微服务项目是管理用户相关数据的,所以叫做用户客户端。
1、引用相关的 maven 包
<dependency>
    <groupId>org.springframework.boot</groupId>
    <artifactId>spring-boot-starter-web</artifactId>
</dependency>
<dependency>
    <groupId>org.springframework.cloud</groupId>
    <artifactId>spring-cloud-starter-oauth2</artifactId>
</dependency>
<dependency>
    <groupId>org.springframework.boot</groupId>
    <artifactId>spring-boot-starter-data-redis</artifactId>
</dependency>
2、application.yml 配置文件
spring:
  application:
    name: client-user
  redis:
    database: 2
    host: localhost
    port: 32768
    password: 1qaz@WSX
    jedis:
      pool:
        max-active: 8
        max-idle: 8
        min-idle: 0
    timeout: 100ms
server:
  port: 6101
  servlet:
    context-path: /client-user

security:
  oauth2:
    client:
      client-id: user-client
      client-secret: user-secret-8888
      user-authorization-uri: http://localhost:6001/oauth/authorize
      access-token-uri: http://localhost:6001/oauth/token
    resource:
      id: user-client
      user-info-uri: user-info
    authorization:
      check-token-access: http://localhost:6001/oauth/check_token
上面是常规配置信息以及 redis 配置,重点是下面的 security 的配置,这里的配置稍有不注意就会出现 401 或者其他问题。
client-id、client-secret 要和认证服务中的配置一致,如果是使用 inMemory 还是 jdbc 方式。
user-authorization-uri 是授权码认证方式需要的,下一篇文章再说。
access-token-uri 是密码模式需要用到的获取 token 的接口。
authorization.check-token-access 也是关键信息,当此服务端接收到来自客户端端的请求后,需要拿着请求中的 token 到认证服务端做 token 验证,就是请求的这个接口
3、资源配置文件
在 OAuth2 的概念里,所有的接口都被称为资源,接口的权限也就是资源的权限,所以 Spring Security OAuth2 中提供了关于资源的注解 @EnableResourceServer,和 @EnableWebSecurity的作用类似。
@Configuration
@EnableResourceServer
@EnableGlobalMethodSecurity(prePostEnabled = true)
public class ResourceServerConfig extends ResourceServerConfigurerAdapter {

    @Value("${security.oauth2.client.client-id}")
    private String clientId;

    @Value("${security.oauth2.client.client-secret}")
    private String secret;

    @Value("${security.oauth2.authorization.check-token-access}")
    private String checkTokenEndpointUrl;

    @Autowired
    private RedisConnectionFactory redisConnectionFactory;

    @Bean
    public TokenStore redisTokenStore (){
        return new RedisTokenStore(redisConnectionFactory);
    }

    @Bean
    public RemoteTokenServices tokenService() {
        RemoteTokenServices tokenService = new RemoteTokenServices();
        tokenService.setClientId(clientId);
        tokenService.setClientSecret(secret);
        tokenService.setCheckTokenEndpointUrl(checkTokenEndpointUrl);
        return tokenService;
    }

    @Override
    public void configure(ResourceServerSecurityConfigurer resources) throws Exception {
        resources.tokenServices(tokenService());
    }
}
因为使用的是 redis 作为 token 的存储,所以需要特殊配置一下叫做 tokenService 的 Bean,通过这个 Bean 才能实现 token 的验证。
4、最后,添加一个 RESTful 接口
@Slf4j
@RestController
public class UserController {

    @GetMapping(value = "get")
    //@PreAuthorize("hasAuthority('ROLE_ADMIN')")
    @PreAuthorize("hasAnyRole('ROLE_ADMIN')")
    public Object get(Authentication authentication){
        //Authentication authentication = SecurityContextHolder.getContext().getAuthentication();
        authentication.getCredentials();
        OAuth2AuthenticationDetails details = (OAuth2AuthenticationDetails)authentication.getDetails();
        String token = details.getTokenValue();
        return token;
    }
}
一个 RESTful 方法,只有当访问用户具有 ROLE_ADMIN 权限时才能访问,否则返回 401 未授权。
通过 Authentication 参数或者 SecurityContextHolder.getContext().getAuthentication() 可以拿到授权信息进行查看。
测试认证功能
1、启动认证服务端,启动端口为 6001
2、启动用户服务客户端,启动端口为6101
3、请求认证服务端获取 token
我是用 REST Client 来做访问请求的,请求格式如下:
POST http://localhost:6001/oauth/token?grant_type=password&username=admin&password=123456&scope=all
Accept: */*
Cache-Control: no-cache
Authorization: Basic dXNlci1jbGllbnQ6dXNlci1zZWNyZXQtODg4OA==
假设咱们在一个 web 端使用,grant_type 是 password,表明这是使用 OAuth2 的密码模式。
username=admin 和 password=123456 就相当于在 web 端登录界面输入的用户名和密码,我们在认证服务端配置中固定了用户名是 admin 、密码是 123456,而线上环境中则应该通过查询数据库获取。
scope=all 是权限有关的,在认证服务的 OAuthConfig 中指定了 scope 为 all 。
Authorization 要加在请求头中,格式为 Basic 空格 base64(clientId:clientSecret),这个微服务客户端的 client-id 是 user-client,client-secret 是 user-secret-8888,将这两个值通过冒号连接,并使用 base64 编码(user-client:user-secret-8888)之后的值为 dXNlci1jbGllbnQ6dXNlci1zZWNyZXQtODg4OA==,可以通过 https://www.sojson.com/base64.html 在线编码获取。

运行请求后,如果参数都正确的话,获取到的返回内容如下,是一段 json 格式
{
  "access_token": "9f958300-5005-46ea-9061-323c9e6c7a4d",
  "token_type": "bearer",
  "refresh_token": "0f5871f5-98f1-405e-848e-80f641bab72e",
  "expires_in": 3599,
  "scope": "all"
}
access_token : 就是之后请求需要带上的 token,也是本次请求的主要目的
token_type:为 bearer,这是 access token 最常用的一种形式
refresh_token:之后可以用这个值来换取新的 token,而不用输入账号密码
expires_in:token 的过期时间(秒)
4、用获取到的 token 请求资源接口
我们在用户客户端中定义了一个接口 http://localhost:6101/client-user/get,现在就拿着上一步获取的 token 来请求这个接口。
GET http://localhost:6101/client-user/get
Accept: */*
Cache-Control: no-cache
Authorization: bearer ce334918-e666-455a-8ecd-8bd680415d84
同样需要请求头 Authorization,格式为 bearer + 空格 + token,正常情况下根据接口的逻辑,会把 token 原样返回。
5、token 过期后,用 refresh_token 换取 access_token
一般都会设置 access_token 的过期时间小于 refresh_token 的过期时间,以便在 access_token 过期后,不用用户再次登录的情况下,获取新的 access_token。
### 换取 access_token
POST http://localhost:6001/oauth/token?grant_type=refresh_token&refresh_token=706dac10-d48e-4795-8379-efe8307a2282
Accept: */*
Cache-Control: no-cache
Authorization: Basic dXNlci1jbGllbnQ6dXNlci1zZWNyZXQtODg4OA==
grant_type 设置为 refresh_token。
refresh_token 设置为请求 token 时返回的 refresh_token 的值。
请求头加入 Authorization,格式依然是 Basic + 空格 + base64(client-id:client-secret)
请求成功后会返回和请求 token 同样的数据格式。
用 JWT 替换 redisToken
上面 token 的存储用的是 redis 的方案,Spring Security OAuth2 还提供了 jdbc 和 jwt 的支持,jdbc 的暂不考虑,现在来介绍用 JWT 的方式来实现 token 的存储。
用 JWT 的方式就不用把 token 再存储到服务端了,JWT 有自己特殊的加密方式,可以有效的防止数据被篡改,只要不把用户密码等关键信息放到 JWT 里就可以保证安全性。
认证服务端改造
先把有关 redis 的配置去掉。
添加 JwtConfig 配置类
@Configuration
public class JwtTokenConfig {

    @Bean
    public TokenStore jwtTokenStore() {
        return new JwtTokenStore(jwtAccessTokenConverter());
    }

    @Bean
    public JwtAccessTokenConverter jwtAccessTokenConverter() {
        JwtAccessTokenConverter accessTokenConverter = new JwtAccessTokenConverter();
        accessTokenConverter.setSigningKey("dev");
        return accessTokenConverter;
    }
}
JwtAccessTokenConverter是为了做 JWT 数据转换,这样做是因为 JWT 有自身独特的数据格式。如果没有了解过 JWT ,可以搜索一下先了解一下。
更改 OAuthConfig 配置类
@Autowired
private TokenStore jwtTokenStore;

@Autowired
private JwtAccessTokenConverter jwtAccessTokenConverter;

@Override
public void configure(final AuthorizationServerEndpointsConfigurer endpoints) throws Exception {
        /**
         * 普通 jwt 模式
         */
         endpoints.tokenStore(jwtTokenStore)
                .accessTokenConverter(jwtAccessTokenConverter)
                .userDetailsService(kiteUserDetailsService)
                /**
                 * 支持 password 模式
                 */
                .authenticationManager(authenticationManager);
}
注入 JWT 相关的 Bean,然后修改 configure(final AuthorizationServerEndpointsConfigurer endpoints) 方法为 JWT 存储模式。
改造用户客户端
修改 application.yml 配置文件
security:
  oauth2:
    client:
      client-id: user-client
      client-secret: user-secret-8888
      user-authorization-uri: http://localhost:6001/oauth/authorize
      access-token-uri: http://localhost:6001/oauth/token
    resource:
      jwt:
        key-uri: http://localhost:6001/oauth/token_key
        key-value: dev
注意认证服务端 JwtAccessTokenConverter设置的 SigningKey 要和配置文件中的 key-value 相同,不然会导致无法正常解码 JWT ,导致验证不通过。
ResourceServerConfig 类的配置
@Configuration
@EnableResourceServer
@EnableGlobalMethodSecurity(prePostEnabled = true)
public class ResourceServerConfig extends ResourceServerConfigurerAdapter {
    @Bean
    public TokenStore jwtTokenStore() {
        return new JwtTokenStore(jwtAccessTokenConverter());
    }

    @Bean
    public JwtAccessTokenConverter jwtAccessTokenConverter() {
        JwtAccessTokenConverter accessTokenConverter = new JwtAccessTokenConverter();

        accessTokenConverter.setSigningKey("dev");
        accessTokenConverter.setVerifierKey("dev");
        return accessTokenConverter;
    }

    @Autowired
    private TokenStore jwtTokenStore;

    @Override
    public void configure(ResourceServerSecurityConfigurer resources) throws Exception {
        resources.tokenStore(jwtTokenStore);
    }
}
运行请求 token 接口的请求
POST http://localhost:6001/oauth/token?grant_type=password&username=admin&password=123456&scope=all
Accept: */*
Cache-Control: no-cache
Authorization: Basic dXNlci1jbGllbnQ6dXNlci1zZWNyZXQtODg4OA==
返回结果如下:
{
  "access_token": "eyJhbGciOiJIUzI1NiIsInR5cCI6IkpXVCJ9.eyJleHAiOjE1NzE3NDM0OTQsInVzZXJfbmFtZSI6ImFkbWluIiwiYXV0aG9yaXRpZXMiOlsiUk9MRV9BRE1JTiJdLCJqdGkiOiI4Y2NhMjlhZi1lYTc3LTRmZTYtOWZlMS0zMjc0MTVkY2QyMWQiLCJjbGllbnRfaWQiOiJ1c2VyLWNsaWVudCIsInNjb3BlIjpbImFsbCJdfQ.0Ik3UwB1xjX2le5luEdtVAI_MEyu_OloRRYtPOvtvwM",
  "token_type": "bearer",
  "refresh_token": "eyJhbGciOiJIUzI1NiIsInR5cCI6IkpXVCJ9.eyJ1c2VyX25hbWUiOiJhZG1pbiIsInNjb3BlIjpbImFsbCJdLCJhdGkiOiI4Y2NhMjlhZi1lYTc3LTRmZTYtOWZlMS0zMjc0MTVkY2QyMWQiLCJleHAiOjE1NzE3NzU4OTQsImF1dGhvcml0aWVzIjpbIlJPTEVfQURNSU4iXSwianRpIjoiZjdkMjg4NDUtMmU2ZC00ZmRjLTg1OGYtMWNiY2RlNzI1ZmMyIiwiY2xpZW50X2lkIjoidXNlci1jbGllbnQifQ.vk_msYtbrAr93h5sK4wy6EC2_wRD_cD_UBS8O6eRziw",
  "expires_in": 3599,
  "scope": "all",
  "jti": "8cca29af-ea77-4fe6-9fe1-327415dcd21d"
}
我们已经看到返回的 token 是 JWT 格式了,到 JWT 在线解码网站 https://jwt.io/ 或者 http://jwt.calebb.net/将 token 解码看一下
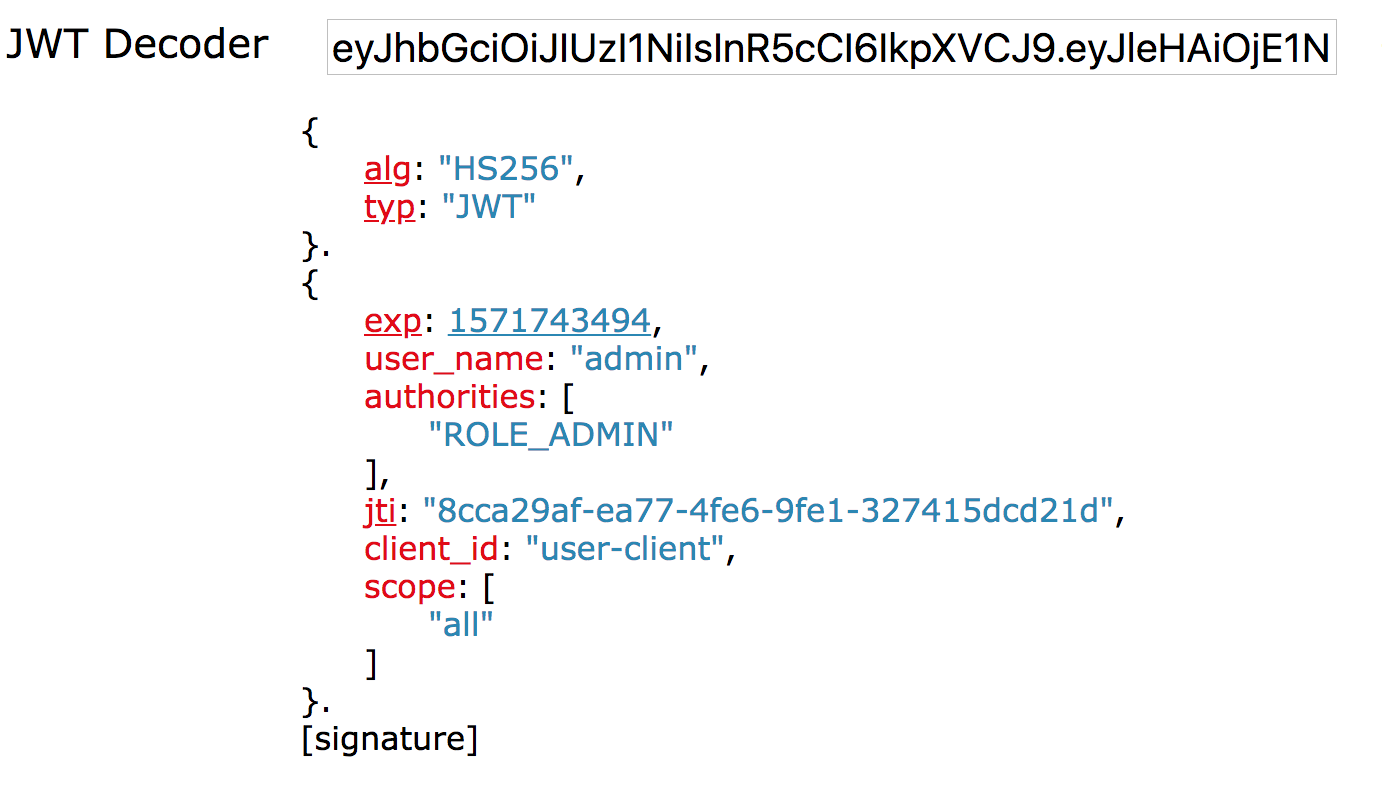
看到了没,user_name、client_id 等信息都在其中。
拿着返回的 token 请求用户客户端接口
GET http://localhost:6101/client-user/get
Accept: */*
Cache-Control: no-cache
Authorization: bearer eyJhbGciOiJIUzI1NiIsInR5cCI6IkpXVCJ9.eyJleHAiOjE1NzE3NDM0OTQsInVzZXJfbmFtZSI6ImFkbWluIiwiYXV0aG9yaXRpZXMiOlsiUk9MRV9BRE1JTiJdLCJqdGkiOiI4Y2NhMjlhZi1lYTc3LTRmZTYtOWZlMS0zMjc0MTVkY2QyMWQiLCJjbGllbnRfaWQiOiJ1c2VyLWNsaWVudCIsInNjb3BlIjpbImFsbCJdfQ.0Ik3UwB1xjX2le5luEdtVAI_MEyu_OloRRYtPOvtvwM
增强 JWT
如果我想在 JWT 中加入额外的字段(比方说用户的其他信息)怎么办呢,当然可以。spring security oauth2 提供了 TokenEnhancer 增强器。其实不光 JWT ,RedisToken 的方式同样可以。
声明一个增强器
public class JWTokenEnhancer implements TokenEnhancer {

    @Override
    public OAuth2AccessToken enhance(OAuth2AccessToken oAuth2AccessToken, OAuth2Authentication oAuth2Authentication) {
        Map<String, Object> info = new HashMap<>();
        info.put("jwt-ext", "JWT 扩展信息");
        ((DefaultOAuth2AccessToken) oAuth2AccessToken).setAdditionalInformation(info);
        return oAuth2AccessToken;
    }
}
通过 oAuth2Authentication 可以拿到用户名等信息,通过这些我们可以在这里查询数据库或者缓存获取更多的信息,而这些信息都可以作为 JWT 扩展信息加入其中。
OAuthConfig 配置类修改
注入增强器
@Autowired
private TokenEnhancer jwtTokenEnhancer;

@Bean
public TokenEnhancer jwtTokenEnhancer(){
    return new JWTokenEnhancer();
}
修改 configure(final AuthorizationServerEndpointsConfigurer endpoints) 方法
@Override
public void configure( final AuthorizationServerEndpointsConfigurer endpoints ) throws Exception{
	/**
	 * jwt 增强模式
	 */
	TokenEnhancerChain	enhancerChain	= new TokenEnhancerChain();
	List<TokenEnhancer>	enhancerList	= new ArrayList<>();
	enhancerList.add( jwtTokenEnhancer );
	enhancerList.add( jwtAccessTokenConverter );
	enhancerChain.setTokenEnhancers( enhancerList );
	endpoints.tokenStore( jwtTokenStore )
	.userDetailsService( kiteUserDetailsService )
	/**
	 * 支持 password 模式
	 */
	.authenticationManager( authenticationManager )
	.tokenEnhancer( enhancerChain )
	.accessTokenConverter( jwtAccessTokenConverter );
}
再次请求 token ,返回内容中多了个刚刚加入的 jwt-ext 字段
{
  "access_token": "eyJhbGciOiJIUzI1NiIsInR5cCI6IkpXVCJ9.eyJ1c2VyX25hbWUiOiJhZG1pbiIsImp3dC1leHQiOiJKV1Qg5omp5bGV5L-h5oGvIiwic2NvcGUiOlsiYWxsIl0sImV4cCI6MTU3MTc0NTE3OCwiYXV0aG9yaXRpZXMiOlsiUk9MRV9BRE1JTiJdLCJqdGkiOiJhNDU1MWQ5ZS1iN2VkLTQ3NTktYjJmMS1mMGI5YjIxY2E0MmMiLCJjbGllbnRfaWQiOiJ1c2VyLWNsaWVudCJ9.5j4hNsVpktG2iKxNqR-q1rfcnhlyV3M6HUBx5cd6PiQ",
  "token_type": "bearer",
  "refresh_token": "eyJhbGciOiJIUzI1NiIsInR5cCI6IkpXVCJ9.eyJ1c2VyX25hbWUiOiJhZG1pbiIsImp3dC1leHQiOiJKV1Qg5omp5bGV5L-h5oGvIiwic2NvcGUiOlsiYWxsIl0sImF0aSI6ImE0NTUxZDllLWI3ZWQtNDc1OS1iMmYxLWYwYjliMjFjYTQyYyIsImV4cCI6MTU3MTc3NzU3OCwiYXV0aG9yaXRpZXMiOlsiUk9MRV9BRE1JTiJdLCJqdGkiOiJmNTI3ODJlOS0wOGRjLTQ2NGUtYmJhYy03OTMwNzYwYmZiZjciLCJjbGllbnRfaWQiOiJ1c2VyLWNsaWVudCJ9.UQMf140CG8U0eWh08nGlctpIye9iJ7p2i6NYHkGAwhY",
  "expires_in": 3599,
  "scope": "all",
  "jwt-ext": "JWT 扩展信息",
  "jti": "a4551d9e-b7ed-4759-b2f1-f0b9b21ca42c"
}
用户客户端解析 JWT 数据
我们如果在 JWT 中加入了额外信息,这些信息我们可能会用到,而在接收到 JWT 格式的 token 之后,用户客户端要把 JWT 解析出来。
引入 JWT 包
<dependency>
    <groupId>io.jsonwebtoken</groupId>
    <artifactId>jjwt</artifactId>
    <version>0.9.1</version>
</dependency>
加一个 RESTful 接口,在其中解析 JWT
@GetMapping(value = "jwt")
@PreAuthorize("hasAnyRole('ROLE_ADMIN')")
public Object jwtParser(Authentication authentication){
    authentication.getCredentials();
    OAuth2AuthenticationDetails details = (OAuth2AuthenticationDetails)authentication.getDetails();
    String jwtToken = details.getTokenValue();
    Claims claims = Jwts.parser()
                .setSigningKey("dev".getBytes(StandardCharsets.UTF_8))
                .parseClaimsJws(jwtToken)
                .getBody();
    return claims;
}
同样注意其中签名的设置要与认证服务端相同。
用上一步的 token 请求上面的接口
### 解析 jwt
GET http://localhost:6101/client-user/jwt
Accept: */*
Cache-Control: no-cache
Authorization: bearer eyJhbGciOiJIUzI1NiIsInR5cCI6IkpXVCJ9.eyJ1c2VyX25hbWUiOiJhZG1pbiIsImp3dC1leHQiOiJKV1Qg5omp5bGV5L-h5oGvIiwic2NvcGUiOlsiYWxsIl0sImV4cCI6MTU3MTc0NTE3OCwiYXV0aG9yaXRpZXMiOlsiUk9MRV9BRE1JTiJdLCJqdGkiOiJhNDU1MWQ5ZS1iN2VkLTQ3NTktYjJmMS1mMGI5YjIxY2E0MmMiLCJjbGllbnRfaWQiOiJ1c2VyLWNsaWVudCJ9.5j4hNsVpktG2iKxNqR-q1rfcnhlyV3M6HUBx5cd6PiQ
返回内容如下:
{
  "user_name": "admin",
  "jwt-ext": "JWT 扩展信息",
  "scope": [
    "all"
  ],
  "exp": 1571745178,
  "authorities": [
    "ROLE_ADMIN"
  ],
  "jti": "a4551d9e-b7ed-4759-b2f1-f0b9b21ca42c",
  "client_id": "user-client"
}
以上就是 password 模式的完整过程,源码放到了 github 上,有需要的可以去看一下。
不要吝惜你的「推荐」呦
欢迎关注,不定期更新本系列和其他文章
古时的风筝 ,进入公众号可以加入交流群