一、Java环境
yum 安装方式安装
1、搜索JDK安装包
yum search java|grep jdk

2、安装
yum install java-1.8.0-openjdk-src.x86_64
3、查看安装结果
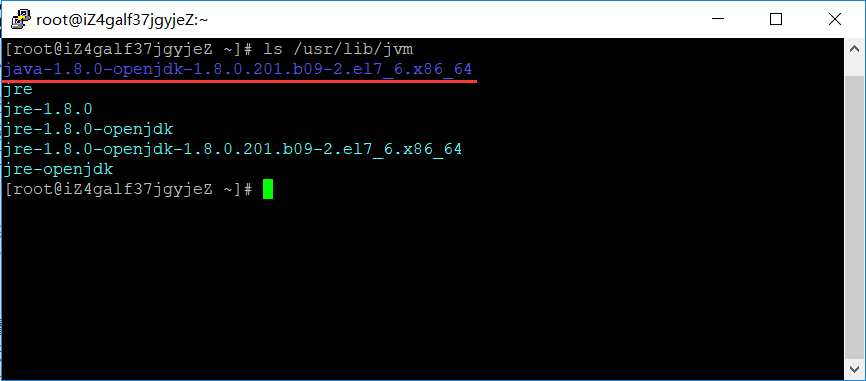
java -version 通过yum默认安装的路径为 /usr/lib/jvm 可以通过cd /usr/lib/jvm 命令 查看
4、配置环境变量
JDK默认安装路径/usr/lib/jvm
4.1 查看JDK默认安装路径/usr/lib/jvm
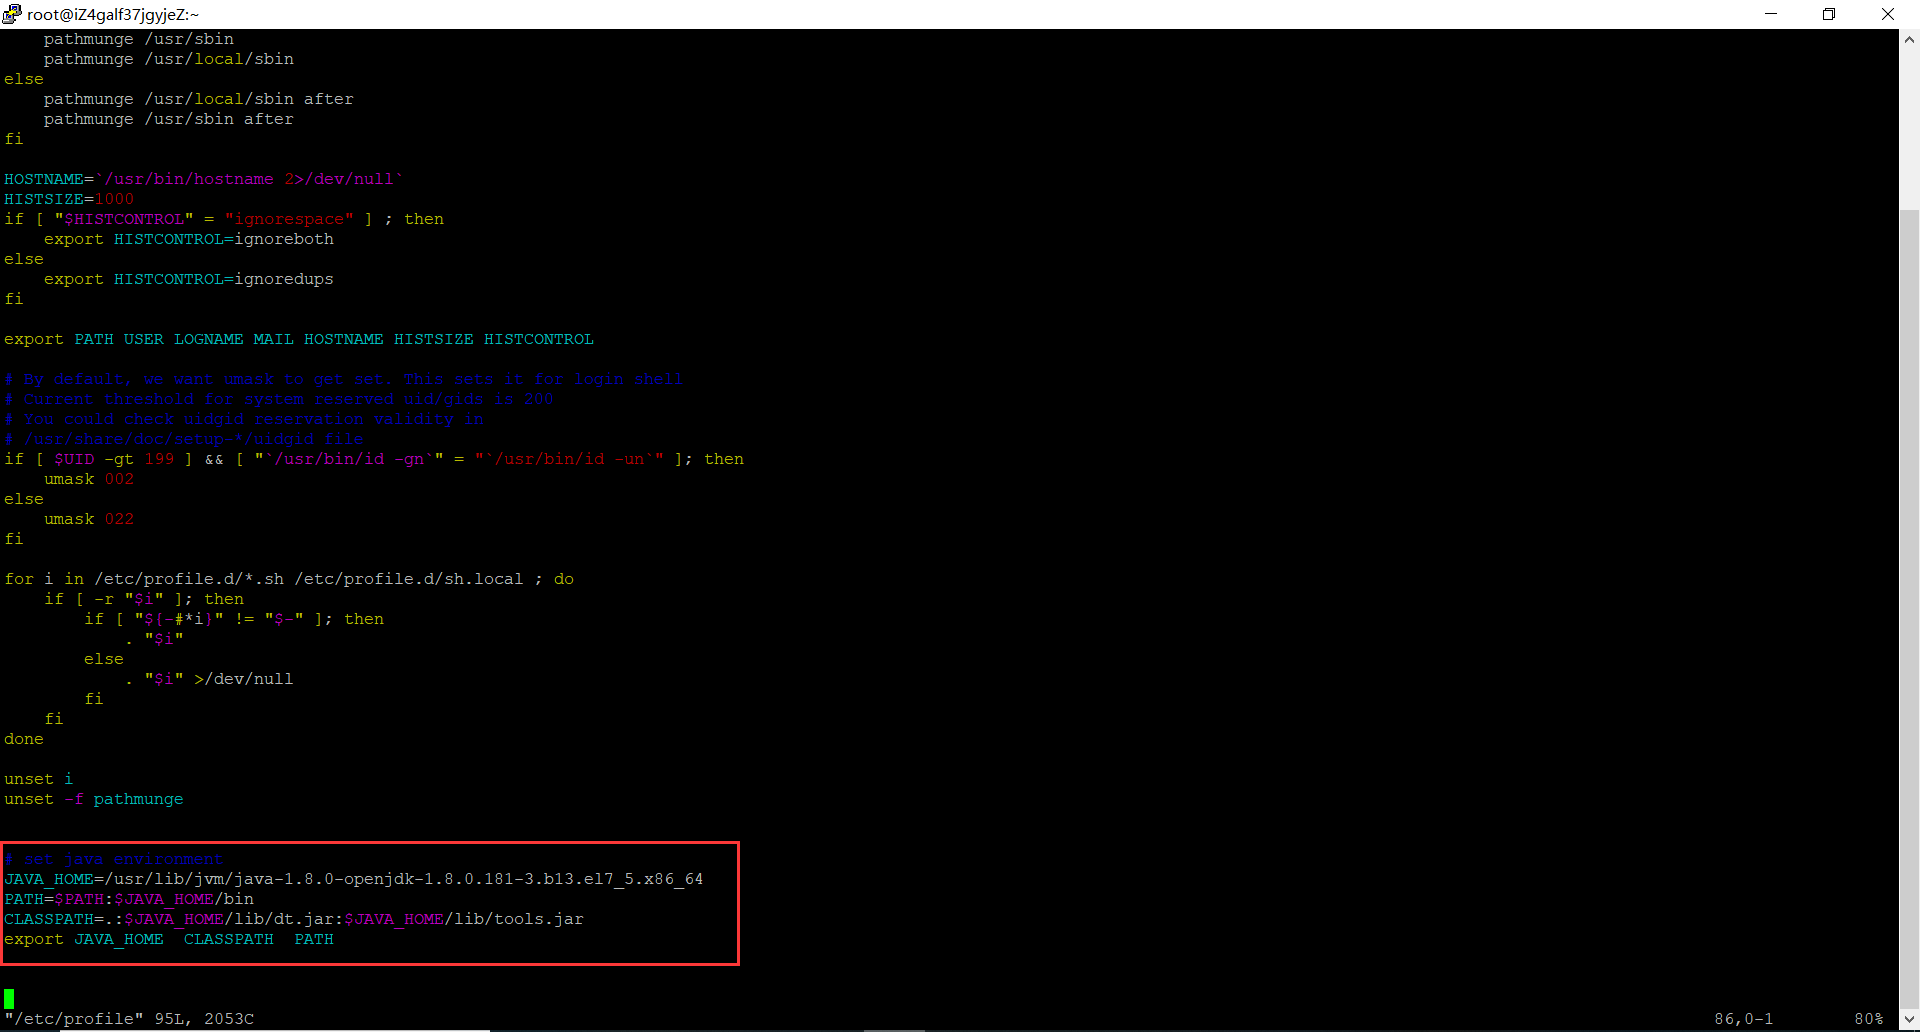
4.2在/etc/profile文件添加如下命令
# set java environment
JAVA_HOME=/usr/lib/jvm/java-1.8.0-openjdk-1.8.0.181-3.b13.el7_5.x86_64
PATH=$PATH:$JAVA_HOME/bin
CLASSPATH=.:$JAVA_HOME/lib/dt.jar:$JAVA_HOME/lib/tools.jar
export JAVA_HOME  CLASSPATH  PATH
4.3保存关闭profile文件,执行如下命令生效
source /etc/profile
4.4使用如下命令,查看JDK变量
 echo $JAVA_HOME
 echo $PATH
 echo $CLASSPATH

二、SSH 无密码验证配置
1、SSH介绍
1.1 SSH的好处:
在linux系统中,ssh是远程登录的默认工具,因为该工具的协议使用了RSA/DSA的加密算法.该工具做linux系统的远程管理是非常安全的。telnet,因为其不安全性,在linux系统中被搁置使用了。
1.2 SSH的原理:
Master(NameNode | JobTracker)作为客户端,要实现无密码公钥认证,连接到服务器Salve(DataNode | Tasktracker)上时,需要在Master上生成一个密钥对,包括一个公钥和一个私钥,而后将公钥复制到所有的Slave上。当Master通过SSH连接Salve时,Salve就会生成一个随机数并用Master的公钥对随机数进行加密,并发送给Master。Master收到加密数之后再用私钥解密,并将解密数回传给Slave,Slave确认解密数无误之后就允许Master进行连接了。这就是一个公钥认证过程,其间不需要用户手工输入密码。重要过程是将客户端Master复制到Slave上。
1.3 SSH的为什么要使用无密码验证设置:
Hadoop启动以后,NameNode是通过SSH(Secure Shell)来启动和停止各个DataNode上的各种守护进程的。
节点之间执行指令的时候是不需要输入密码的形式,故我们需要配置SSH运用无密码公钥认证的形式,这样NameNode使用SSH无密码登录并启动DataName进程,同样原理,DataNode上也能使用SSH无密码登录到NameNode。
2、配置
那么我们想要的结果是在 master 机器上能不输入密码直接登录到 slave1 和 slave2 机器上。反之在 slave1 上能不输入密码登录到 master 和 slave2 机器上。
首先我们配置从 master 机器上不输入密码登录到 slave1 机器上。
第一步:确认系统已经安装了 SSH
我们需要两个服务,ssh和rsync。可以通过下面命令查看结果显示如下:
rpm –qa | grep openssh
rpm –qa | grep rsync

则表示没安装,通过以下命令安装
master 机器上生成 秘钥对
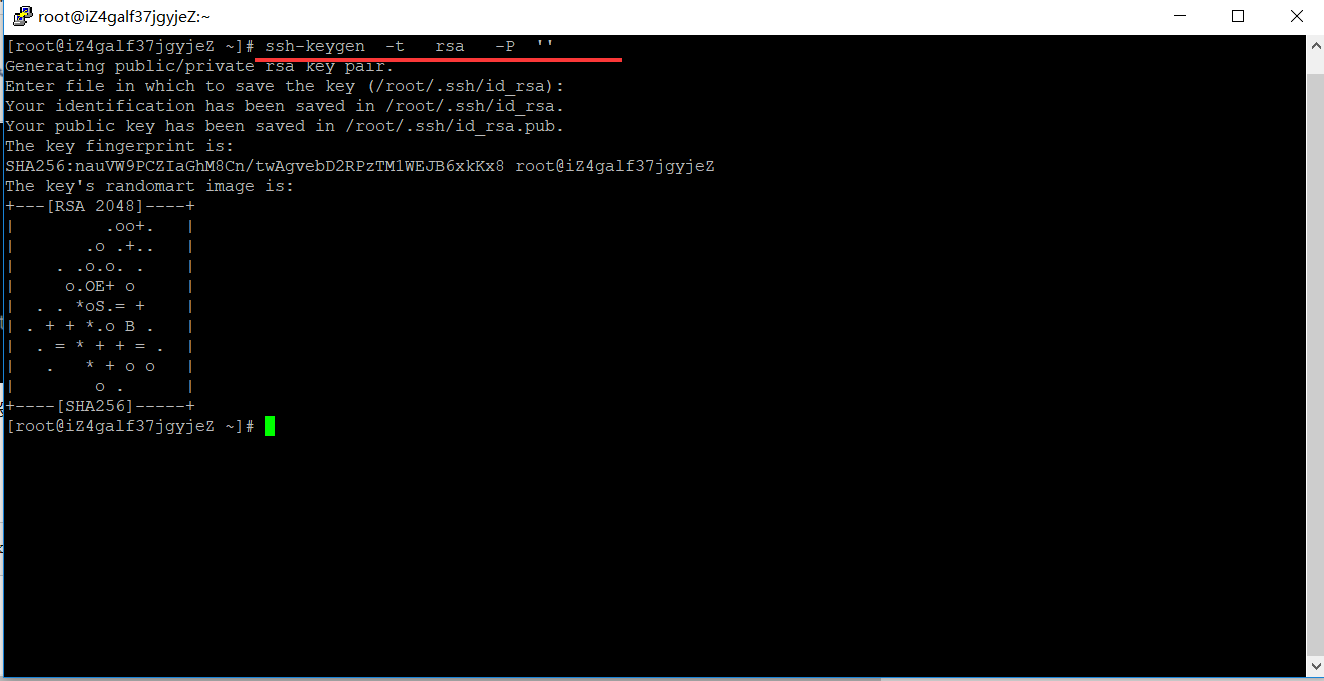
在 master 机器上输入一下命令:
ssh-keygen -t rsa -P ''
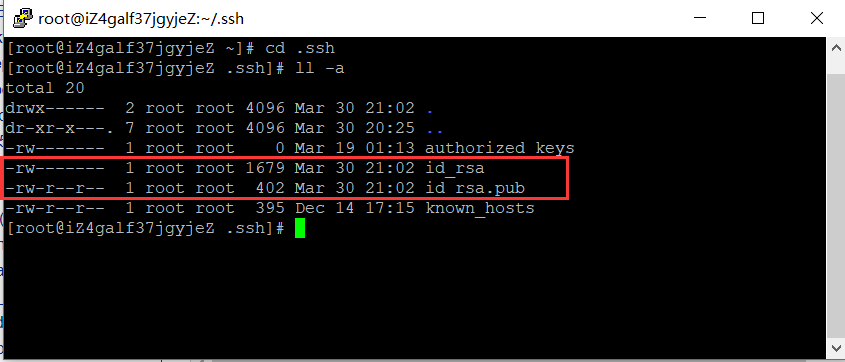
这条命令是生成无密码秘钥对,rsa 是加密算法,-P '' 表示密码为空。询问其保存路径时直接回车采用默认路径。生成的密钥对:id_rsa和id_rsa.pub,默认存储在"/root/.ssh"目录下。
查看"/home/hadoop/"下是否有".ssh"文件夹,且".ssh"文件下是否有两个刚生产的无密码密钥对。
创建authorized_keys文件并将密钥写入
touch /root/.ssh/authorized_keys
查看下,是否创建成功
[root@hadoop01 .ssh]# ls   /root/.ssh/
authorized_keys  id_rsa  id_rsa.pub
[root@hadoop01 .ssh]#
或者把公钥 id_rsa.pub追加到授权的key里面去。
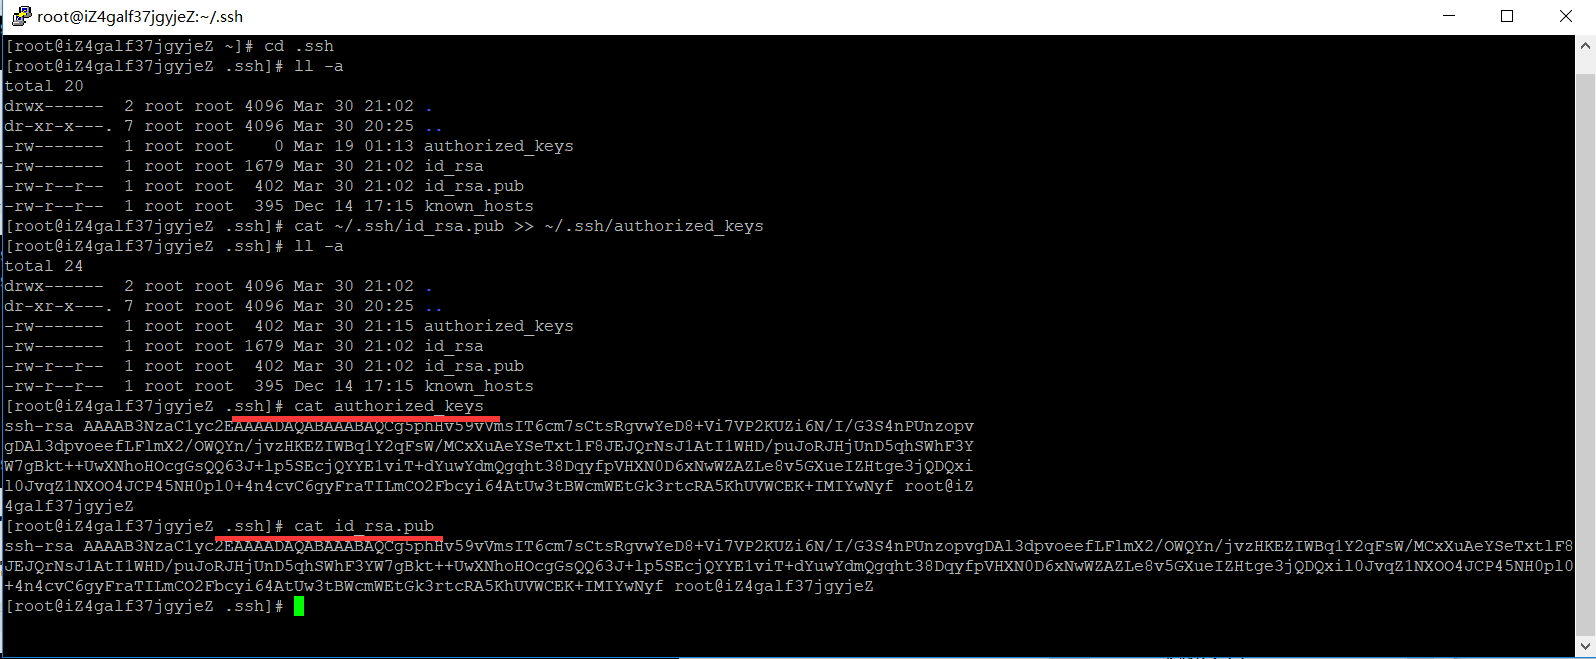
cat ~/.ssh/id_rsa.pub >> ~/.ssh/authorized_keys
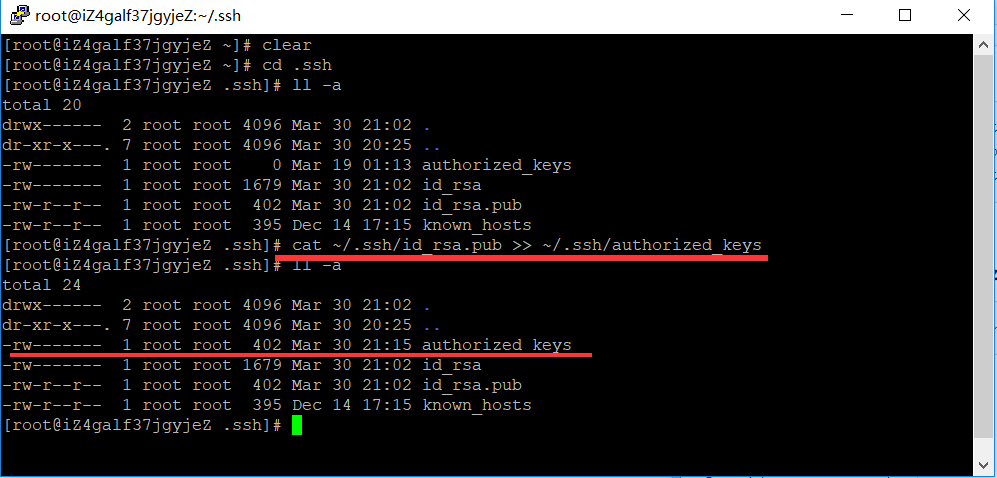
对比查看写入是否一致
授权authorized_keys文件
chmod 600 ~/.ssh/authorized_keys
三、用root用户登录服务器修改SSH配置文件
cat /etc/ssh/sshd_config
#       $OpenBSD: sshd_config,v 1.100 2016/08/15 12:32:04 naddy Exp $

# This is the sshd server system-wide configuration file.  See
# sshd_config(5) for more information.

# This sshd was compiled with PATH=/usr/local/bin:/usr/bin

# The strategy used for options in the default sshd_config shipped with
# OpenSSH is to specify options with their default value where
# possible, but leave them commented.  Uncommented options override the
# default value.

# If you want to change the port on a SELinux system, you have to tell
# SELinux about this change.
# semanage port -a -t ssh_port_t -p tcp #PORTNUMBER
#
Port 22
#AddressFamily any
#ListenAddress 0.0.0.0
#ListenAddress ::

HostKey /etc/ssh/ssh_host_rsa_key
#HostKey /etc/ssh/ssh_host_dsa_key
HostKey /etc/ssh/ssh_host_ecdsa_key
HostKey /etc/ssh/ssh_host_ed25519_key

# Ciphers and keying
#RekeyLimit default none

# Logging
#SyslogFacility AUTH

#LogLevel INFO

# Authentication:

#LoginGraceTime 2m
#PermitRootLogin yes
#StrictModes yes
#MaxAuthTries 6
#MaxSessions 10

#PubkeyAuthentication yes

# The default is to check both .ssh/authorized_keys and .ssh/authorized_keys2
# but this is overridden so installations will only check .ssh/authorized_keys
AuthorizedKeysFile      .ssh/authorized_keys

#AuthorizedPrincipalsFile none

#AuthorizedKeysCommand none
#AuthorizedKeysCommandUser nobody

# For this to work you will also need host keys in /etc/ssh/ssh_known_hosts
#HostbasedAuthentication no
# Change to yes if you don't trust ~/.ssh/known_hosts for
# HostbasedAuthentication
#IgnoreUserKnownHosts no
# Don't read the user's ~/.rhosts and ~/.shosts files
#IgnoreRhosts yes

# To disable tunneled clear text passwords, change to no here!
#PermitEmptyPasswords no


# Change to no to disable s/key passwords
#ChallengeResponseAuthentication yes
ChallengeResponseAuthentication no

# Kerberos options
#KerberosAuthentication no
#KerberosOrLocalPasswd yes
#KerberosTicketCleanup yes
#KerberosGetAFSToken no
#KerberosUseKuserok yes

# GSSAPI options
GSSAPIAuthentication yes
GSSAPICleanupCredentials no
#GSSAPIStrictAcceptorCheck yes
#GSSAPIKeyExchange no
#GSSAPIEnablek5users no

# Set this to 'yes' to enable PAM authentication, account processing,
# and session processing. If this is enabled, PAM authentication will
# be allowed through the ChallengeResponseAuthentication and
# PAM authentication via ChallengeResponseAuthentication may bypass
# the setting of "PermitRootLogin without-password".
# If you just want the PAM account and session checks to run without
# and ChallengeResponseAuthentication to 'no'.
# WARNING: 'UsePAM no' is not supported in Red Hat Enterprise Linux and may cause several
# problems.
UsePAM yes

#AllowAgentForwarding yes
#AllowTcpForwarding yes
#GatewayPorts no
X11Forwarding yes
#X11DisplayOffset 10
#X11UseLocalhost yes
#PermitTTY yes
#PrintMotd yes
#PrintLastLog yes
#TCPKeepAlive yes
#UseLogin no
#UsePrivilegeSeparation sandbox
#PermitUserEnvironment no
#Compression delayed
#ClientAliveInterval 0
#ClientAliveCountMax 3
#ShowPatchLevel no
#UseDNS yes
#PidFile /var/run/sshd.pid
#MaxStartups 10:30:100
#PermitTunnel no
#ChrootDirectory none
#VersionAddendum none

# no default banner path
#Banner none

# Accept locale-related environment variables
AcceptEnv LANG LC_CTYPE LC_NUMERIC LC_TIME LC_COLLATE LC_MONETARY LC_MESSAGES
AcceptEnv LC_PAPER LC_NAME LC_ADDRESS LC_TELEPHONE LC_MEASUREMENT
AcceptEnv LC_IDENTIFICATION LC_ALL LANGUAGE
AcceptEnv XMODIFIERS

# override default of no subsystems
Subsystem       sftp    /usr/libexec/openssh/sftp-server

# Example of overriding settings on a per-user basis
#Match User anoncvs
#       X11Forwarding no
#       AllowTcpForwarding no
#       PermitTTY no
#       ForceCommand cvs server

UseDNS no
AddressFamily inet
SyslogFacility AUTHPRIV
PermitRootLogin yes
PasswordAuthentication yes
重启服务
service sshd restart
验证

注意看我们两个箭头,说明已经无密码登录到 slave1 机器上了。那么这样就算大功告成。