1. 原理图
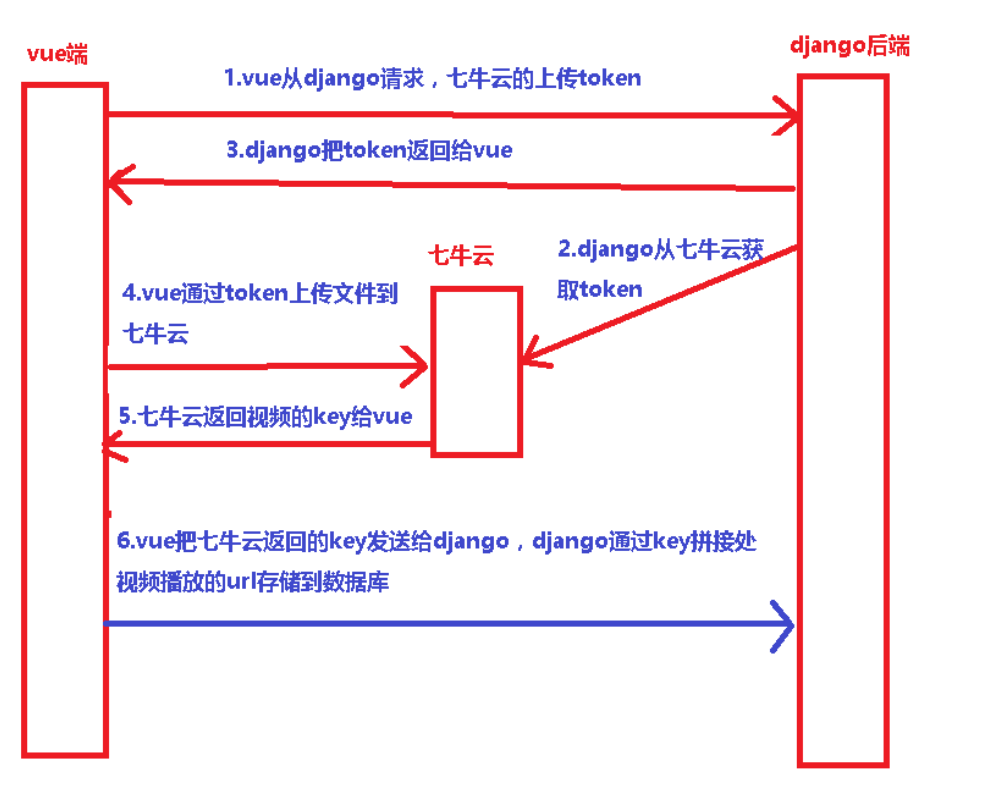
2. 获取七牛云token
from qiniu import Auth


class QnApiView(APIView):

    def get(self, request):
        # 需要填写你的 Access Key 和 Secret Key
        access_key = 'EKPODOXU_320j3iA2WpNVtG2hfHAPHxY6vhDnSMo'
        secret_key = '1Tjto3C6_xIUKBlo3d4PkhJR556hpvtmNxoanXjt'
        # 构建鉴权对象
        q = Auth(access_key, secret_key)
        # 要上传的空间
        bucket_name = 'sylimage'
        # 上传后保存的文件名
        key = None
        # 生成上传 Token,可以指定过期时间等
        # 上传策略示例
        # https://developer.qiniu.com/kodo/manual/1206/put-policy
        policy = {
            # 'callbackUrl':'https://requestb.in/1c7q2d31',
            # 'callbackBody':'filename=$(fname)&filesize=$(fsize)'
            # 'persistentOps':'imageView2/1/w/200/h/200'
        }
        # 3600为token过期时间,秒为单位。3600等于一小时
        token = q.upload_token(bucket_name, key, 3600, policy)

        return Response({'code': 0, 'msg': 'token1', 'data': {"uptoken": token}})
3. vue通过token上传视频到七牛云
course_show.vue课程页面下点击添加视频携带课程id跳转到QnUpload.vue
<router-link :to="{name: 'qn_upload', query: {'cid': course.id}}">添加视频</router-link>
3.1 获取token
getQiniuToken: function (callback){
        qn_token_get({ }).then(resp => {
          // debugger
          console.log(resp)
          this.uptoken = resp.data.uptoken;
          console.log(this.uptoken)
          callback()  // callback 出入的是回调函数 initQiniu() 用来初始化Qiniu.uploader()
        }).catch( err=>{
          console.log(err,'err')
        })
      },
3.2 初始化七牛云(官方文档)
initQiniu: function () {
        var ths = this
        var uploader = Qiniu.uploader({
          disable_statistics_report: false,                                   // 禁止自动发送上传统计信息到七牛,默认允许发送
          runtimes: 'html5,flash,html4',                                      // 上传模式,依次退化
          browse_button: 'uploadImage',                                       // 上传选择的点选按钮,必需
          container: 'container',                                             // 上传区域DOM ID,默认是browser_button的父元素
          max_file_size: '500mb',                                             // 最大文件体积限制
          flash_swf_url: 'Moxie.swf',                                         // 引入flash,相对路径
          dragdrop: false,                                                    // 关闭可拖曳上传
          chunk_size: '4mb',                                                  // 分块上传时,每块的体积
          multi_selection: !(moxie.core.utils.Env.OS.toLowerCase() === "ios"),
          uptoken: this.uptoken,     // 在初始化时,uptoken,uptoken_url,uptoken_func三个参数中必须有一个被设置,uptoken是上传凭证,由其他程序生成;uptoken_url是提供了获取上传凭证的地址,如果需要定制获取uptoken的过程则可以设置uptoken_func;其优先级为uptoken > uptoken_url > uptoken_func
          // uptoken_url: 'http://127.0.0.1:8000/uptoken',                                                 // 在初始化时,uptoken,uptoken_url,uptoken_func三个参数中必须有一个被设置,uptoken是上传凭证,由其他程序生成;uptoken_url是提供了获取上传凭证的地址,如果需要定制获取uptoken的过程则可以设置uptoken_func;其优先级为uptoken > uptoken_url > uptoken_func
          // uptoken:'EKPODOXU_320j3iA2WpNVtG2hfHAPHxY6vhDnSMo:98ANunJRp…6InN5bGltYWdlOiIsImRlYWRsaW5lIjoxNjAyNjY3ODA4fQ==',
          domain: 'redinnovation.s3-cn-north-1.qiniucs.com',               // bucket域名,下载资源时用到,必需
          get_new_uptoken: false,                                              // 设置上传文件的时候是否每次都重新获取新的uptoken
          auto_start: true,                                                   // 选择文件后自动上传,若关闭需要自己绑定事件触发上传
          max_retries: 3,                                                     // 上传失败最大重试次数
          save_key: true,
          resize: {                                                           // 想限制上传图片尺寸,直接用resize这个属性
             300,
            height: 300
          },
          init: {
            'FilesAdded': function(up, files) {                             // 文件添加进队列后,处理相关的事情
              plupload.each(files, function(file) {
                console.log(file)
              });
            },
            'BeforeUpload': function(up, file) {                            // 每个文件上传前,处理相关的事情
              console.log("开始上传之前");
              $(".upload-progress").show();
            },
            'UploadProgress': function(up, file) {                          // 每个文件上传时,处理相关的事情
              console.log("上传中");
              $(".upload-progress").html("上传进度:"+file.percent + "%");
            },
            'FileUploaded': function(up, file, info) {                       // 每个文件上传成功后,处理相关的事情
              console.log("上传成功");
              console.log(info,4567890);
              $(".upload-progress").hide();
              var img = new Image();                                      //创建一个Image对象,实现图片的预下载
              var res = JSON.parse( info.response )
              // debugger
              ths.qn_url = ths.qn_url + res.key
              console.log(ths.form_data)
              ths.form_data.video = ths.qn_url
            },
            'Error': function(up, err, errTip) {
              console.log("上传出错")
            },
            'UploadComplete': function() {
              //队列文件处理完毕后,处理相关的事情
            }
          }
        });
      }
3.3 上传成功之后拼接出来视频url
'FileUploaded': function(up, file, info) {                       // 每个文件上传成功后,处理相关的事情
    console.log("上传成功");
    console.log(info,4567890);
    $(".upload-progress").hide();
    var img = new Image();                                      //创建一个Image对象,实现图片的预下载
    var res = JSON.parse( info.response )
    // debugger
    ths.qn_url = ths.qn_url + res.key
    ths.form_data.video = ths.qn_url
},
3.4 发给django存入数据库
add_sec(){
    add_sections(this.form_data).then((res)=>{
        console.log(res)
    })
},
3.5 添加节信息接口
class SectionsApi(APIView):

    def post(self, request):
        print(request.data)
        sections_obj = Sections(
            title=request.data.get('title'),
            serial_num=request.data.get('seriasl_num'),
            chapters=Chapters.objects.get(pk=request.data.get('chapters')),
            learn_time=request.data.get('learn_time'),
            video=request.data.get('video'),
            seq_num=request.data.get('seq_num')
        )
        sections_obj.save()
        return Response({'msg': 'OK', 'code': 200})