使用mysql-mmm和mysql主从同步部署mysql高可用集群
1.配置主主结构
A、B主机设置
mysql> grant all on *.* to root@"%" identified by "1";
mysql> grant replication slave on *.* to user@"%" identified by "1";
A主机
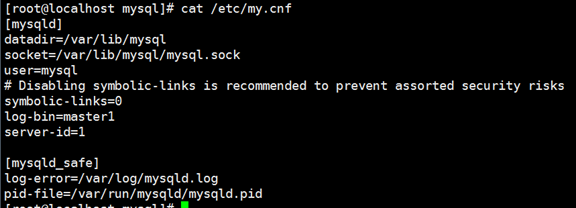
mysql> change master to master_host="192.168.100.101",master_user="user",master_password="1",master_log_file="master2.000001",master_log_pos=106;
mysql> slave start;

B主机
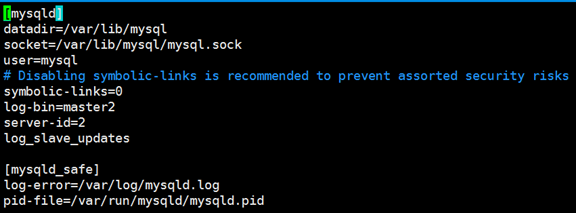
mysql> change master to master_host="192.168.100.100",master_user="user",master_password="1",master_log_file="master1.000001",master_log_pos=106;
mysql> slave start;

- 配置一主多从结构
C主机
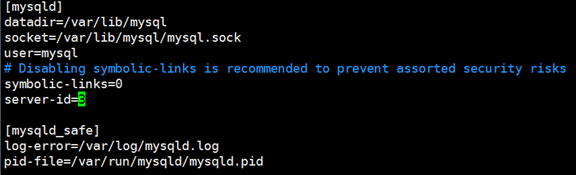
mysql> change master to master_host="192.168.100.101",master_user="user",master_password="1",master_log_file="master2.000001",master_log_pos=106;
D主机
mysql> change master to master_host="192.168.100.101",master_user="user",master_password="1",master_log_file="master2.000001",master_log_pos=106;
- 在所有机器安装mysql-mmm软件
tar xf mysql-mmm-2.2.1.tar.gz
cd mysql-mmm-2.2.1
make install
- 配置mysql-mmm实现mysql高可用集群
mmm_common.conf——所有服务器都需配置,都一样
作用:指定集群中服务器的角色和使用的虚拟IP地址
数据库服务器都设置数据库授权
mysql> grant replication client on *.* to monitor@"%" identified by "monitor";
mysql> grant replication client,process,super on *.* to agent@"%" identified by "agent";
所有的数据库服务器都要配置
vim /etc/mysql-mmm/mmm_agent.conf
include mmm_common.conf //加载mmm_common.conf
this 主机名 //指定自己的主机名
监控配置
五台都需安装
依赖包
yum -y install gcc* perl-Date-Manipperl-Date-Manipperl-Date-Manipperl-XML-DOM-XPathperl-XML-Parserperl-XML-RegExp rrdtoolperl-Class-Singleton perlperl-DBD-MySQLperl-Params-Validateperl-MailToolsperl-Time-HiRes
mount /dev/sr0 /media
cd /media/Packages
yum -y localinstall perl-*
安装Algorithm-Diff
tar xf Algorithm-Diff-1.1903.tar.gz
cd Algorithm-Diff-1.1903
perl Makefile.PL
make && make install
安装Proc-Daemon
tar xf Proc-Daemon-0.23.tar.gz
cd Proc-Daemon-0.23
perl Makefile.PL
make && make install
安装Net-ARP
tar xf Net-ARP-1.0.9.tgz
cd Net-ARP
perl Makefile.PL
make && make install
'
安装Log-Log4perl
tar xf Log-Log4perl-1.42.tar.gz
cd Log-Log4perl-1.42
perl Makefile.PL
make && make install
A、B、C、D开启服务/etc/init.d/mysql-mmm-agent start
E主机开启/etc/init.d/mysql-mmm-monitor start
[root@e Proc-Daemon-0.23]# mmm_control show
a(192.168.100.100) master/AWAITING_RECOVERY. Roles:
b(192.168.100.101) master/AWAITING_RECOVERY. Roles:
c(192.168.100.102) slave/AWAITING_RECOVERY. Roles:
d(192.168.100.103) slave/AWAITING_RECOVERY. Roles:
[root@e Proc-Daemon-0.23]# mmm_control set_online a
OK: State of 'a' changed to ONLINE. Now you can wait some time and check its new roles!
[root@e Proc-Daemon-0.23]# mmm_control set_online b
OK: State of 'b' changed to ONLINE. Now you can wait some time and check its new roles!
[root@e Proc-Daemon-0.23]# mmm_control set_online c
OK: State of 'c' changed to ONLINE. Now you can wait some time and check its new roles!
[root@e Proc-Daemon-0.23]# mmm_control set_online d
OK: State of 'd' changed to ONLINE. Now you can wait some time and check its new roles!
[root@e mysql-mmm]# mmm_control show
a(192.168.100.100) master/ONLINE. Roles: writer(192.168.100.99)
b(192.168.100.101) master/ONLINE. Roles:
c(192.168.100.102) slave/ONLINE. Roles: reader(192.168.100.88)
d(192.168.100.103) slave/ONLINE. Roles: reader(192.168.100.89)
A、B、C、D配置文件
[root@a mysql-mmm]# cat mmm_common.conf
active_master_role    writer


<host default>
    cluster_interface        eth0  //网卡

    pid_path                /var/run/mmm_agentd.pid
    bin_path                /usr/lib/mysql-mmm/

    replication_user        user   //数据库用户
    replication_password    1    //密码

    agent_user            agent    代理用户
    agent_password            agent  代理密码
</host>

<host a>
    ip                        192.168.100.100  IP
    mode                    master      角色:主
    peer                    a        主机名
</host>

<host b>
    ip                        192.168.100.101
    mode                    master
    peer                    b
</host>

<host c>
    ip                        192.168.100.102    IP
    mode                    slave      角色:重
</host>

<host d>
    ip                        192.168.100.103
    mode                    slave
</host>

<role writer>    写操作
    hosts                    a,b
    ips                        192.168.100.99    虚拟IP
    mode                    exclusive    唯一  只能有一台写操作
</role>

<role reader>    读操作
    hosts                    c,d
    ips                        192.168.100.88, 192.168.100.89
    mode                    balanced    负载  多台读操作
</role>
E主机配置文件
[root@e mysql-mmm]# cat mmm_mon.conf
include mmm_common.conf

<monitor>
    ip                        192.168.100.104
    pid_path                /var/run/mmm_mond.pid
    bin_path                /usr/lib/mysql-mmm/
    status_path                /var/lib/misc/mmm_mond.status
    ping_ips                192.168.100.100, 192.168.100.101, 192.168.100.102, 192.168.100.103
</monitor>

<host default>
    monitor_user            monitor    监控用户名
    monitor_password        monitor    监控密码
</host>

debug 0    //不显示报错信息,若有故障开启1,查看详细信息
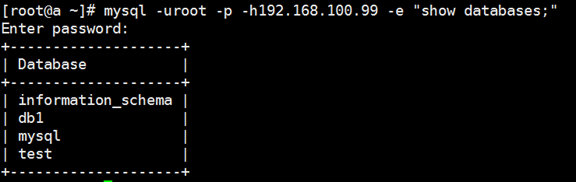
验证结果: