以下采用的系统为ubuntu16.04,开发板为迅为iTOP4412,4.3寸屏。
下载qt5.7源码qt-everywhere-opensource-src-5.7.0.tar.xz
http://www.download3k.com/Install-Qt.html
下载ARM交叉编译工具arm-2014.05-29-arm-none-Linux-gnueabi-i686-pc-linux-gnu.tar.bz2
http://www.veryarm.com/arm-none-linux-gnueabi-gcc
下载tslib1.4
http://vdisk.weibo.com/s/AcUHxOERV2k0?sudaref=www.baidu.com
arm交叉编译器arm-2014的安装
将“arm-2014.05-29-arm-none-linux-gnueabi-i686-pc-linux-gnu.tar.bz2”解压到Ubuntu 系统的文件夹“/usr/local/arm”中。
然后修改环境变量,切换到home目录,然后输入命令“vim .bashrc”,打开设置环境变量的文件“.bashrc”,将环境变量修改为“export PATH=$PATH:/usr/local/arm/arm-2014.05/bin”
保存退出,然后更新一下环境变量,输入命令“source .bashrc”。
source .bashrc- 1
- 1
接着测试一下,编译器路径设置的对不对。如下图,在Ubuntu 命令行中输入命令”arm”,
然后按键盘”Tab”,出现编译器“arm-none-linux-gnueabi-gcc-4.8.2”,这就说明编译
器路径设置正确。
交叉编译tslib1.4
对触摸屏信号的获取、校正、滤波处理,均采用开源的tslib,本文采用的tslib版本为最新的tslib1.4(可以从本文提供的链接中下载tslib1.4)。
1.将下载好的tslib1.4拷贝到/home/lz/transplant目录下(可以根据自己的系统选择某一目录),然后执行解压缩命令
tar -vxf tslib-1.4.tar.gz- 1
- 1
切换到tslib目录:
cd tslib- 1
- 1
安装交叉编译tslib必须的一些工具(可以先查看是否已安装,ubuntu16.04自带这些工具,可跳过)
sudo apt-get install autoconf
sudo apt-get install automake
sudo apt-get install libtool- 1
- 2
- 3
- 1
- 2
- 3
2.利用脚本写编译过程
在tslib文件夹下新建文件configTslib14.sh
vi configTslib14.sh- 1
- 1
内容如下:
#!/bin/sh
make clean && make distclean
echo "ac_cv_func_malloc_0_nonnull=yes" >arm-linux.cache
CC=/usr/local/arm/arm-2014.05/bin/arm-none-linux-gnueabi-gcc ./configure --host=arm-linux --prefix=/opt/tslib1.4 --cache-file=arm-linux.cache
make && make install- 1
- 2
- 3
- 4
- 5
- 1
- 2
- 3
- 4
- 5
然后运行configTslib14.sh
./configTslib14.sh- 1
- 1
执行结束后,我们查看一下是否安装成功,执行命令:
ls /opt/tslib1.4- 1
- 1
如果出现bin,etc,include,lib这4个目录,如下图所示,说明交叉编译并安装tslib成功。 
交叉编译QT5.7.0
将下载的qt-everywhere-opensource-src-5.7.0.tar.gz执行如下命令解压:
tar -vxf qt-everywhere-opensource-src-5.7.0.tar.gz- 1
- 1
cd qt-everywhere-opensource-src-5.7.0- 1
- 1
修改交叉编译架构用到的信息:
gedit qtbase/mkspecs/linux-arm-gnueabi-g++/qmake.conf- 1
- 1
修改如下图所示:
#
# qmake configuration for building with arm-linux-gnueabi-g++
#

MAKEFILE_GENERATOR      = UNIX
CONFIG                 += incremental
QMAKE_INCREMENTAL_STYLE = sublib

QT_QPA_DEFAULT_PLATFORM = linux #eglfs
QMAKE_CFLAGS_RELEASE += -O2 -march=armv7-a
QMAKE_CXXFLAGS_RELEASE += -O2 -march=armv7-a

include(../common/linux.conf)
include(../common/gcc-base-unix.conf)
include(../common/g++-unix.conf)

# modifications to g++.conf
QMAKE_CC                = arm-none-linux-gnueabi-gcc
QMAKE_CXX               = arm-none-linux-gnueabi-g++
QMAKE_LINK              = arm-none-linux-gnueabi-g++
QMAKE_LINK_SHLIB        = arm-none-linux-gnueabi-g++

# modifications to linux.conf
QMAKE_AR                = arm-none-linux-gnueabi-ar cqs
QMAKE_OBJCOPY           = arm-none-linux-gnueabi-objcopy
QMAKE_NM                = arm-none-linux-gnueabi-nm -P
QMAKE_STRIP             = arm-none-linux-gnueabi-strip
load(qt_config)- 1
- 2
- 3
- 4
- 5
- 6
- 7
- 8
- 9
- 10
- 11
- 12
- 13
- 14
- 15
- 16
- 17
- 18
- 19
- 20
- 21
- 22
- 23
- 24
- 25
- 26
- 27
- 28
- 1
- 2
- 3
- 4
- 5
- 6
- 7
- 8
- 9
- 10
- 11
- 12
- 13
- 14
- 15
- 16
- 17
- 18
- 19
- 20
- 21
- 22
- 23
- 24
- 25
- 26
- 27
- 28
创建一个脚本文件,用于生成Makefile,执行命令
gedit autoConfigure.sh- 1
- 1
输入下面内容并保存:
#!/bin/sh
./configure
-v
-prefix /opt/qt-5.7.0
-release
-opensource
-no-accessibility
-make libs
-xplatform linux-arm-gnueabi-g++
-optimized-qmake
-pch
-qt-sql-sqlite
-qt-zlib
-tslib
-no-opengl
-no-sse2
-no-openssl
-no-nis
-no-cups
-no-glib
-no-pkg-config
-no-separate-debug-info
-I/opt/tslib1.4/include -L/opt/tslib1.4/lib- 1
- 2
- 3
- 4
- 5
- 6
- 7
- 8
- 9
- 10
- 11
- 12
- 13
- 14
- 15
- 16
- 17
- 18
- 19
- 20
- 21
- 22
- 23
- 1
- 2
- 3
- 4
- 5
- 6
- 7
- 8
- 9
- 10
- 11
- 12
- 13
- 14
- 15
- 16
- 17
- 18
- 19
- 20
- 21
- 22
- 23
其中-prefix /opt/qt-5.7.0代表我们编译完QT5.4.1后要安装地址;-tslib代表QT对触摸板的支持,-I 和 -L后面分别为为第一步编译tslib的include和lib的安装目录。
执行命令:
chmod 777 qt.configure.sh
./autoConfigure.sh- 1
- 2
- 1
- 2
上述命令自动生成Makefile文件。
执行命令启动编译:
make- 1
- 1
编译大概2个小时。
编译结束后,执行安装命令:
sudo make install- 1
- 1
我们切换到目标目录下看看是否安装成功:
cd /opt/qt-5.7.0
ls- 1
- 2
- 1
- 2
如图所示:
将/opt/qt-5.7.0和/opt/tslib1.4 拷贝到开发板的文件系统中对应的目录中。
设置QT的交叉编译环境
安装qtcreator
进入qtcreator开发环境
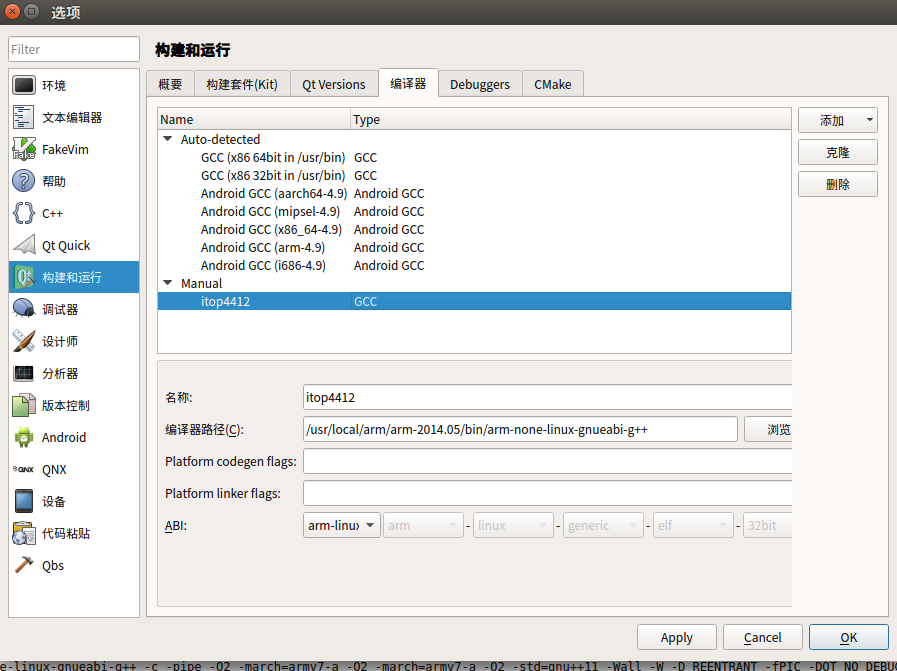
在菜单中选择Tools——Options,在弹出的对话框中,选择Build & Run,选择标签Compilers,按下图设置,选择C++交叉编译器,如下图所示: 
切换到Qt Versions标签,点击“Add”按钮,选择qmake,如图所示: 
选择完成,按“OK”按钮,设置如图所示:
切换到Kits标签,点击“Add”按钮,然后设置如下图所示: 
在4412开发板上配置tslib并交叉编译一个能够在4412开发板上运行的QT应用程序
把字库Ubuntu_L.ttf 等字库拷贝到 /opt/qt-5.7.0/lib/fonts
在开发板串口命令窗口中输入:
vi /etc/profile- 1
- 1
如下图所示: 
将其修改为以下内容
export TSLIB_ROOT=/opt/tslib1.4
export QT_ROOT=/opt/qt-5.7.0
export TSLIB_TSDEVICE=/dev/input/event2
export TSLIB_TSEVENTTYPE=input
export TSLIB_CONFFILE=/opt/tslib1.4/etc/ts.conf
export TSLIB_PLUGINDIR=/opt/tslib1.4/lib/ts
export TSLIB_CONSOLEDEVICE=none
export TSLIB_FBDEVICE=/dev/fb0
export QWS_MOUSE_PROTO=tslib:/dev/input/event2
export LD_LIBRARY_PATH=/lib:/usr/lib:/usr/local/lib:$QT_ROOT/lib:$TSLIB_ROOT/lib:$TSLIB_ROOT/lib/
export QT_QPA_PLATFORM_PLUGIN_PATH=$QT_ROOT/plugins
export QT_QPA_PLATFORM=linuxfb:tty=/dev/fb0
export QT_QPA_FONTDIR=$QT_ROOT/lib/fonts
export QT_QPA_GENERIC_PLUGINS=tslib- 1
- 2
- 3
- 4
- 5
- 6
- 7
- 8
- 9
- 10
- 11
- 12
- 13
- 14
- 1
- 2
- 3
- 4
- 5
- 6
- 7
- 8
- 9
- 10
- 11
- 12
- 13
- 14
保存退出,执行命令(一定要执行,否则可能报错):
source /etc/profile- 1
- 1
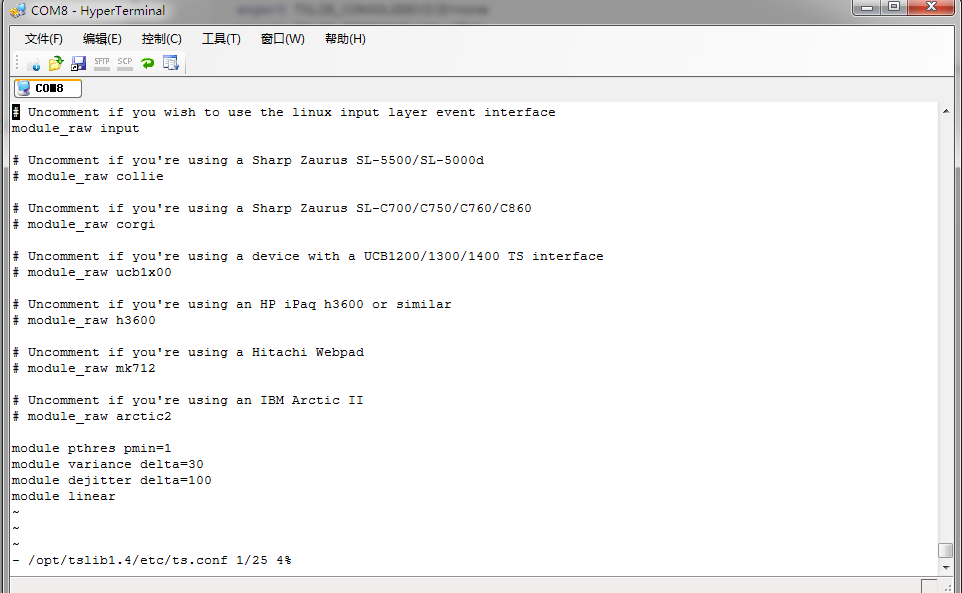
然后在串口命令窗中输入 vi /opt/tslib1.4/etc/ts.conf 来配置触摸屏 
把第二行的注释去掉,把ts设置成输入模式(注意把前面的空格也去掉) 
下面编写测试程序来测试开发板上
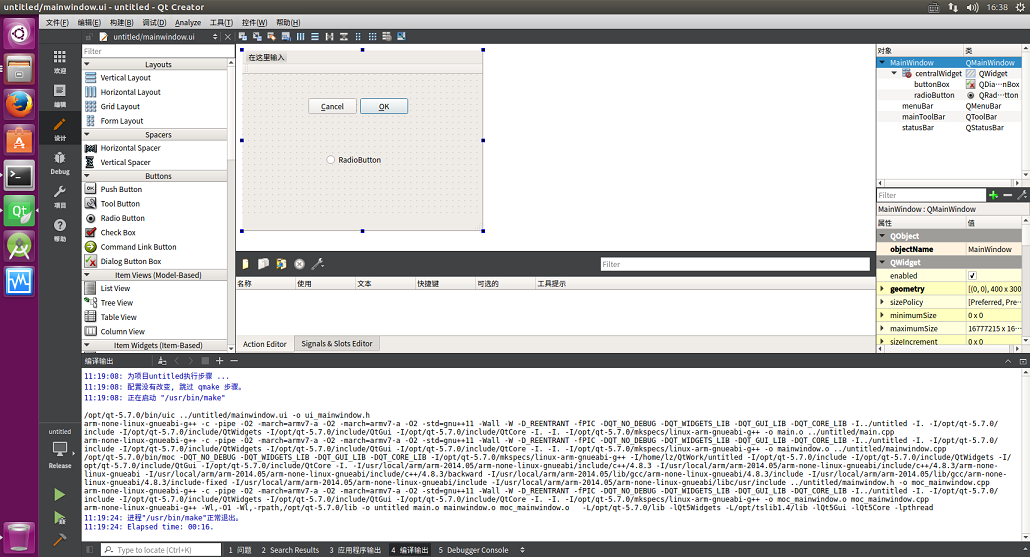
打开qtcreator,新建项目,拖几个按钮上去,如下图所示 
编译得到可执行程序untitled,查看一下,可以看到其信息显示为arm平台,如下图所示 
将untitled拷贝到开发板中文件系统的/bin目录,运行该程序。
[root@iTOP-4412]# /bin/untitled - 1
- 1
看一下板子: 
http://blog.csdn.net/u012175418/article/details/52704734