声明:
本博客欢迎转发,但请保留原作者信息!
新浪微博:@Lingxian_kong;
博客地址:孔令贤的博客;
内容系本人学习、研究和总结,如有雷同,实属荣幸!
安装docker-machine
我的安装环境是mac,之前在mac上安装有vagrant和virtualbox,所以我没有直接安装官方推荐的Docker Toolbox。其实我可以手动创建几台vagrant虚拟机,然后手动配置这三台虚拟机为一个swarm集群。但看了swarm官网的资料,都推荐使用docker-machine,之前不怎么熟悉,所以也借此机会熟悉一下,先在mac上安装docker-machine命令行工具。
因为mac不是linux,不支持直接创建容器,在mac下使用docker的架构图如下: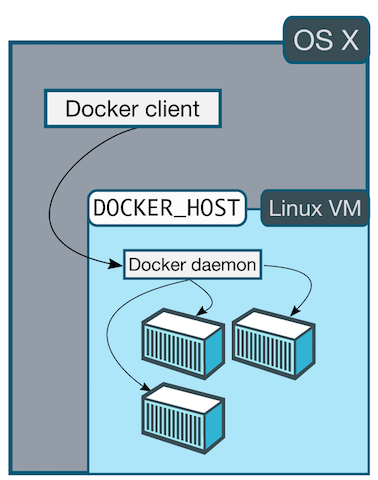
经过尝试,当使用docker-machine接管已有的virtualbox虚拟机时,会强制启用TLS,docker deamon的监听端口被改为2376,这里有个讨论。如果想手动配置swarm集群,不想配置TLS,就比较尴尬了。所以,最后我还是没有使用docker-machine配置swarm集群。下面仅是记录我尝试docker-machine的过程。
先安装docker-machine工具:
$ curl -L https://github.com/docker/machine/releases/download/v0.5.0/docker-machine_darwin-amd64.zip >machine.zip &&
    unzip machine.zip &&
    rm machine.zip
$ sudo mv docker-machine* /usr/local/bin/
查看docker-machine版本信息:
$ docker-machine -v
docker-machine version 0.5.0 (04cfa58)
因为之前在mac上已经装了virtualbox和vagrant,并且有一个vagrant虚拟机上安装了docker,所以这里仅仅是将这个名为’ubuntu’的虚拟机被docker-machine识别:
$ docker-machine create -d generic
 --generic-ssh-user vagrant
 --generic-ssh-key ~/vagrant/ubuntu/.vagrant/machines/default/virtualbox/private_key
 --generic-ip-address 192.168.33.12
 ubuntu
Running pre-create checks...
Creating machine...
Waiting for machine to be running, this may take a few minutes...
Machine is running, waiting for SSH to be available...
Detecting operating system of created instance...
Provisioning created instance...
Copying certs to the local machine directory...
Copying certs to the remote machine...
Setting Docker configuration on the remote daemon...
To see how to connect Docker to this machine, run: docker-machine env ubuntu
注意,该命令会更改docker宿主机,即ubuntu虚拟机的一些配置,会重写/etc/default/docker,默认端口会改为2376,此外之前配置的Daocloud加速器(国内玩docker必备)也需要重新添加,参见https://dashboard.daocloud.io/mirror
配置成功后,查看docker-machine管理的docker主机
$ docker-machine ls
NAME     ACTIVE   DRIVER    STATE     URL                        SWARM
ubuntu   *        generic   Running   tcp://192.168.33.12:2376
如果后续不想这个虚拟机被docker-machine管理了,就使用
docker-machine rm ubuntu命令从docker-machine中注销掉。
给mac安装docker命令行,这里使用homebrew安装,关于homebrew参见http://brew.sh/
$ rbrew install docker
导入环境变量,使后面的docker命令操作的docker主机指向这个ubuntu虚拟机,后续就可以在mac上直接执行docker命令:
$ eval "$(docker-machine env ubuntu)"
$ docker info
Containers: 2
Images: 58
Server Version: 1.9.0
Storage Driver: aufs
 Root Dir: /var/lib/docker/aufs
 Backing Filesystem: extfs
 Dirs: 62
 Dirperm1 Supported: false
Execution Driver: native-0.2
Logging Driver: json-file
Kernel Version: 3.13.0-24-generic
Operating System: Ubuntu 14.04 LTS
CPUs: 1
Total Memory: 994.1 MiB
Name: ubuntu
ID: CV2F:GZUO:YJ33:5WCY:3IZG:4WA3:SIRE:PPSR:IRG7:4OUR:2HTS:WRNV
WARNING: No swap limit support
Labels:
 provider=generic
安装docker-swarm
因为国内的网络原因,使用docker hub提供的token方式做服务发现很不稳定,最终我还是使用静态文件的方式。下面使用token的方式也仅仅是对过程做个记录。
以下使用Docker Hub提供的服务发现功能配置swarm集群,在ubuntu主机内执行:
$ docker pull swarm
$ docker run --rm swarm create
a3ec81af8d0d0690fcaf2ac95042f771
直接使用ubuntu docker主机作为swarm manager节点,同时也作为agent节点
$ docker run -d swarm join --addr=192.168.33.12:2375 token://a3ec81af8d0d0690fcaf2ac95042f771
$ docker run -d -p 2377:2375 swarm manage token://a3ec81af8d0d0690fcaf2ac95042f771
$ unset DOCKER_TLS_VERIFY (因为我们不使用TLS,因此需要修改这个环境变量)
$ docker -H tcp://0.0.0.0:2377 info (因为使用token的方式有问题,因此下面的nodes数是0)
Containers: 0
Images: 0
Role: primary
Strategy: spread
Filters: health, port, dependency, affinity, constraint
Nodes: 0
CPUs: 0
Total Memory: 0 B
Name: 63b845851a3b
增加swarm agent节点,因为网络原因,我使用docker-machine命令增加docker主机失败,所以还是手动创建了一个名为’swarmagent’的vagrant虚拟机并安装docker engine(参见https://docs.docker.com/engine/installation/ubuntulinux/)。
$ docker-machine create
      -d virtualbox
      --swarm
      --swarm-discovery token://a3ec81af8d0d0690fcaf2ac95042f771
  swarm-agent-00
Running pre-create checks...
Creating machine...
Error creating machine: Error in driver during machine creation: Get https://api.github.com/repos/boot2docker/boot2docker/releases: dial tcp: i/o timeout
在swarmagent节点里,将-H tcp://0.0.0.0:2375 -H unix:///var/run/docker.sock写入/etc/default/docker文件(别忘了配置Daocloud的加速器,下载swarm镜像时会很给力),加入swarm集群:
$ docker pull swarm
$ docker run -d swarm join --addr=192.168.33.13:2375 token://a3ec81af8d0d0690fcaf2ac95042f771
列出swarm集群节点:
$ docker run --rm swarm list token://a3ec81af8d0d0690fcaf2ac95042f771
192.168.33.12:2375
192.168.33.13:2375
但是通过swarm manager却查询不到节点信息,如下:
$ docker -H tcp://0.0.0.0:2377 info
Containers: 0
Images: 0
Role: primary
Strategy: spread
Filters: health, port, dependency, affinity, constraint
Nodes: 0
CPUs: 0
Total Memory: 0 B
Name: 63b845851a3b
使用静态文件做服务发现
因为不想再安装etcd/conul/zookeeper,所以就偷个懒,直接使用静态文件的方式做服务发现。swarm支持的几种服务发现方式可以参见这里。
首先在ubuntu虚拟机里面新建一个文件,内容如下:
$ cat /opt/kong/docker_mount/swarm_hosts
192.168.33.12:2375
192.168.33.13:2375
接着创建swarm manager服务,注意这里的-v参数:
$ docker run -d -p 2377:2375 -v /opt/kong/docker_mount/swarm_hosts:/tmp/cluster swarm manage file:///tmp/cluster
c7e96ed127e2f23c757cac8e297ff869e3f0af96cb4cf778d90c2d353e750e40
查看swarm集群信息:
$ docker -H tcp://0.0.0.0:2377 info
Containers: 2
Images: 5
Role: primary
Strategy: spread
Filters: health, port, dependency, affinity, constraint
Nodes: 2
 swarmagent: 192.168.33.13:2375
  └ Status: Healthy
  └ Containers: 0
  └ Reserved CPUs: 0 / 1
  └ Reserved Memory: 0 B / 514.6 MiB
  └ Labels: executiondriver=native-0.2, kernelversion=3.13.0-24-generic, operatingsystem=Ubuntu 14.04 LTS, storagedriver=aufs
 ubuntu: 192.168.33.12:2375
  └ Status: Healthy
  └ Containers: 2
  └ Reserved CPUs: 0 / 1
  └ Reserved Memory: 0 B / 1.019 GiB
  └ Labels: executiondriver=native-0.2, kernelversion=3.13.0-24-generic, operatingsystem=Ubuntu 14.04 LTS, storagedriver=aufs
CPUs: 2
Total Memory: 1.522 GiB
Name: c7e96ed127e2
得了,总算了安装成功了。
参考文档:
swarm官方文档:https://docs.docker.com/swarm/
http://lingxiankong.github.io/2015-12-20-docker-swarm-in-mac.html