Android Debug Bridge
Introduction
Android Debug Bridge (adb) is a versatile command line tool that lets you communicate with an emulator instance or connected Android-powered device. It is a client-server program that includes three components:
- A client, which sends commands. The client runs on your development machine. You can invoke a client from a shell by issuing an adb command. Other Android tools such as DDMS also create adb clients.
- A daemon, which runs commands on a device. The daemon runs as a background process on each emulator or device instance.
- A server, which manages communication between the client and the daemon. The server runs as a background process on your development machine.
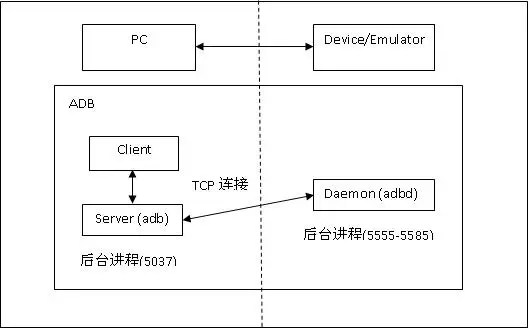
adb 工具模型示意图
You can find the adb tool in <sdk>/platform-tools/
How adb Works
When you start an adb client, the client first checks whether there is an adb server process already running. If there isn't, it starts the server process. When the server starts, it binds to local TCP port 5037 and listens for commands sent from adb clients—all adb clients use port 5037 to communicate with the adb server.
The server then sets up connections to all running emulator/device instances. It locates emulator/device instances by scanning odd-numbered ports in the range 5555 to 5585, the range used by emulators/devices. Where the server finds an adb daemon, it sets up a connection to that port. Note that each emulator/device instance acquires a pair of sequential ports — an even-numbered port for console connections and an odd-numbered port for adb connections. For example:
Emulator 1, console: 5554
Emulator 1, adb: 5555
Emulator 2, console: 5556
Emulator 2, adb: 5557
and so on...
As shown, the emulator instance connected to adb on port 5555 is the same as the instance whose console listens on port 5554.
Once the server has set up connections to all emulator instances, you can use adb commands to access those instances. Because the server manages connections to emulator/device instances and handles commands from multiple adb clients, you can control any emulator/device instance from any client (or from a script)
Enabling adb Debugging
In order to use adb with a device connected over USB, you must enable USB debugging in the device system settings, under Developer options.
On Android 4.2 and higher, the Developer options screen is hidden by default. To make it visible, go to Settings > About phone and tap Build number seven times. Return to the previous screen to find Developer options at the bottom.
On some devices, the Developer options screen may be located or named differently.
Note: When you connect a device running Android 4.2.2 or higher to your computer, the system shows a dialog asking whether to accept an RSA key that allows debugging through this computer. This security mechanism protects user devices because it ensures that USB debugging and other adb commands cannot be executed unless you're able to unlock the device and acknowledge the dialog. This requires that you have adb version 1.0.31 (available with SDK Platform-tools r16.0.1 and higher) in order to debug on a device running Android 4.2.2 or higher.
For more information about connecting to a device over USB, read Using Hardware Devices.
Syntax
You can issue adb commands from a command line on your development machine or from a script. The usage is:
adb [-d|-e|-s <serialNumber>] <command>
If there's only one emulator running or only one device connected, the adb command is sent to that device by default. If multiple emulators are running and/or multiple devices are attached, you need to use the -d, -e, or -s option to specify the target device to which the command should be directed.
Commands
The table below lists all of the supported adb commands and explains their meaning and usage.
| Category | Command | Description | Comments |
|
Target
Device
|
-d | Direct an adb command to the only attached USB device. | Returns an error if more than one USB device is attached. |
| -e | Direct an adb command to the only running emulator instance. | Returns an error if more than one emulator instance is running. | |
| -s <serialNumber> | Direct an adb command a specific emulator/device instance, referred to by its adb-assigned serial number (such as "emulator-5556"). | See Directing Commands to a Specific Emulator/Device Instance. | |
| General | devices | Prints a list of all attached emulator/device instances. | See Querying for Emulator/Device Instances for more information. |
| help | Prints a list of supported adb commands. | ||
| version | Prints the adb version number. | ||
| Debug | logcat [option] [filter-specs] | Prints log data to the screen. | |
| bugreport | Prints dumpsys, dumpstate, and logcat data to the screen, for the purposes of bug reporting. | ||
| jdwp | Prints a list of available JDWP processes on a given device. | You can use the forward jdwp:<pid> port-forwarding specification to connect to a specific JDWP process. For example: adb forward tcp:8000 jdwp:472 |
|
| Data | install <path-to-apk> | Pushes an Android application (specified as a full path to an .apk file) to an emulator/device. | |
| pull <remote> <local> | Copies a specified file from an emulator/device instance to your development computer. | ||
| push <local> <remote> | Copies a specified file from your development computer to an emulator/device instance. | ||
| Ports and Networking |
forward <local> <remote> | Forwards socket connections from a specified local port to a specified remote port on the emulator/device instance. | Port specifications can use these schemes:
|
| ppp <tty> [parm]... | Run PPP over USB.
|
||
| Scripting | get-serialno | Prints the adb instance serial number string. | See Querying for Emulator/Device Instances for more information. |
| get-state | Prints the adb state of an emulator/device instance. | ||
| wait-for-device | Blocks execution until the device is online — that is, until the instance state is device. | You can prepend this command to other adb commands, in which case adb will wait until the emulator/device instance is connected before issuing the other commands. Here's an example:adb wait-for-device shell getpropNote that this command does not cause adb to wait until the entire system is fully booted. For that reason, you should not prepend it to other commands that require a fully booted system. As an example, the install requires the Android package manager, which is available only after the system is fully booted. A command such as adb wait-for-device install <app>.apkwould issue the install command as soon as the emulator or device instance connected to the adb server, but before the Android system was fully booted, so it would result in an error. |
|
| Server | start-server | Checks whether the adb server process is running and starts it, if not. | |
| kill-server | Terminates the adb server process. | ||
| Shell | shell | Starts a remote shell in the target emulator/device instance. | See ADB Shell Commands for more information. |
| shell [shellCommand] | Issues a shell command in the target emulator/device instance and then exits the remote shell. |
Table 1. Available adb commands
Querying for Emulator/Device Instances
Before issuing adb commands, it is helpful to know what emulator/device instances are connected to the adb server. You can generate a list of attached emulators/devices using the devices command:
adb devices
In response, adb prints this status information for each instance:
- Serial number — A string created by adb to uniquely identify an emulator/device instance by its console port number. The format of the serial number is <type>-<consolePort>. Here's an example serial number: emulator-5554
- State — The connection state of the instance may be one of the following:
- offline — the instance is not connected to adb or is not responding.
- device — the instance is now connected to the adb server. Note that this state does not imply that the Android system is fully booted and operational, since the instance connects to adb while the system is still booting. However, after boot-up, this is the normal operational state of an emulator/device instance.
- no device — there is no emulator/device connected.
The output for each instance is formatted like this:
[serialNumber] [state]
Here's an example showing the devices command and its output:
adb devices
List of devices attached
emulator-5554 device
emulator-5556 device
emulator-5558 device
Directing Commands to a Specific Emulator/Device Instance
If multiple emulator/device instances are running, you must specify a target instance when issuing adb commands. To do so, use the -s option in the commands. The usage for the -s option is:
adb -s <serialNumber> <command>
As shown, you specify the target instance for a command using its adb-assigned serial number. You can use the devices command to obtain the serial numbers of running emulator/device instances. For example:
adb -s emulator-5556 install helloWorld.apk
Note that, if you issue a command without specifying a target emulator/device instance while multiple devices are available, adb generates an error.
If you have multiple devices available (hardware or emulated), but only one is an emulator, simply use the -e option to send commands to the emulator. Likewise if there's multiple devices but only one hardware device attached, use the -d option to send commands to the hardware device.
Installing an Application
You can use adb to copy an application from your development computer and install it on an emulator/device instance. To do so, use the install command. With the command, you must specify the path to the .apk file that you want to install:
adb install <path_to_apk>
For more information about how to create an .apk file that you can install on an emulator/device instance, see Building and Running
Note that, if you are using Android Studio, you do not need to use adb (or aapt) directly to install your application on the emulator/device. Instead, Android Studio handles the packaging and installation of the application for you.
Forwarding Ports
You can use the forward command to set up arbitrary port forwarding — forwarding of requests on a specific host port to a different port on an emulator/device instance. Here's how you would set up forwarding of host port 6100 to emulator/device port 7100:
adb forward tcp:6100 tcp:7100
You can also use adb to set up forwarding to named abstract UNIX domain sockets, as illustrated here:
adb forward tcp:6100 local:logd
Copying Files to or from an Emulator/Device Instance
You can use the adb commands pull and push to copy files to and from an emulator/device instance. Unlike the install command, which only copies an APK file to a specific location, the pull and push commands let you copy arbitrary directories and files to any location in an emulator/device instance.
To copy a file or directory (and its sub-directories) from the emulator or device, use
adb pull <remote> <local>
To copy a file or directory (and its sub-directories) to the emulator or device, use
adb push <local> <remote>
In the commands, <local> and <remote> refer to the paths to the target files/directory on your development machine (local) and on the emulator/device instance (remote). For example:
adb push foo.txt /sdcard/foo.txt
Stopping the adb Server
In some cases, you might need to terminate the adb server process and then restart it to resolve the problem (e.g., if adb does not respond to a command).
To stop the adb server, use the kill-server command. You can then restart the server by issuing any other adb command.
参考
《Android Debug Bridge》 https://developer.android.com/studio/command-line/adb.html#directingcommands