Loading............. 本文档为草稿版,持续更新......
文档作者长期从事中间服务件开发,整理所得,有技术看法或其他交流的可发邮件至yuanqi_07@126.com。
一、目前流行的WebService框架介绍:
①Apache Axis2
Apache Axis2相比Apache Axis1更加有效、更加模块化、更加面向xml,支持容易插件模块扩展新功能和特性,例如安全和可靠。Apache Axis2是基于Apache AXIOM,它是一 个高性能、pull-based XML对象模型。Apache Axis2的关键特性:
l 解析xml更快。采用自己的对象模型和StAX (Streaming API for XML)。
l 更低的内存占用。
l 支持热部署。新服务加入到系统,无需重启服务。
l 支持异步webservice、
l 更加灵活。引擎给开发人员提供了充足的自由度可扩展客户头信息处理、系统管理、
l 更加稳定性。
l 支持WSDL1.1、WSDL2.0。
l 方便集成其他组件(Add-ons)。几个web services已经被集成,包括:WSS4J for security (Apache Rampart), Sandesha for reliable messaging, Kandula which is an encapsulation of WS-Coordination, WS-AtomicTransaction and WS-BusinessActivity.
l 良好的扩展性。
②Apache CXF
Apache CXF是一个开源服务框架。Apache CXF = Celtix + XFire,Apache CXF 的前身叫 Apache CeltiXfire,现在已经正式更名为 Apache CXF 了,以下简称为 CXF。CXF 继承了Celtix和XFire两大开源项目的精华,比如:JAX-WS and JAX-RS,主要特性包括:
l 支持Web services标准。包括:SOAP、the WSI Basic Profile、WSDL、WS-Addressing、WS-Policy、WS-ReliableMessaging、WS-Security、WS-SecureConversation和WS-SecurityPolicy.
l 支持不同类型前端开发模型。CXF实现了JAX-WS APIs,支持JAX-RS开发。
l 容易使用。CXF设计的简洁和直观,具有简洁APIs迅速的构建基于代码的服务,Maven插件使得工具集成更加容易、JAX-WS API支持、Spring 2.x XML使得配置更加容易。
l 支持二进制和遗留协议。CXF被设计为可插拔的架构,在不同的传输协议结合下,不仅支持XML,也支持非XML类型绑定,例如:JSON和CORBA。
③Dubbo
Dubbo是Alibaba开源的分布式服务框架,它最大的特点是按照分层的方式来架构,使用这种方式可以使各个层之间解耦合(或者最大限度地松耦合)。
二、概念介绍
①、Web Service也叫XML Web Service WebService是一种可以接收从Internet或者Intranet上的其它系统中传递过来的请求,轻量级的独立的通讯技术。是:通过SOAP在Web上提供的软件服务,使用WSDL文件进行说明,并通过UDDI进行注册。
②、SOAP协议:简单对象访问协议,简单对象访问协议是交换数据的一种协议规范,是一种轻量的、简单的、基于XML的协议,它被设计成在WEB上交换结构化的和固化的信息。SOAP作为webService三要素SOAP、WSDL、UUID之一, SOAP用来描述传递信息的格式, WSDL 用来描述如何访问具体的接口, uddi用来管理,分发,查询webService 。 SOAP 可以和现存的许多因特网协议和格式结合使用,包括超文本传输协议(HTTP),简单邮件传输协议(SMTP),多用途网际邮件扩充协议(MIME)。它还支持从消息系统到远程过程调用(RPC)等大量的应用程序。SOAP使用基于XML的数据结构和超文本传输协议(HTTP)的组合定义了一个标准的方法使用Internet上各种不同操作环境中的分布式对象。
③、JAX-WS规范是一组XML web services的JAVA API,JAX-WS允许开发者可以选择RPC-oriented或者message-oriented 来实现自己的web services。
在 JAX-WS中,一个远程调用可以转换为一个基于XML的协议例如SOAP,在使用JAX-WS过程中,开发者不需要编写任何生成和处理SOAP消息的代码。JAX-WS的运行时实现会将这些API的调用转换成为对应的SOAP消息。在服务器端,用户只需要通过Java语言定义远程调用所需要实现的接口SEI(service endpoint interface),并提供相关的实现,通过调用JAX-WS的服务发布接口就可以将其发布为WebService接口。在客户端,用户可以通过JAX-WS的API创建一个代理(用本地对象来替代远程的服务)来实现对于远程服务器端的调用。当然 JAX-WS 也提供了一组针对底层消息进行操作的API调用,你可以通过Dispatch 直接使用SOAP消息或XML消息发送请求或者使用Provider处理SOAP或XML消息。
通过web service所提供的互操作环境,我们可以用JAX-WS轻松实现JAVA平台与其他编程环境(.net等)的互操作。
三、探索Web服务框架发展
①、使用RI发布WS
RI是Java官方提供的JAX_WS规范的具体实现。
RI下载地址:https://github.com/javaee/metro-jax-ws
Tomcat改造:对tomcat下的config/catalina.properties文件进行配置:在common.loader后静态引入或动态引入所有lib下的jar包,让该jar包成为Tomcat加载启动时默认加载的jar包。
项目编写入门:
1、编写接口及其实现:
接口:
package cn.yq.demo.ws.soap_jaxws.service;
import javax.jws.WebService;
@WebService
public interface UserHiService {
String say(String name);
}
实现:
@WebService(
serviceName="HelloService",
portName="HelloServicePort",
endpointInterface="cn.yq.demo.ws.soap_jaxws.service.UserHiService"
)
public class UserHiserviceImpl implements UserHiService{
@Override
public String say(String name) {
return "你好:"+name;
}
}
2、在WEB-INF下添加sun-jaxws.xml文件
<?xml version="1.0" encoding="UTF-8"?>
<endpoints version="2.0" xmlns="http://java.sun.com/xml/ns/jax-ws/ri/runtime" >
<endpoint name="HellloService"
implementation="cn.yq.demo.ws.soap_jaxws.service.impl.UserHiserviceImpl"
url-pattern="/ws/soap/hello"/>
</endpoints>
表示仅发布一个endpoint。URL表示WSDL的访问模式。
3、部署启动Tomcat
打开浏览器输入:http://localhost:8080/applicationName/ws/soap/hello 可以进入RI WS控制台。点击查看具体的WSDL服务描述。
RI是Oracle下的项目,由于是EJB的拥护者,所以对于Spring的支持并不友善。
②、使用CXF内置的Jetty发布WS
Jetty 是一个开源的servlet容器,它为基于Java的web容器,例如JSP和servlet提供运行环境。Jetty是使用Java语言编写的,它的API以一组JAR包的形式发布。开发人员可以将Jetty容器实例化成一个对象,可以迅速为一些独立运行(stand-alone)的Java应用提供网络和web连接。
1、配置Maven,准备环境
配置好Eclipse或IDEA的Maven User配置,指定自己的仓库配置文件。
用org.apache.maven.archetypes maven-archetype-webapp构建简单的初始化web项目。创建后,替换项目中的JRE System Library和ServerRuntime,替换好后通过Maven update Project。
配置Maven依赖:
Maven依赖库查询地址:http://mvnrepository.com/
<project xmlns="http://maven.apache.org/POM/4.0.0" xmlns:xsi="http://www.w3.org/2001/XMLSchema-instance"
xsi:schemaLocation="http://maven.apache.org/POM/4.0.0 http://maven.apache.org/maven-v4_0_0.xsd">
<modelVersion>4.0.0</modelVersion>
<groupId>cn.yq</groupId>
<artifactId>axis_day03</artifactId>
<packaging>war</packaging>
<version>0.0.1-SNAPSHOT</version>
<name>axis_day03</name>
<url>http://maven.apache.org</url>
<properties>
<project.build.sourceEncoding>UTF-8</project.build.sourceEncoding>
<cxf.version>3.0.4</cxf.version>
</properties>
<dependencies>
<dependency>
<groupId>junit</groupId>
<artifactId>junit</artifactId>
<version>3.8.1</version>
<scope>test</scope>
</dependency>
<!--CXF-->
<dependency>
<groupId>org.apache.cxf</groupId>
<artifactId>cxf-rt-frontend-jaxws</artifactId>
<version>${cxf.version}</version>
</dependency>
<dependency>
<groupId>org.apache.cxf</groupId>
<artifactId>cxf-rt-transports-http-jetty</artifactId>
<version>${cxf.version}</version>
</dependency>
</dependencies>
<build>
<finalName>axis_day03</finalName>
</build>
</project>
2、接口与实现的编写同RI。
3、通过JaxWsServerFactory发布WS
package cn.yq.jax;
import org.apache.cxf.jaxws.JaxWsServerFactoryBean;
import cn.yq.service.HelloService;
import cn.yq.service.impl.HelloServiceImpl;
public class JaxWsServer {
public static void main(String[] args) {
String wsurl = "http://localhost:8080/ws/soap/hello";
JaxWsServerFactoryBean factory = new JaxWsServerFactoryBean();
factory.setAddress(wsurl);
factory.setServiceClass(HelloService.class);
factory.setServiceBean(new HelloServiceImpl());
factory.create();
System.out.println("创建成功!SAOP WS");
}
}
4、运行JaxWsServer 类发布WebService服务。
该种方式仅供探索,不适合开发环境。
③、在Web容器中使用Spring+CXF发布WS
1、配置Maven依赖:
<project xmlns="http://maven.apache.org/POM/4.0.0" xmlns:xsi="http://www.w3.org/2001/XMLSchema-instance"
xsi:schemaLocation="http://maven.apache.org/POM/4.0.0 http://maven.apache.org/maven-v4_0_0.xsd">
<modelVersion>4.0.0</modelVersion>
<groupId>cn.yq</groupId>
<artifactId>axis_day04</artifactId>
<packaging>war</packaging>
<version>0.0.1-SNAPSHOT</version>
<url>http://maven.apache.org</url>
<properties>
<project.build.sourceEncoding>UTF-8</project.build.sourceEncoding>
<cxf.version>3.0.4</cxf.version>
<spring.version>4.0.5.RELEASE</spring.version>
</properties>
<dependencies>
<dependency>
<groupId>junit</groupId>
<artifactId>junit</artifactId>
<version>3.8.1</version>
<scope>test</scope>
</dependency>
<!-- CXF -->
<dependency>
<groupId>org.apache.cxf</groupId>
<artifactId>cxf-rt-frontend-jaxws</artifactId>
<version>${cxf.version}</version>
</dependency>
<dependency>
<groupId>org.apache.cxf</groupId>
<artifactId>cxf-rt-transports-http-jetty</artifactId>
<version>${cxf.version}</version>
</dependency>
<!-- Spring -->
<dependency>
<groupId>org.springframework</groupId>
<artifactId>spring-context</artifactId>
<version>${spring.version}</version>
</dependency>
<dependency>
<groupId>org.springframework</groupId>
<artifactId>spring-web</artifactId>
<version>${spring.version}</version>
</dependency>
</dependencies>
<build>
<finalName>axis_day04</finalName>
</build>
</project>
2、接口与实现的编写。
接口:
@WebService
public interface HelloService {
String say(String name);
}
实现:
@WebService
@Component
public class HelloServiceImpl implements HelloService{
public String say(String name) {
return "你好:"+name;
}
}
实现好后,让Spring管理bean。
3、配置web.xml文件:
<!DOCTYPE web-app PUBLIC
"-//Sun Microsystems, Inc.//DTD Web Application 2.3//EN"
"http://java.sun.com/dtd/web-app_2_3.dtd" >
<web-app>
<display-name>Archetype Created Web Application</display-name>
<!-- Spring -->
<context-param>
<param-name>contextConfigLocation</param-name>
<param-value>classpath:spring.xml</param-value>
</context-param>
<listener>
<listener-class>org.springframework.web.context.ContextLoaderListener</listener-class>
</listener>
<!-- CXF -->
<servlet>
<servlet-name>cxf</servlet-name>
<servlet-class>org.apache.cxf.transport.servlet.CXFServlet</servlet-class>
</servlet>
<servlet-mapping>
<servlet-name>cxf</servlet-name>
<url-pattern>/ws/*</url-pattern>
</servlet-mapping>
</web-app>
以上配置完成两件事: Spring容器管理的配置与ws服务的处理管理。 所有带有/ws前缀的请求都将会交给CXFServlet进行处理,也就是用来处理WS请求。
4、配置Spring配置文件:classpath:spring.xml
<?xml version="1.0" encoding="UTF-8"?>
<beans xmlns="http://www.springframework.org/schema/beans"
xmlns:xsi="http://www.w3.org/2001/XMLSchema-instance" xmlns:context="http://www.springframework.org/schema/context"
xmlns:mvc="http://www.springframework.org/schema/mvc"
xsi:schemaLocation="
http://www.springframework.org/schema/beans
http://www.springframework.org/schema/beans/spring-beans.xsd
http://www.springframework.org/schema/context
http://www.springframework.org/schema/context/spring-context.xsd
http://www.springframework.org/schema/mvc
http://www.springframework.org/schema/mvc/spring-mvc.xsd">
<context:component-scan base-package="cn.yq.service.impl"/>
<import resource="spring-cxf.xml"/>
</beans>
5、配置cxf分离配置:
<?xml version="1.0" encoding="UTF-8"?>
<beans xmlns="http://www.springframework.org/schema/beans"
xmlns:xsi="http://www.w3.org/2001/XMLSchema-instance" xmlns:jaxws="http://cxf.apache.org/jaxws"
xsi:schemaLocation="http://www.springframework.org/schema/beans
http://www.springframework.org/schema/beans/spring-beans.xsd
http://cxf.apache.org/jaxws
http://cxf.apache.org/schemas/jaxws.xsd">
<jaxws:endpoint id="helloService" implementor="#helloServiceImpl" address="/soap/hello" />
</beans>
6、发布启动Tomcat:
在浏览器中输入http://localhost:8080/applicationName/ws 即可进入CXF控制台查看servicesList。
④、介绍三种生成WebServici客户端的方法:
1、CXF提供的WS客户端
通用动态代理客户端
package cn.yq.client;
import org.apache.cxf.endpoint.Client;
import org.apache.cxf.endpoint.dynamic.DynamicClientFactory;
public class HelloServiceClient {
public static void main(String[] args) {
DynamicClientFactory factory=DynamicClientFactory.newInstance();
String wsdlUrl="http://localhost:8080/axis_day04/ws/soap/hello?wsdl";
Client client=factory.createClient(wsdlUrl);
try {
Object[] results=client.invoke("say", "world");
System.out.println(results[0]);
} catch (Exception e) {
e.printStackTrace();
}
}
}
2、基于Spring 的客户端
使用javaws:client
步骤:
①接口类
package cn.yq.service;
import javax.jws.WebService;
@WebService
public interface HelloServiceImpl {
String say(String name);
}
②配置javaws:client的类型
<?xml version="1.0" encoding="UTF-8"?>
<beans xmlns="http://www.springframework.org/schema/beans"
xmlns:xsi="http://www.w3.org/2001/XMLSchema-instance" xmlns:jaxws="http://cxf.apache.org/jaxws"
xsi:schemaLocation="http://www.springframework.org/schema/beans
http://www.springframework.org/schema/beans/spring-beans.xsd
http://cxf.apache.org/jaxws
http://cxf.apache.org/schemas/jaxws.xsd">
<jaxws:client id="helloService" serviceClass="cn.yq.service.HelloService"
address="http://localhost:8080/axis_day04/ws/soap/hello"
/>
</beans>
③客户端实现类直接调用服务端
package cn.yq.axis_day04_spring_client;
import org.springframework.context.ApplicationContext;
import org.springframework.context.support.ClassPathXmlApplicationContext;
import cn.yq.service.HelloService;
/**
*
* @Path cn.yq.axis_day04_spring_client.App
* @Description TODO
* @date 2018年4月24日下午10:44:35
* @author yuanqi
* @version:1.0
*/
public class App {
private static ApplicationContext context;
public static void main(String[] args) {
context = new ClassPathXmlApplicationContext("spring-client.xml");
HelloService helloService=(HelloService)context.getBean("helloService");
String result=helloService.say("Smith");
System.out.println(result);
}
}
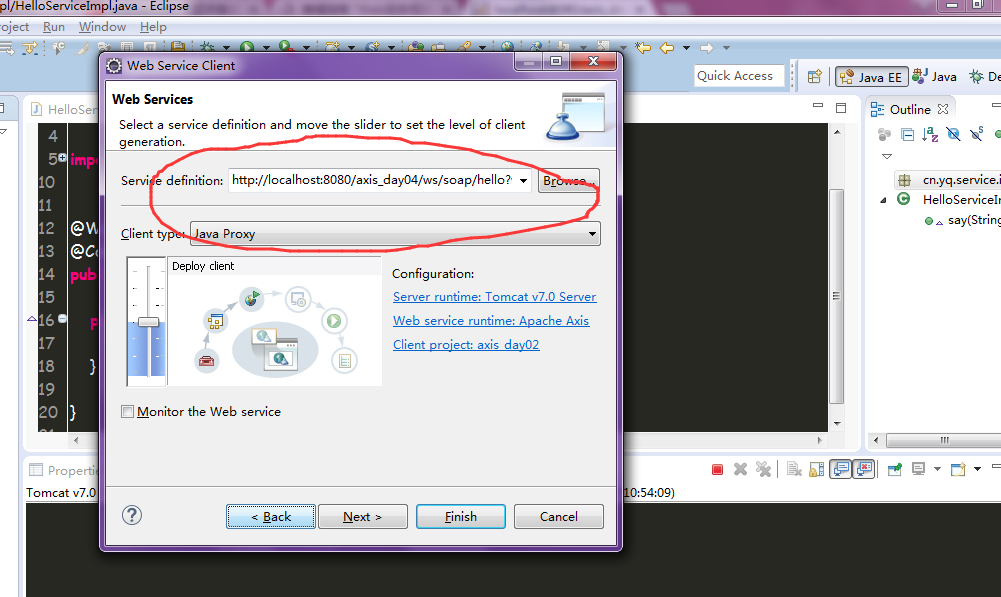
3、用eclipse自带jdk插件生成客户端
Eclipse选择NEW > OTHER> WebServiceClient 输入wdsl的地址,然后选择对应要生成客户端的包下即可。