简介
SAML的全称是Security Assertion Markup Language, 是由OASIS制定的一套基于XML格式的开放标准,用在身份提供者(IdP)和服务提供者 (SP)之间交换身份验证和授权数据。
SAML的一个非常重要的应用就是基于Web的单点登录(SSO)。
接下来我们一起来看看SAML是怎么工作的。
SAML的构成
在SAML协议中定义了三个角色,分别是principal:代表主体通常表示人类用户。identity provider (IdP)身份提供者和service provider (SP)服务提供者。
IdP的作用就是进行身份认证,并且将用户的认证信息和授权信息传递给服务提供者。
SP的作用就是进行用户认证信息的验证,并且授权用户访问指定的资源信息。
SAML的优势
为什么要使用SAML呢?
第一可以提升用户体验,如果系统使用SAML,那么可以在登录一次的情况下,访问多个不同的系统服务。这实际上也是SSO的优势,用户不需要分别记住多个系统的用户名和密码,只用一个就够了。
第二可以提升系统的安全性,使用SAML,我们只需要向IdP提供用户名密码即可,
第三用户的认证信息不需要保存在所有的资源服务器上面,只需要在在IdP中存储一份就够了。
SAML是怎么工作的
接下来,我们通过一个用SAML进行SSO认证的流程图,来分析一下SAML是怎么工作的。
根据请求方式有redirect和post的不同,使用SAML来进行SSO认证有通常有三种方式,我们一一道来。
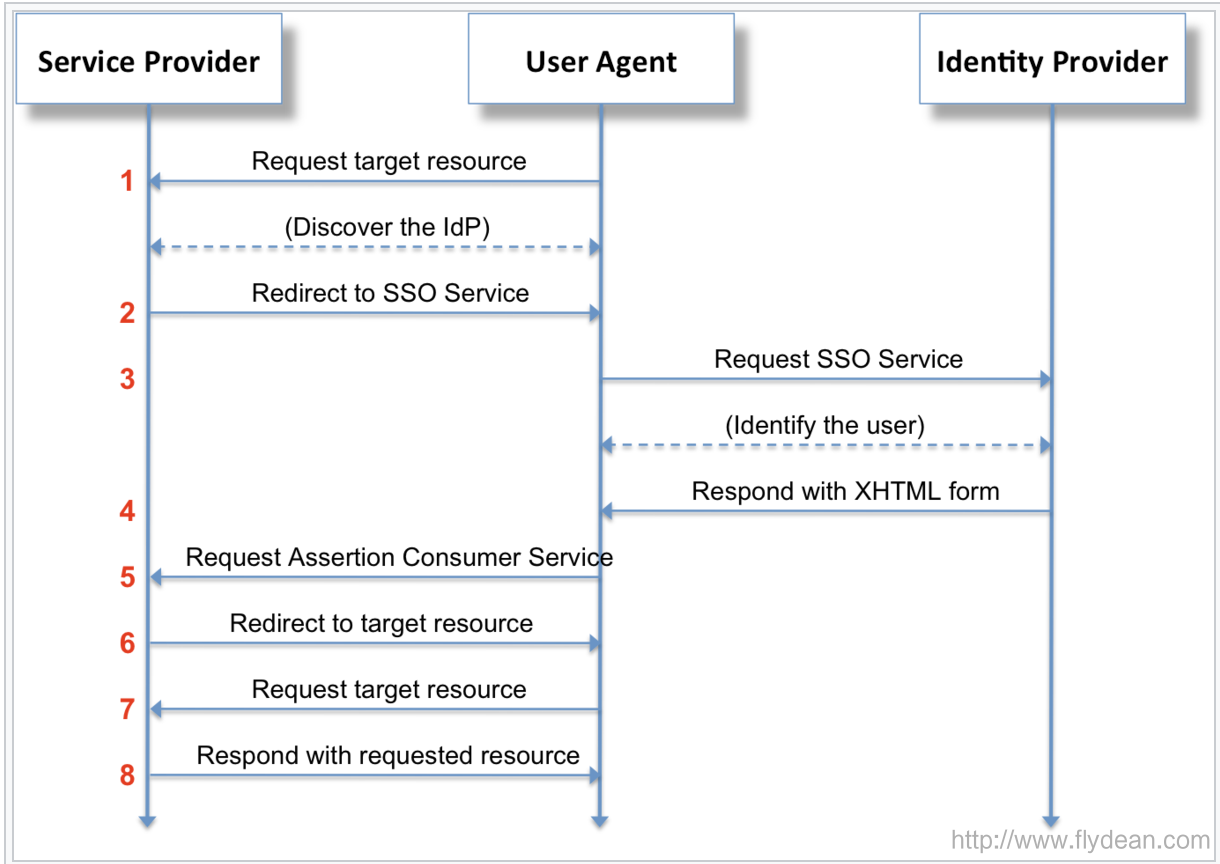
SP redirect request; IdP POST response

上图中User Agent就是web浏览器,我们看一下如果用户想请求Service Provider的资源的时候,SAML协议是怎么处理的。
- 用户通过User Agent请求Service Provider,比如:
http://sp.flydean.com/myresource
SP将会对该资源进行相应的安全检查,如果发现已经有一个有效的安全上下文的话,SP将会跳过2-7步,直接进入第8步。
- 如果在第一步的时候,SP并没有找到相应的有效安全上下文的话,则会生成对应的SAMLRequest,并将User Agent重定向到IdP:
302 Redirect
Location: https://idp.flydean.com/SAML2/SSO/Redirect?SAMLRequest=request&RelayState=token
RelayState是SP维护的一个状态信息,主要用来防止CSRF攻击。
其中这个SAMLRequest是用Base64编码的samlp:AuthnRequest,下面是一个samlp:AuthnRequest的例子:
  <samlp:AuthnRequest
    xmlns:samlp="urn:oasis:names:tc:SAML:2.0:protocol"
    xmlns:saml="urn:oasis:names:tc:SAML:2.0:assertion"
    ID="aaf23196-1773-2113-474a-fe114412ab72"
    Version="2.0"
    IssueInstant="2020-09-05T09:21:59Z"
    AssertionConsumerServiceIndex="0"
    AttributeConsumingServiceIndex="0">
    <saml:Issuer>https://sp.flydean.com/SAML2</saml:Issuer>
    <samlp:NameIDPolicy
      AllowCreate="true"
      Format="urn:oasis:names:tc:SAML:2.0:nameid-format:transient"/>
  </samlp:AuthnRequest>
为了安全起见,SAMLRequest还可以使用SP提供的签名key来进行签名。
- User agent将会发送一个get请求到IdP的SSO server :
GET /SAML2/SSO/Redirect?SAMLRequest=request&RelayState=token HTTP/1.1
Host: idp.flydean.com
IdP收到这个AuthnRequest请求之后,将会进行安全验证,如果是合法的AuthnRequest,那么将会展示登录界面。
- 用户可以输入用户名密码进行登录。登录成功之后,IdP将会返回一个XHTML form:
  <form method="post" action="https://sp.flydean.com/SAML2/SSO/POST" ...>
    <input type="hidden" name="SAMLResponse" value="response" />
    <input type="hidden" name="RelayState" value="token" />
    ...
    <input type="submit" value="Submit" />
  </form>
这个form中包含了SAMLResponse信息,SAMLResponse中包含了用户相关的信息。
同样的SAMLResponse也是使用Base64进行编码过的samlp:Response。
<samlp:Response
    xmlns:samlp="urn:oasis:names:tc:SAML:2.0:protocol"
    xmlns:saml="urn:oasis:names:tc:SAML:2.0:assertion"
    ID="identifier_2"
    InResponseTo="identifier_1"
    Version="2.0"
    IssueInstant="2020-09-05T09:22:05Z"
    Destination="https://sp.flydean.com/SAML2/SSO/POST">
    <saml:Issuer>https://idp.flydean.com/SAML2</saml:Issuer>
    <samlp:Status>
      <samlp:StatusCode
        Value="urn:oasis:names:tc:SAML:2.0:status:Success"/>
    </samlp:Status>
    <saml:Assertion
      xmlns:saml="urn:oasis:names:tc:SAML:2.0:assertion"
      ID="identifier_3"
      Version="2.0"
      IssueInstant="2020-09-05T09:22:05Z">
      <saml:Issuer>https://idp.flydean.com/SAML2</saml:Issuer>
      <!-- a POSTed assertion MUST be signed -->
      <ds:Signature
        xmlns:ds="http://www.w3.org/2000/09/xmldsig#">...</ds:Signature>
      <saml:Subject>
        <saml:NameID
          Format="urn:oasis:names:tc:SAML:2.0:nameid-format:transient">
          3f7b3dcf-1674-4ecd-92c8-1544f346baf8
        </saml:NameID>
        <saml:SubjectConfirmation
          Method="urn:oasis:names:tc:SAML:2.0:cm:bearer">
          <saml:SubjectConfirmationData
            InResponseTo="identifier_1"
            Recipient="https://sp.flydean.com/SAML2/SSO/POST"
            NotOnOrAfter="2020-09-05T09:27:05Z"/>
        </saml:SubjectConfirmation>
      </saml:Subject>
      <saml:Conditions
        NotBefore="2020-09-05T09:17:05Z"
        NotOnOrAfter="2020-09-05T09:27:05Z">
        <saml:AudienceRestriction>
          <saml:Audience>https://sp.flydean.com/SAML2</saml:Audience>
        </saml:AudienceRestriction>
      </saml:Conditions>
      <saml:AuthnStatement
        AuthnInstant="2020-09-05T09:22:00Z"
        SessionIndex="identifier_3">
        <saml:AuthnContext>
          <saml:AuthnContextClassRef>
            urn:oasis:names:tc:SAML:2.0:ac:classes:PasswordProtectedTransport
         </saml:AuthnContextClassRef>
        </saml:AuthnContext>
      </saml:AuthnStatement>
    </saml:Assertion>
  </samlp:Response>
我们可以看到samlp:Response中包含有saml:Assertion信息。
-
user agent 收到XHTML form之后将会提交该form给SP。
-
SP中的assertion consumer service将会处理这个请求,创建相关的安全上下文,并将user agent重定向到要访问的资源页面。
-
user agent再次请求SP资源。
-
因为安全上下文已经创建完毕,SP可以直接返回相应的资源,不用再次到IdP进行认证。
我们可以看到上面的所有的信息交换都是由前端浏览器来完成的,在SP和IdP之间不存在直接的通信。
这种全部由前端来完成信息交换的方式好处就是协议流非常简单,所有的消息都是简单的GET或者POST请求。
如果为了提高安全性,也可以使用引用消息。也就是说IdP返回的不是直接的SAML assertion,而是一个SAML assertion的引用。SP收到这个引用之后,可以从后台再去查询真实的SAML assertion,从而提高了安全性。
SP POST Request; IdP POST Response
刚刚讲的是SP redirect Request,这里我们看一下SP POST request是怎么做的:

和第一种方式的不同之处在于第二步和第三步。
第二步:SP不再进行redirect了,而是返回一个XHTML form给User agent:
  <form method="post" action="https://idp.flydean.com/SAML2/SSO/POST" ...>
    <input type="hidden" name="SAMLRequest" value="request" />
    <input type="hidden" name="RelayState" value="token" />
    ...
    <input type="submit" value="Submit" />
  </form>
第三步:拿到第二步的XHTML form之后,User agent将该form post到IdP SSO server。
从第四步开始就和第一种方式是一样的了。
SP redirect artifact; IdP redirect artifact
第三种方式,SP和IdP都用的是redirect,但是redirect的内容都是artifact。
之前我们讲了SAML message可以以值的方式也可以以引用的方式来进行传递。
而这种以引用的传递方式就是artifact。
收到artifact的receiver会发送一个samlp:ArtifactResolve 给issuer,从而获得真正的message。
下面是一个向IdP请求message的例子:
  <samlp:ArtifactResolve
    xmlns:samlp="urn:oasis:names:tc:SAML:2.0:protocol"
    xmlns:saml="urn:oasis:names:tc:SAML:2.0:assertion"
    ID="_cce4ee769ed970b501d680f697989d14"
    Version="2.0"
    IssueInstant="2020-09-05T09:21:58Z">
    <saml:Issuer>https://idp.flydean.com/SAML2</saml:Issuer>
    <!-- an ArtifactResolve message SHOULD be signed -->
    <ds:Signature
      xmlns:ds="http://www.w3.org/2000/09/xmldsig#">...</ds:Signature>
    <samlp:Artifact>AAQAAMh48/1oXIM+sDo7Dh2qMp1HM4IF5DaRNmDj6RdUmllwn9jJHyEgIi8=</samlp:Artifact>
  </samlp:ArtifactResolve>
相应的server会返回一个包含samlp:AuthnRequest的samlp:ArtifactResponse:
<samlp:ArtifactResponse
    xmlns:samlp="urn:oasis:names:tc:SAML:2.0:protocol"
    ID="_d84a49e5958803dedcff4c984c2b0d95"
    InResponseTo="_cce4ee769ed970b501d680f697989d14"
    Version="2.0"
    IssueInstant="2020-09-05T09:21:59Z">
    <!-- an ArtifactResponse message SHOULD be signed -->
    <ds:Signature
      xmlns:ds="http://www.w3.org/2000/09/xmldsig#">...</ds:Signature>
    <samlp:Status>
      <samlp:StatusCode
        Value="urn:oasis:names:tc:SAML:2.0:status:Success"/>
    </samlp:Status>
    <samlp:AuthnRequest
      xmlns:samlp="urn:oasis:names:tc:SAML:2.0:protocol"
      xmlns:saml="urn:oasis:names:tc:SAML:2.0:assertion"
      ID="_306f8ec5b618f361c70b6ffb1480eade"
      Version="2.0"
      IssueInstant="2020-09-05T09:21:59Z"
      Destination="https://idp.flydean.com/SAML2/SSO/Artifact"
      ProtocolBinding="urn:oasis:names:tc:SAML:2.0:bindings:HTTP-Artifact"
      AssertionConsumerServiceURL="https://sp.flydean.com/SAML2/SSO/Artifact">
      <saml:Issuer>https://sp.flydean.com/SAML2</saml:Issuer>
      <samlp:NameIDPolicy
        AllowCreate="false"
        Format="urn:oasis:names:tc:SAML:1.1:nameid-format:emailAddress"/>
    </samlp:AuthnRequest>
  </samlp:ArtifactResponse>
看下第三种方式的流程图:

可以看到这种方式和前面两种方式的区别就是多了一个请求真实message的步骤。
以第三,四,五步为例:
第三步user agent请求IdP的SSO server:
https://idp.example.org/SAML2/SSO/Artifact?SAMLart=artifact_1&RelayState=token
注意这里请求的参数变成了SAMLart。
第四步,IdP需要发送一个samlp:ArtifactResolve到SP来请求真正的samlp:AuthnRequest。
第五步,SP返回一个samlp:ArtifactResponse 包含samlp:AuthnRequest。
总结
SAML协议和它的基本用法就是上面这样。下面的文章我们会举一个具体的例子,来讲解如何应用SAML协议。
本文作者:flydean程序那些事
本文链接:http://www.flydean.com/saml-startup/
本文来源:flydean的博客
欢迎关注我的公众号:「程序那些事」最通俗的解读,最深刻的干货,最简洁的教程,众多你不知道的小技巧等你来发现!