CAS单点登录系列:
CAS 5.1.x 的搭建和使用(一)—— 通过Overlay搭建服务端

CAS 5.1.x 的搭建和使用(二)—— 通过Overlay搭建服务端-其它配置说明

CAS 5.1.x 的搭建和使用(三)—— 官方示例来熟悉客户端搭建

CAS 5.1.x 的搭建和使用(四)—— 配置使用HTTP协议访问的服务端
这节主要解释一下上一节剩余的一些配置是做什么的,为了阅读方便直接在配置文件中写,四组分隔线中的内容就是
#STEP 3 在TOMCAT8.5中跑一个模板然后将其war包中解压出来的的application.properties复制出来,放到手动创建的src下的resources里面

##
# CAS Server Context Configuration
#
server.context-path=/cas
server.port=8443

#STEP 5添加认证服务

①——————————————————————————————————————————分割线—————————————————START—————————————————————————————————————————————————
cas.serviceRegistry.initFromJson=true
这个配置可以从
https://apereo.github.io/cas/5.1.x/installation/Configuration-Properties.html#service-registry
以及
https://apereo.github.io/cas/5.1.x/installation/JSON-Service-Management.html
读到。
如果不想读可以参考一下我的理解:
加了这个之后就可以通过

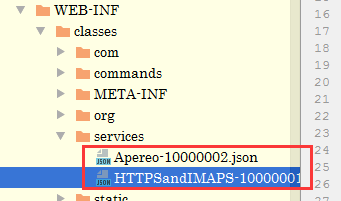
这些放在services目录的json文件来注册服务了,
先说一下这里的“服务”
其实指的就是客户端,更准确的说就是它的url,如果一个客户端没有注册到CAS的服务列表,
那么你通过客户端跳转到CAS,CAS会拒绝这个跳转。

war包解压出来的services里已经有了两个json文件,其中HTTPSandIMAPS-100xxxxxx.json中有一段:
"serviceId" : "^(https|imaps|http)://.*",
后边这部分是个正则表达式,为了支持http协议的客户端,我在里面加了个http,代表所有URL符合这个正则表达式的服务都会被当成已经注册的服务
①——————————————————————————————————————————分割线———————————————————END———————————————————————————————————————————————
#STEP 4签发证书,如果是用spring boot之类嵌入式的容器,则需要改这里的配置,如果是直接部在tomcat中,则需要把tomcat改成https的
#server.ssl.key-store=file:/etc/cas/thekeystore
#server.ssl.key-store-password=changeit
#server.ssl.key-password=changeit
# server.ssl.ciphers=
# server.ssl.client-auth=
# server.ssl.enabled=
# server.ssl.key-alias=
# server.ssl.key-store-provider=
# server.ssl.key-store-type=
# server.ssl.protocol=
# server.ssl.trust-store=
# server.ssl.trust-store-password=
# server.ssl.trust-store-provider=
# server.ssl.trust-store-type=

#server.max-http-header-size=2097152
#server.use-forward-headers=true
#server.connection-timeout=20000
#server.error.include-stacktrace=NEVER

#server.tomcat.max-http-post-size=2097152
#server.tomcat.basedir=build/tomcat
#server.tomcat.accesslog.enabled=true
#server.tomcat.accesslog.pattern=%t %a "%r" %s (%D ms)
#server.tomcat.accesslog.suffix=.log
#server.tomcat.max-threads=10
#server.tomcat.port-header=X-Forwarded-Port
#server.tomcat.protocol-header=X-Forwarded-Proto
#server.tomcat.protocol-header-https-value=https
#server.tomcat.remote-ip-header=X-FORWARDED-FOR
#server.tomcat.uri-encoding=UTF-8

spring.http.encoding.charset=UTF-8
spring.http.encoding.enabled=true
spring.http.encoding.force=true

##
# CAS Cloud Bus Configuration
#
spring.cloud.bus.enabled=false
# spring.cloud.bus.refresh.enabled=true
# spring.cloud.bus.env.enabled=true
# spring.cloud.bus.destination=CasCloudBus
# spring.cloud.bus.ack.enabled=true

endpoints.enabled=false
endpoints.sensitive=true

endpoints.restart.enabled=false
endpoints.shutdown.enabled=false

management.security.enabled=true
management.security.roles=ACTUATOR,ADMIN
management.security.sessions=if_required
management.context-path=/status
management.add-application-context-header=false

security.basic.authorize-mode=role
security.basic.enabled=false
security.basic.path=/cas/status/**

##
# CAS Web Application Session Configuration
#
server.session.timeout=300
server.session.cookie.http-only=true
server.session.tracking-modes=COOKIE

##
# CAS Thymeleaf View Configuration
#
spring.thymeleaf.encoding=UTF-8
②——————————————————————————————————————————分割线—————————————————START—————————————————————————————————————————————————
spring.thymeleaf.cache=false

这个配置没有在官网找到说明,是自己摸索出来的,服务端的HTML页面使用的是thymeleaf编写(http://www.ultraq.net.nz/thymeleaf/layout)
thymeleaf默认会在启动的时候就把页面的静态内容给放到缓存里,这给我修改CAS默认登录页带来了很大的麻烦,每次修改一点点页面内容,刷新是看不到效果的,只得重启服务,为了方便开发,
我把这个配置设成false,就是说不要缓存。

如果你也想修改登录页这里给出几个建议:
1、如果不懂thyeleaf先简单了解一下thymeleaf官网的demo写法;
2、登录页的模板是layout.html,其中有几个js是从谷歌CDN上下载的,而谷歌我们国内又访问不了,
这就会导致登录页加载非常慢,建议先把这几个js本地化;
3、登录页主要是casLoginView.html和fragments目录下的loginform.html;
4、layout.html引入了好几个类似logo.html,footer.html的页面,这几个页面看名字就知道干什么的,建议对他们进行修改,改成自己的
②——————————————————————————————————————————分割线—————————————————END—————————————————————————————————————————————————
spring.thymeleaf.mode=HTML
##
# CAS Log4j Configuration
#
# logging.config=file:/etc/cas/log4j2.xml
server.context-parameters.isLog4jAutoInitializationDisabled=true

##
# CAS AspectJ Configuration
#
spring.aop.auto=true
spring.aop.proxy-target-class=true

##
# CAS Authentication Credentials
#
#STEP4 注释掉写死的用户 改用jdbc的用户 START
#cas.authn.accept.users=casuser::Mellon

cas.authn.jdbc.query[0].sql=select * from cms_auth_user where user_name=?
cas.authn.jdbc.query[0].healthQuery=
cas.authn.jdbc.query[0].isolateInternalQueries=false
cas.authn.jdbc.query[0].url=jdbc:mysql://127.0.0.1:3306/CASTEST?useUnicode=true&characterEncoding=UTF-8&autoReconnect=true&useSSL=false
cas.authn.jdbc.query[0].failFast=true
cas.authn.jdbc.query[0].isolationLevelName=ISOLATION_READ_COMMITTED
cas.authn.jdbc.query[0].dialect=org.hibernate.dialect.MySQLDialect
cas.authn.jdbc.query[0].leakThreshold=10
cas.authn.jdbc.query[0].propagationBehaviorName=PROPAGATION_REQUIRED
cas.authn.jdbc.query[0].batchSize=1
cas.authn.jdbc.query[0].user=root
#cas.authn.jdbc.query[0].ddlAuto=create-drop
cas.authn.jdbc.query[0].maxAgeDays=180
cas.authn.jdbc.query[0].password=123456
cas.authn.jdbc.query[0].autocommit=false
cas.authn.jdbc.query[0].driverClass=com.mysql.jdbc.Driver
cas.authn.jdbc.query[0].idleTimeout=5000
# cas.authn.jdbc.query[0].credentialCriteria=
# cas.authn.jdbc.query[0].name=
# cas.authn.jdbc.query[0].order=0
# cas.authn.jdbc.query[0].dataSourceName=
# cas.authn.jdbc.query[0].dataSourceProxy=false

cas.authn.jdbc.query[0].fieldPassword=password

# cas.authn.jdbc.query[0].fieldExpired=
# cas.authn.jdbc.query[0].fieldDisabled=
# cas.authn.jdbc.query[0].principalAttributeList=sn,cn:commonName,givenName

#cas.authn.jdbc.query[0].passwordEncoder.type=DEFAULT
③——————————————————————————————————————————分割线—————————————————START—————————————————————————————————————————————————
#cas.authn.jdbc.query[0].passwordEncoder.type=com.example.CustomPasswordEncoder
#cas.authn.jdbc.query[0].passwordEncoder.characterEncoding=UTF-8
#cas.authn.jdbc.query[0].passwordEncoder.encodingAlgorithm=MD5

#cas.authn.jdbc.query[0].passwordEncoder.secret=
#cas.authn.jdbc.query[0].passwordEncoder.strength=16

这一段可以指定密码的验证方式,如果什么都不做,那么传入的密码什么样,数据库中保存的密码就得是什么样,如果加密方式比较简单就是MD5之类的,可以直接用上边的encodingAlgorithm
后边直接写个MD5完事。
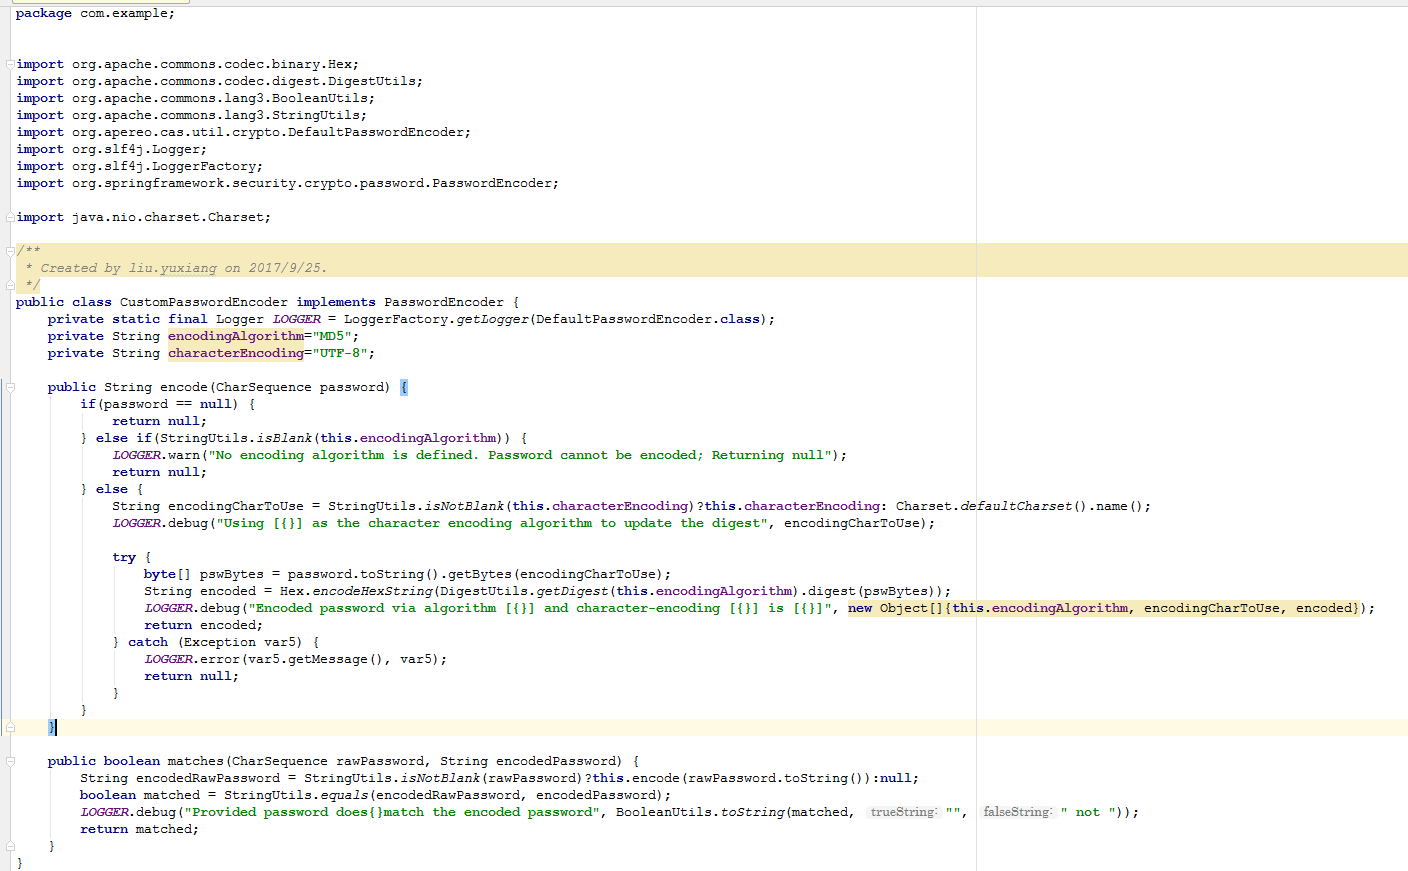
如果加密方式比较复杂则可以自己实现加密方法,通过实现spring的PasswordEncoder,示例如下,对应上边type后边配置的内容

③——————————————————————————————————————————分割线—————————————————END—————————————————————————————————————————————————
# cas.authn.jdbc.query[0].principalTransformation.suffix=
# cas.authn.jdbc.query[0].principalTransformation.caseConversion=NONE|UPPERCASE|LOWERCASE
# cas.authn.jdbc.query[0].principalTransformation.prefix=
# STEP4 END


##
# CAS Delegated Authentication
#
#cas.authn.pac4j.bitbucket.clientName=Bitbucket
#cas.authn.pac4j.dropbox.clientName=Dropbox
#cas.authn.pac4j.facebook.clientName=Facebook
#cas.authn.pac4j.foursquare.clientName=Foursquare
#cas.authn.pac4j.github.clientName=Github
#cas.authn.pac4j.google.clientName=Google
#cas.authn.pac4j.linkedIn.clientName=LinkedIn
#cas.authn.pac4j.paypal.clientName=PayPal
#cas.authn.pac4j.twitter.clientName=Twitter
#cas.authn.pac4j.yahoo.clientName=Yahoo
#cas.authn.pac4j.windowsLive.clientName=Windows Live
#cas.authn.pac4j.wordpress.clientName=WordPress
④——————————————————————————————————————————分割线—————————————————START—————————————————————————————————————————————————
#多属性
cas.authn.attributeRepository.jdbc[0].singleRow=true
cas.authn.attributeRepository.jdbc[0].order=0
cas.authn.attributeRepository.jdbc[0].url=jdbc:mysql://127.0.0.1:3306/CASTEST?useUnicode=true&characterEncoding=UTF-8&autoReconnect=true&useSSL=false
cas.authn.attributeRepository.jdbc[0].username=user_name
cas.authn.attributeRepository.jdbc[0].user=root
cas.authn.attributeRepository.jdbc[0].password=123456
cas.authn.attributeRepository.jdbc[0].sql=select * from cms_auth_user where {0}
cas.authn.attributeRepository.jdbc[0].dialect=org.hibernate.dialect.MySQLDialect
cas.authn.attributeRepository.jdbc[0].ddlAuto=none
cas.authn.attributeRepository.jdbc[0].driverClass=com.mysql.jdbc.Driver
cas.authn.attributeRepository.jdbc[0].leakThreshold=10
cas.authn.attributeRepository.jdbc[0].propagationBehaviorName=PROPAGATION_REQUIRED
cas.authn.attributeRepository.jdbc[0].batchSize=1
cas.authn.attributeRepository.jdbc[0].healthQuery=SELECT 1
cas.authn.attributeRepository.jdbc[0].failFast=true

CAS默认返回给客户端的只有用户ID,如果想返回更多的内容就要加上这段内容了,上面这个配置会返回cms_auth_user表下的所有字段。
如何获取这些字段可以在客户端通过以下代码:
    AttributePrincipal principal = (AttributePrincipal) request.getUserPrincipal();

    final Map attributes = principal.getAttributes();

更详细的内容在客户端章节会给出
④——————————————————————————————————————————分割线—————————————————ENDT—————————————————————————————————————————————————
总共四条。