本文的目的:
项目截图说明

附flexigrid参数说明(可以去flexigrid.js文件中查看配置):
height: 200, //flexigrid插件的高度,单位为px
'auto', //宽度值,auto表示根据每列的宽度自动计算,在IE6下建议设置具体值否则会有问题
striped: true, //是否显示斑纹效果,默认是奇偶交互的形式
novstripe: false,//没用过这个属性
min 30, //列的最小宽度
minheight: 80, //列的最小高度
resizable: false, //resizable table是否可伸缩
url: false, //ajax url,ajax方式对应的url地址
method: 'POST', // data sending method,数据发送方式
dataType: 'json', // type of data loaded,数据加载的类型,xml,json
errormsg: '发生错误', //错误提升信息
usepager: false, //是否分页
nowrap: true, //是否不换行
page: 1, //current page,默认当前页
total: 1, //total pages,总页面数
useRp: true, //use the results per page select box,是否可以动态设置每页显示的结果数
rp: 25, // results per page,每页默认的结果数
rpOptions: [10, 15, 20, 25, 40, 100], //可选择设定的每页结果数
title: false, //是否包含标题
pagestat: '显示记录从{from}到{to},总数 {total} 条', //显示当前页和总页面的样式
procmsg: '正在处理数据,请稍候 ...', //正在处理的提示信息
query: '', //搜索查询的条件
qtype: '', //搜索查询的类别
qop: "Eq", //搜索的操作符
nomsg: '没有符合条件的记录存在', //无结果的提示信息
minColToggle: 1, //允许显示的最小列数
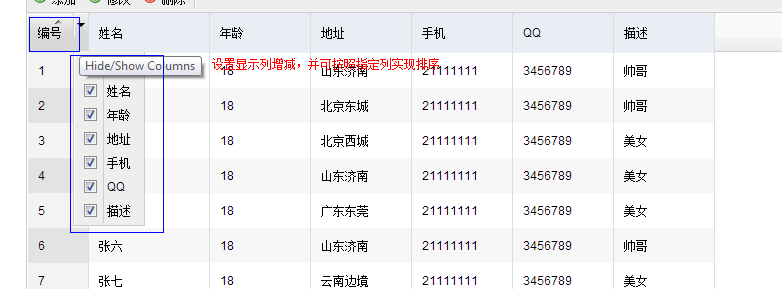
showToggleBtn: true, //是否允许显示隐藏列,该属性有bug设置成false点击头脚本报错。
hideOnSubmit: true, //是否在回调时显示遮盖
showTableToggleBtn: false, //是否显示【显示隐藏Grid】的按钮
autoload: true, //自动加载,即第一次发起ajax请求
blockOpacity: 0.5, //透明度设置
onToggleCol: false, //当在行之间转换时,可在此方法中重写默认实现,基本无用
onChangeSort: false, //当改变排序时,可在此方法中重写默认实现,自行实现客户端排序
onSuccess: false, //成功后执行
onSubmit: false, // 调用自定义的计算函数,基本没用
实现步骤
1、配置EF5.0 code first生成并初始化数据库
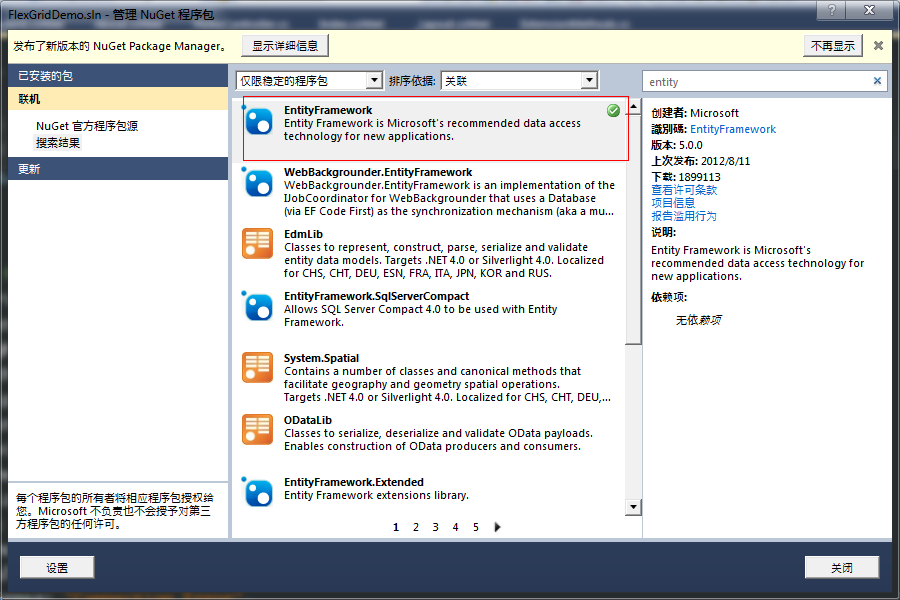
首先在项目中添加对EF5.0的引用,获取方式可以通过nuget包管理器添加或者通过控制台添加,这里给出一种方式的截图。
编写实体类(代码中有注释说明):


[Table("Students",Schema="xxxx")]//数据库映射表名及架构
    public class Student
    {
        [Key]//主键且自增长
        public int ID { get; set; }
        public string Name { get; set; }
        public int Age { get; set; }
        public string Address { get; set; }
        public string Mobile { get; set; }
        public string QQ { get; set; }
        public string Description { get; set; }
    }
编写数据库上下文:
public class GridDbContext:DbContext
    {
        public GridDbContext():base("name=GridDbContext")//指定EF识别的数据库连接字符串名称
        {
            Database.SetInitializer<GridDbContext>(new GridDbInitializer());//初始化数据库,也可在global中设置
        }
        public DbSet<Student> Students { get; set; }
    }
此处注意若是不指定数据库连接字符串名称,在web.config中只需将连接字符串的名称与数据库上下文类的名称一样即可。
连接字符串:
<connectionStrings>
    <add name="GridDbContext" connectionString="Data Source=(local);Initial Catalog=XXXX;Integrated Security=SSPI" providerName="System.Data.SqlClient" />
  </connectionStrings>
编写数据库表初始化数据填充类:
public class GridDbInitializer : DropCreateDatabaseIfModelChanges<GridDbContext>
    {
        //初始化数据库数据
        protected override void Seed(GridDbContext context)
        {
            List<Student> list = new List<Student>(){
             new Student(){Name="张一",Age=18,Address="山东济南",Mobile="21111111",QQ="3456789",Description="帅哥"},
             new Student(){Name="张二",Age=18,Address="北京东城",Mobile="21111111",QQ="3456789",Description="帅哥"},
             new Student(){Name="张三",Age=18,Address="北京西城",Mobile="21111111",QQ="3456789",Description="美女"},
             new Student(){Name="张四",Age=18,Address="山东济南",Mobile="21111111",QQ="3456789",Description="美女"},
             new Student(){Name="张五",Age=18,Address="广东东莞",Mobile="21111111",QQ="3456789",Description="美女"},
             new Student(){Name="张六",Age=18,Address="山东济南",Mobile="21111111",QQ="3456789",Description="帅哥"},
             new Student(){Name="张七",Age=18,Address="云南边境",Mobile="21111111",QQ="3456789",Description="美女"},
             new Student(){Name="张八",Age=18,Address="山东济南",Mobile="21111111",QQ="3456789",Description="帅哥"},
             new Student(){Name="张九",Age=18,Address="山东济南",Mobile="21111111",QQ="3456789",Description="帅哥"},
             new Student(){Name="张十",Age=18,Address="山东菏泽",Mobile="21111111",QQ="3456789",Description="美女"},
             new Student(){Name="张十一",Age=18,Address="山东泰安",Mobile="21111111",QQ="3456789",Description="帅哥"},
           };
            list.ForEach(c => context.Students.Add(c));
            context.SaveChanges();
        }
至此,EF生成数据库配置完成,我们只需在controller中随便写一个方法调用一下,便可在数据库中自动生数据库及表,并初始化数据。
2、配置Flexigrid
在模板页中添加对jquery等js的引用
<script src="../../Scripts/jquery-1.8.0.min.js" type="text/javascript"></script>
    <script src="../../Scripts/jquery-ui-1.8.23.min.js" type="text/javascript"></script>
    <script src="../../Scripts/jquery.unobtrusive-ajax.min.js" type="text/javascript"></script>
    <script src="@Url.Content("~/Scripts/flexigrid.js")" type="text/javascript"></script>
    <script src="@Url.Content("~/Scripts/flexigrid.pack.js")" type="text/javascript"></script>
    <link href="@Url.Content("~/Content/flexigrid.css")" rel="stylesheet" type="text/css" />
首先我们在HomeController中为Index添加一个视图,在此视图中配置flxigrid。
index页面显示代码:
@{
    ViewBag.Title = "Home Page";
}
    <script type="text/javascript">
        $(document).ready(function () {
            $('#students').flexigrid({
                url: '/Home/FlexigridList',
                dataType: 'json',
                colModel: [
                { display: '编号', name: 'ID',  40, sortable: true, align: 'left' },
                { display: '姓名', name: 'Name',  100, sortable: false, align: 'left' },
                { display: '年龄', name: 'Age',  80, sortable: true, align: 'left' },
                { display: '地址', name: 'Address',  80, sortable: false, align: 'left' },
                { display: '手机', name: 'Mobile',  80, sortable: false, align: 'left' },
                { display: 'QQ', name: 'QQ',  80, sortable: false, align: 'left' },
                { display: '描述', name: 'Description',  80, sortable: false, align: 'left' }
            ],
                buttons: [
            { name: '添加', bclass: 'add', onpress: button },
            { name: '修改', bclass: 'edit', onpress: button },
            { name: '删除', bclass: 'delete', onpress: button },
            { separator: true }
            ],
                searchitems: [
                { display: '姓名', name: 'Name' },
                { display: '描述', name: 'Description' }
            ],
                sortname: 'ID',
                sortorder: 'asc',
                usepager: true,
                title: '学生列表',
                useRp: true,
                rp: 10,
                showTableToggleBtn: true,
                 1040,
                height: 350,
                checkbox: true,
                rowId: 'ID'
            });
        })
        function button(com,grid) {
                switch (com) {
                    case "添加":
                        AddOrEdit(0);
                        return;
                    case "修改":
                        var ids = $('tr.trSelected td:first').text();
                        if (ids == undefined) {
                            alert("请选择一条数据");
                        }
                        else {
                            AddOrEdit(ids);
                        }
                        return;
                    case "删除":
                        var valueArray = new Array();
                        var list = $('tr.trSelected').each(function () {
                            valueArray.push($(this).find("td:first").text());
                        });
                        if (valueArray.length <= 0) {
                            alert("请选择一条数据");
                        }
                        else {
                            var idsstring = valueArray.join(',');
                            DeletStudent(idsstring);
                            window.location.reload();
                        }
                        return;
                }
};
        function AddOrEdit(ids) {
            $.ajax({
                type: "GET",
                url: "/home/AddStudent?id="+ids,
                success: function (html) {
                    $("<div class='formtalbe'></div>").html(html)
                                .attr("title", "操作")
                                .dialog({
                                    autoOpen: true,
                                    modal: true,
                                     300,
                                    buttons: {
                                        "确定": function () {
                                            $(".formtalbe").find("form").submit();
                                            $(".formtalbe").remove();
                                        },
                                        "取消": function () { $(this).dialog('destroy').remove(); $(this).dialog("close"); }
                                    }
                                });
                },
                error: function () {
                    $(".formtalbe").remove();
                    alert("操作失败!");
                }
            });

        }
        function DeletStudent(idsstring) {
            $.getJSON("/Home/DelStudent?ids=" + idsstring, function (data) {
                if (data == true)
                    alert("删除成功!");
            });
        }
</script>
<div id="maintable">
    <table id="students" style="display:none"></table>
</div>
flexigrid的配置说明参考前文给出的配置及js中的配置说明,下面给出重点几处的说明:
$('#students').flexigrid()将指定表格转化成flexigrid控件
url: '/Home/FlexigridList',后台返回表格ajax数据的方法,datatype为json数据类型
colModel:配置显示列名称,后台返回对应的数据列,大小,是否排序,位置等
buttons:工具栏按钮
searchitems:设置需要查询的列
其他配置不做说明(checkbox有问题。)
配置完成以后,运行程序现在便能程序出flexigrid的样子了。
接下来我们为根据某一显示列排序及模糊查询扩展两个IQueryable<T>的扩展方法,代码如下:
public static class ExtensionMethods
    {
        //按某一字段排序查询扩展方法
        public static IQueryable<T> OrderBy<T>(this IQueryable<T> source, string propertyName, bool asc)
        {
            var type = typeof(T);
            string methodName = asc ? "OrderBy" : "OrderByDescending";
            var property = type.GetProperty(propertyName);
            var parameter = Expression.Parameter(type, "p");
            var propertyAccess = Expression.MakeMemberAccess(parameter, property);
            var orderByExp = Expression.Lambda(propertyAccess, parameter);
            MethodCallExpression resultExp = Expression.Call(typeof(Queryable), methodName, new Type[] { type, property.PropertyType }, source.Expression, Expression.Quote(orderByExp));
            return source.Provider.CreateQuery<T>(resultExp);
        }
        //根据某一字段进行模糊查询
        public static IQueryable<T> Like<T>(this IQueryable<T> source, string propertyName, string keyword)
        {
            var type = typeof(T);
            var property = type.GetProperty(propertyName);
            var parameter = Expression.Parameter(type, "p");
            var propertyAccess = Expression.MakeMemberAccess(parameter, property);
            Expression methodExp = Expression.Call(Expression.Property(parameter, type.GetProperty(propertyName)), typeof(string).GetMethod("Contains", new Type[] { typeof(string) }), Expression.Constant(keyword));
            Expression<Func<T, bool>> lambda = Expression.Lambda<Func<T, bool>>(methodExp, parameter);
            return source.Where(lambda);
        }
    }
后台Home/FlexigridList获取数据的方法(代码中有详细说明)
//两种获取参数的方式,一种在action上面直接接收,另一种就是用Request.Form()或者Formcollection来接收
        public JsonResult FlexigridList(int page,int rp,string qtype,string query,string sortname,string sortorder)
        {
            //获取表格控件需要的参数
            //int page = int.Parse(Request.Form["page"]);
            //int rp = int.Parse(Request.Form["rp"]);
            //string qtype = Request.Form["qtype"].ToString();
            //string query = Request.Form["query"].ToString();
            //string sortname = Request.Form["sortname"].ToString();
            //string sortorder = Request.Form["sortorder"].ToString();

            //var q = db.Students.ToList().AsQueryable();
            var q = from c in db.Students
                    select c;
            ////根据某一字段进行模糊查询,见扩展方法
            if (!string.IsNullOrEmpty(qtype) && !string.IsNullOrEmpty(query))
            {
                q = q.Like(qtype, query);
            }
            ////按某一字段进行排序
            if (!string.IsNullOrEmpty(sortname) && !string.IsNullOrEmpty(sortorder))
            {
                q = q.OrderBy(sortname, (sortorder == "asc"));
            }
            ////分页
            q = q.Skip((page - 1) * rp).Take(rp);
            ////构造前台需要的JSON数据类型
            List<Object> row=new List<Object>();
            foreach (Student stu in q)
            {
                var cells = new List<string>() {stu.ID.ToString(), stu.Name, stu.Age.ToString(), stu.Address, stu.Mobile, stu.QQ, stu.Description };
                row.Add(new { id = stu.ID, cell =cells });
            }
            return Json(new { page=page,total=db.Students.Count(),rows=row}, JsonRequestBehavior.AllowGet);
        }
此方法的重点在于去前台参数值,根据某一字段构建排序及模糊查询,返回前台需要的json数据等。
文章到此为止,如果程序正确前台按自定列排序,查询,显示数据等都应该正常。
3、实现增删改
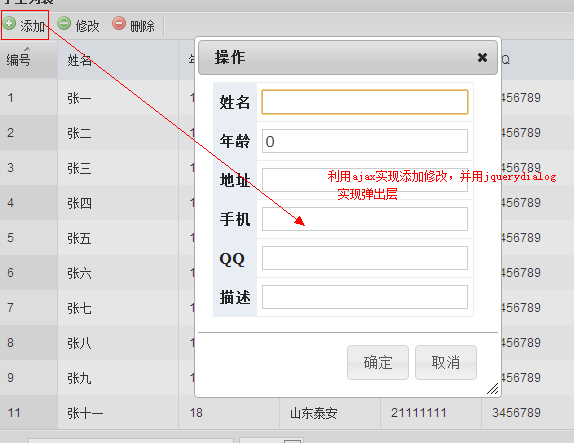
点击flexigrid的添加和修改按钮,通过jquery 的ajax请求,将添加及修改页面加载到jquery dialog中。demo中单独为此了一个 js函数,代码如下
        function AddOrEdit(ids) {
            $.ajax({
                type: "GET",
                url: "/home/AddStudent?id="+ids,
                success: function (html) {
                    $("<div class='formtalbe'></div>").html(html)
                                .attr("title", "操作")
                                .dialog({
                                    autoOpen: true,
                                    modal: true,
                                     300,
                                    buttons: {
                                        "确定": function () {
                                            $(".formtalbe").find("form").submit();
                                            $(".formtalbe").remove();
                                        },
                                        "取消": function () { $(this).dialog('destroy').remove(); $(this).dialog("close"); }
                                    }
                                });
                },
                error: function () {
                    $(".formtalbe").remove();
                    alert("操作失败!");
                }
            });

        }
此方法的关键在于ajax请求后台aciton并将试图加载在一个jquery dialog中,jquery控制表单提交等,添加后修改判断通过实体类ID判断。
后台添加修改方法:
//添加及修改
        public ActionResult AddStudent(int id=0)
        {
            var stu=id>0?db.Students.Find(id):new Student();
            return View(stu);
        }
        [HttpPost]
        public ActionResult AddStudent(Student student,FormCollection fc)
        {
            TryUpdateModel(student, fc);
            if (student.ID == 0)
                db.Students.Add(student);
            else
                db.Entry(student).State = EntityState.Modified;
            db.SaveChanges();
            return RedirectToAction("Index");
        }
添加及修改页面:
@model FlexGridDemo.Models.Student
@{
    Layout = null;
    }

@using (Html.BeginForm("AddStudent", "Home"))
{
    <table>
        <tr>
        @Html.HiddenFor(m=>m.ID)
            <th>姓名</th>
            <td>@Html.TextBoxFor(m=>m.Name)</td>
        </tr>
        <tr>
            <th>年龄</th>
            <td>@Html.TextBoxFor(m=>m.Age)</td>
        </tr>
        <tr>
            <th>地址</th>
            <td>@Html.TextBoxFor(m=>m.Address)</td>
        </tr>
        <tr>
            <th>手机</th>
            <td>@Html.TextBoxFor(m=>m.Mobile)</td>
        </tr>
        <tr>
            <th>QQ</th>
            <td>@Html.TextBoxFor(m=>m.QQ)</td>
        </tr>
        <tr>
            <th>描述</th>
            <td>@Html.TextBoxFor(m=>m.Description)</td>
        </tr>
    </table>
}
前台删除js方法,同样是ajax提交
function DeletStudent(idsstring) {
            $.getJSON("/Home/DelStudent?ids=" + idsstring, function (data) {
                if (data == true)
                    alert("删除成功!");
            });
        }
后台action方法
//批量删除
        public ActionResult DelStudent(string ids)
        {
            var idarray = ids.Split(',');
            foreach(var id in idarray)
            {
                var temp=db.Students.Find(int.Parse(id));
                db.Entry(temp).State=EntityState.Deleted;
            }
            db.SaveChanges();
            return Json(true);
        }
案例到此结束,flexigrid展示数据,数据的增删改查都已经实现了。
结语
由于只是为了掩饰flexigrid的使用,项目中有很多不合理的地方,已知的问题:flexigrid多选框的问题,添加修改字段没有添加验证,添加修改及删除成功后没有实现局部刷新等问题。
如有需要可自己扩展。
DEMO下载:点我下载
欢迎各位有志之士讨论批评,如资料有用欢迎推荐,欢迎拍砖。