web应用
服务端代码


#!/usr/bin/python3
# -*- coding: utf-8 -*-
# @Time    : 2018/10/22 7:47
# @File    : JDserver.py


import socket

sock = socket.socket()
sock.bind(("127.0.0.1", 8800))
sock.listen(5)

while True:
    print("server.................")
    conn, addr = sock.accept()  # conn客户端套接字,
    data = conn.recv(1024)
    with open("index.html", 'r', encoding="utf-8") as f:  # 打开文件的编码方式必须加,要不报编码错
        dat = f.read()

    print(dat)
    conn.send(('HTTP/1.1 200 OK

%s' % dat).encode("utf-8"))  # HTTP/1.1 200 OK

这个是固定格式
    # conn.send(b'HTTP/1.1 200 OK

12345646')  # HTTP/1.1 200 OK

这个是固定格式
    conn.close()
index.html
<!DOCTYPE html>
<html lang="en">
<head>
    <meta charset="UTF-8">
    <title>Title</title>
</head>
<body>
<h1>hello luffycity!</h1>
<img src="https://ss0.baidu.com/6ONWsjip0QIZ8tyhnq/it/u=1971562986,2214539904&fm=58&bpow=600&bpoh=800" alt="">
<a href="https://www.luffycity.com">路飞</a>
</body>
</html>
wsgiref简单描述
简单示例:
按着 http 请求协议解析数据 # wsgiref
    专注于web业务开发
按着 http 相应协议封装数据 # wsgiref

#!/usr/bin/python3
# -*- coding: utf-8 -*-
# @Time    : 2018/10/22 9:41
# @File    : wsgi_server.py


from wsgiref.simple_server import make_server


def application(environ, start_response):
    # 按着 http 请求协议解析数据 :environ字典
    # 按着 http 相应协议封装数据: start_response
    print(environ)
    print(type(environ))

    # 当前的请求路径
    global pa
    path = environ.get("PATH_INFO")
    start_response("200 OK", [])
    if path == "/login":

        pa = "login.html"
    elif path == "/index":
        pa = "index.html"
    with open(pa, "r", encoding="utf8") as f:
        data = f.read()
    return [data.encode("utf8")]


# 封装socket
httped = make_server("127.0.0.1", 8090, application)
# 等待用户连接: conn, addr = sock.accept()
httped.serve_forever()  # application(environ,start_response)
WSGI对于应用程序有以下标准规定:
1. 应用程序必须是一个可调用的对象,因此,应用程序可以是一个函数,一个类,或者一个重载了__call__的类的实例。
2. 应用程序必须接受两个参数并且要按照位置顺序,分别是environ(环境变量),以及start_response函数(负责将响应的status code,headers写进缓冲区但不返回给客户端)。
3. 应用程序返回的结果必须是一个可迭代的对象。
start_response('200 OK', [('Content-Type', 'text/html')])# 第二个参数可以是空列表
return [data.encode('utf8')] #返回的数据必须是列表+字节数据
server = make_server("", 8080, run_server)# 第一个参数是ip,可以为空
from wsgiref.simple_server import make_server


def run_server(environ, start_response):
    start_response('200 OK', [])
    path = environ.get("PATH_INFO")
    data = "<h2>hello wordl</h2>"
    if path == '/login':
        with open("./html/login.html", 'r') as f:
            data = f.read()
    return [data.encode('utf8')]


def run():
    server = make_server("", 8080, run_server)
    server.serve_forever()


if __name__ == "__main__":
    run()
MVC与MTV模型
MVC
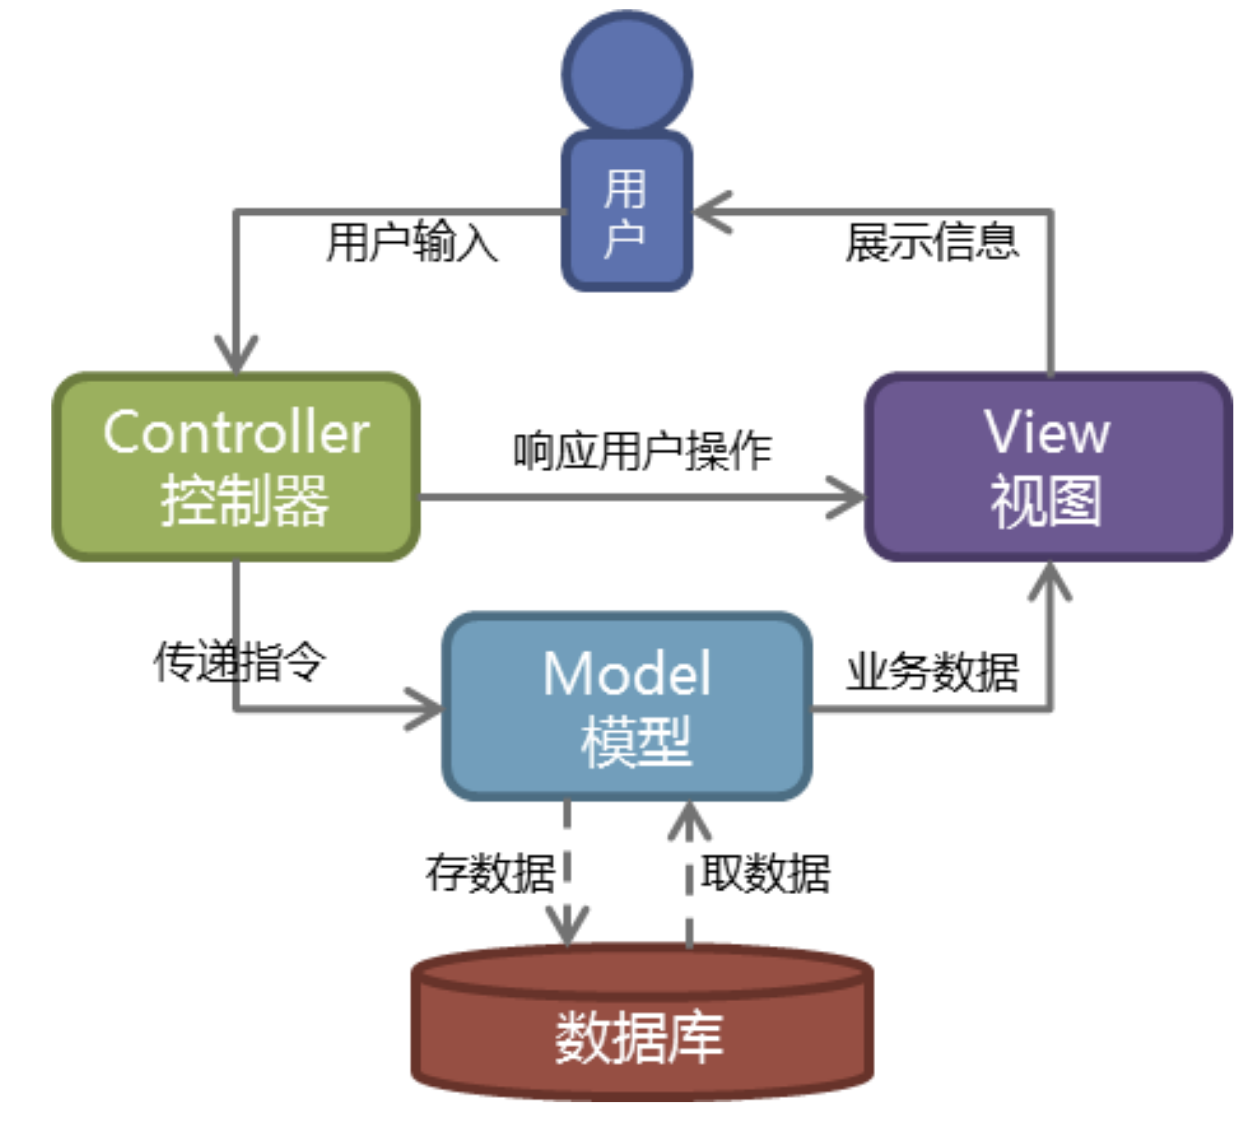
Web服务器开发领域里著名的MVC模式,所谓MVC就是把Web应用分为模型(M),控制器(C)和视图(V)三层,他们之间以一种插件式的、松耦合的方式连接在一起,模型负责业务对象与数据库的映射(ORM),视图负责与用户的交互(页面),控制器接受用户的输入调用模型和视图完成用户的请求,其示意图如下所示:
MTV
Django的MTV模式本质上和MVC是一样的,也是为了各组件间保持松耦合关系,只是定义上有些许不同,Django的MTV分别是值:
M 代表模型(Model): 负责业务对象和数据库的关系映射(ORM)。
T 代表模板 (Template):负责如何把页面展示给用户(html)。
V 代表视图(View): 负责业务逻辑,并在适当时候调用Model和Template。
除了以上三层之外,还需要一个URL分发器,它的作用是将一个个URL的页面请求分发给不同的View处理,View再调用相应的Model和Template,MTV的响应模式如下所示:
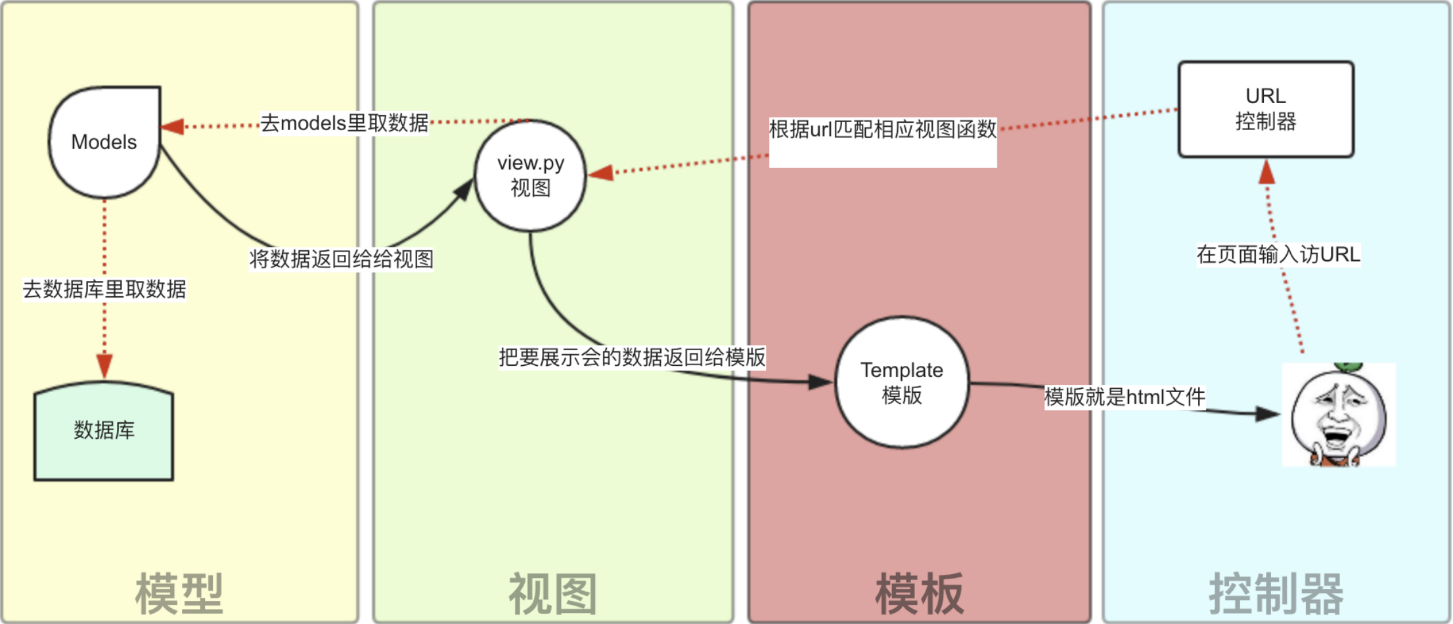
一般是用户通过浏览器向我们的服务器发起一个请求(request),这个请求回去访问视图函数,(如果不涉及到数据调用,那么这个时候视图函数返回一个模板也就是一个网页给用户),视图函数调用模型,模型去数据库查找数据,然后逐级返回,视图函数把返回的数据填充到模板中空格中,最后返回网页给用户。
django安装与新建项目
pip3 install django==2.0.1
# 如果网络不好,可能安装会报错:ReadTimeoutError: HTTPSConnectionPool(host='files.pythonhosted.org', port=443): Read timed out.
#解决: 1、pip3 --default-timeout=100 install django==2.0.1
# 2、pip3 install -i https://pypi.tuna.tsinghua.edu.cn/simple django==2.0.1
命令行模式
创建一个文件夹mysites
#进入文件夹创建项目:
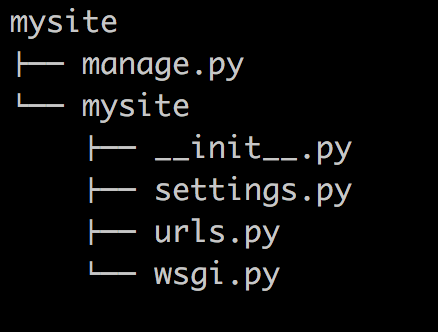
django-admin.py startproject mysites
cd mysites
#创建应用
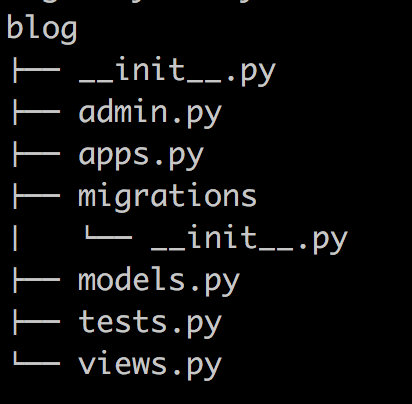
python3 manage.py startapp blog
bolg下面views.py,modules.py最初始
mysites-mysites下面的urls.py和settings.py
mysites下面生成一个文件夹templates存放html
#启动服务
python3 manage.py runserver 8888
#页面直接访问:
127.0.0.1:8888
pycharm创建django项目
选择Django,1、项目名称,2、More-Settings:Application name
小案例:
/timer
urls.py文件中增加控制器
from django.contrib import admin
from django.urls import path
from my_demo1 import views

urlpatterns = [
    path('admin/', admin.site.urls),
    path('timer/', views.timer),
]
views.py中增加timer函数 return render(request,"timer.html",{"ctime":ctime})
def timer(request):
    import time
    ctime = time.time()
    return render(request, "timer.html", {"ctime": ctime})
#ctime是函数返回的时间参数
templates中增加timer.html,当前时间:{{ctime}}
<!DOCTYPE html>
<html lang="en">
<head>
    <meta charset="UTF-8">
    <title>Title</title>
</head>
<body>
    <h4>{{ ctime }}</h4>
</body>
</html>
注意:更改代码,不用重新启动项目,django自动重启
访问报错:django.template.exceptions.TemplateDoesNotExist: timer.html
# 修改setting.py中的TEMPLATES-DIRS的值:
'DIRS': [os.path.join(BASE_DIR, 'templates')]
TEMPLATES = [
    {
        'BACKEND': 'django.template.backends.django.DjangoTemplates',
        'DIRS': [os.path.join(BASE_DIR, 'templates')],
        'APP_DIRS': True,
        'OPTIONS': {
            'context_processors': [
                'django.template.context_processors.debug',
                'django.template.context_processors.request',
                'django.contrib.auth.context_processors.auth',
                'django.contrib.messages.context_processors.messages',
            ],
        },
    },
]