通过CSS渐变创建的是一个没有固定比例和固定尺寸的<image>类型,也就是说是一张图片,这张图片的尺寸由所应用的元素的相关信息决定。凡是支持图片类型的CSS属性都可以设置渐变,而支持颜色值的CSS属性就不能设置渐变。比如,background-image可以设置渐变,background-color不能设置渐变。
所有现代浏览器都支持渐变的W3C标准语法,包括IE10。
渐变类型有两种:线性渐变和径向渐变。
线性渐变
线性渐变可以通过两个函数指定:linear-gradient() 和 repeating-linear-gradient()。
线性渐变的大概原理图(图中“已设置背景渐变为例”中的“已”应为“以”):

我们视觉上看到渐变效果上的那些色带实际上是与渐变轴垂直的。如果我们在渐变区域内任意做一条渐变轴的垂线,那么垂线上的点的颜色是完全相同的。
linear-gradient()
W3C标准语法:
<linear-gradient> = linear-gradient([ [ <angle> | to <side-or-corner> ] ,]? <color-stop>[, <color-stop>]+)
<angle> 是角度,单位deg
<side-or-corner> = [left | right] || [top | bottom]
<color-stop> = <color> [ <length> | <percentage> ]?
取值:
下述值用来表示渐变的方向,可以使用角度或者关键字来设置:
- <angle>:
- 用角度值指定渐变的方向(或角度)。
- to left:
- 设置渐变为从右到左。相当于: 270deg
- to right:
- 设置渐变从左到右。相当于: 90deg
- to top:
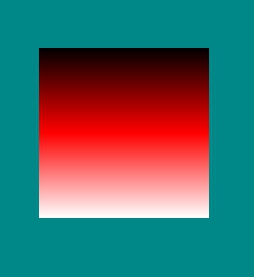
- 设置渐变从下到上。相当于: 0deg
- to bottom:
- 设置渐变从上到下。相当于: 180deg。这是默认值,等同于留空不写。
<color-stop> 用于指定渐变的起止颜色:
- <color>:指定颜色。
- <length>:用长度值指定起止色位置。不允许负值
- <percentage>:用百分比指定起止色位置。
- 下面看一个示例
- 代码:
 1 <!DOCTYPE html>
 2 <html>
 3 <head>
 4 <meta charset="utf-8">
 5 <title>CSS3 渐变</title>
 6 <style type="text/css">
 7    *{
 8     padding: 0;
 9     margin: 0;
10    }
11    html,body{
12     height: 100%;
13     background-color: #008888;
14    }
15    #wikipedia{
16     position: relative;
17     margin:auto;
18     margin-top:200px;
19     width: 170px;
20     height: 170px;
21     /*background-image: repeating-linear-gradient(to bottom,black,#fff,red);*/
22     background-image: linear-gradient(to bottom,black,red,#fff);
23     background-repeat: no-repeat;
24    }
25
26    </style>
27 </head>
28 <body>
29    <section class="flex-continer" id="wikipedia">
30
31    </section>
32 </body>
33 </html>
效果

对于不指定具体位置的渐变,颜色的分界点在哪儿,举例说明。
background-image: linear-gradient(to bottom,black,red,gray,blue,green);
- 示意图

- 设置了5种颜色,这5种颜色从渐变轴上的开始点开始到渐变轴上的结束点为止,把这之间的距离均分成了4段;如果设置4种颜色,就均分成3段,依次类推。
- 下面看看指定了具体位置的渐变的情况。
- 在linear-gradient()函数中,从左到右相邻颜色名后指定的位置的差值,就是从前一个颜色渐变到后一个颜色的渐变带的宽度。如果差值不大于零,则没有渐变效果。而且第一个颜色名后指定的位置,实际上是从渐变开始点算起,第一个颜色的纯色带在渐变轴方向上的宽度,这个位置以后才有可能有渐变效果。最后一个颜色名后的位置与第一个颜色名后的位置的差值,是从第一个颜色渐变到最后一个颜色的总的渐变带的宽度,最后一个位置往后都是纯色。(这里说的位置是渐变轴上从渐变开始点算起的位置)
- 例 1、
- 代码:
 1 <style type="text/css">
 2    *{
 3     padding: 0;
 4     margin: 0;
 5    }
 6    html,body{
 7     height: 100%;
 8     background-color: #008888;
 9    }
10    #wikipedia{
11     position: relative;
12     margin:auto;
13     margin-top:200px;
14     width: 170px;
15     height: 170px;
16     /*background-image: repeating-linear-gradient(to bottom,black,#fff,red);*/
17     background-image: linear-gradient(to bottom,black 40px,red 20px,#fff 40px);
18     /*background-image: linear-gradient(to bottom,black,red,gray,blue,green);*/
19     background-repeat: no-repeat;
20    }
21    #a{
22     position:absolute;
23     width:20px;
24     height:40px;
25    top:0px;
26     left:0;
27     background-color: green;
28    }
29    </style>
30 <body>
31    <section class="flex-continer" id="wikipedia">
32        <div id="a"></div>
33    </section>
34 </body>
效果:

图中绿色矩形高度为40px,用于对比测试。
例 2、
为了验证上面的解释,使用了3、4、5和60deg的特殊直角三角关系。
代码:
 1 <style type="text/css">
 2    *{
 3     padding: 0;
 4     margin: 0;
 5    }
 6    html,body{
 7     height: 100%;
 8     background-color: #008888;
 9    }
10    #wikipedia{
11     position: relative;
12     margin:auto;
13     margin-top:200px;
14     width: 360px;
15     height: 270px;
16     /*background-image: repeating-linear-gradient(to bottom,black,#fff,red);*/
17     background-image: linear-gradient(60deg,black 50px,red 60px,#fff 100px);
18     /*background-image: linear-gradient(to bottom,black,red,gray,blue,green);*/
19     background-repeat: no-repeat;
20    }
21    #a{
22     position:absolute;
23     width:40px;
24     height:30px;
25     bottom:0px;
26     left:0;
27     background-color: green;
28    }
29    </style>
30 </head>
31 <body>
32    <section class="flex-continer" id="wikipedia">
33       <div id="a"></div>
34    </section>
35 </body>
效果:

图中绿色方块宽40px,高30px,对角线50px。整个背景区域宽360px,高270px。
repeating-linear-gradient()
repeating-linear-gradient()设置重复的线性渐变。他的语法与linear-gradient()的一样。
语法:
<repeating-linear-gradient> = linear-gradient([ [ <angle> | to <side-or-corner> ] ,]? <color-stop>[, <color-stop>]+)
<side-or-corner> = [left | right] || [top | bottom]
<color-stop> = <color> [ <length> | <percentage> ]?
取值:
下述值用来表示渐变的方向,可以使用角度或者关键字来设置:
<angle>:用角度值指定渐变的方向(或角度)。to left:设置渐变为从右到左,相当于: 270deg;to right:设置渐变从左到右,相当于: 90deg;to top:设置渐变从下到上,相当于: 0deg;to bottom:设置渐变从上到下。相当于: 180deg。这是默认值,等同于留空不写。
<color-stop> 用于指定渐变的起止颜色:
<color>:
指定颜色。
<length>:
用长度值指定起止色位置。不允许负值
<percentage>:
用百分比指定起止色位置。
在颜色名后不指定具体位置时,他的效果与linear-gradient()的效果一样。看例子。
以本篇的第一个例子为例,只修改第22行代码:
background-image: linear-gradient(to bottom,black,red,#fff);
为:
background-image: repeating-linear-gradient(to bottom,black,red,#fff);
最后效果完全一样:
如果颜色名后指定了具体位置,两者的差别就很明显了。
一般情况下,第一个颜色名后的位置,实际上是第一个重复单元在渐变轴上开始的位置;最后一个颜色名后的位置,实际上是第一个重复单元在渐变轴上结束的位置,中间的颜色名在重复单元中按顺序依次排列。
在实际应用中,情况比较复杂,不光是只看第一个颜色名和最后一个颜色名后的位置,而是对比除第一个颜色名外所有颜色名后的位置的数值,数值最大的,就是重复单元中的最后一个颜色。(对于不一般的情况,情形太多,没有一一去试)
例1、
代码:
 1 <style type="text/css">
 2    *{
 3     padding: 0;
 4     margin: 0;
 5    }
 6    html,body{
 7     height: 100%;
 8     background-color: #008888;
 9    }
10    #wikipedia{
11     position: relative;
12     margin:auto;
13     margin-top:200px;
14     width: 360px;
15     height: 270px;
16     background-image: repeating-linear-gradient(to bottom,black 80px,red 90px,#fff 110px);
17     /*background-image: linear-gradient(60deg,black 50px,red 60px,#fff 100px);*/
18     /*background-image: linear-gradient(to bottom,black,red,gray,blue,green);*/
19     background-repeat: no-repeat;
20    }
21    #a{
22     position:absolute;
23     width:30px;
24     height:30px;
25     top:20px;
26     left:0;
27     background-color: green;
28    }
29    </style>
30 </head>
31 <body>
32    <section class="flex-continer" id="wikipedia">
33       <div id="a"></div>
34    </section>
35 </body>
效果:

background-image: repeating-linear-gradient(to bottom,black 80px,red 90px,#fff 110px);
上面代码中,黑色在渐变轴方向上距渐变的开始点80px处开始,即黄线与渐变轴的交点。从这一点开始,颜色从黑色先渐变到红色再渐变到白色,至110px处结束,形成第一个重复单元,然后往下依次用重复单元填充背景区域的余下空间。填充到底部时,再循环到顶部开始,直到填充完整个背景区域。(图中的绿色小方块宽和高均为20px,绝对定位,top属性为20px)
这里第一个颜色名后的数值不像linear-gradient()中第一个名后的数值会形成指定宽度的纯色带。
要用repeating-linear-gradient()形成纯色带,可以像下面这样写代码:
background-image: repeating-linear-gradient(to bottom,black 80px,black 110px,#fff 110px,#fff 140px);
效果:

径向渐变
径向渐变可以通过两个函数指定:radial-gradient() 和 repeating-radial-gradient()。
径向渐变以指定的点为中心点,向四周以同心圆或同心椭圆的形状按指定的颜色渐变。
下面还以背景区域为例讲解。
radial-gradient()
radial-gradient() 的语法(按正则表达式的规则理解):
radial-gradient() = radial-gradient(
  [ [ circle               || <length> ]                  [ at <position> ]? , |
    [ ellipse              || <length-percentage>{2} ]    [ at <position> ]? , |
    [ [ circle | ellipse ] || <extent-keyword> ]          [ at <position> ]? , |
    at <position> ,
  ]?
  <color-stop> [ , <color-stop> ]+
)
<extent-keyword> = closest-corner | closest-side | farthest-corner | farthest-side
指定渐变形状
1、形状关键字
circle 表示圆形
ellipse 表示椭圆形
可以直接以关键字circle或ellipse指定渐变形状,也可以通过数值指定渐变的形状。圆形就指定一个数值,表示半径;椭圆就指定两个不相等的数值,第一个是水平轴,第二个是垂直轴,如果水平轴等于垂直轴,其实就是一个正圆。(默认形状要看背景区域的尺寸,背景区域是正方形,就是原型,否则就是椭圆)
形状关键字为circle时,表示半径的数值不能使用百分数,且不能指定超过一个值;形状关键字为ellipse时,可以使用百分数数值,且必须指定两个值(分别代表水平轴和垂直轴)或不指定值,不能只指定一个值。
2、半径或轴长关键字<extent-keyword>
<extent-keyword>的取值:
closest-side |
渐变的边缘形状与容器距离渐变中心点最近的一边相切(圆形)或者至少与距离渐变中心点最近的垂直和水平边相切(椭圆)。 |
closest-corner |
渐变的边缘形状与容器距离渐变中心点最近的一个角相交。 |
farthest-side |
与closest-side相反,边缘形状与容器距离渐变中心点最远的一边相切(或最远的垂直和水平边)。 |
farthest-corner |
渐变的边缘形状与容器距离渐变中心点最远的一个角相交。 |
以上设置的半径或轴长,实际上指的是从渐变中心点开始,从第一个颜色渐变到最后一个颜色时,渐变带在水平径向上和垂直径向上的宽度,每种颜色的分布(没有指定结束位置),与前面线性渐变颜色在渐变轴上的分布一样。
例子:
代码:
 1 <style type="text/css">
 2    *{
 3     padding: 0;
 4     margin: 0;
 5    }
 6    html,body{
 7     height: 100%;
 8     background-color: #008888;
 9    }
10    #wikipedia{
11     position: relative;
12     margin:auto;
13     margin-top:200px;
14     width: 400px;
15     height: 400px;
16     background-image: radial-gradient(circle 100px,black,#fff,red);
17     /*background-image: linear-gradient(60deg,black 50px,red 60px,#fff 100px);*/
18     background-repeat: no-repeat;
19    }
20    #a{
21     position:absolute;
22     width:100px;
23     height:100px;
24     top:150px;
25     left:150px;
26     background-color: rgba(31,131,33,0.2);
27    }
28    </style>
29 </head>
30 <body>
31    <section class="flex-continer" id="wikipedia">
32       <div id="a"></div>
33    </section>
34 </body>
效果:

图中泛绿的透明小方块宽和高均为100px,在背景区域的正中心,作参照。整个背景区域宽和高均为400px。整个渐变区域从正中心开始,由黑色先渐变到白色(从黑到白,渐变带50px),再从白色渐变到红色(也是50px),最终整个渐变带从正中心到结束宽100px,就是CSS代码中设置的100px。
指定渐变中心点位置<position>
指定玩形状之后,还可以指定渐变的中心点位置。<position> 与 background-position 或者 transform-origin 类似。指定具体数值时,可以指定为负值。如果不指定,以背景区域为例,则在背景区域的正中心。(规范中有一个gradient box 术语)
指定颜色的位置<color-stop>
<color-stop>表示某个确定位置的固定色值,包含一个<color>值加上可选的位置值(相对虚拟渐变射线的<percentage>或者<length>长度值)。 百分比值0%,或者长度值0,表示渐变中心点;百分比值100%表示渐变射线(以渐变中心点为端点)与gardient box边缘相交的点。 其间的百分比值线性对应渐变射线上的点。
这里百分数的计算,我猜测:以渐变中心点为端点,向gardient box的四个顶点做线段,以得到的四条线段中最长的那一条为准计算百分数的值。
例子1、
代码:
 1 <style type="text/css">
 2    *{
 3     padding: 0;
 4     margin: 0;
 5    }
 6    html,body{
 7     height: 100%;
 8     background-color: #008888;
 9    }
10    #wikipedia{
11     position: relative;
12     margin:auto;
13     margin-top:200px;
14     width: 400px;
15     height: 200px;
16     background-image: radial-gradient(circle at 0px 0px,black 50%,#fff,red);
17     /*background-image: linear-gradient(60deg,black 50px,red 60px,#fff 100px);*/
18     background-repeat: no-repeat;
19    }
20    #a{
21     position:absolute;
22     width:200px;
23     height:100px;
24     top:0px;
25     left:0px;
26     background-color: rgba(31,131,33,0.3);
27    }
28    </style>
29 </head>
30 <body>
31    <section class="flex-continer" id="wikipedia">
32       <div id="a"></div>
33    </section>
34 </body>
效果:

图中径向渐变的中心点为0px 0px,即背景区域的左上角顶点。背景区域宽为400px,高为200px,绿色方框宽为200px,高为100px,黑色的结束位置设置为100%,从图上看,就是背景区域对角线的重点位置。
再看一个例子2、
代码:
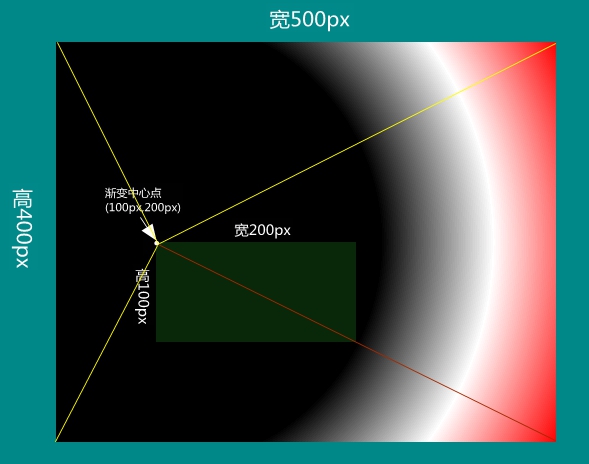
 1 <style type="text/css">
 2    *{
 3     padding: 0;
 4     margin: 0;
 5    }
 6    html,body{
 7     height: 100%;
 8     background-color: #008888;
 9    }
10    #wikipedia{
11     position: relative;
12     margin:auto;
13     margin-top:200px;
14     width: 500px;
15     height: 400px;
16     background-image: radial-gradient(circle at 100px 200px,black 50%,#fff,red);
17     /*background-image: linear-gradient(60deg,black 50px,red 60px,#fff 100px);*/
18     background-repeat: no-repeat;
19    }
20    #a{
21     position:absolute;
22     width:200px;
23     height:100px;
24     top:200px;
25     left:100px;
26     background-color: rgba(31,131,33,0.3);
27    }
28    </style>
29 </head>
30 <body>
31    <section class="flex-continer" id="wikipedia">
32       <div id="a"></div>
33    </section>
34 </body>
效果:
还有一个例子3、
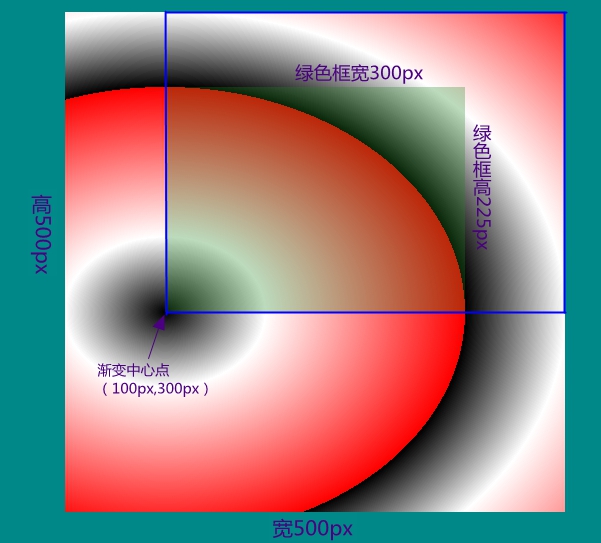
 1 <style type="text/css">
 2    *{
 3     padding: 0;
 4     margin: 0;
 5    }
 6    html,body{
 7     height: 100%;
 8     background-color: #008888;
 9    }
10    #wikipedia{
11     position: relative;
12     margin:auto;
13     margin-top:200px;
14     width: 500px;
15     height: 500px;
16     background-image: radial-gradient(circle at 100px 300px,black 50%,#fff,red);
17     /*background-image: linear-gradient(60deg,black 50px,red 60px,#fff 100px);*/
18     background-repeat: no-repeat;
19    }
20    #a{
21     position:absolute;
22     width:200px;
23     height:150px;
24     bottom:200px;
25     left:100px;
26     background-color: rgba(31,131,33,0.3);
27    }
28    </style>
29 </head>
30 <body>
31    <section class="flex-continer" id="wikipedia">
32       <div id="a"></div>
33    </section>
34 </body>
效果:

通过上面的例子可以看到,第一个颜色名后跟位置值形成了一个以该值为半径的纯色块,与线性渐变的原理是相通的(不再解释了,语言组织能力不行)。
直接看例子:
代码:
 1 <style type="text/css">
 2    *{
 3     padding: 0;
 4     margin: 0;
 5    }
 6    html,body{
 7     height: 100%;
 8     background-color: #008888;
 9    }
10    #wikipedia{
11     position: relative;
12     margin:auto;
13     margin-top:200px;
14     width: 500px;
15     height: 500px;
16     background-image: radial-gradient(circle at 100px 300px,black 100px,#fff 300px,red 100%);
17     /*background-image: linear-gradient(60deg,black 50px,red 60px,#fff 100px);*/
18     background-repeat: no-repeat;
19    }
20    #a{
21     position:absolute;
22     width:100px;
23     height:100px;
24     bottom:200px;
25     left:100px;
26     background-color: rgba(31,131,33,0.3);
27    }
28    </style>
29 </head>
30 <body>
31    <section class="flex-continer" id="wikipedia">
32       <div id="a"></div>
33    </section>
34 </body>
效果:

在这个例子中白色的位置在与以渐变中心点为圆心并与背景区域顶部相切的圆上。从白色渐变到白色的渐变带的宽度为200px(300px - 100px)。
repeating-radial-gradient()
repeating-radial-gradient()设置重复径向渐变。
语法与radial-gradient()的语法一样:
repeating-radial-gradient(
       [[ circle  || <length> ]                     [at <position>]? , |
        [ ellipse || [<length> | <percentage> ]{2}] [at <position>]? , |
        [[ circle | ellipse ] || <extent-keyword> ] [at <position>]? , |
                                                     at <position>   ,    <color-stop> [ , <color-stop> ]+ )
原理与重复线性渐变的原理相通(不是相同)。第一个颜色名后指定的位置,实际上是第一个重复单元的开始的位置,不指定就从渐变中心点开始。一般情况下最后一个颜色明后的位置与第一个颜色名后的位置的差值,就是一个重复单元在水平径向上的宽度。
看例子1、
代码:
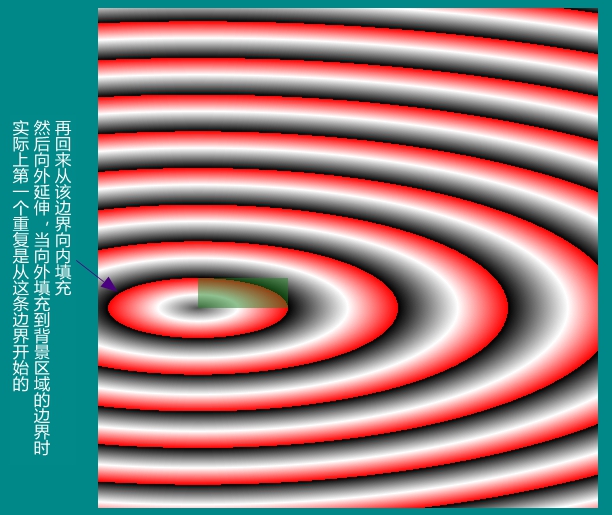
 1 <style type="text/css">
 2    *{
 3     padding: 0;
 4     margin: 0;
 5    }
 6    html,body{
 7     height: 100%;
 8     background-color: #008888;
 9    }
10    #wikipedia{
11     position: relative;
12     margin:auto;
13     margin-top:200px;
14     width: 500px;
15     height: 500px;
16     background-image: repeating-radial-gradient(ellipse  40px 30px at 100px 300px,black,#fff 100px,red 300px );
17     /*background-image: radial-gradient(circle at 100px 300px,black 100px,#fff 300px,red 100%);*/
18     background-repeat: no-repeat;
19    }
20    #a{
21     position:absolute;
22     width:300px;
23     height:225px;
24     bottom:200px;
25     left:100px;
26     background-color: rgba(31,131,33,0.3);
27    }
28    </style>
29 </head>
30 <body>
31    <section class="flex-continer" id="wikipedia">
32       <div id="a"></div>
33    </section>
34 </body>
效果:
在上面的例子中巧了,设置的椭圆的水平轴与垂直轴的比例刚好与图中蓝色线条围起来的矩形的宽与高的比例相同。如果我不设置水平轴与垂直轴,出来的效果与上图一样,也就是说呈现出来的径向渐变形状的水平轴与垂直轴的比例由设置的水平轴与垂直轴的比例决定(只是取其比例,不论具体数值);不设置设置水平轴与垂直轴,就根据渐变中心点与gradient box的距渐变中心点最远的那个角(farthest-corner)围成的矩形的比例决定渐变的形状。
再看个例子2、
代码:
 1 <style type="text/css">
 2    *{
 3     padding: 0;
 4     margin: 0;
 5    }
 6    html,body{
 7     height: 100%;
 8     background-color: #008888;
 9    }
10    #wikipedia{
11     position: relative;
12     margin:auto;
13     margin-top:200px;
14     width: 500px;
15     height: 500px;
16     background-image: repeating-radial-gradient(ellipse 30px 10px at 100px 300px,black 90px,#fff 150px,red 200px );
17     /*background-image: radial-gradient(circle at 100px 300px,black 100px,#fff 300px,red 100%);*/
18     background-repeat: no-repeat;
19    }
20    #a{
21     position:absolute;
22     width:90px;
23     height:30px;
24     bottom:200px;
25     left:100px;
26     background-color: rgba(31,131,33,0.5);
27    }
28    </style>
29 </head>
30 <body>
31    <section class="flex-continer" id="wikipedia">
32       <div id="a"></div>
33    </section>
34 </body>
效果:
指定的椭圆水平轴与垂直轴的比例为30px : 10px = 3 : 1,第一个重复的位置开始的位置在水平方向上距离渐变中心点90px处,绿色小方框的宽为90px,高为30px,是根据 3 : 1 的比例算出来的。
上面只是看了一般情况的例子,不一般的情况没有举例。在官方文档中 3.4小节中有说明(链接在下面参考文章中)。
(完)
参考文章: