首先对系统参数进行调整
vim /etc/security/limits.conf
#打开文件数量
*  soft nofile 65535
*  hard nofile 65535
#进程数量
*  soft nproc 65535
*  hard nproc 65535
#内存限制
*  soft memlock unlimited
*  hard memlock umlimited
[root@bogon ~]#  vim /etc/sysctl.conf
vm.max_map_count = 655360
[root@bogon ~]#  sysctl -p
elasticsearch5之后的版本不能以root用户运行,需要创建普通用户
[root@localhost elastic]# useradd es
[root@localhost elastic]# chown -R es:es /usr/elastic
[root@localhost elastic]# chown -R /elk
[root@localhost elastic]# su -c '/usr/elastic/bin/elastic -d' es
将压缩包解压后修改其配置文件,如下(其他节点更红色文字改对应配置)
[root@localhost elastic]# grep '^[a-z]' config/elasticsearch.yml
cluster.name: elk-1                                 #集群名称,同一集群内名称唯一
node.name: elk-node1                                #当前节点名称
node.master: true                                   #是否允许当前节点成为master
node.data: true                                     #是否允许当前节点存储数据
path.data: /elk                                     #数据文件存储路径
path.logs: /elk                                     #日志文件存储路径
bootstrap.memory_lock: true                         #允许es进程直接申请所需最大内存,在jvm配置文件中xms,xmx要设置相同,64位系统不要超过32G
network.host: 192.168.1.8,127.0.0.1                 #es绑定地址
http.enabled: true                                  #开启http服务
http.port: 9200                                     #对外http端口
transport.tcp.port: 9300                            #集群内部通讯端口
transport.tcp.compress: true                        #tcp传输数据时压缩,默认false
discovery.zen.ping.unicast.hosts: ["192.168.1.8","hosts2:port"]   #集群发现节点配置

####
##2个节点,master设置为2的时候,一台出现故障导致集群不可用
##解决方案:
##把还存活的节点的配置文件集群选举相关的选项注释掉或者改成1
##discovery.zen.minimum_master_nodes: 1
##重启服务
*配置文件中给出了三种配置高性能集群拓扑结构的模式,如下:
# 1.如果你想让节点从不选举为主节点,只用来存储数据,可作为负载器
# node.master: false
# node.data: true
# node.ingest: true
# 2. 如果想让节点成为主节点,且不存储任何数据,并保有空闲资源,可作为协调器
# node.master: true
# node.data: false
# node.ingest: true
# 3. 如果想让节点既不称为主节点,又不成为数据节点,那么可将他作为搜索器,从节点中获取数据,生成搜索结果等
# node.master: false
# node.data: false
# node.ingest: true
# 4. 仅作为协调器
# node.master: false
# node.data: false
# node.ingest: false
启动elasticsearch,先不要将程序放到后台,因为启动会报很多错误,这里输出到前台的日志可以看到报错的内容,后面会写报错的解决方法

查看服务状态,出现下方内容代表启动成功
[root@localhost ~]# curl 192.168.1.8:9200
{
  "name" : "elk-node1",
  "cluster_name" : "elk-1",
  "cluster_uuid" : "bcKUMQBRTJinREihKesF4A",
  "version" : {
    "number" : "6.8.0",
    "build_flavor" : "default",
    "build_type" : "tar",
    "build_hash" : "65b6179",
    "build_date" : "2019-05-15T20:06:13.172855Z",
    "build_snapshot" : false,
    "lucene_version" : "7.7.0",
    "minimum_wire_compatibility_version" : "5.6.0",
    "minimum_index_compatibility_version" : "5.0.0"
  },
  "tagline" : "You Know, for Search"
}
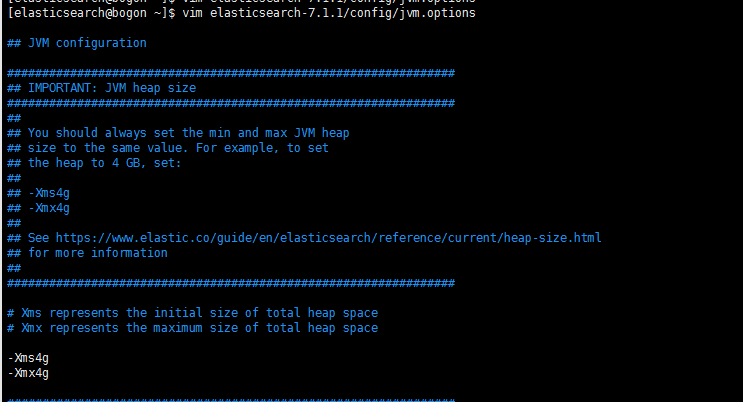
调整elasticsearch使用内存
#建议elasticsearch使用物理内存的一半,默认使用1G
#修改配置文件,如下
增删改查
# 搜索
curl -XGET "http://192.168.1.75:9200/class/_search"
# 不限定域搜索搜索
curl -XGET "http://192.168.1.75:9200/class/_search?q=li si"
# 限定域搜索
curl -XGET "http://192.168.1.75:9200/class/_search?q=name:lisi"

# 添加PUT
curl -XPUT "http://192.168.1.75:9200/class/student/1" -H 'Content-Type: application/json' -d'
{
  "name": "zhangsan",
  "sex": "man",
  "hobby": "computer"
}'
# 查询GET
curl -XGET "http://192.168.1.75:9200/class/student/1/"
# 更新POST,updata
curl -XPOST "http://192.168.1.75:9200/class/student/1/_update" -H 'Content-Type: application/json' -d'
{
  "doc":{"sex":"ji"}
}'
# 删除DELETE
curl -XDELETE "http://192.168.1.75:9200/class/student/1"
# 查看有哪些索引
curl -XGET "http://192.168.1.75:9200/_cat/indices"
# 删除索引
curl -XDELETE "http://192.168.1.75:9200/class"
以下是启动报错及解决办法
- Caused by: java.lang.RuntimeException: can not run elasticsearch as root
#这个报错是es不能以root身份运行,需要创建其他用户
[root@bogon ~]#  groupadd es
[root@bogon ~]#  useradd es -g es
[root@bogon ~]#  su - es
#之后以es身份运行就可以了
-
max file descriptors [4096] for elasticsearch process is too low, increase to at least [65536]
#在文件最后加入
[root@bogon ~]#  vim /etc/security/limits.conf       //文件最后加入
es soft nofile 65536
es hard nofile 65536
- max number of threads [1024] for user [elsearch] is too low, increase to at least [2048]
#在文件最后加入
[root@bogon ~]#  vim /etc/security/limits.conf       //文件最后加入
es soft nproc 4096
es hard nproc 4096
- max virtual memory areas vm.max_map_count [65530] is too low, increase to at least [262144]
#修改配置文件/etc/sysctl.conf,添加下面配置
[root@bogon ~]#  vim /etc/sysctl.conf
vm.max_map_count = 655360
[root@bogon ~]#  sysctl -p
- memory locking requested for elasticsearch process but memory is not locked
[root@bogon ~]# ulimit -l unlimited

#永久解除
[root@bogon ~]# vim /etc/security/limits.conf
*  soft memlock unlimited  #内存限制
*  hard memlock unlimited
编写systemd启动文件
[Unit]
Description=elasticsearch

[Service]
User=es
LimitNOFILE=655360
LimitNPROC=655360
LimitMEMLOCK=infinity
ExecStart=/data/elasticsearch/bin/elasticsearch

[Install]
WantedBy=multi-user.target
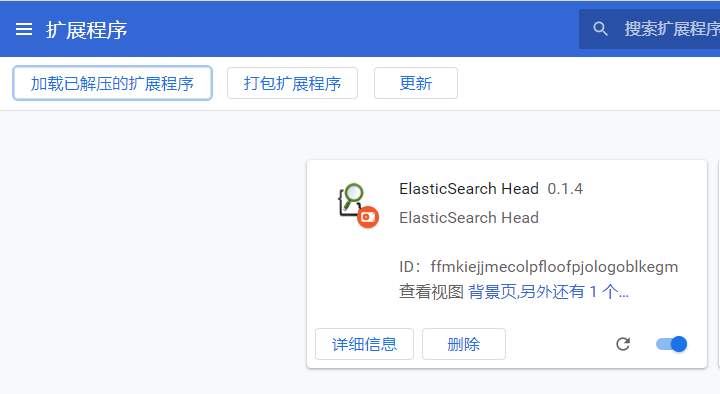
安装head组件
elasticsearch配置文件中添加支持跨域配置
http.cors.enabled: true
http.cors.allow-origin: "*"
head插件有服务器版本和浏览器插件版本,使用google浏览器可以直接安装head插件
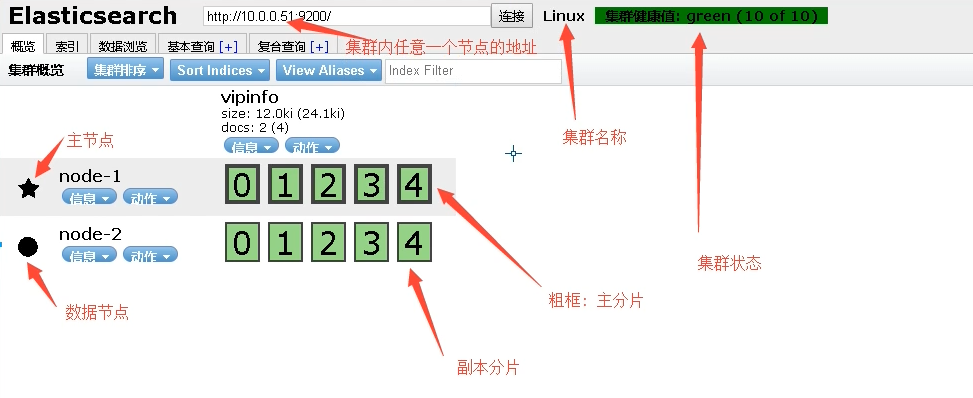
集群状态颜色:
绿色:所有条件都满足,数据完整,副本满足
黄色:数据完整,副本不满足
红色:有索引里的数据出现不完整了
紫色:有分片正在同步中