一、 搭建基本环境
1、导入数据库sql语句,创建库表
2、创建bean
3、mybaits操作数据库
1)application.yml配置数据库信息链接数据库
2)使用注解版的mybatis
1.@MapperScan注解指定需要扫描的Mapper所在地的包
这里涉及到一个知识点:如果bean里面的属性是(dId)和数据库的字段(d_id)不一样,可以在application.yml文件内添加驼峰命名
mybatis:
  configuration:
    map-underscore-to-camel-case: true
其实就是创建一个springboot+mybaits的工程
二、快速体验缓存
步骤:
* 1、开启基于注解的缓存 @EnableCaching (一般在SpringBoot的启动类加)
* 2、标注缓存注解即可
* @Cacheable ==>作用:调用方法之前先要看指定的key有没有数据,没有的话直接调方法,有了的话就直接调缓存
* @CacheEvict ==>作用:清除缓存
* @CachePut ==>作用:即调用方法又更新缓存
* 默认使用的是ConcurrentMapCacheManager==ConcurrentMapCache;将数据保
1、缓存注解
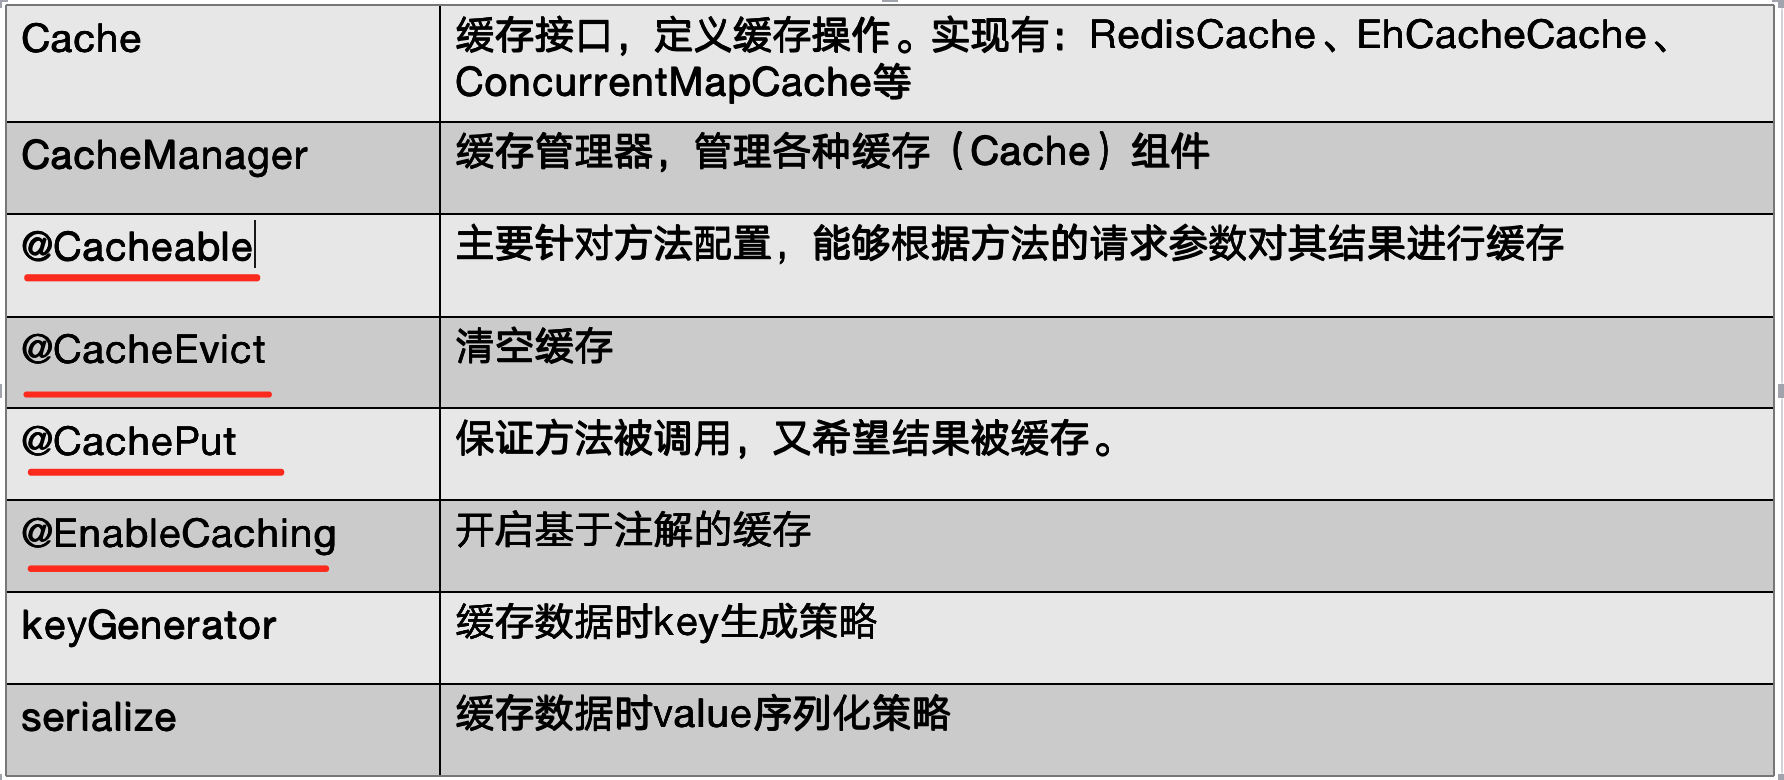
keyGenerator key的生成器,和key二者之间任选一
红线标记的是常用的几个注解的含义
2、缓存的主要参数

key编写的SpEL表:

key的内容可以是方法名、目标对象、目标对象类以及参数列表。其中参数可以有几种方式:key='#id' 参数id的值,等同于#a0、 #po、 #iban、 #root.args[0]
3、实例验证@Cacheable、@CacheEvict、@CachePut、@Caching的用法
1) Service编写缓存的规则
package com.wufq.cache.service.impl;

import com.wufq.cache.bean.Employee;
import com.wufq.cache.mapper.EmployeeMapper;
import com.wufq.cache.service.EmployeeService;
import org.springframework.beans.factory.annotation.Autowired;
import org.springframework.cache.annotation.*;
import org.springframework.stereotype.Service;

/**
 * @Description
 * @Author wufq
 * @Version
 * @Date 2021/8/12 13:30
 */
@CacheConfig(cacheNames="emp")
@Service
public class EmployeeServiceImpl implements EmployeeService {

    @Autowired
    EmployeeMapper employeeMapper;

     /*
    * 将方法的运行结果进行缓存,以后读取数据直接从缓存中读取
    * 不引入redis的时候:concurrentHashMap是默认的缓存管理器
    *
     * @Cacheable针对方法配置,能够根据方法的请求参数对其结果进行缓存
     *
     * CacheManager管理多个cache组件,CURD操作在每一个组件内,每一个组件都有一个组件名
     * 几个属性:
     *      value/cacheNames  指定缓存组建的名称。可以指定多个缓存组的名称:value = {"emp","temp"}
     *      key 缓存数据使用的key  默认是使用方法参数的值
     *          编写SpEL:#id:参数id的值,等同于#a0、 #po、 #iban、 #root.args[0]
     *      keyGenerator key生成器,和key效果一样,二选一
     *      cacheManager/cacheResolver二选一:  缓存管理器(比如:有两个缓存管理器redis和concurrentHashMap都存了同一个缓存组建emp,这时候就用到了cacheManager来区分)
    *       condition:指定复合条件的情况才能缓存  (比如:condition = "#id>1"  id>1的时候才缓存)
    *       unless:否定缓存,作用和condition相反(比如:"#result==null"  结果等于null的不缓存)
    *       sync:是否使用异步模式
    */

     //调用方法之前先要看指定的key有没有数据,没有的话直接调方法,有了的话就直接调缓存
    @Cacheable(value = {"emp"}/*,key = "#id",condition="#id>0",unless="#id==2"*/)
    @Override
    public Employee queryEmpById(Integer id) {
        System.out.println("==========》查询第"+id+"号员工");
        return employeeMapper.queryEmpById(id);
    }

    /*
    *
     * @CachePut即调用方法又更新缓存数据
     * 修改了数据库的某个数据,同时更新缓存
     * 运行时机:直接先调方法,把结果放到缓存中
     *
     * 测试步骤:
     *  1、先查询id=1的员工,第一次读数据库后会把key=id的结果放到缓存中(key=1:value=employee对象)
     *  2、更新id=1的员工,第一次更新数据库后同样会把结果放到数据库中,
     *       但是由于没有设置key,所以会把默认的参数当做key,结果为Employee对象放到缓存中(key=employee:value=employee对象)
     *  3、查询id=1的员工====>查询的结果:没有更新前的数据(问题:数据库内的数据和缓存的数据没有同步)
     *      原因:第一步和第二步放到缓存里面的数据是不一样的,所以再次查询的时候仍然查的是key=1的数据
     *      解决办法:指定更新和查询的key是同一个,两种办法
     *      1)key = "#employee.id"
     *      2)key = "#result.id"
     *
    */
    @CachePut(/*value = "emp",*/key = "#result.id")
    @Override
    public Employee update(Employee employee) {
         System.out.println("EmpUpdate====》"+employee);
         employeeMapper.update(employee);
         return employee;
    }

    /*
    * @CacheEvict 清除缓存
    * key:指定要清除的数据
    * allEntries  清除全部缓存,默认是true
    * beforeInvocation =false 缓存的清除是在方法之前执行,默认是在方法之后执行
     *
    */
    @CacheEvict(/*value = "emp"*/)
    @Override
    public void delete(Integer id) {
        employeeMapper.delete(id);
    }


    @Override
    public Integer insert(Employee employee) {
        return employeeMapper.insert(employee);
    }

    /*
    * Caching 设计复杂的缓存规则
    *
    * value="emp"每一个规则都有这样的一个缓存组名,所以可以在类名前+@CacheConfig(cacheNames="emp")设置缓存规则公共的部分
    *
    * */

    @Caching(
            cacheable={
                  @Cacheable(/*value = "emp",*/key = "#lastName")
            },
            put = {
                    @CachePut(/*value="emp",*/key = "#result.id"),
                    @CachePut(/*value="emp",*/key = "#result.email")
            }
    )
    @Override
    public Employee queryEmpByLastName(String lastName) {
        System.out.println("==========》查询"+lastName+"员工");
        return employeeMapper.queryEmpByLastName(lastName);
    }
}
* 三、整合redis作为缓存
*Redis 是一个开源(BSD许可)的,内存中的数据结构存储系统,它可以用作数据库、缓存和消息中间件。
1、引入redis的starter -->pom文件
<dependency>
            <groupId>org.springframework.boot</groupId>
            <artifactId>spring-boot-starter-data-redis</artifactId>
        </dependency>
2、配置redis -->yml文件
server:
  port: 8081
spring:
  datasource:
    driver-class-name: com.mysql.cj.jdbc.Driver
    url: jdbc:mysql://172.16.203.143:3306/book?useUnicode=true&characterEncoding=utf-8&serverTimezone=Asia/Shanghai
    username: root
    password: 1234
  redis: #配置redis的地址
    host:  172.16.203.139
mybatis:
  mapper-locations:
    - classpath:mapper/*.xml
    - classpath*:com/**/mapper/*.xml
  type-aliases-package: com.wufq.aitesting.modelVersion
#  开启mybatis的驼峰命名,作用是解决bean里面的属性和数据库内的字段不一致问题
  configuration:
    map-underscore-to-camel-case: true
#  开启日志,这个是只开启mapper下的日志
logging:
     level:
          com.wufq.cache.mapper: debug
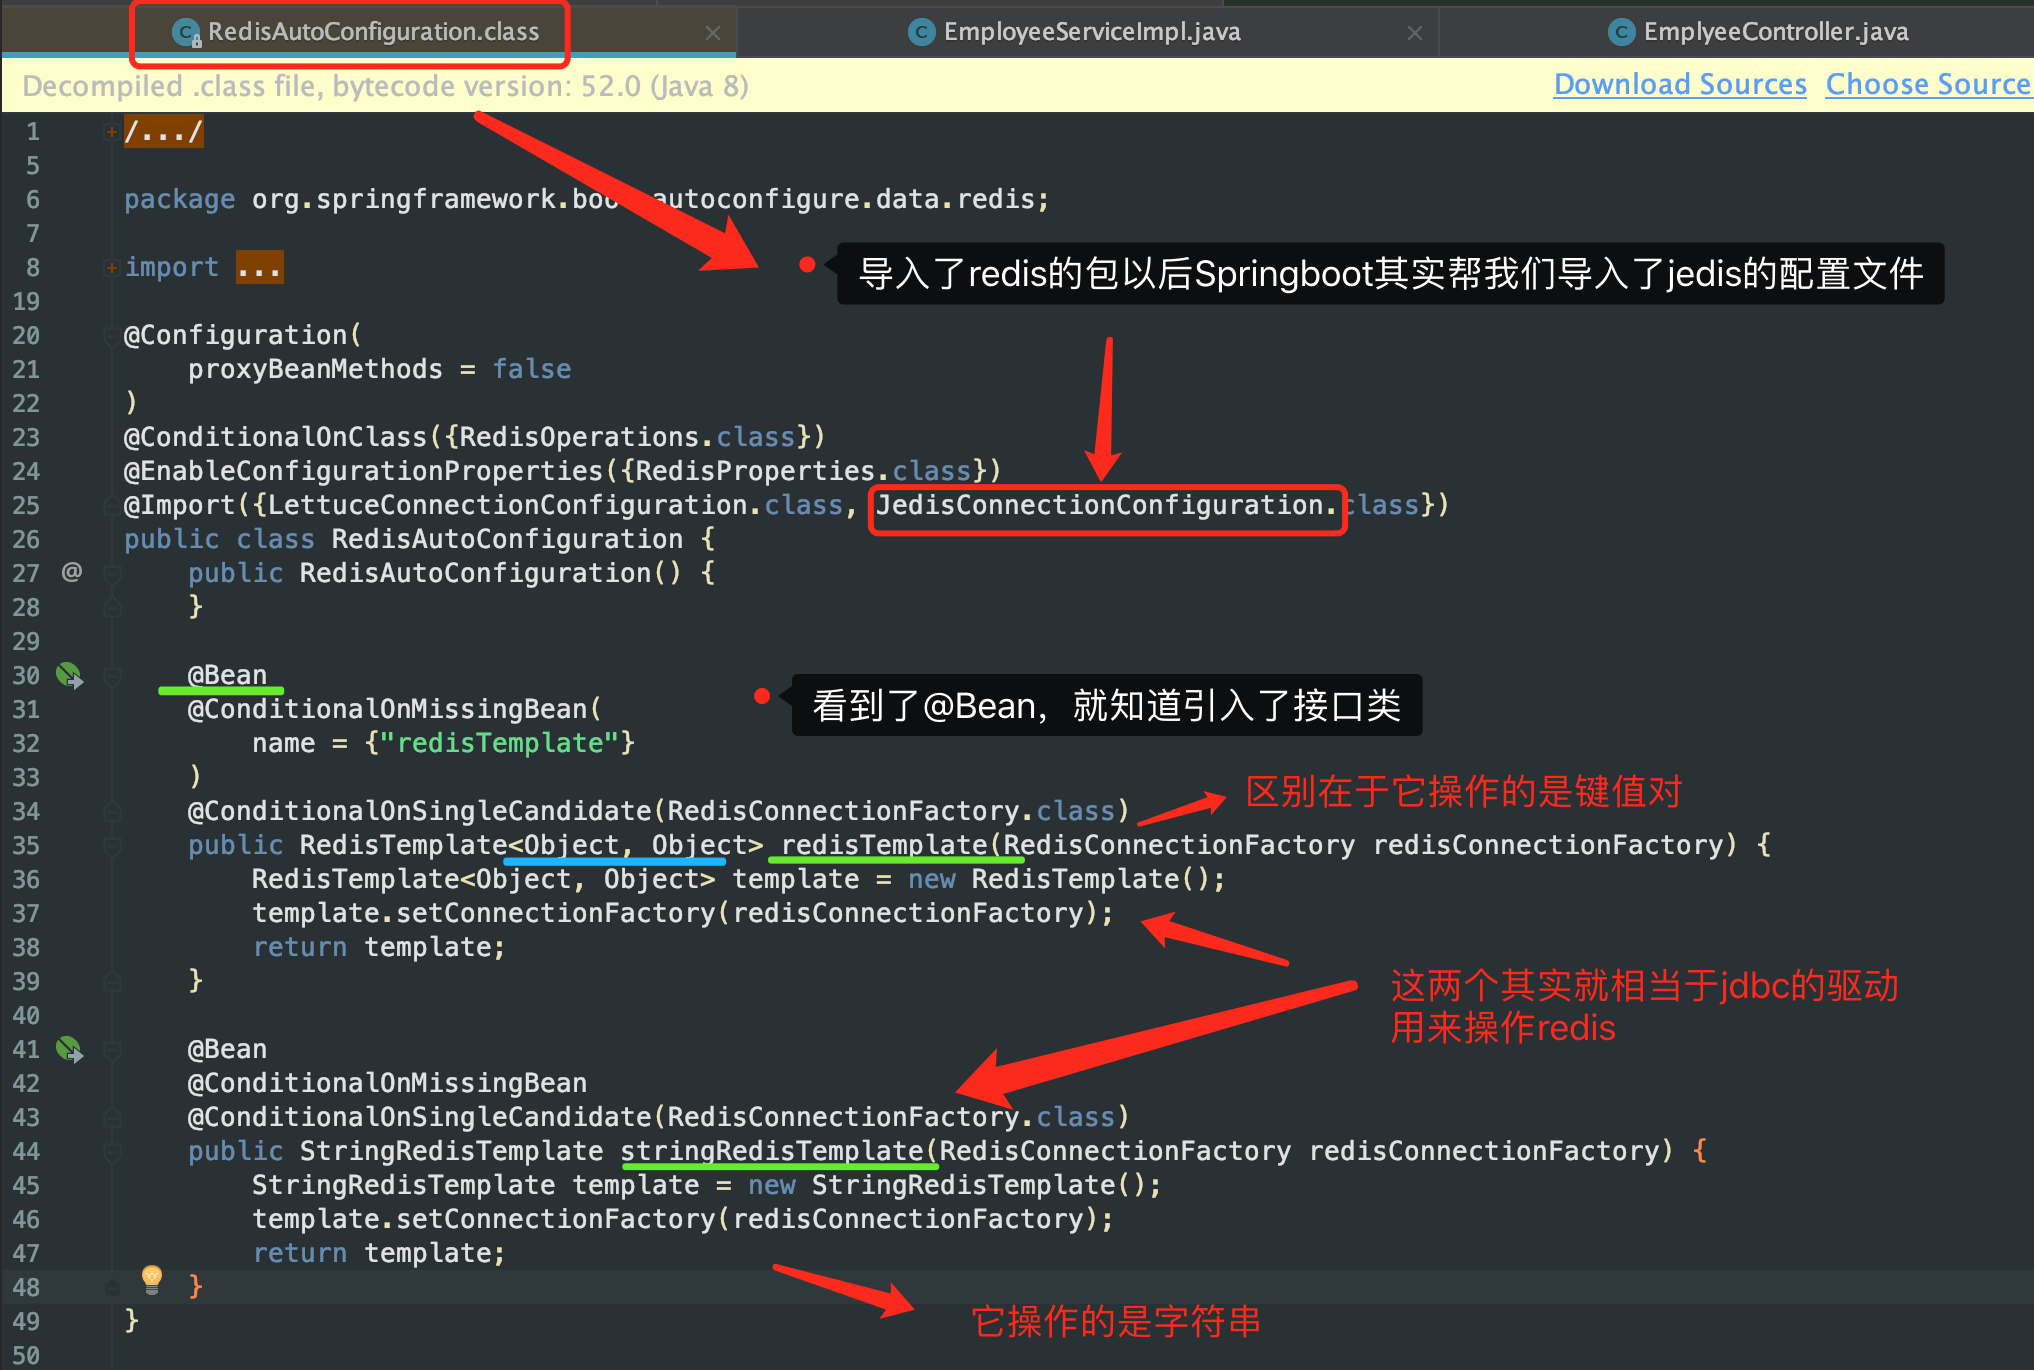
3、解析redis配置文件原理
4、客户端连接redis无法连接的问题
1)首先关闭linu防火墙:systemctl disable firewalld
2)配置redis.conf文件:
 bind 192.168.1.100 10.0.0.1 192.168.0.214
 bind 127.0.0.1 ::1
配置可以远程连接的ip地址
5、Java程序测试设置和获取redis的值&RedisTemplate序列化机制
1)回顾redis存取数据的五大类型
string(字符串)、List(列表)、set(集合)、Hash(散列)、ZSet(有序集合)
2)测试类测试往redis内存值以及取值
两种存值类型:StringRedisTemplate(操作k-v都是字符串的)RedisTemplate(操作k-v都是对象的)
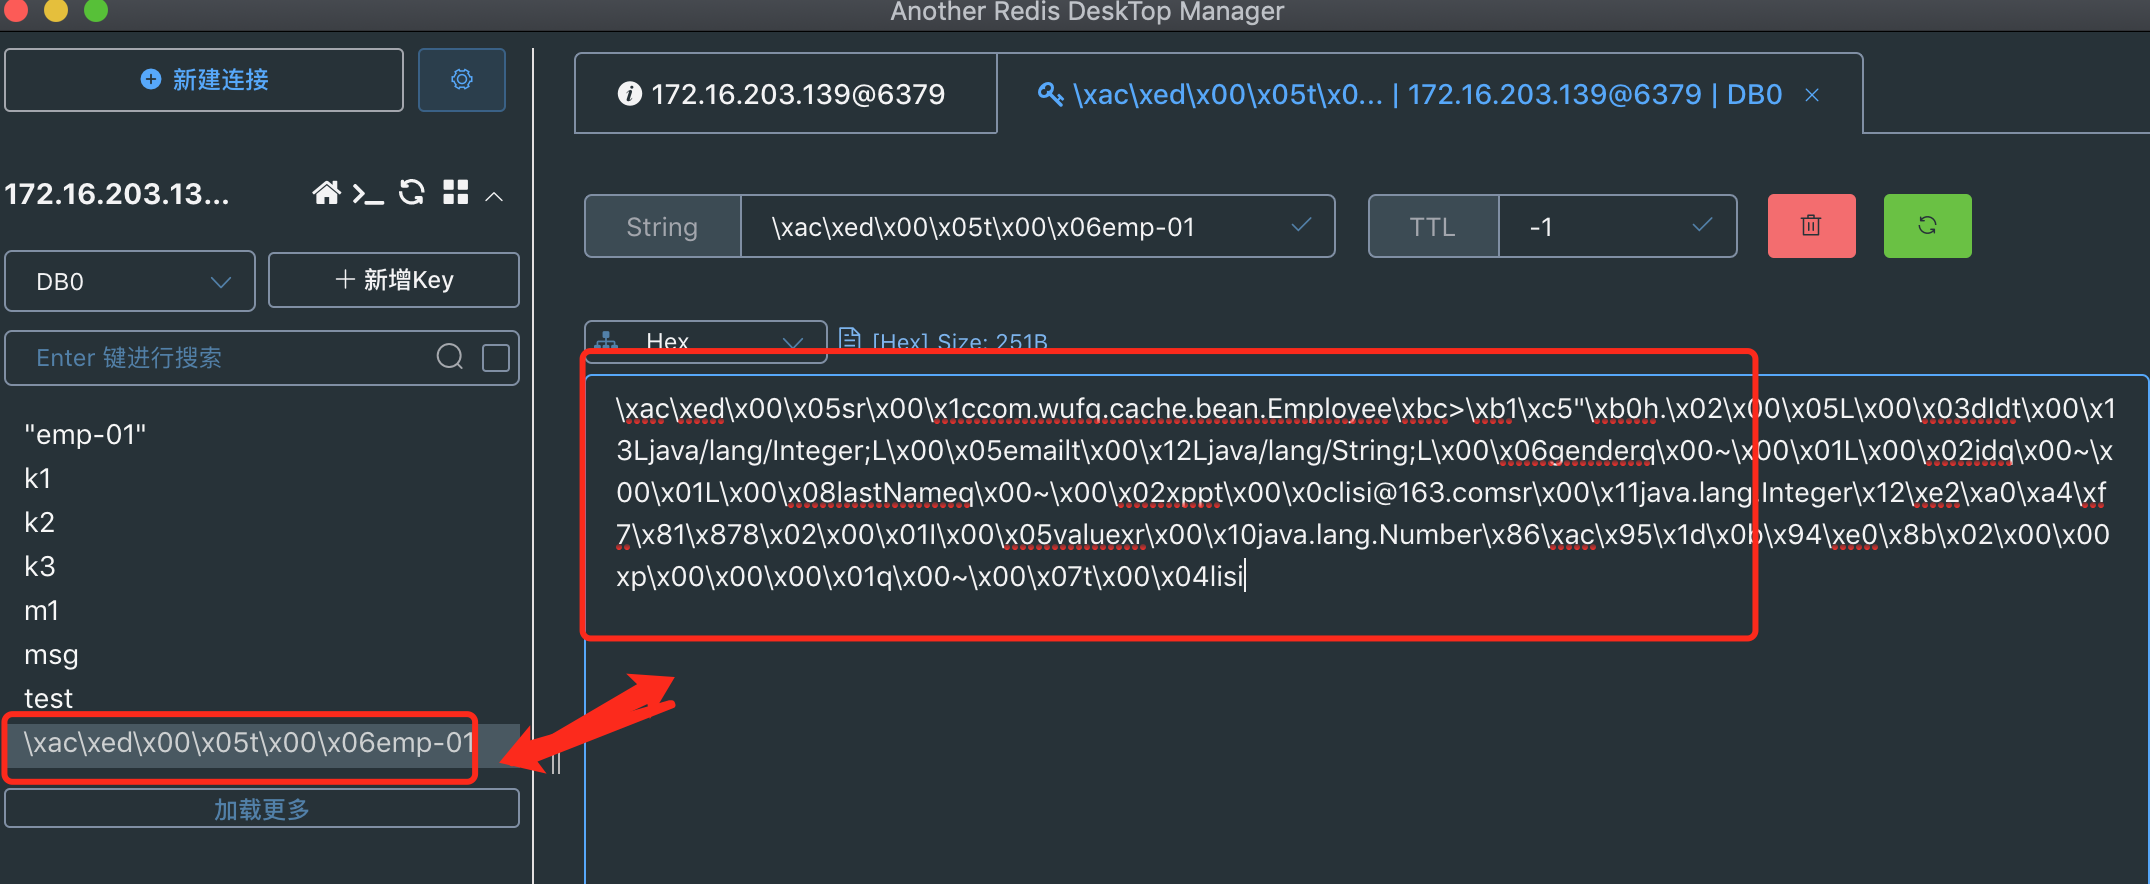
@RunWith(SpringRunner.class)
@SpringBootTest
public class SpringbootG01CacheApplicationTests {

    @Autowired
    EmployeeMapper employeeMapper;

    @Autowired
    RedisTemplate redisTemplate;  //操作k-v都是对象的

    @Autowired
    StringRedisTemplate stringRedisTemplate; //操作k-v都是字符串的

    @Autowired
    RedisTemplate<Object,Employee> empRedisTemplate;


    /*
    * redis常见五大数据类型
    * string(字符串)、List(列表)、set(集合)、Hash(散列)、ZSet(有序集合)
    *   stringRedisTemplate.opsForValue()[String字符串类型]
    *   stringRedisTemplate.opsForList()[list列表]
    *   stringRedisTemplate.opsForSet()[set集合]
    *   stringRedisTemplate.opsForHash()[Hash散列]
    *   stringRedisTemplate.opsForZSet()[ZSet(有序集合)]
    *
    */
    @Test
    public void test01(){
//        stringRedisTemplate.opsForValue().set("msg1","hello");
//        stringRedisTemplate.opsForList().leftPushAll("k3","v1","k2","v3");
        stringRedisTemplate.opsForSet().add("m1","vm1","vm2");
    }

    @Test
    public void test02() {
        String msg = stringRedisTemplate.opsForValue().get("msg");
        System.out.println(msg);
    }

//    测试k-v是对象的类型
    @Test
    public void test03() {
        Employee employee = employeeMapper.queryEmpById(1);
        /*
        * 单纯这样请求会报序列化的错误:SerializationException: Cannot serialize;[com.wufq.cache.bean.Employee]
        * 所以要在Employee类上implements Serializable
        * 默认如果保存了对象,使用了jdk序列化机制,序列化后的数据保存到了redis中,但是我们需要保存的是json的格式的数据
        */
//        redisTemplate.opsForValue().set("emp-01",employee);
        /*
        * 解决办法:将数据已json格式保存到redis中
        *   1、自己将对象转换为json
        *   2、redisTemplate默认的序列化规则
        *      编写一个MyRedisConfig类实现Employee的序列化
        */
        empRedisTemplate.opsForValue().set("emp-01",employee);

    }
}
注意:存入字符串的时候是没有问题的,但是在存入k-v对象时就会报序列化的错误(存入redis的数据如下图:)
解决办法2:利用名redisTemplate默认的序列化规则自定义(查看错误日志:上面代码的黄色部分)
步骤:
1》先给Employee类加上Serializable接口
public class Employee implements Serializable{
2》编写一个config类自定义实现序列化(MyRedisConfig类)
package com.wufq.cache.config;

import com.wufq.cache.bean.Employee;
import org.springframework.context.annotation.Bean;
import org.springframework.context.annotation.Configuration;
import org.springframework.data.redis.connection.RedisConnectionFactory;
import org.springframework.data.redis.core.RedisTemplate;
import org.springframework.data.redis.serializer.Jackson2JsonRedisSerializer;

/**
 * @Description
 * @Author wufq
 * @Version
 * @Date 2021/8/13 15:56
 */
@Configuration
public class MyRedisConfig {

    //实现Employee对象的序列化
    @Bean
    public RedisTemplate<Object, Employee> empRedisTemplate(RedisConnectionFactory redisConnectionFactory) {
        RedisTemplate<Object, Employee> template = new RedisTemplate();
        template.setConnectionFactory(redisConnectionFactory);

        /*
        * 放一个序列化器
         * setDefaultSerializer(RedisSerializer<?> serializer),里面的参数是RedisSerializer类型
         * 进入到RedisSerializer接口类内点击:control+h可以查看里面有一些实现类,其中一项就是Jackson2JsonRedisSerializer
        * */
        Jackson2JsonRedisSerializer<Employee> serializer = new Jackson2JsonRedisSerializer<Employee>(Employee.class);
        template.setDefaultSerializer(serializer);

        return template;
    }
}
3》重新传入k-v对象 --->在测试类内
@Autowired
    RedisTemplate<Object,Employee> empRedisTemplate;
empRedisTemplate.opsForValue().set("emp-01",employee);
4》redis验证传入的对象是json对象

上面是springboot1.0x版本序列化的方式,其实springboot2.0x版本就不需要这么写了,而采用下面MyRedisConfig的写法,并且不需要在bean上implements Serializable
6、测试缓存
* 原理:CacheManager===Cache 缓存组件来实际给缓存中存取数据
* 1)、引入redis的starter,容器中保存的是 RedisCacheManager;
* 2)、RedisCacheManager 帮我们创建 RedisCache 来作为缓存组件;RedisCache通过操作redis缓存数据的
其实上面两步SpringBoot在引入了redis的jar包后,就已经被实现了,可以直接用缓存注解来实现(@Cacheable、@CacheEvict、@CachePut、@Caching)
问题:用缓存注解实现以后存储k-v对象时同样会有序列化的问题:
解决方法:
* 3)、默认保存数据 k-v 都是Object;利用序列化保存;如何保存为json
* 1、引入了redis的starter,cacheManager变为 RedisCacheManager;
* 2、默认创建的 RedisCacheManager 操作redis的时候使用的是 RedisTemplate<Object, Object>
* 3、RedisTemplate<Object, Object> 是 默认使用jdk的序列化机制
* 4)、自定义CacheManager;
|-- 编写MyRedisConfig类实现序列化
package com.wufq.cache.config;

import com.wufq.cache.bean.Department;
import com.wufq.cache.bean.Employee;
import org.springframework.context.annotation.Bean;
import org.springframework.context.annotation.Configuration;
import org.springframework.context.annotation.Primary;
import org.springframework.data.redis.cache.RedisCacheConfiguration;
import org.springframework.data.redis.cache.RedisCacheManager;
import org.springframework.data.redis.connection.RedisConnectionFactory;
import org.springframework.data.redis.serializer.Jackson2JsonRedisSerializer;
import org.springframework.data.redis.serializer.RedisSerializationContext;

/**
 * @Description
 * @Author wufq
 * @Version
 * @Date 2021/8/13 15:56
 */
@Configuration
public class MyRedisConfig {

    //实现Employee对象的序列化
    /*@Bean 这种方式是springboot1.0x版本的方式
    public RedisTemplate<Object, Employee> empRedisTemplate(RedisConnectionFactory redisConnectionFactory) {
        RedisTemplate<Object, Employee> template = new RedisTemplate();
        template.setConnectionFactory(redisConnectionFactory);

        *//*
        * 放一个序列化器
         * setDefaultSerializer(RedisSerializer<?> serializer),里面的参数是RedisSerializer类型
         * 进入到RedisSerializer接口类内点击:ctrol+h可以查看里面有一些实现类,其中一项就是Jackson2JsonRedisSerializer
        * *//*
        Jackson2JsonRedisSerializer<Employee> serializer = new Jackson2JsonRedisSerializer<Employee>(Employee.class);
        template.setDefaultSerializer(serializer);

        return template;
    }*/

    //这种是springboot2.0x版本的方式
    //@Primary标记默认缓存器
    @Primary
    @Bean
    public RedisCacheManager employeeRedisCacheManager(RedisConnectionFactory redisConnectionFactory) {

        RedisCacheConfiguration config = RedisCacheConfiguration.defaultCacheConfig()
                .serializeKeysWith(RedisSerializationContext.SerializationPair.fromSerializer(new Jackson2JsonRedisSerializer(Employee.class)))
                .serializeValuesWith(RedisSerializationContext.SerializationPair.fromSerializer(new Jackson2JsonRedisSerializer(Employee.class)))
                .disableCachingNullValues();                       RedisCacheManager redisCacheManager = RedisCacheManager.builder(redisConnectionFactory)
                .cacheDefaults(config)
                .transactionAware()
                .build();
        return redisCacheManager;
    }

    @Bean
    public RedisCacheManager deployeeRedisCacheManager(RedisConnectionFactory redisConnectionFactory) {

        RedisCacheConfiguration config = RedisCacheConfiguration.defaultCacheConfig()
                .serializeKeysWith(RedisSerializationContext.SerializationPair.fromSerializer(new Jackson2JsonRedisSerializer(Department.class)))
                .serializeValuesWith(RedisSerializationContext.SerializationPair.fromSerializer(new Jackson2JsonRedisSerializer(Department.class)))
                .disableCachingNullValues();                       RedisCacheManager redisCacheManager = RedisCacheManager.builder(redisConnectionFactory)
                .cacheDefaults(config)
                .transactionAware()
                .build();
        return redisCacheManager;
    }


}
这里面需要注意的点:如果有几个bean这里面就需要写几个RedisCacheManager,并且要用@Primary标记一个默认缓存器
|-- 在EmployeeServiceImpl和DepartmentServiceImpl类上要告诉分别采用了那个RedisCacheManager
@CacheConfig(cacheNames="dep",cacheManager = "deployeeRedisCacheManager")

@CacheConfig(cacheNames="emp",cacheManager = "employeeRedisCacheManager")
这样就实现了k-v对象的序列化
-------另外一种情况------------
@Qualifier("deployeeRedisCacheManager")
    @Autowired
    RedisCacheManager deployeeRedisCacheManager;


/*
    * 另外一种场景:
    * 在redis中已经有了这个缓存,但是另外一个方法获取到了一个值,并且想把这个值用编码的方式放到缓存里面或者是对其进行修改等等操作
    * 实现步骤:
    * 1、自动注入RedisCacheManager并Qualifier
    * 2、通过编写的deployeeRedisCacheManager获取某个缓存
    * 3、往缓存内存取数据、获取数据等等
    *
    */

    public Department queryDepById(Integer id) {
        System.out.println("查询部门:"+id);

        Department department = departmentMapper.queryDepById(id);
        //获取某个缓存
        Cache cache = deployeeRedisCacheManager.getCache("dep");
        cache.put("dep:1", department);


        return department;
    }