一、简介
通过颜色定位和Sobel算子定位可以计算出一个个的矩形区域,这些区域都是潜在车牌区域,但是在进行SVM判别是否是车牌之前,还需要进行一定的处理。主要是考虑到以下几个问题:
1、定位区域存在一定程度的倾斜,需要旋转到正常视角;
2、定位区域存在偏斜,除了进行旋转之后,还需要进行仿射变换;
3、定位出区域的大小不一致,需要对车牌的尺寸进行统一。
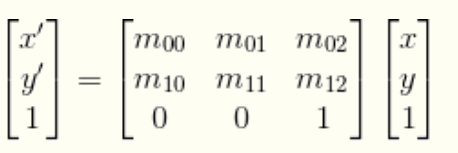
仿射变换(Affine Transformation 或 Affine Map),又称仿射映射,是指在几何中,一个向量空间进行一次线性变换并接上一个平移,变换为另一个向量空间的过程。它保持了二维图形的“平直性”(即:直线经过变换之后依然是直线)和“平行性”(即:二维图形之间的相对位置关系保持不变,平行线依然是平行线,且直线上点的位置顺序不变)。
一个任意的仿射变换都能表示为乘以一个矩阵(线性变换)接着再加上一个向量(平移)的形式。
那么, 我们能够用仿射变换来表示如下三种常见的变换形式:
- 旋转,rotation (线性变换)
- 平移,translation(向量加)
- 缩放,scale(线性变换)
如果进行更深层次的理解,仿射变换代表的是两幅图之间的一种映射关系。这类变换可以用一个3*3的矩阵M来表示,其最后一行为(0,0,1)。该变换矩阵将原坐标为(x,y)变换为新坐标(x',y')。
对应的opencv函数如下:
1、getRotationMatrix2D
Mat getRotationMatrix2D(Point2f center, angle, scale)
已知旋转中心坐标(坐标原点为图像左上端点)、旋转角度(单位为度°,顺时针为负,逆时针为正)、放缩比例,返回旋转/放缩矩阵。
2、warpAffine
void warpAffine(InputArray src,
OutputArray dst,
InputArray M,
Size dsize,
int flags=INTER_LINEAR,
int borderMode=BORDER_CONSTANT,
const Scalar& borderValue=Scalar())
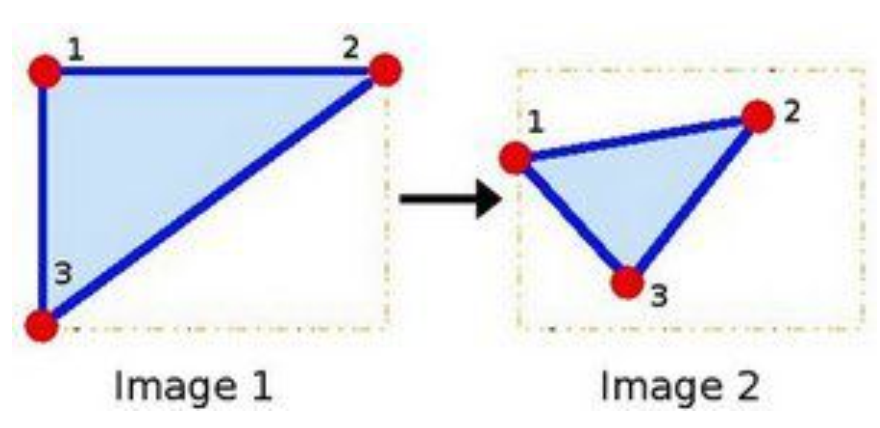
根据getRotationMatrix2D得到的变换矩阵,计算变换后的图像。warpAffine 方法要求输入的参数是原始图像的左上点,右上点,左下点,以及输出图像的左上点,右上点,左下点。注意,必须保证这些点的对应顺序,否则仿射的效果跟你预想的不一样。因此 opencv 需要的是三个点对(共六个点)的坐标,然后建立一个映射关系,通过这个映射关系将原始图像的所有点映射到目标图像上。
如下图所示:
二、偏斜扭转
具体偏斜扭转的代码如下所示:


  1 int CPlateLocate::deskew(const Mat &src, const Mat &src_b,
  2                          vector<RotatedRect> &inRects,
  3                          vector<CPlate> &outPlates, bool useDeteleArea, Color color) {
  4   Mat mat_debug;
  5   src.copyTo(mat_debug);
  6
  7   for (size_t i = 0; i < inRects.size(); i++) {
  8     RotatedRect roi_rect = inRects[i];
  9
 10     float r = (float) roi_rect.size.width / (float) roi_rect.size.height;
 11     float roi_angle = roi_rect.angle;
 12
 13     Size roi_rect_size = roi_rect.size;
 14     if (r < 1) {
 15       roi_angle = 90 + roi_angle;
 16       swap(roi_rect_size.width, roi_rect_size.height);
 17     }
 18
 19     if (m_debug) {
 20       Point2f rect_points[4];
 21       roi_rect.points(rect_points);
 22       for (int j = 0; j < 4; j++)
 23         line(mat_debug, rect_points[j], rect_points[(j + 1) % 4],
 24              Scalar(0, 255, 255), 1, 8);
 25     }
 26
 27     // changed
 28     // rotation = 90 - abs(roi_angle);
 29     // rotation < m_angel;
 30     // m_angle=60
 31     if (roi_angle - m_angle < 0 && roi_angle + m_angle > 0) {
 32       Rect_<float> safeBoundRect;
 33       bool isFormRect = calcSafeRect(roi_rect, src, safeBoundRect);
 34       if (!isFormRect) continue;
 35
 36       Mat bound_mat = src(safeBoundRect);
 37       Mat bound_mat_b = src_b(safeBoundRect);
 38
 39       if (0) {
 40         imshow("bound_mat_b", bound_mat_b);
 41         waitKey(0);
 42         destroyWindow("bound_mat_b");
 43       }
 44
 45       Point2f roi_ref_center = roi_rect.center - safeBoundRect.tl();
 46
 47       Mat deskew_mat;
 48       if ((roi_angle - 5 < 0 && roi_angle + 5 > 0) || 90.0 == roi_angle ||
 49           -90.0 == roi_angle) {
 50         deskew_mat = bound_mat;
 51       } else {
 52
 53
 54         Mat rotated_mat;
 55         Mat rotated_mat_b;
 56
 57         if (!rotation(bound_mat, rotated_mat, roi_rect_size, roi_ref_center,
 58                       roi_angle))
 59           continue;
 60
 61         if (!rotation(bound_mat_b, rotated_mat_b, roi_rect_size, roi_ref_center,
 62                       roi_angle))
 63           continue;
 64
 65         // we need affine for rotatioed image
 66         double roi_slope = 0;
 67
 68         if (isdeflection(rotated_mat_b, roi_angle, roi_slope)) {
 69           affine(rotated_mat, deskew_mat, roi_slope);
 70         } else
 71           deskew_mat = rotated_mat;
 72       }
 73
 74
 75       Mat plate_mat;
 76       plate_mat.create(HEIGHT, WIDTH, TYPE);
 77
 78       // haitungaga add,affect 25% to full recognition.
 79       if (useDeteleArea)
 80         deleteNotArea(deskew_mat, color);
 81
 82
 83       if (deskew_mat.cols * 1.0 / deskew_mat.rows > 2.3 &&
 84           deskew_mat.cols * 1.0 / deskew_mat.rows < 6) {
 85
 86         if (deskew_mat.cols >= WIDTH || deskew_mat.rows >= HEIGHT)
 87           resize(deskew_mat, plate_mat, plate_mat.size(), 0, 0, INTER_AREA);
 88         else
 89           resize(deskew_mat, plate_mat, plate_mat.size(), 0, 0, INTER_CUBIC);
 90
 91         CPlate plate;
 92         plate.setPlatePos(roi_rect);
 93         plate.setPlateMat(plate_mat);
 94         if (color != UNKNOWN) plate.setPlateColor(color);
 95
 96         outPlates.push_back(plate);
 97       }
 98     }
 99   }
100
101   return 0;
102 }
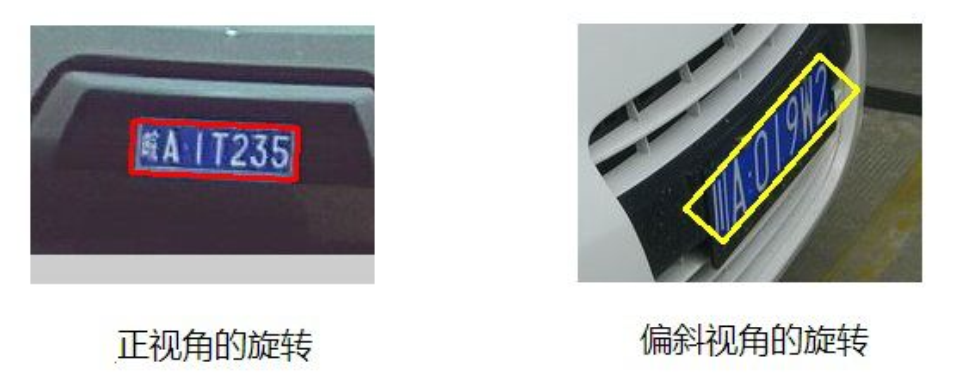
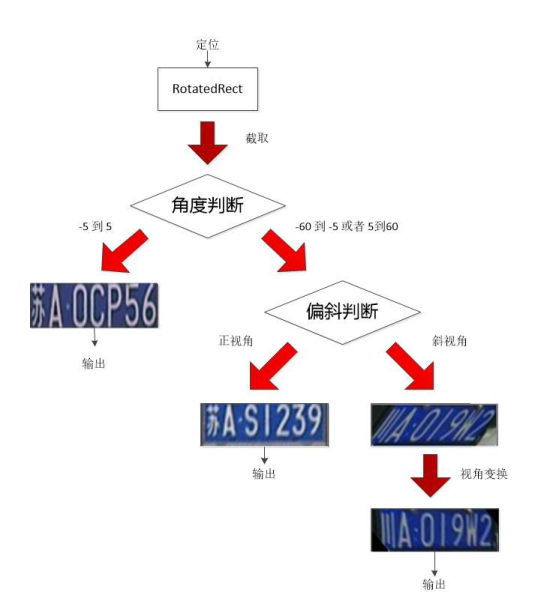
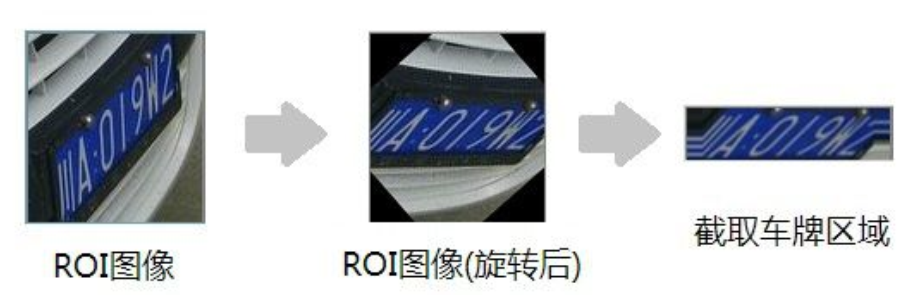
下面我们对代码的主要逻辑过程做一个简单的梳理,对于定位后的车牌,首先进行旋转角度的判定,在-5°~5°范围内车牌直接输出,在-60°~ -5°和 5°~60°范围内车牌,首先进行偏斜程度的判定,如果偏斜程度不严重,旋转后输出,否则旋转角度后还需要仿射变换。
rotation()函数主要用于对倾斜的图片进行旋转, 具体的代码如下:
 1 bool CPlateLocate::rotation(Mat &in, Mat &out, const Size rect_size,
 2                             const Point2f center, const double angle) {
 3   Mat in_large;
 4   in_large.create(int(in.rows * 1.5), int(in.cols * 1.5), in.type());
 5
 6   float x = in_large.cols / 2 - center.x > 0 ? in_large.cols / 2 - center.x : 0;
 7   float y = in_large.rows / 2 - center.y > 0 ? in_large.rows / 2 - center.y : 0;
 8
 9   float width = x + in.cols < in_large.cols ? in.cols : in_large.cols - x;
10   float height = y + in.rows < in_large.rows ? in.rows : in_large.rows - y;
11
12   /*assert(width == in.cols);
13   assert(height == in.rows);*/
14
15   if (width != in.cols || height != in.rows) return false;
16
17   Mat imageRoi = in_large(Rect_<float>(x, y, width, height));
18   addWeighted(imageRoi, 0, in, 1, 0, imageRoi);
19
20   Point2f center_diff(in.cols / 2.f, in.rows / 2.f);
21   Point2f new_center(in_large.cols / 2.f, in_large.rows / 2.f);
22
23   Mat rot_mat = getRotationMatrix2D(new_center, angle, 1);
24
25   /*imshow("in_copy", in_large);
26   waitKey(0);*/
27
28   Mat mat_rotated;
29   warpAffine(in_large, mat_rotated, rot_mat, Size(in_large.cols, in_large.rows),
30              CV_INTER_CUBIC);
31
32   /*imshow("mat_rotated", mat_rotated);
33   waitKey(0);*/
34
35   Mat img_crop;
36   getRectSubPix(mat_rotated, Size(rect_size.width, rect_size.height),
37                 new_center, img_crop);
38
39   out = img_crop;
40
41   if (0) {
42     imshow("out", out);
43     waitKey(0);
44     destroyWindow("out");
45   }
46
47   /*imshow("img_crop", img_crop);
48   waitKey(0);*/
49
50   return true;
51 }
在旋转的过程当中,遇到一个问题,就是旋转后的图像被截断了,如下图所示:
仔细分析下代码可以发现,getRotationMatrix2D() 函数主要根据旋转中心和角度进行旋转,当旋转角度还小时,一切都还好,但当角度变大时,明显我们看到的外接矩形的大小也在扩增。在这里,外接矩形被称为视框,也就是我需要旋转的正方形所需要的最小区域。随着旋转角度的变大,视框明显增大。 如下图所示:
EasyPR使用了一个极为简单的策略,它将原始图像与目标图像都进行了扩大化。首先新建一个尺寸为原始图像 1.5 倍的新图像,接着把原始图像映射到新图像上,于是我们得到了一个显示区域(视框)扩大化后的原始图像。显示区域扩大以后,那些在原图像中没有值的像素被置了一个初值。接着调用 warpAffine 函数,使用新图像的大小作为目标图像的大小。warpAffine 函数会将新图像旋转,并用目标图像尺寸的视框去显示它。于是我们得到了一个所有感兴趣区域都被完整显示的旋转后图像,这样,我们再使用 getRectSubPix()函数就可以获得想要的车牌区域了。
接下来就是分析截取后的车牌区域。车牌区域里的车牌分为正角度和偏斜角度两种。对于正的角度而言,可以看出车牌区域就是车牌,因此直接输出即可。而对于偏斜角度而言,车牌是平行四边形,与矩形的车牌区域不重合。如何判断一个图像中的图形是否是平行四边形?
一种简单的思路就是对图像二值化,然后根据二值化图像进行判断。为了判断二值化图像中白色的部分是平行四边形。一种简单的做法就是从图像中选择一些特定的行。计算在这个行中,第一个全为0的串的长度。从几何意义上来看, 这就是平行四边形斜边上某个点距离外接矩形的长度。假设我们选择的这些行位于二值化图像高度的 1/4,2/4,3/4 处的话,如果是白色图形是矩形的话, 这些串的大小应该是相等或者相差很小的,相反如果是平行四边形的话,那么这些串的大小应该不等,并 且呈现一个递增或递减的关系。通过这种不同,我们就可以判断车牌区域里的图形,究竟是矩形还是平行 四边形。
偏斜判断的另一个重要作用就是,计算平行四边形倾斜的斜率,这个斜率值用来在下面的仿射变换中 发挥作用。我们使用一个简单的公式去计算这个斜率,那就是利用上面判断过程中使用的串大小,假设二值化图像高度的 1/4,2/4,3/4 处对应的串的大小分别为 len1,len2,len3,车牌区域的高度为 Height。 一个计算斜率 slope 的计算公式就是:(len3-len1)/Height*2。

函数 isdeflection() 的主要功能是判断车牌偏斜的程度,并且计算偏斜的值。具体代码如下:
 1 bool CPlateLocate::isdeflection(const Mat &in, const double angle,
 2                                 double &slope) {
 3   int nRows = in.rows;
 4   int nCols = in.cols;
 5
 6   assert(in.channels() == 1);
 7
 8   int comp_index[3];
 9   int len[3];
10
11   comp_index[0] = nRows / 4;
12   comp_index[1] = nRows / 4 * 2;
13   comp_index[2] = nRows / 4 * 3;
14
15   const uchar* p;
16
17   for (int i = 0; i < 3; i++) {
18     int index = comp_index[i];
19     p = in.ptr<uchar>(index);
20
21     int j = 0;
22     int value = 0;
23     while (0 == value && j < nCols) value = int(p[j++]);
24
25     len[i] = j;
26   }
27
28   // len[0]/len[1]/len[2] are used to calc the slope
29
30   double maxlen = max(len[2], len[0]);
31   double minlen = min(len[2], len[0]);
32   double difflen = abs(len[2] - len[0]);
33
34   double PI = 3.14159265;
35
36   double g = tan(angle * PI / 180.0);
37
38   if (maxlen - len[1] > nCols / 32 || len[1] - minlen > nCols / 32) {
39
40     double slope_can_1 =
41         double(len[2] - len[0]) / double(comp_index[1]);
42     double slope_can_2 = double(len[1] - len[0]) / double(comp_index[0]);
43     double slope_can_3 = double(len[2] - len[1]) / double(comp_index[0]);
44     slope = abs(slope_can_1 - g) <= abs(slope_can_2 - g) ? slope_can_1
45                                                          : slope_can_2;
46     return true;
47   } else {
48     slope = 0;
49   }
50
51   return false;
52 }
我们已经实现了旋转功能,并且在旋转后的区域中截取了车牌区域,然后判断车牌区域中的图形是一 个平行四边形。下面要做的工作就是把平行四边形扭正成一个矩形。

函数 affine() 的主要功能是对图像进行根据偏斜角度,进行仿射变换。具体代码如下:
 1 void CPlateLocate::affine(const Mat &in, Mat &out, const double slope) {
 2
 3   Point2f dstTri[3];
 4   Point2f plTri[3];
 5
 6   float height = (float) in.rows;
 7   float width = (float) in.cols;
 8   float xiff = (float) abs(slope) * height;
 9
10   if (slope > 0) {
11
12     // right, new position is xiff/2
13
14     plTri[0] = Point2f(0, 0);
15     plTri[1] = Point2f(width - xiff - 1, 0);
16     plTri[2] = Point2f(0 + xiff, height - 1);
17
18     dstTri[0] = Point2f(xiff / 2, 0);
19     dstTri[1] = Point2f(width - 1 - xiff / 2, 0);
20     dstTri[2] = Point2f(xiff / 2, height - 1);
21   } else {
22
23     // left, new position is -xiff/2
24
25     plTri[0] = Point2f(0 + xiff, 0);
26     plTri[1] = Point2f(width - 1, 0);
27     plTri[2] = Point2f(0, height - 1);
28
29     dstTri[0] = Point2f(xiff / 2, 0);
30     dstTri[1] = Point2f(width - 1 - xiff + xiff / 2, 0);
31     dstTri[2] = Point2f(xiff / 2, height - 1);
32   }
33
34   Mat warp_mat = getAffineTransform(plTri, dstTri);
35
36   Mat affine_mat;
37   affine_mat.create((int) height, (int) width, TYPE);
38
39   if (in.rows > HEIGHT || in.cols > WIDTH)
40
41     warpAffine(in, affine_mat, warp_mat, affine_mat.size(),
42                CV_INTER_AREA);
43   else
44     warpAffine(in, affine_mat, warp_mat, affine_mat.size(), CV_INTER_CUBIC);
45
46   out = affine_mat;
47 }
最后使用 resize 函数将车牌区域统一化为 EasyPR 的车牌大小,大小为136*36。