Previously I’ve wrote about design and implementation an UPSERT with SSIS. UPSERT is about Update existing records, and Insert new records. Today I want to extend this to cover DELETED records as well. So method used in this post can be used to find INSERTED / UPDATED / DELETED records from the source table and apply those changes into the destination table.
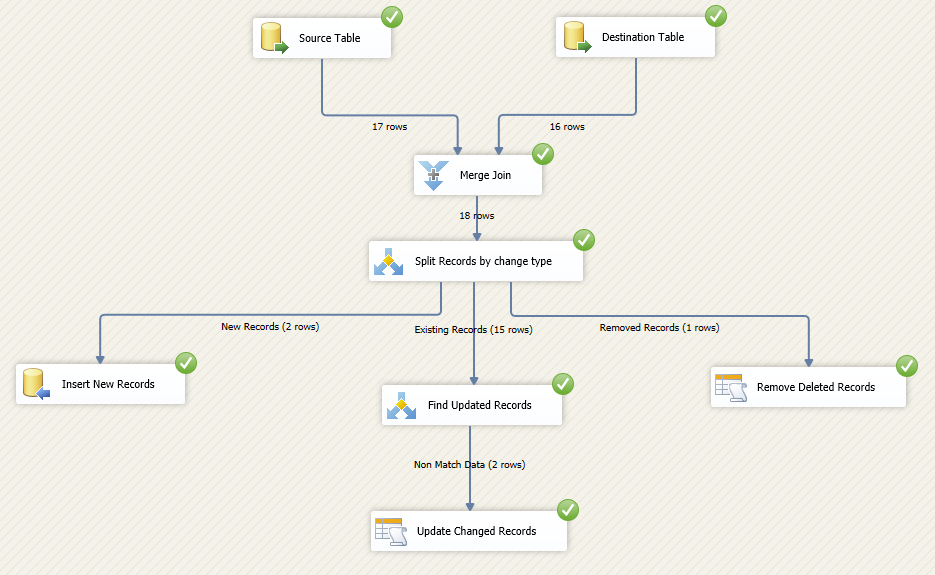
In this example I used Merge Join Transformation, Conditional Split, and OLE DB Command transform to implement the solution. First we apply a full outer join on source and destination table on key column(s) with Merge Join transformation. Then we use a conditional split to find out the change type (removed, new, or existing records). Existing records will require another processing to find out is there any changes happened or not? We use another conditional split to compare value of equivalent columns in source and destination.
Source table used in this example is Department table from AdventureWorks2012 sample database which you can download online for free.
Solution:
1- Create an OLE DB Source for source table, use select command below to select data:
select *
from dbo.Department
order by DepartmentID
Note to the ORDER BY Clause in this statement. That part is required because Merge Join transform require sorted sources as input. Name this component as Source Table
2- Create another OLE DB Source for destination table. In this example source and destination has same table name but are in different databases. So we use same script as step 1 for this one as well. Name this component as Destination Table.
3- Right click on OLE DB Source, choose Show Advanced Editor. In the Advanced Editor window go to Input and Output Properties tab. Select the OLE DB Source Output, and change the IsSorted Property to true.
4- Expand OLE DB Source output, and then under Output Columns select DepartmentID. Then change the SortKeyPosition to 1.
5- Apply steps 3 and 4 for both OLE DB Sources (Source Table and Destination Table)
6- Drag and drop a Merge Join transformation, connect two OLE DB Sources to this. Set Source Table as left and Destination Table as right input of this transformation.
7- Go to Merge Join transformation editor, DepartmentID will be used as joining column (selected based on sort properties of previous components). Note that if you don’t sort input columns of the merge join transformation then you cannot get into the editor of this transformation and you face the error regarding sorting of inputs.
Select all columns from Source and Destination tables in the merge join transform, and rename them as picture below shows (add Source or Destination prefix to each column)
8- Add a Conditional Split transformation and write two expressions below to find out new records, and removed records. Also rename default output as existing records and screenshot below shows
Expressions used in this sample are very easy and simply find record changes. For example expression below:
!ISNULL(SourceDepartmentID) && ISNULL(DestinationDepartmentID)
Used to find new records. And literally means records that has SourceDepartmentID but not DestinationDepartmentID.
And this script used to find deleted records:
ISNULL(SourceDepartmentID) && !ISNULL(DestinationDepartmentID)
9- Add an OLE DB Destination and connect NEW RECORDS output to it. Set configuration for destination table and use columns with Source prefix in the column mapping of the OLE DB destination. This destination component will insert new records into the destination table.
10- Add an OLE DB Command and connect Removed RECORDS output to it. Create a connection to destination database, and write script below to delete records by input department ID:
delete from dbo.department where DepartmentID=?
In the column mappings, map DestinationDepartmentID to the parameter of statement.
11- Add another Conditional Split and connect Existing Records output to it. We use this component to find only records that had a change in one of the values. So we compare equivalent source and destination columns to find non-match data.
This is the expression used to find match data in screenshot below:
(SourceName == DestinationName) && (SourceGroupName == DestinationGroupName) && (SourceModifiedDate == DestinaitonModifiedDate)
12- Create a stored procedure in destination database to update the Department table.
CREATE PROCEDURE dbo.UpdateDepartment
@DepartmentID smallint
,@Name nvarchar(50)
,@GroupName nvarchar(50)
,@ModifiedDate datetime
AS
BEGIN
SET NOCOUNT ON;
UPDATE [dbo].[Department]
SET
[Name] = @Name
,[GroupName] = @GroupName
,[ModifiedDate] = @ModifiedDate
WHERE [DepartmentID] = @DepartmentID
END
13- Add another OLE DB Command and use non match output as the input data stream to it. Connect it to destination database, and write below statement in Component Properties tab’s SQLCommand property.
exec dbo.UpdateDepartment ?,?,?,?
14- Map input columns (with source prefixes) to parameters in the stored procedure as screenshot below shows
15- Run the package and you will see changes will be applied to destination table.
Testing the solution:
Here is data rows from source table
And data rows from destination table
Yellow records are new records
Pink records are updated records
Green record is deleted record (in destination table)
After running the package you will see records will be redirected to data path as implemented:
And destination table will pick changes: