视频地址
一、基础语法
1 安装
1.1 最简单的安装方式
直接在页面用script引入,此种方式引入尽量将js放在head里面,避免抖屏
2 简单使用
创建vue实例:new Vue()
el:元素,让vue接管界面哪个element(元素),el参数就是元素id,该元素也成称为挂载点,挂载点中的内容称为模板
data:挂载点下面有一些数据,放到data里面
<!DOCTYPE html>
<html lang="en">
<head>
    <meta charset="UTF-8">
    <title>简单使用</title>
    <script src="js/vue.js"></script>
</head>
<body>
    <!--Vue实例挂载点,-->
    <div id="root">
        <!--模板-->
        <h1>{{msg}}</h1>
    </div>
<script>
	//创建一个vue实例
    new Vue({
    	//让vue接管界面哪个element(元素),el参数就是元素id
        el: '#root',
        // 模板内容还可以用以下方式书写
        // template: '<h1>{{msg}}</h1>',
        data:{
            msg:'Hello World!'
        }
    });
</script>
</body>
</html>
关系:
- id为root的标签叫做vue实例的挂载点,vue只会处理挂载点下面的内容,实例和挂载点唯一对应
- 挂载点中的内容称为模板,模板有两种书写方式:第一种直接写在挂载点内部;第二种写在vue实例的template属性里面,格式:template: <标签内容>
3 数据、事件、方法
3.1 数据绑定
<body>
<div id="root">
    <h1>{{msg}}</h1>
    <h1 v-text="number"></h1>
    <div v-html="content"></div>
</div>
<script>
    new Vue({
        el: '#root',
        data: {
            msg: 'Hello World!',
            number: 123,
            content: '<h1>对标签进行转义</h1>',
        }
    });
</script>
</body>
- {{msg}}:插值表达式。
- v-text:意思是标签h1中的内容由number指定,直接填写数据原始内容。
- v-html:对内容进行html转义。
3.2 事件、方法
v-on:进行事件绑定,后面跟着事件类型和方法名。方法在methods中进行定义。v-on:可以简写为@
<body>
<div id="root">
    <div v-on:click="handleClick">{{msg}}</div>
</div>
<script>
    new Vue({
        el: '#root',
        data: {
            msg: 'Hello',
            number: 123,
            content: '<h1>对标签进行转义</h1>',
        },
        methods: {
            handleClick: function () {
                this.msg = 'World';
            },
        }
    });
</script>
</body>
4 属性绑定、数据双向绑定
4.1 属性单项绑定
绑定方法:v-bind:属性名,缩写::属性名
<!DOCTYPE html>
<html lang="en" xmlns:v-on="http://www.w3.org/1999/xhtml" xmlns:v-bind="http://www.w3.org/1999/xhtml">
<head>
    <meta charset="UTF-8">
    <title>属性绑定、数据双向绑定</title>
    <script src="js/vue.js"></script>
</head>
<body>
<div id="root">
    <div v-bind:title="title">{{msg}}</div>
</div>
<script>
    new Vue({
        el: '#root',
        data: {
            msg: 'Hello World',
            title: '这是个问候语'
        }
    });
</script>
</body>
</html>
- 使用[v-bind:title=“title”]属性绑定后,双引号里面的title就是一个表达式,所以里面可以写js的内容比如[v-bind:title="'dell li + 'title"]
- [v-bind:]可以缩写为[:]
4.2 数据双向绑定
<body>
<div id="root">
    <input v-model="msg">
    <div v-text="msg"></div>
</div>
<script>
    new Vue({
        el: '#root',
        data: {
            msg: 'Hello World',
            title: '这是个问候语'
        }
    });
</script>
</body>
4.3 计算属性和侦听器
该例将实现以下功能:全名fullName通过firstName、lastName计算得到,firstName、lastName发生改变fullName也随之改变,count就加1。
<!DOCTYPE html>
<html lang="en" xmlns:v-on="http://www.w3.org/1999/xhtml" xmlns:v-bind="http://www.w3.org/1999/xhtml"
      xmlns:v-text="http://www.w3.org/1999/xhtml">
<head>
    <meta charset="UTF-8">
    <title>计算属性和侦听器</title>
    <script src="js/vue.js"></script>
</head>
<body>
<div id="root">
    姓:<input v-model="firstName">
    名:<input v-model="lastName"><br>
    姓名:{{fullName}}<br>
    名字改变次数:{{count}}
</div>
<script>
    new Vue({
        el: '#root',
        data: {
            firstName: 'Chen',
            lastName: 'Yuhua',
            count: 0,
        },
        //属性计算,一个属性通过其他属性计算而来,firstName lastName中有人的值发生改变时fullName才会重新计算
        computed:{
            fullName:function () {
                return this.firstName + '' + this.lastName;
            }
        },
        //属性监听
        watch:{
            fullName:function () {
                this.count++;
            }
        }
    });
</script>
</body>
</html>
1.属性计算:使用vue的conputed属性,一个属性通过其他属性计算而来,firstName lastName中有人的值发生改变时fullName才会重新计算,否则使用缓存值
2. 属性监听:使用vue的watch属性,监听属性或者计算属性的变化
4.4 v-if、v-show、v-for
<!DOCTYPE html>
<html lang="en" xmlns:v-on="http://www.w3.org/1999/xhtml" xmlns:v-bind="http://www.w3.org/1999/xhtml"
      xmlns:v-text="http://www.w3.org/1999/xhtml">
<head>
    <meta charset="UTF-8">
    <title>v-if、v-show、v-for</title>
    <script src="js/vue.js"></script>
</head>
<body>
<div id="root">
	<!--控制消息的隐藏显示-->
    <button @click="handleShow">{{btnVal}}</button>
    <h1 v-if="show">v-if:{{msg}}</h1>
    <h1 v-show="show">v-show:{{msg}}</h1>

    <ul>
    	<!--遍历数组 key可以提高效率-->
        <li v-for="(item,index) of list" :key="index">{{item}}</li>
    </ul>
</div>
<script>
    new Vue({
        el: '#root',
        data: {
            show:true,
            msg:'你好!中国',
            btnVal: '隐藏',
            list:[1,2,3,4]
        },
        methods:{
            handleShow: function () {
                this.show = !this.show;
                if (this.show) {
                    this.btnVal = '隐藏';
                }else{
                    this.btnVal = '显示';
                }
            },
        }
    });
</script>
</body>
</html>
4.4.1 v-if、v-show区别
v-if: 直接创建或者删除标签来控制元素的显示和隐藏,代价较大。
v-show:通过css样式控制元素的显示和隐藏。
若是需要元素频繁的显示和隐藏应该使用v-show。
4.4.2 v-for循环
:key可以提高渲染效率,每项数据的key值不能相同。
二、vue中的组件
2.1 todolist功能开发
功能:输入框中输入内容,提交后清空输入框,在列表中进行展示。

<!DOCTYPE html>
<html lang="en" xmlns:v-on="http://www.w3.org/1999/xhtml" xmlns:v-bind="http://www.w3.org/1999/xhtml"
      xmlns:v-text="http://www.w3.org/1999/xhtml">
<head>
    <meta charset="UTF-8">
    <title>todolist功能实现</title>
    <script src="js/vue.js"></script>
</head>
<body>
<div id="root">
    <div>
        <input v-model="inputValue">
        <button @click="handleSubmit">提交</button>
    </div>
    <ul>
        <li v-for="(item,index) of list" :key="index">{{item}}</li>
    </ul>
</div>
<script>
    new Vue({
        el: '#root',
        data: {
            inputValue:'',
            list:[],
        },
        methods: {
            handleSubmit: function () {
                this.list.push(this.inputValue);
                this.inputValue = '';
            },
        }
    });
</script>
</body>
</html>
2.2 todolist组件拆分
组件:页面的某一部分,实际项目开发中,一个内容较多的网页内容可以拆分称多个部分,每个部分就是一个组件,便于维护。
2.2.1 将列表进行组件拆分
- 全局组件。
<ul>
	<!--组件使用-->
    <todo-item></todo-item>
</ul>
<script>
	<!--组件注册-->
	Vue.component('todo-item', {
	    template:'<li>item</li>'
	});
</script>
这种方式定义的组件叫做全局组件,定义好之后在项目中的任何地方都可以使用。
- 局部组件。
<!--组件使用-->
<ul>
    <todo-item></todo-item>
</ul>
<script>
	<!--组件定义-->
    var todoItem = {
        template:'<li>item</li>'
    }
    new Vue({
        el: '#root',
        // 组件注册
        compoments:{
            'todo-item':todoItem
        }
    });
</script>
通过此种方式定义的组件就是局部组件,想要使用就需要使用vue的compoments属性定义到挂载点之下。意思就是在该vue实例里面想要使用todoItem这个组件,就需要进行组件注册,使用todo-item这个标签使用。
- 功能实现
<!DOCTYPE html>
<html lang="en" xmlns:v-on="http://www.w3.org/1999/xhtml" xmlns:v-bind="http://www.w3.org/1999/xhtml"
      xmlns:v-text="http://www.w3.org/1999/xhtml">
<head>
    <meta charset="UTF-8">
    <title>todolist功能实现</title>
    <script src="js/vue.js"></script>
</head>
<body>
<div id="root">
    <div>
        <input v-model="inputValue">
        <button @click="handleSubmit">提交</button>
    </div>
    <ul>
        <!--:content 向子组件把item值传递过去-->
        <todo-item
            v-for="(item,index) of list"
            :key="index"
            :content="item"
        ></todo-item>
    </ul>
</div>
<script>

    Vue.component('todo-item',{
        //接收父组件传过来的content值
        props:['content'],
        template:'<li>{{content}}</li>'
    })
    new Vue({
        el: '#root',
        data: {
            inputValue: '',
            list: [],
        },
        methods: {
            handleSubmit: function () {
                this.list.push(this.inputValue);
                this.inputValue = '';
            },
        }
    });
</script>
</body>
</html>
Vue中父组件向子组件是通过属性进行传值的,子组件需要使用props进行属性值的接收。
2.3 组件和实例的关系
每个Vue的组件都是一个Vue的实例,都拥有data、template、methods等属性。任何一个Vue项目都是由多个Vue实例组成。组件是否是实例可以用以下代码验证:
Vue.component('todo-item',{
        //接收父组件传过来的content值
        props:['content'],
        template:'<li @click="handleClick">{{content}}</li>',
		methods:{
			handleClick:function(){
				alert("clicked!")
			}
		}
    })

注意:如果一个Vue实例没有template属性,它会将挂载点下所有内容当做模板使用。
2.4 实现todolist删除功能
该实例实现以下功能:输入框提交内容后,清空输入框,列表对内容进行展示,点击列表某项,该项将被删除。

由于子组件的删除依赖父组件的list的值,所以点击子组件item时需要将信息传递给父组件,让父组件删除list中对应的值。子组件需要父组件将index下标传递过来,子组件向父组件通信需要一个发布订阅的模式,通过$emit发布delete事件同时将index传递出去,父组件创建子组件的时候需要监听delete事件
<!DOCTYPE html>
<html lang="en" xmlns:v-on="http://www.w3.org/1999/xhtml" xmlns:v-bind="http://www.w3.org/1999/xhtml"
      xmlns:v-text="http://www.w3.org/1999/xhtml">
<head>
    <meta charset="UTF-8">
    <title>todolist删除功能实现</title>
    <script src="js/vue.js"></script>
</head>
<body>
<div id="root">
    <div>
        <input v-model="inputValue">
        <button @click="handleSubmit">提交</button>
    </div>
    <ul>
        <!--:content 向子组件进行传值-->
        <todo-item
            v-for="(item,index) of list"
            :key="index"
            :content="item"
            :index="index"
            @delete="handleDelete"
        ></todo-item>
    </ul>
</div>
<script>
    Vue.component('todo-item',{
        //接收父组件传过来的content值
        props:['content',"index"],
        template:'<li @click="handleClick">{{content}}</li>',
        methods:{
            handleClick:function () {
            	//通过$emit发布事件:定义“delete”事件,向父组件传值“index”
                this.$emit('delete', this.index);
            }
        }
    })

    new Vue({
        el: '#root',
        data: {
            inputValue: '',
            list: [],
        },
        methods: {
            handleSubmit: function () {
                this.list.push(this.inputValue);
                this.inputValue = '';
            },
            handleDelete:function (index) {
                this.list.splice(index, 1);
            }
        }
    });
</script>
</body>
</html>
父组件向子组件通过“属性”传值,子组件向父组件通过“$emit()”进行通知传值。
三、Vue-cli的使用
3.1 简介和使用
3.1.1 简介
Vue 提供了一个官方的 CLI,为单页面应用 (SPA) 快速搭建繁杂的脚手架。它为现代前端工作流提供了 batteries-included 的构建设置。只需要几分钟的时间就可以运行起来并带有热重载、保存时 lint 校验,以及生产环境可用的构建版本。
3.1.2 使用
- 安装node。
- 安装npm。
- 创建项目。
npm install -g @vue/cli-init
# vue init now works exactly the same as vue-cli@2.x
vue init webpack my-project
- 运行项目。
npm run dev
3.2.3 项目目录介绍
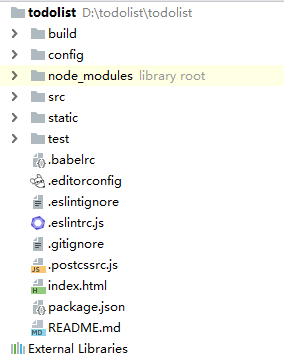
build:webpack配置文件,不需要关注。
config:针对开发环境,线上环境的配置,不需要关注。
node_modules:项目依赖。
src:源代码放置目录。
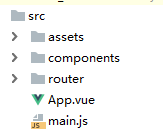
- main.js
// The Vue build version to load with the `import` command
// (runtime-only or standalone) has been set in webpack.base.conf with an alias.
import Vue from 'vue'
import App from './App'
import router from './router'

Vue.config.productionTip = false

/* eslint-disable no-new */
new Vue({
  // 挂载点在id为app的节点
  el: '#app',
  router,
  // 注册一个局部组件, import App from './App' 从当前目录下App引入的组件。
  // components: { App }等价于components: { App:App }引入一个名为App的组件,如果健和值相同,直接这么简写
  components: { App },
  // 模板显示的就是App组件下的内容,
  template: '<App/>'
})
- App.vue包含一个组件所有内容。
<template>
  <div id="app">
  </div>
</template>

<script>
export default {
}
</script>
<style>
</style>
static:静态文件目录。
test:测试目录。
index.html:整个网页最外层的html,有个id为app的挂载点,Vue的根实例挂在在该挂载点上。
<!DOCTYPE html>
<html>
  <head>
    <meta charset="utf-8">
    <meta name="viewport" content="width=device-width,initial-scale=1.0">
    <title>todolist</title>
  </head>
  <body>
    <div id="app"></div>
    <!-- built files will be auto injected -->
  </body>
</html>
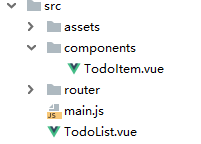
3.2 使用Vue-cli开发todolist
目录文件
main.js
// The Vue build version to load with the `import` command
// (runtime-only or standalone) has been set in webpack.base.conf with an alias.
import Vue from 'vue'
import router from './router'

Vue.config.productionTip = false

/* eslint-disable no-new */
new Vue({
  // 挂载点在id为app的节点
  el: '#app',
  router,
  // 注册一个局部组件, import App from './App' 从当前目录下App引入的组件。
  // components: { App }等价于components: { App:App }引入一个名为App的组件,如果健和值相同,直接这么简写
  components: { TodoList },
  // 模板显示的就是App组件下的内容,
  template: '<TodoList/>'
})
TodoList.vue
<template>
  <div>
    <div>
      <input v-model="inputValue"/>
      <button @click="handleSubmit">提交</button>
    </div>
    <ul>
      <todo-item
        v-for="(item,index) of list"
        :key="index"
        :content="item"
        :index="index"
        @delete="handleDelete"
      ></todo-item>
    </ul>
  </div>
</template>
<script>
// 导入组件
import TodoItem from './components/TodoItem'
export default {
  // 注册组件
  components: {
    'todo-item': TodoItem
  },
  // data之前是个对象,现在是个函数,书写各式如下
  // data: function () {
  //   return {
  //     inputValue: ''
  //   }
  // },
  // 在ES6语法里可以对函数进行简化
  data () {
    return {
      // 表示data函数有个返回值为inputValue
      inputValue: '',
      list: []
    }
  },
  methods: {
    handleSubmit () {
      // Vue底层会做变更让this指该组件或者实例
      // this.list应该指向实例的list,为何指向data的list呢?这也是Vue底层做的处理,this.list==this.$data.list,
      // 给出this.list会自动去data里面找,如果没找到,会去computed计算属性里面面找。
      this.list.push(this.inputValue)
      this.inputValue = ''
    },
    handleDelete (index) {
      this.list.splice(index, 1)
    }
  }
}
</script>

<style>
</style>
TodeItem.vue
<template>
  <div >
    <li
      @click="handleDelete"
    >{{content}}</li>
  </div>
</template>

<script>
export default {
  props: ['content', 'index'],
  methods: {
    handleDelete () {
      this.$emit('delete', this.index)
    }
  }
}
</script>

<!-- Add "scoped" attribute to limit CSS to this component only -->
<!-- 添加"scoped"属性,该css样式只针对该组件,去掉后会影响所有组件  -->
<style scoped>
<style scoped>
</style>
一个vue只有一个最外层标签
整个教程整理自慕课网教学视频,视频地址