vue-router

    是什么
        是vue官方的一个插件
        专门用来实现一个SPA应用
        基于vue的项目基本都会用到此库

        vuex  vue-router  这两个插件应用很广泛
单页Web应用(single page web application,SPA)
        整个应用只有一个完整的页面(这个完整的页面,由多个组件组成)

        点击页面中的链接不会刷新页面, 本身也不会向服务器发请求

        当点击路由链接时, 只会做页面的局部更新(组件切换)

        数据都需要通过ajax请求获取, 并在前端异步展现
路由
        是一个key:value的映射关系

        前台路由   路径 和 要显示的组件
        {

            path:'/home',
            component:Home

        }
        当点击链接的时候,路径会发生变化,但是不会向服务器发请求,而是去显示对应的组件
后台路由   路径 和 匹配的函数

        app.get('/users/info',function(){})

        当点击链接的时候,路径会发生变化,而且会向服务器发请求,然后匹配到后端的一个函数处理这个路由的请求,返回需要的
        数据
简单理解前台路由:路由可以让我们实现组件的切换和跳转:
            点击链接,匹配路由,显示对应的组件
路由组件和非路由组件

            //宏观上去看  如果一个组件是点击链接之后才会出现的,那么就一定和路由相关,就被路由组件

            //一个组件是在路由器中的路由中注册的,就是路由组件
            //一个组件不是在路由中注册的就叫非路由组件
案例实现
1.安装router, npm install vue-router
2.新建文件夹router,文件,新建index.js, 引入vue, router,
import Vue from "vue";
import Vuerouter from "vue-router";
//使用插件
Vue.use(Vuerouter);
暴露路由
// 暴露路由
export default Vuerouter({});
3.在入口文件main.js中,引入路由,注册路由
import router from '@/router'

Vue.config.productionTip = false

new Vue({
  el:'#root',
  render: h => h(App),
  router
  //注册路由器,注册之后
  //每个路由组件内部都可以通过this.$router拿到路由器对象
  //每个路由组件内部都可以通过this.$route拿到当前的路由对象
})
4,在router中引入路由组件,并且配置路由对象
// 引入路由组件
import About from '@/pages/About'
import Home from '@/pages/Home'
// 暴露路由
export default new Vuerouter({

  routes:[
    {
      path:'/home',
      component:Home
    },

    {
      path:'/about',
      component:About

    },

    {
      //重定向
      path:'/',
      redirect:'/home'

    }
  ]
});
在父组件中设置路由连接
<ul class="nav nav-stacked col-md-6" role="tablist">
          <li role="presentation" class="active">
            <router-link to="/home" aria-controls="home" role="tab" data-toggle="tab">Home</router-link>
            <!-- <a href="#home" aria-controls="home" role="tab" data-toggle="tab">Home</a> -->
          </li>
          <li role="presentation">
            <router-link to="/about" aria-controls="About" role="tab" data-toggle="tab">About</router-link>
            <!-- <a href="#About" aria-controls="About" role="tab" data-toggle="tab">About</a> -->
          </li>
        </ul>
<div class="tab-content col-md-6">
          <keep-alive include="Home">
            <router-view></router-view>
          </keep-alive>
        </div>
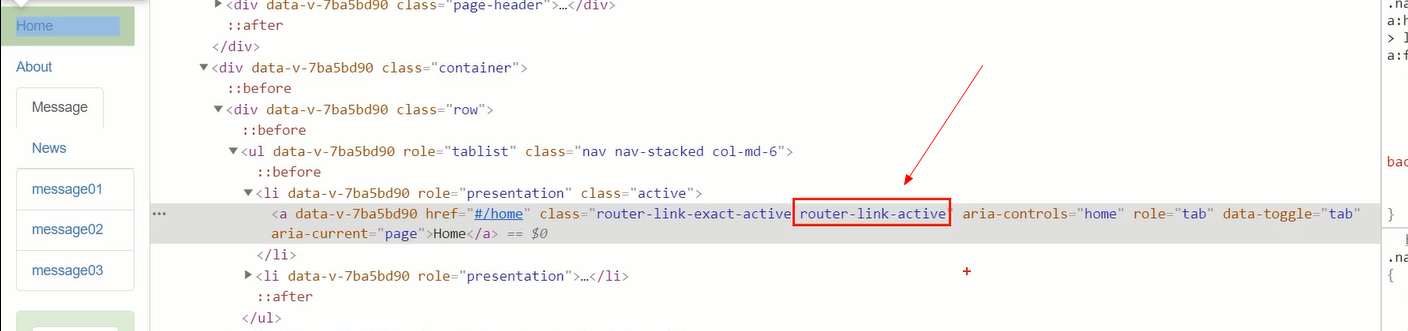
5.给点击的路由连接设置样式,.router-link-active点击a标签,会自动有这个类
.router-link-active{
      color: red !important;
    }
6.设置二级路由
在router的文件中,引入组件,配置二级路由对象
import Message  from '@/pages/Message'
import News  from '@/pages/News'

// 暴露路由
export default new Vuerouter({

  routes:[
    {
      path:'/home',
      component:Home,
      children:[
        {
          // path:'/home/message',子路由组件,可以省略
          path:'message',  //简写
          component:Message
        },

        {
          path:'news',  //简写
          component:News
        },

        {
          path:'',  //默认代表/home路径,重定向
          redirect:'message'  //可以简写成路径,默认跳转到message路径
        }
      ]
    },
7.设置三级路由
export default new Vuerouter({
  routes: [
    {
      path: "/home",
      component: Home,
      children: [
        {
          // path:'/home/message',子路由组件,可以省略
          path: "message", //简写
          component: Message,
          children: [
            {
              path: "msgdtil",
              component: MsgDtil,
            },
          ],
        },
设置路由连接
<div role="tabpanel" class="tab-pane active" id="Message">
    <ul class="list-group">
      <li class="list-group-item" v-for="(message, index) in messages" :key="message.id">
        <router-link to="/home/message/msgdtil"  >{{message.content}}</router-link>
        <!-- <a href="##">message01</a> -->
      </li>

    </ul>
    <div class="alert alert-success" role="alert">
        <!-- 设置路由组件 -->
        <router-view></router-view>
    </div>
  </div>
八,原始路由传参,params和query参数
最原始的传参
                参数:params参数和路径一样       /message/10
                      query参数路径后使用?去拼接起来的    /xxx/  ? aa = bb && xx = yy
<router-link :to="`/home/message/msgdetail/${m.id}?msgcontent=${m.content}`">{{m.content}}</router-link>
此时params参数,需要在改路由对象中设置键
 {
              path: "msgdtil/:mid",
              component: MsgDtil,
            },
路由组件中接收参数
  <li class="list-group-item">messageID:{{$route.params.mid}}</li>
    <li class="list-group-item">message:{{$route.query.msgcontent}}</li>
九, 路由传参,props简化传递
如果路由组件不需要这么麻烦接收参数{{$route.params.mid}}, 那么可以通过在路由对象中配置props来简化接收参数
使用props简化路由传参给子组件操作(路由当中传参的三种操作)
                1)布尔值
                路由当中需要配置 props:true,只能接收params参数,它会把路由当中接收的参数,置为子组件的属性
                2)对象
                很少用,只能给子组件传递默认静态值
                3)函数
                用的比较多,比较灵活,可以把params和query的参数都映射为子组件的属性
                props(route){ //route就是当前我这个路由对象
                                    //把路由对象当中的参数,不管什么参数
                                    //全部拿到作为子组件的属性去使用
                                    return {
                                            msgId:route.params.msgId,
                                            msgContent:route.query.msgContent
                                    }
                                }
在路由对象中配置props
 {
              path:'msgdetail/:mid',
              component:MsgDetail,
              // props:true  //代表只是针对params参数,属性传递给相应的路由组件对象
              // props:{username:'赵丽颖'} //props可以是一个对象,对象内部的数据是要传递给路由组件的静态数据
              // props(route){
              //   //把路径传参传递过来的params参数和query参数,都取出来,自己封装为一个对象
              //   //好让props可以进行属性传递
              //   return {mid:route.params.mid,msgcontent:route.query.msgcontent}
              // },
          //箭头函数写法
              props: route => ({mid:route.params.mid,msgcontent:route.query.msgcontent}),
              name:'msgdetail'

            }
export default {
  name: "MsgDetail",
  props: ["mid", "msgcontent"],
  data() {
    return {
      title: ""
    };
  },
 <!-- <li class="list-group-item">messageID:{{$route.params.mid}}</li> -->
    <li class="list-group-item">messageID:{{mid}}</li>
    <!-- <li class="list-group-item">message:{{$route.query.msgcontent}}</li> -->
    <li class="list-group-item">message:{{msgcontent}}</li>
十,命名路由写法,对象形式
路由链接组件中给路由传参可以写成对象形式,前提需要给路由起名字name,也叫命名路由
在路由对象中命名该路由
 {
              path:'msgdetail/:mid',
              component:MsgDetail,
              // props:true  //代表只是针对params参数,属性传递给相应的路由组件对象
              // props:{username:'赵丽颖'} //props可以是一个对象,对象内部的数据是要传递给路由组件的静态数据
              // props(route){
              //   //把路径传参传递过来的params参数和query参数,都取出来,自己封装为一个对象
              //   //好让props可以进行属性传递
              //   return {mid:route.params.mid,msgcontent:route.query.msgcontent}
              // },
              props: route => ({mid:route.params.mid,msgcontent:route.query.msgcontent}),
              name:'msgdetail'

            }
路由连接命名写法
 <!-- 原始字符串路径写法 -->
        <!-- <router-link :to="`/home/message/msgdetail/${m.id}?msgcontent=${m.content}`">{{m.content}}</router-link> -->
        <!-- 对象写法 -->
        <router-link :to="{name:'msgdetail',params:{mid:m.id},query:{msgcontent:m.content}}">{{m.content}}</router-link>
<template>
  <ul class="list-group">
    <!-- <li class="list-group-item">messageID:{{$route.params.mid}}</li> -->
    <li class="list-group-item">messageID:{{mid}}</li>
    <!-- <li class="list-group-item">message:{{$route.query.msgcontent}}</li> -->
    <li class="list-group-item">message:{{msgcontent}}</li>
    <li class="list-group-item">{{title}}</li>

  </ul>
</template>

<script>

const titleArr = [
  { id: 1, title: "msg01" },
  { id: 2, title: "msg02" },
  { id: 3, title: "msg03" }
];
export default {
  //关于路由组件销毁的问题,因为多个路由连接,跳转的都是同一个组件,
  //路由传参的id和组件自定义的id去匹配,获取title,填充模板数据

  name:'MsgDtil',
  //路由传参,props传递
  props:['mid', 'msgcontent'],
  data() {
    return {
      title:''
    };
  },

  mounted(){
    //路由传参过来的数字,自动变成了字符窜形式
    console.log(typeof(this.mid))  // string
    this.title= titleArr.find(item =>item.id === this.mid*1).title
  }
};
</script>

<style scoped ></style>
效果图
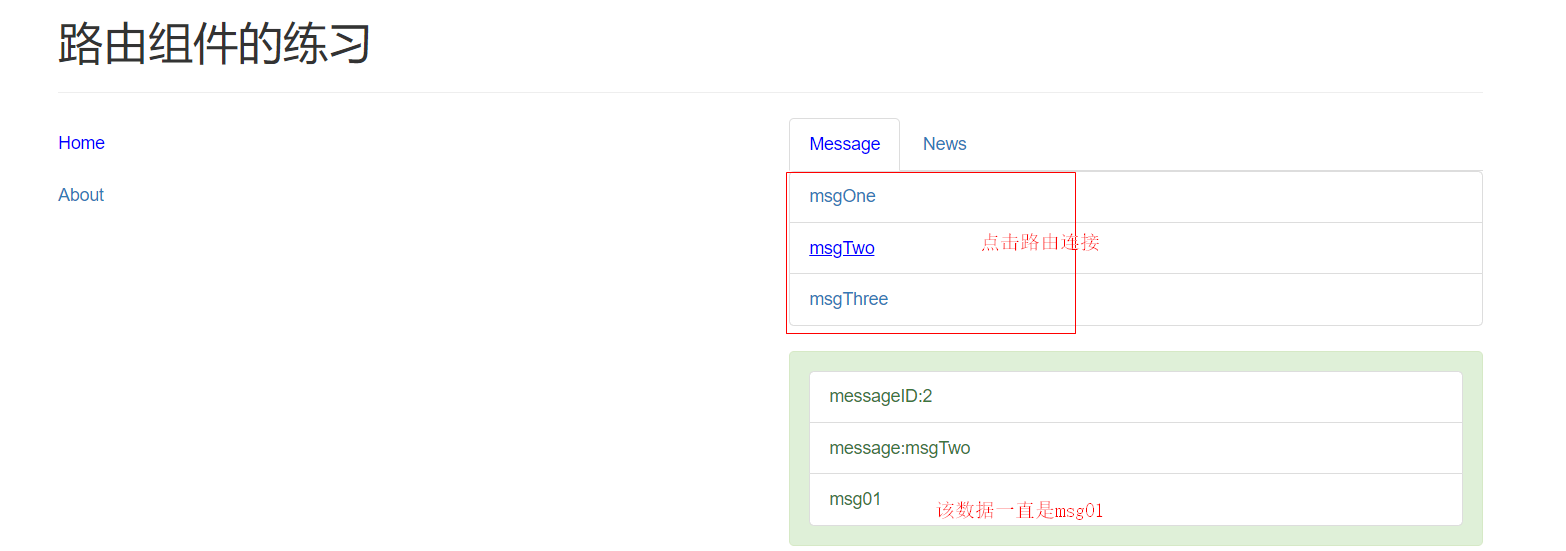
数据一直没有变化,因为多个路由连接都是跳转同一个路由组件,路由组件的生命周期一直存在,没有销毁,所以mounted加载后,新数据不会渲染
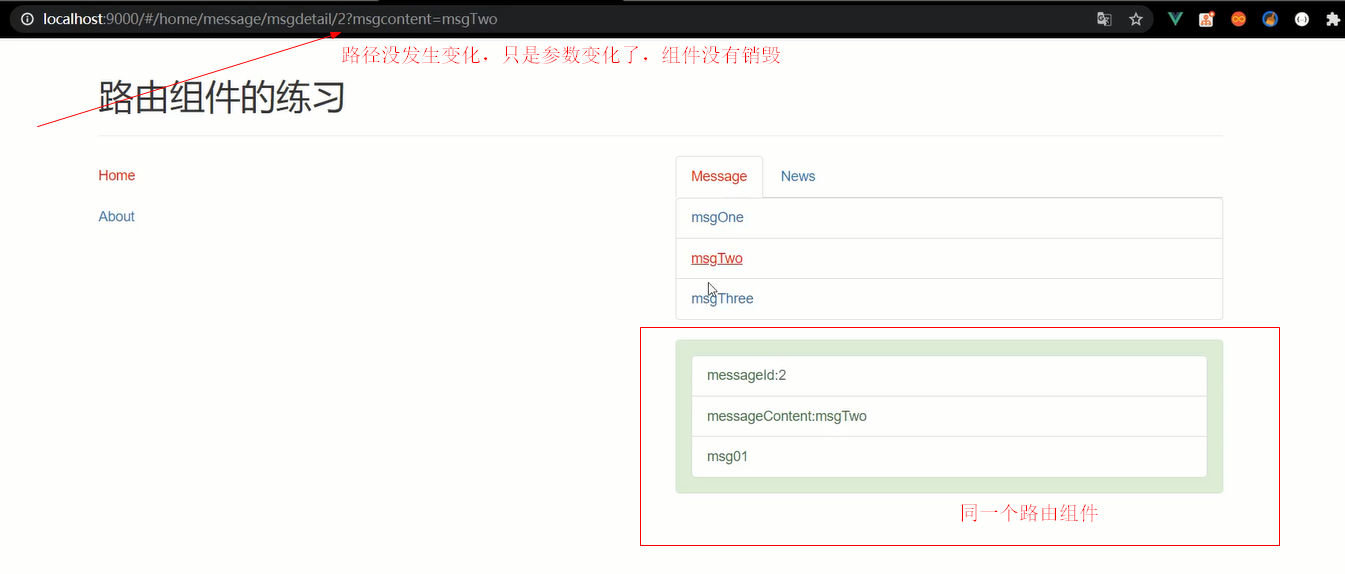
此时需要解决该bug,因为路由对象的params和query参数是不断变化的,此时我们需要监视路由对象$route, 只要路由对象的参数发生变化,就可以重新更新数据
<template>
  <ul class="list-group">
    <!-- <li class="list-group-item">messageID:{{$route.params.mid}}</li> -->
    <li class="list-group-item">messageID:{{mid}}</li>
    <!-- <li class="list-group-item">message:{{$route.query.msgcontent}}</li> -->
    <li class="list-group-item">message:{{msgcontent}}</li>
    <li class="list-group-item">{{title}}</li>

  </ul>
</template>

<script>

const titleArr = [
  { id: 1, title: "msg01" },
  { id: 2, title: "msg02" },
  { id: 3, title: "msg03" }
];
export default {
  //关于路由组件销毁的问题,因为多个路由连接,跳转的都是同一个组件,
  //路由传参的id和组件自定义的id去匹配,获取title,填充模板数据

  name:'MsgDtil',
  //路由传参,props传递
  props:['mid', 'msgcontent'],
  data() {
    return {
      title:''
    };
  },

  mounted(){
    //路由传参过来的数字,自动变成了字符窜形式
    console.log(typeof(this.mid))  // string
    this.changeTitle()
  },

  //监视路由变化
  watch:{
    $route(newRoute, oldRoute){
      this.changeTitle()
    }
  },

  methods:{
    changeTitle(){
      this.title= titleArr.find(item =>item.id ===this.mid*1 ).title
    }
  }


};
</script>

<style scoped ></style>
路由组件和非路由组件的最大区别
            路由组件的生命周期是点击链接的时候,才开始的,路由组件才会创建,mounted才能执行
            路由组件在切换的时候,会被销毁,显示的时候重新创建
            同一个路由组件传参显示不同数据,mounted回调只会执行一次,因为是一个组件
十一,缓存路由组件
使用的是vue的一个组件,参考vue的官方文档
        使用这个东西可以保证我们在切换组件的时候,原来显示的组件不被销毁。数据不会销毁


        <keep-alive include="Home">   Home是对应的组件对象的名字,不是路由的名字
                    <router-view></router-view>
              </keep-alive>
十二,编程式路由导航
定义一个事件,函数
<ul class="list-group">
      <li class="list-group-item" v-for="(n, index) in news" :key="n.id">
        {{n.content}}
        <button
          type="button"
          class="btn btn-primary"
          data-toggle="button"
          aria-pressed="false"
          autocomplete="off"
          @click="changeLr(n)"
        > {{ n.id }}</button>
      </li>

    </ul>
 methods: {
    // handlerBack(){
    //   this.$router.back()
    // },

    toNewsDetail(n) {
      //编程式导航(路由)
      // this.$router.push(`/home/news/newsdetail/${n.id}?newscontent=${n.content}`)//就是实现路由链接的效果
      //对象形式
      const location = {
        name: "newsdetail",
        params: { nid: n.id },
        query: { newscontent: n.content },
      };

      // this.$router.push(location); //就是实现路由链接的效果

      this.$router.replace(location);
    },
  },
1)this.$router.push(path): 相当于点击路由链接(可以返回到当前路由界面)
2) this.$router.replace(path): 用新路由替换当前路由(不可以返回到当前路由界面)
3) this.$router.back(): 请求(返回)上一个记录路由
$router.push()和$router.replace()的区别,返回有区别。
$router.push()是往历史记录里面追加
$router.replace()每一次都是覆盖添加
<button @click="$router.back()">返回</button>
路由模式hash和history之间的区别
解决history路由404

        hash模式:
                路径中带#: http://localhost:8080/#/home/news
                发请求的路径: http://localhost:8080  项目根路径,将域和路由路径用#隔开,
                响应: 返回的总是index页面  ==> path部分(/home/news)被解析为前台路由路径

        history模式:
                路径中不带#: http://localhost:8080/home/news
                发请求的路径: http://localhost:8080/home/news
                响应: 404错误,被当做后台路由,去找资源,显然8080端口是没有该资源的
                希望: 如果没有对应的资源, 返回index页面, path部分(/home/news)被解析为前台路由路径

在路由对象中配置路由模式
export default new VueRouter({
  mode:'history',
  ///home/message/msgdetail/1
  routes:[
    {
      path:'/home',
      component:Home,
解决history模式404的方式
解决: 添加配置
                    devServer添加: historyApiFallback: true, // 任意的 404 响应都被替代为 index.html
                    output添加: publicPath: '/', // 引入打包的文件时路径以/开头
在webpack配置文件配置
//3. 增加 devServer 配置
   devServer: {
    historyApiFallback: true, // 任意的 404 响应都被替代为 index.html
    open: true,     // 自动打开浏览器
    compress: true, // 启动gzip压缩
    port: 3000,     // 端口号
    quiet:true,
// 输出配置
  output: {
    // 输出文件名
    filename: 'built.js',
    //输出文件路径配置
    path: path.resolve(__dirname, 'dist'),
    //1. 添加 devServer 服务后需要调整输出的路径
    publicPath: '/'
此时在index.html引入的css不能是相对路径了,
<!DOCTYPE html>
<html lang="en">

<head>
  <meta charset="UTF-8">
  <meta name="viewport" content="width=device-width, initial-scale=1.0">
  <title>Document</title>
  <!-- <link rel="stylesheet" href="./css/bootstrap.css"> -->
  <link rel="stylesheet" href="/css/bootstrap.css">
  <style>
    .list-group-item {
        position: relative;
    }

    .btn {
         80px;
        height: 30px;
        position: absolute;
        right: 0;
        bottom: 5px;
    }
    .router-link-active{
      color: red !important;
    }
</style>
</head>

<body>
  <div id="root"></div>
</body>

</html>