一,权限管理中的权限列表开发

1.1,配置路由对象
import Rights from '@/views/Power/rights'

  {
    path: '/home',
    component: Home,
    // 重定向
    redirect: '/welcome',
    children: [
      { path: '/welcome', component: Welcome },
      { path: '/users', component: User },
      { path: '/rights', component: Rights }
    ]
1.2,页面渲染时,发送请求,获取权限列表数据
mounted() {
    this.getRightsList()
  },
  methods: {
    // 请求用户权限数据
    async getRightsList() {
      let { data: res } = await this.$http.get('rights/list')
      // console.log(res)
      if (res.meta.status !== 200) {
        return this.$message.error('获取权限数据失败')
      } else {
        this.rightsList = res.data
      }
    }
数据渲染页面
<!-- 顶部面包屑 -->
    <el-breadcrumb>
      <el-breadcrumb-item :to="{ path: '/home' }">首页</el-breadcrumb-item>
      <el-breadcrumb-item>权限列表</el-breadcrumb-item>
      <el-breadcrumb-item>权限管理</el-breadcrumb-item>
    </el-breadcrumb>

    <!-- 卡片视图 -->
    <el-card style="margin-top:20px">
      <el-table :data="rightsList" border stripe >
        <el-table-column type="index" align="center"></el-table-column>
        <el-table-column
          label="权限名称"
          align="center"
          prop="authName"
        ></el-table-column>
        <el-table-column
          label="路径"
          align="center"
          prop="path"
        ></el-table-column>
        <el-table-column label="权限登等级" align="center" >
          <template slot-scope="{ row, $index }">
            <el-tag v-if="row.level === '0'">标签一</el-tag>
            <el-tag type="success" v-else-if="row.level === '1'">标签二</el-tag>
            <el-tag type="info" v-else>标签三</el-tag>
          </template>
        </el-table-column>
      </el-table>
    </el-card>
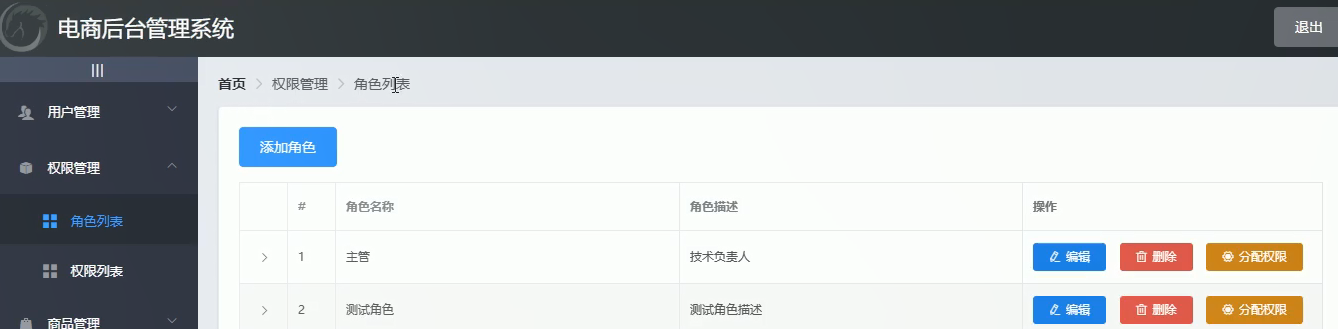
二,权限管理中的角色管理功能开发
2.1,配置路由对象
import Roles from '@/views/Power/roles.vue'
{
    path: '/home',
    component: Home,
    // 重定向
    redirect: '/welcome',
    children: [
      { path: '/welcome', component: Welcome },
      { path: '/users', component: User },
      { path: '/rights', component: Rights },
      { path: '/roles', component: Roles }
    ]
2.2,页面渲染时,发送请求,获取角色列表数据
  mounted() {
    this.getrolesList();
  },
  methods: {
    // 发送请求,获取角色列表数据
    async getrolesList() {
      let { data: res } = await this.$http.get("roles");
      //  console.log(res)
      if (res.meta.status !== 200)
        return this.$message.error("获取角色列表失败");
      this.roleslist = res.data;
    },
2.3,页面数据渲染
<!-- 顶部面包屑 -->
<el-breadcrumb>
<el-breadcrumb-item :to="{ path: '/home' }">首页</el-breadcrumb-item>
<el-breadcrumb-item>用户管理</el-breadcrumb-item>
<el-breadcrumb-item>用户列表</el-breadcrumb-item>
</el-breadcrumb>
<!-- 卡片视图 -->
<el-card style="margin-top:20px">
<el-button type="primary">添加角色</el-button>
<el-table :data="roleslist" border stripe style="margin:20px 0 ">
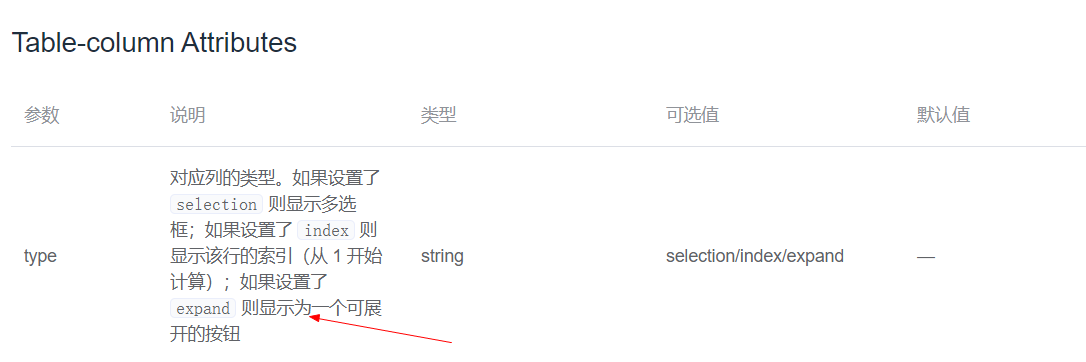
<el-table-column type="expand"> </el-table-column>
<el-table-column type="index" align="center"></el-table-column>
<el-table-column
label="角色名称"
align="center"
prop="roleName"
></el-table-column>
<el-table-column
label="角色名称"
align="center"
prop="roleDesc"
></el-table-column>
<el-table-column label="操作" width="300px">
<template slot-scope="{ row, $index }">
<el-button type="primary" icon="el-icon-edit" size="mini"
>编辑</el-button
>
<el-button type="danger" icon="el-icon-delet" size="mini"
>删除</el-button
>
<el-button type="warning" icon="el-icon-setting" size="mini"
>分配权限</el-button
>
</template>
</el-table-column>
</el-table>
</el-card>
2.4,对于第一列的展开项的页面搭建

获取的角色列表数据,一共嵌套有三层角色,需要用到栅格layout
{
    "data": [
        {
            "id": 30,
            "roleName": "主管",
            "roleDesc": "技术负责人",
            "children": [
                {
                    "id": 101,
                    "authName": "商品管理",
                    "path": null,
                    "children": [
                        {
                            "id": 104,
                            "authName": "商品列表",
                            "path": null,
                            "children": [
                                {
                                    "id": 105,
                                    "authName": "添加商品",
                                    "path": null
                                }
                            ]
                        }
                    ]
                }
            ]
        }
    ],
    "meta": {
        "msg": "获取成功",
        "status": 200
    }
}
<el-table :data="roleslist" border stripe style="margin:20px 0 ">
        <el-table-column type="expand">
          <template slot-scope="{ row, $index }">
            <el-row
              v-for="(item1, index1) in row.children"
              :key="item1.id"
              :class="['bdbottom', index1 === 0 ? 'bdtop' : '','vcone']"
            >
              <!-- 渲染一级权限 -->
              <el-col :span="5">
                <el-tag type="danger" size="normal">{{
                  item1.authName
                }}</el-tag>
                <i class="el-icon-caret-right"></i>
              </el-col>
              <!-- 渲染二级,三级权限 -->
              <el-col :span="19">
                <el-row
                class="vcone"
                  v-for="(item2, index2) in item1.children"
                  :key="item2.id"
                  :class="index2 === 0 ? '' : 'bdtop'"
                >
                  <!-- 渲染二级权限 -->
                  <el-col :span="6">
                    <el-tag type="success" size="normal">{{
                      item2.authName
                    }}</el-tag>

                    <i class="el-icon-caret-right"></i>
                  </el-col>
                  <!-- 渲染三级权限 -->
                  <el-col :span="18" >
                    <el-tag type="success" size="normal" v-for="(item3, index3) in item2.children" :key="item3.id">{{
                      item3.authName
                    }}</el-tag>

                  </el-col>
                </el-row>
              </el-col>
            </el-row>


          </template>
        </el-table-column>
样式,vcone是垂直居中效果
.el-tag {
  margin: 7px;
}

.bdbottom {
  border-bottom: 1px solid hotpink;
}

.bdtop {
  border-top: 1px solid hotpink;
}

.vcone {
  display: flex;
  align-items: center;
}
2.5,删除角色权限功能


  <!-- 渲染三级权限 -->
                  <el-col :span="18" >
                    <el-tag type="success" size="normal" closable
                    v-for="(item3, index3) in item2.children" :key="item3.id"
                    @close="removeright(row, item3.id)"
                    >{{
                      item3.authName
                    }}</el-tag>

                  </el-col>
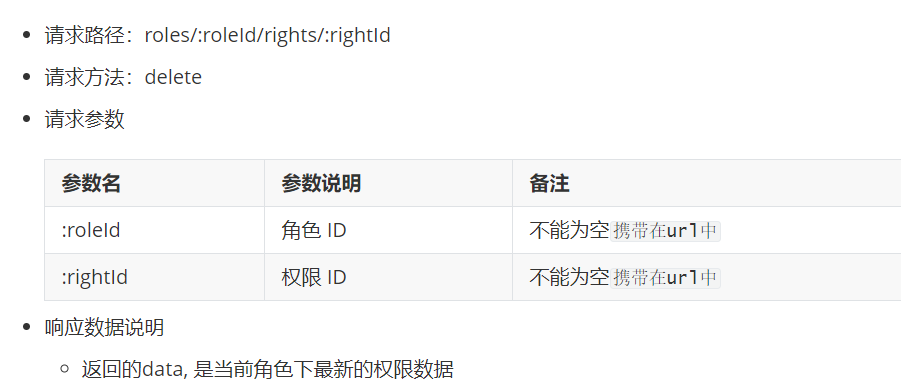
不需要重新发送请求this.getrolesList(), 获取角色列表数据,因为此时table会出现渲染,展开的数据会合上,删除请求后的返回的data数据直接赋值给row.children即可
// 点击tag,移除tag
    async removeright(role, itemId) {
      let result = await this.$confirm('是否要删除?', '确认信息', {
        distinguishCancelAndClose: true,
        confirmButtonText: '确定',
        cancelButtonText: '取消'
      }).catch(error => error)

      // console.log(result)
      if (result !== 'confirm') {
        return this.$message.info('取消删除')
      }

      let { data: res } = await this.$http.delete(
        `roles/${role.id}/rights/${itemId}`
      )
      // console.log(res)
      if (res.meta.status !== 200) return this.$message.error('删除权限失败')
      // 重新渲染数据,删除请求返回最新的数据
      role.children = res.data

      // this.getrolesList()

      this.$message.success('确认删除')
    }
2.6,点击分配权限按钮,弹出树形权限列表

   <el-button
              type="warning"
              icon="el-icon-setting"
              size="mini"
              @click="showSetRightDialog(row)"
              >分配权限</el-button
            >
发送请求,获取权限数据
  // 点击分配权限,弹出框
    async showSetRightDialog(row) {
      // 获取该用户的角色Id
      this.roleId = row.id

      let { data: res } = await this.$http.get('rights/tree')
      // console.log(res)
      if (res.meta.status !== 200) return this.$message.error('获取数据失败')
      this.rolesTreeList = res.data

      this.setRightdialogVisible = true
    }
返回的数据样式
 {
    data: [
      {
        id: 101,
        authName: '商品管理',
        path: null,
        pid: 0,
        children: [
          {
            id: 104,
            authName: '商品列表',
            path: null,
            pid: 101,
            children: [
              {
                id: 105,
                authName: '添加商品',
                path: null,
                pid: '104,101'
              }
            ]
          }
        ]
      }
    ],
    meta: {
      msg: '获取权限列表成功',
      status: 200
    }
  }
树形权限列表搭建
<!-- 分配权限弹框 -->
    <el-dialog
      title="分配权限"
      :visible.sync="setRightdialogVisible"
      width="50%"
    >
      <el-tree :data="rolesTreeList" :props="treeProps" ref="treeRef"></el-tree>
      <span slot="footer" class="dialog-footer">
        <el-button @click="setRightdialogVisible = false">取 消</el-button>
        <el-button type="primary" @click="setRightdialogVisible = false"
          >确 定</el-button
        >
      </span>
    </el-dialog>
在data中定义
 // 树形权限数据
      rolesTreeList: [],
      // 树形控件绑定对象
      treeProps: {
        children: 'children',
        label: 'authName'
      }
2.7,优化tree结构
![]()


  <el-tree
        :data="rolesTreeList"
        :props="treeProps"
        show-checkbox
        node-key="id"
        default-expand-all
        :default-checked-keys="defaultKey"
        ref="treeRef"
      ></el-tree>
在data中定义默认勾选三级节点id的数组
// 默认三级节点id数组
      defaultKey: []
点击分配权限按钮,默认展开每个角色勾选的权限
 // 点击分配权限,弹出框
    async showSetRightDialog(row) {
      // 获取该用户的角色Id
      this.roleId = row.id

      let { data: res } = await this.$http.get('rights/tree')
      // console.log(res)
      if (res.meta.status !== 200) return this.$message.error('获取数据失败')
      this.rolesTreeList = res.data
      // 调用递归函数,保存三级id
      this.getLeafKeys(row, this.defaultKey)

      this.setRightdialogVisible = true
    },
// 递归获取三级商品的id
    getLeafKeys(node, arr) {
      if (!node.children) {
        // 是三级节点
        return arr.push(node.id)
      }

      // 不是三级节点
      node.children.forEach(item => {
        this.getLeafKeys(item, arr)
      })
    }
此时有个bug,点击第一个分配权限按钮,收集的三级节点id的数组是用户的,点击第二个分配权限按钮,收集的三级节点id的数组也会有第一个用户的,我们需要在关闭dialog之前,清空
上一个用户的id数组defaultKey
<!-- 分配权限弹框 -->
    <el-dialog
      title="分配权限"
      :visible.sync="setRightdialogVisible"
      width="50%"
      @closed="setRightdialogClosed"
    >
  // 关闭权限弹框,清除上一次的三级节点id数组
    setRightdialogClosed() {
      this.defaultKey = []
    }
2.8,添加用户分配权限功能
点击分配权限按钮(保存角色id),添加权限,点击确定,发送请求,给角色分配添加的权限

发送的请求,需要注意的参数,提前整理参数

 // 点击分配权限,弹出框
    async showSetRightDialog(row) {
      // 获取该用户的角色Id
      this.roleId = row.id

      let { data: res } = await this.$http.get('rights/tree')
      // console.log(res)
      if (res.meta.status !== 200) return this.$message.error('获取数据失败')
      this.rolesTreeList = res.data
      // 调用递归函数,保存三级id
      this.getLeafKeys(row, this.defaultKey)

      this.setRightdialogVisible = true
    },
在data中保存该角色id,为发送请求获取参数
// 分配权限点击确定按钮,分配权限
    async creatRight() {
      // console.log(this.$refs.treeRef)

      //返回目前被选中的节点的 key(id) 所组成的数组
      const checkedArr = [
        ...this.$refs.treeRef.getCheckedKeys(),
        ...this.$refs.treeRef.getHalfCheckedKeys()
      ]

      // 将数组变成字符窜
      const checkedStr = checkedArr.join(',')
      // console.log(checkedStr)

      // 发送请求,分配权限
      let { data: res } = await this.$http.post(`roles/${this.roleId}/rights`, {
        rids: checkedStr
      })
      // console.log(res)
      if (res.meta.status !== 200) return this.$message.error('分配权限失败')
      this.$message.success('分配权限成功')
      // 重新发送页面请求
      this.getrolesList()
      this.setRightdialogVisible = false
    }
三,用户管理中的用户列表分配角色功能

点击分配角色(保存row),发送请求,获取角色列表数据
   <!-- 分配角色按钮 -->
            <el-tooltip
              effect="dark"
              content="分配角色"
              placement="top"
              :enterable="false"
            >
              <el-button
                type="warning"
                icon="el-icon-setting"
                size="mini"
                @click="setRoles(row)"
              ></el-button>
            </el-tooltip>
// 分配角色弹框
    async setRoles(row) {
      // console.log(row)
      this.userInfo = row;
      // 发送请求,获取角色列表
      let { data: res } = await this.$http.get("roles");
      // console.log(res)
      this.rolesList = res.data;

      this.setRoledialogVisible = true;
    },
在data中定义属性
   // 分配角色弹框的是否开启
      setRoledialogVisible: false,
      // 分配角色的信息
      userInfo: {},
      // 角色列表
      rolesList: [],
      selectedRoleId:'',
页面搭建
 <!-- 分配角色弹框 -->
    <el-dialog title="提示" :visible.sync="setRoledialogVisible" width="50%">
      <div>
        <p>当前用户: {{ userInfo.username }}</p>
        <p>当前角色: {{ userInfo.role_name }}</p>
        <p>
          分配新角色
          <el-select v-model="selectedRoleId" placeholder="请选择">
            <el-option
              v-for="item in rolesList"
              :key="item.id"
              :label="item.roleName"
              :value="item.id"
            >
            </el-option>
          </el-select>
        </p>
      </div>
      <span slot="footer" class="dialog-footer">
        <el-button @click="setRoledialogVisible = false">取 消</el-button>
        <el-button type="primary" @click="setRoledialogVisible = false"
          >确 定</el-button
        >
      </span>
    </el-dialog>
在弹出框中,点击确定按钮,发送请求,给用户修改角色权限
  <span slot="footer" class="dialog-footer">
        <el-button @click="setRoledialogVisible = false">取 消</el-button>
        <el-button type="primary" @click="saveRoleInfo"
          >确 定</el-button
        >
  // 点击确认按钮,保存角色分配按钮
    async saveRoleInfo() {
      if (!this.selectedRoleId) return this.$message.error("选择角色");
      // 发送请求,选择角色
      let { data: res } = await this.$http.put(
        `users/${this.userInfo.id}/role`,
        { rid: this.selectedRoleId }
      );
      // console.log(res)
      // 重新请求页面数据
      this.getUserList()
      this.setRoledialogVisible = false;
    },
每次关闭dialog框,需要清空下拉框选中的值
<!-- 分配角色弹框 -->
    <el-dialog title="提示" :visible.sync="setRoledialogVisible" width="50%" @close="setRoledClosed">
 // 关闭dialog框,清除选中的值
    setRoledClosed() {
      this.selectedRoleId = ''
      // this.userlist = null;
    }