AJAX
AJAX(Asynchronous Javascript And XML)翻译成中文就是“异步Javascript和XML”。即使用Javascript语言与服务器进行异步交互,传输的数据为XML(当然,传输的数据不只是XML)。
异步/同步
同步交互:客户端发出一个请求后,需要等待服务器响应结束后,才能发出第二个请求;
异步交互:客户端发出一个请求后,无需等待服务器响应结束,就可以发出第二个请求。
AJAX的特点
1. 异步
2. 浏览器页面的局部刷新
AJAX的优缺点
优点:
AJAX使用Javascript技术向服务器发送异步请求;
AJAX无须刷新整个页面;
因为服务器响应内容不再是整个页面,而是页面中的局部,所以AJAX性能高;
缺点:
AJAX并不适合所有场景,很多时候还是要使用同步交互;
AJAX虽然提高了用户体验,但无形中向服务器发送的请求次数增多了,导致服务器压力增大;
因为AJAX是在浏览器中使用Javascript技术完成的,所以还需要处理浏览器兼容性问题;
AJAX技术
四步操作:
创建核心对象 var xmlHttp = new XMLHttpRequest()
使用核心对象打开与服务器的连接; xmlHttp.open(method,url,asynchronized)
发送请求; xmlHttp.send(); //如果是GET请求,则send(null),因为请求体在URL里
注册监听,监听服务器响应[根据响应状态确定请求是否完成,onreadystatechange会一直处监听状态]
var context = xmlHttp.responseText() 来接收后台的响应。
XMLHTTPRequest
open(请求方式, URL, 是否异步)
send(请求体):只有POST有请求体,GET的内容在浏览器的地址框内
onreadystatechange,指定监听函数,它会在xmlHttp对象的状态发生变化时被调用【有0,1,2,3,4状态】
readyState,当前xmlHttp对象的状态,其中4状态表示服务器响应结束
status:服务器响应的状态码,只有服务器响应结束时才有这个东东,200表示响应成功;
responseText:获取服务器的响应体
备注:
介绍一下XMLHttpRequest对象的5种状态:
0:初始化未完成状态,只是创建了XMLHttpRequest对象,还未调用open()方法;
1:请求已开始,open()方法已调用,但还没调用send()方法;
2:请求发送完成状态,send()方法已调用;
3:开始读取服务器响应;
4:读取服务器响应结束。
简单的AJAX请求---get请求
<script>
function func1() {
    var xmlHttp = createXMLHttpRequest();
    xmlHttp.open('GET', /ajax/, true);
    xmlHttp.send(null);  # 推荐写上null,因为有的Firefox不支持括号内什么都不写的形式
    xmlHttp.onreadystatechange=function () {
        if(xmlHttp.status == 200 && xmlHttp.readyState == 4){
            alert(xmlHttp.readyState);
            context = xmlHttp.responseText(); {# 打印值 #}
        }
    };
}
// 创建XMLHttpRequest对象
function createXMLHttpRequest() {
    var xmlHttp;
    // 适用于大多数浏览器,以及IE7和IE更高版本
    try{
        xmlHttp = new XMLHttpRequest();
    } catch (e) {
        // 适用于IE6
        try {
            xmlHttp = new ActiveXObject("Msxml2.XMLHTTP");
        } catch (e) {
            // 适用于IE5.5,以及IE更早版本
            try{
                xmlHttp = new ActiveXObject("Microsoft.XMLHTTP");
            } catch (e){}
        }
    }
    return xmlHttp;
}
</script>
注意:
发送POST请求时:
<0>因为是POST请求,注意去掉settings.py里面的CsrfV防伪栈请求,否则403错误
<1>需要设置请求头【send之前open之后】,否则数据发送不过去
xmlHttp.setRequestHeader(“Content-Type”, “application/x-www-form-urlencoded”);
注意 :form表单会默认这个键值对;
Ajax中不设定,Web服务器会忽略请求体的内容【后台娶不到此值】
urlencoded编码格式 : http://10.15.13.162/?username=FTL&password=hhh[注意问号]
{#form默认的,数据放在请求体内传递给后台#}
<form action="" enctype="application/x-www-form-urlencoded">
    <input type="text">
</form>
<2>在发送时可以指定请求体了:xmlHttp.send(“username=yuan&password=123”)
xmlHttp.open('POST', /ajax/, true);
xmlHttp.send('name=FTL'&password='HHH') # 静态发送数据
post请求完整版:
<script>
    function func1() {
        var xmlHttp = createXMLHttpRequest();
        xmlHttp.open('POST', /ajax/, true);    // 先请求内容,后设置请求体发送数据
        xmlHttp.setRequestHeader('Content-Type', 'application/x-www-form-urlencoded');
        xmlHttp.send('name=FTL');
        xmlHttp.onreadystatechange=function () {
            if(xmlHttp.status == 200 && xmlHttp.readyState == 4){
                alert(xmlHttp.readyState);
                context = xmlHttp.responseText(); {# 打印值 #}
            }
        };
    }
   // 创建XMLHttpRequest对象
   function createXMLHttpRequest(){
      ...
   }
</script>
Ajax实现的小结
创建XMLHttpRequest对象;
调用open()方法打开与服务器的连接;
调用send()方法发送请求;
为XMLHttpRequest对象指定onreadystatechange事件函数,这个函数会在
XMLHttpRequest的1、2、3、4,四种状态时被调用;
XMLHttpRequest对象的5种状态,通常我们只关心4状态。
XMLHttpRequest对象的status属性表示服务器状态码,它只有在readyState为4时才能获取到。
XMLHttpRequest对象的responseText属性表示服务器响应内容,它只有在
readyState为4时才能获取到!
基于JS的AJax实例实现:
settigs.py:
'DIRS': [os.path.join(BASE_DIR, 'templates')],  # 设置templates的路径为Django以前版本
# 'DIRS': [],      # 注释掉该行,此为Django 2.0.1最新版本
# 'django.middleware.csrf.CsrfViewMiddleware',
         ...省略默认配置
STATIC_URL = '/static/'
TEMPLATE_DIRS = (os.path.join(BASE_DIR,  'templates'),)  # 原配置
# 静态资源文件
STATICFILES_DIRS = (os.path.join(BASE_DIR, "statics"),)   # 现添加的配置,这里是元组,注意逗号
templates/func_named.html
<!DOCTYPE html>
<html lang="en">
<head>
<meta charset="UTF-8">
</head>
<body>
<form action="/ajax/" method="post">
{#移出框后触发函数,blur取消焦点,onfocus获得焦点#}
<p>用户名<input type="text" name="ajax_name" value="" onblur="func1(this)">
<span id="ajax_repeat"></span>
</p>
<p>密 码<input type="password" name="ajax_pass"><br></p>
<input type="submit" value="提交">
<input type="reset" value="重置">
</form>
</body>
<script>
function func1(self) {
var xmlHttp = createXMLHttpRequest();
xmlHttp.open('POST', /ajax/, true);
xmlHttp.setRequestHeader('Content-Type', 'application/x-www-form-urlencoded');
var ajax_username = self.value;
console.log(ajax_username);
xmlHttp.send('ajax_username=' + ajax_username);
xmlHttp.onreadystatechange = function () {
if(xmlHttp.status == 200 && xmlHttp.readyState == 4) {
alert(xmlHttp.readyState);
context = xmlHttp.responseText; {# 返回函数的值 #}
if(context == '1'){
document.getElementById("ajax_repeat").innerHTML="用户名已注册";
}
}
};
}
// 创建XMLHttpRequest对象
function createXMLHttpRequest() {
var xmlHttp;
// 适用于大多数浏览器,以及IE7和IE更高版本
try{
xmlHttp = new XMLHttpRequest();
} catch (e) {
// 适用于IE6
try {
xmlHttp = new ActiveXObject("Msxml2.XMLHTTP");
} catch (e) {
// 适用于IE5.5,以及IE更早版本
try{
xmlHttp = new ActiveXObject("Microsoft.XMLHTTP");
} catch (e){}
}
}
return xmlHttp;
}
</script>
</html>
mysite2/urls.py
from django.contrib import admin
from django.urls import path
from blog import views
from django.conf.urls import url
urlpatterns = [
       # Ajax
   url(r'ajax/', views.ajax),   # 将路径名跟函数进行映射
]
views.py
from django.shortcuts import render, HttpResponse
import datetime
# ajax
def ajax(request):
    if request.method == 'POST':
        ajax_username = request.POST.get('ajax_username')
        print('ajax_name', ajax_username)
        if ajax_username == 'FTL':   # 存在返回1,不存在返回0
            return HttpResponse("1")
        return HttpResponse("0")
    return render(request, 'ajax.html')
页面显示:
问题集结:
问题:
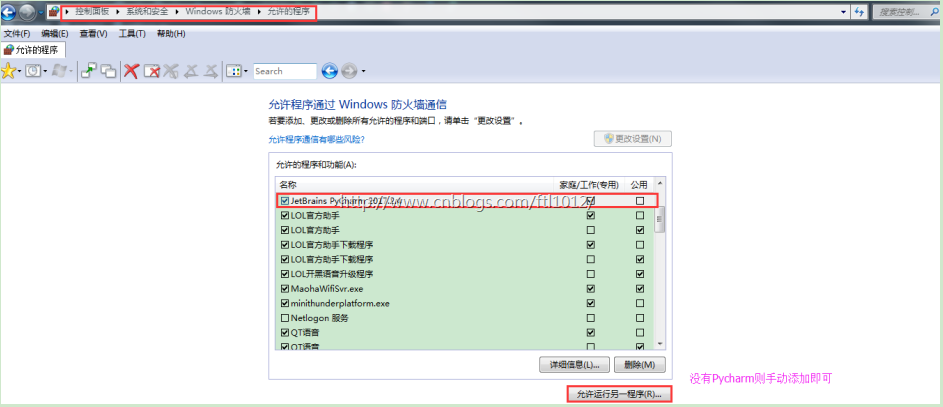
【整个关闭防火墙也可以】
控制面板系统和安全Windows 防火墙允许的程序


