[转]http://www.cnblogs.com/jenry/articles/428348.html
Tools
The only tool you need is ORCA. ORCA is a Microsoft utility for modifying and validating Windows Installer packages. It is a database tool created for setup authors and administrators who work with the Windows Installer Service. This utility is a part of the Windows Installer SDK download along with other MSI related tools.
You can use ORCA to open and modify MSI packages.
To download and install ORCA, follow these steps:
- Visit the SDK Platform Site page to download the Windows Installer SDK. The link to Windows Installer SDK should be on the left hand side frame on the above site.
- Click on that link to go to the next page to download Windows Installer SDK, which includes ORCA.
- After downloading and installing Windows Installer SDK, go to \Program Files\Microsoft SDK\Bin folder on the machine to look for Orca.msi.
- Run Orca.msi by double clicking on it, which is the setup to install ORCA on your machine.
- After installing ORCA on your machine, you will be able to right click on any MSI package and open it in ORCA.
Using the code
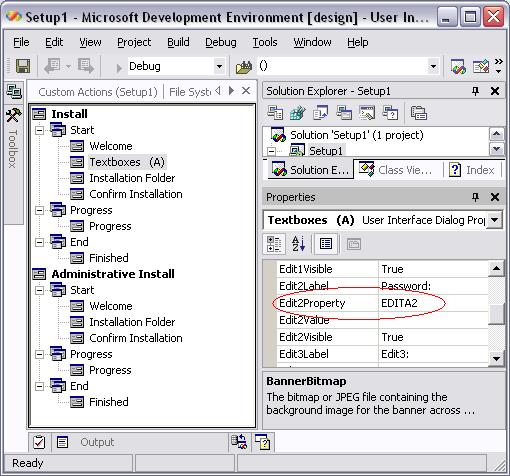
The first thing to do, is generate our VS.NET setup project and identify our future password textbox. You can see Edit2Property in our example that is EDITA2.
Now, we start to modify the MSI to enable our password text changing attributes for our textbox EDITA2.
First of all, we’ve to start ORCA and open the MSI file generated by VS.NET, and go to ‘Control’ table.
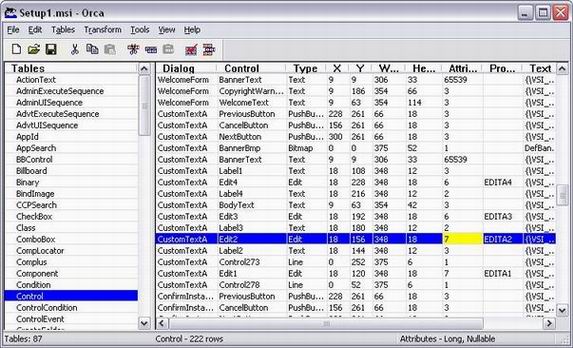
Normally, all textboxes are called CustomTextA, and we’ve to identify our textbox by Property column. In our case, we can see our row, has ‘7’ as attributes. Let’s go to see what means this ‘7’.
The attributes are set in binary format, so ‘7’ is 111. 100 + 10 + 1 and this is 4 + 2 + 1 in decimal format. Now, we can go to control attributes table here and check what attributes are 4,2,1.
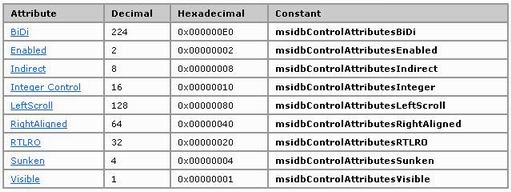
We can see that our textbox has the following properties: Enabled, Sunken and Visible. Now, check that there’s an advance properties table for textboxes, and there’s a Password property with value 2097152.
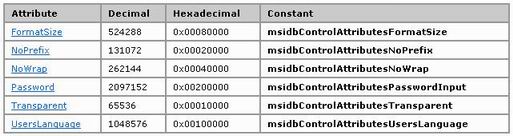
Now we have to add this property to the initial property value (7). 2097152 + 7 = 2097159, that’s our new property value. Set in attributes cell and save the MSI File.
Now, check your MSI, and you could see that our textbox is a password textbox!!!