在之前的一篇文章《AOP概述及Spring中的AOP》中我们已经介绍了关于Spring AOP的相关概念,接下来这篇文章将继续使用之前的案例来介绍如何通过XML配置文件的方法来配置和使用Spring AOP。
一、准备工作
1、导入依赖
要想使用Spring AOP的功能,需要添加以下依赖:
<dependency>
    <groupId>org.aspectj</groupId>
    <artifactId>aspectjweaver</artifactId>
    <version>1.9.5</version>
</dependency>
2、添加约束
XML配置文件在之前的基础上需要额外添加xmlns:aop约束:
<?xml version="1.0" encoding="UTF-8"?>
<beans xmlns="http://www.springframework.org/schema/beans"
       xmlns:xsi="http://www.w3.org/2001/XMLSchema-instance"
       xmlns:aop="http://www.springframework.org/schema/aop"
       xsi:schemaLocation="
        http://www.springframework.org/schema/beans
        https://www.springframework.org/schema/beans/spring-beans.xsd
        http://www.springframework.org/schema/aop
        https://www.springframework.org/schema/aop/spring-aop.xsd">

    <!-- bean definitions here -->

</beans>
3、添加Spring IoC配置
在XML配置文件中添加以下内容:
<?xml version="1.0" encoding="UTF-8"?>
<beans xmlns="http://www.springframework.org/schema/beans"
       xmlns:xsi="http://www.w3.org/2001/XMLSchema-instance"
       xmlns:aop="http://www.springframework.org/schema/aop"
       xsi:schemaLocation="
        http://www.springframework.org/schema/beans
        https://www.springframework.org/schema/beans/spring-beans.xsd
        http://www.springframework.org/schema/aop
        https://www.springframework.org/schema/aop/spring-aop.xsd">

    <!-- 数据访问层 -->
    <bean id="accountDao" class="cn.frankfang.dao.impl.AccountDaoImpl">
        <property name="runner" ref="runner"/>
        <property name="connectionUtils" ref="connectionUtils"/>
    </bean>

    <!-- 服务层 -->
    <bean id="accountService" class="cn.frankfang.service.impl.AccountServiceImpl">
        <constructor-arg name="accountDao" ref="accountDao"/>
    </bean>

    <!-- 配置数据源 -->
    <bean id="dataSource" class="com.mchange.v2.c3p0.ComboPooledDataSource">
        <property name="driverClass" value="com.mysql.cj.jdbc.Driver"/>
        <property name="jdbcUrl" value="jdbc:mysql://127.0.0.1:3306/test?useAffectedRows=true"/>
        <property name="user" value="root"/>
        <property name="password" value="123456"/>
    </bean>

    <!-- dbutils -->
    <bean id="runner" class="org.apache.commons.dbutils.QueryRunner" scope="prototype"/>

    <!-- 连接工具类 -->
    <bean id="connectionUtils" class="cn.frankfang.utils.ConnectionUtils">
        <property name="dataSource" ref="dataSource"/>
    </bean>
</beans>
二、Spring AOP配置步骤
1、将通知类注入到容器中
在spring-config.xml配置类中添加以下内容:
<!-- 1.把通知Bean也交给Spring来管理 -->
<bean id="transactionManager" class="cn.frankfang.utils.TransactionManager">
	<property name="connectionUtils" ref="connectionUtils"/>
</bean>
2、开启AOP配置
在XML配置文件中添加<aop:config/>标签,表明开始AOP的配置:
<!-- 2.使用aop:config标签,表明开始AOP的配置 -->
<aop:config>
    <!-- 配置AOP切面 -->
</aop:config>
若需获取更多关于开启AOP支持的内容,请参阅:Schema-based AOP Support。
3、配置AOP切面
在开启AOP配置之后,在<aop:config/>标签中添加<aop:aspect/>标签表明配置AOP切面:
<!-- 2.使用aop:config标签,表明开始AOP的配置 -->
<aop:config>
    <!-- 3.使用aop:aspect标签表明配置切面 -->
    <aop:aspect id="transactionManager" ref="transactionManager">
        <!-- 配置通知的类型,并且建立通知方法和切入点方法的关联 -->
    </aop:aspect>
</aop:config>
上面的代码中使用了<aop:aspect/>标签中的id属性和ref属性,下面对这两个属性的作用进行解释:
id属性:是给切面提供一个唯一的标识ref属性:是指通知类bean的id
若需获取更多关于配置AOP切面的内容,请参阅:Declaring an Aspect。
4、配置通知类型
在配置完AOP切面相关属性之后,接下来就需要需要配置通知类型:
<!-- 2.使用aop:config标签,表明开始AOP的配置 -->
<aop:config>
    <!-- 3.使用aop:aspect标签表明配置切面 -->
    <aop:aspect id="transactionManager" ref="transactionManager">
        <!-- 4.配置通知的类型,并且建立通知方法和切入点方法的关联 -->
        <!-- 前置通知 -->
        <aop:before method="beginTransaction" pointcut="execution(public * cn.frankfang.service.impl.AccountServiceImpl.*(..)))"/>
        <!-- 后置通知 -->
        <aop:after-returning method="commit" pointcut="execution(public * cn.frankfang.service.impl.AccountServiceImpl.*(..)))"/>
    </aop:aspect>
</aop:config>
在上面的代码中我们使用了<aop:before/>和<aop:after/>标签分别配置了切面的前置和后置通知,关于可配置的通知类型及相应的标签我们将在下面的通知类型部分进行详细介绍。
注意到<aop:before/>和<aop:after/>标签都包含了method和pointcut属性,下面将对这两个属性进行解释:
method属性:用于指定通知类中哪个方法是相应的通知pointcut属性:用于指定切入点表达式,该表达式的含义指的是对业务层中哪些方法增强
注:我们将在接下来的切入点表达式部分对切入点表达式进行详细介绍。
上面代码中<aop:before/>和<aop:after/>标签中pointcut属性的内容是相同的,这样写起来比较繁琐,而且修改起来也很麻烦,那么有没有一种更简便的写法呢?答案是肯定的,我们可以使用<aop:pointcut/>标签简化配置。
<aop:pointcut/>标签用于配置切入点表达式,该标签包含id和expression两个属性,id属性用于指定表达式的唯一标识,而expression属性用于指定切入点表达式的内容。
下面我们就使用<aop:pointcut/>标签来简化配置:
<!-- 2.使用aop:config标签,表明开始AOP的配置 -->
<aop:config>
    <!-- 3.使用aop:aspect标签表明配置切面 -->
    <aop:aspect id="transactionManager" ref="transactionManager">
        <!-- 配置切入点表达式 -->
        <aop:pointcut id="accountServiceImplPointcut"
                      expression="execution(public * cn.frankfang.service.impl.AccountServiceImpl.*(..)))"/>
        <!-- 4.配置通知的类型,并且建立通知方法和切入点方法的关联 -->
        <!-- 前置通知 -->
        <aop:before method="beginTransaction" pointcut-ref="accountServiceImplPointcut"/>
        <!-- 后置通知 -->
        <aop:after-returning method="commit" pointcut-ref="accountServiceImplPointcut"/>
    </aop:aspect>
</aop:config>
注意:当配置切入点表达式之后,<aop:before/>和<aop:after/>标签中就可以用pointcout-ref属性代替pointcut属性来指定配置的切入点表达式的id。
此外,也可以在<aop:aspect/>标签外面配置切入点表达式,不过需要注意的是必须在<aop:aspect/>标签之前配置切入点表达式,否则会出错(因为有约束进行限制)。
注:若需获取更多关于配置切入点的内容,请参阅:Declaring a Pointcut。
我们继续在配置中添加异常通知和最终通知,完整的AOP配置如下:
<!-- 2.使用aop:config标签,表明开始AOP的配置 -->
<aop:config>
    <!-- 配置切入点表达式 -->
    <aop:pointcut id="accountServiceImplPointcut"
                      expression="execution(public * cn.frankfang.service.impl.AccountServiceImpl.*(..)))"/>
    <!-- 3.使用aop:aspect标签表明配置切面 -->
    <aop:aspect id="transactionManager" ref="transactionManager">
        <!-- 4.配置通知的类型,并且建立通知方法和切入点方法的关联 -->
        <!-- 前置通知 -->
        <aop:before method="beginTransaction" pointcut-ref="accountServiceImplPointcut"/>
        <!-- 后置通知 -->
        <aop:after-returning method="commit" pointcut-ref="accountServiceImplPointcut"/>
        <!-- 异常通知 -->
        <aop:after-throwing method="rollback" pointcut-ref="accountServiceImplPointcut"/>
        <!-- 最终通知 -->
        <aop:after method="release" pointcut-ref="accountServiceImplPointcut"/>
    </aop:aspect>
</aop:config>
若需获取更多关于配置通知类型的内容,请参阅:Declaring Advice。
5、测试
在启动类中用ClassPathXmlApplicationContext加载类路径下的配置文件
ApplicationContext context = new ClassPathXmlApplicationContext("spring-config.xml");
之后启动项目,结果如下:
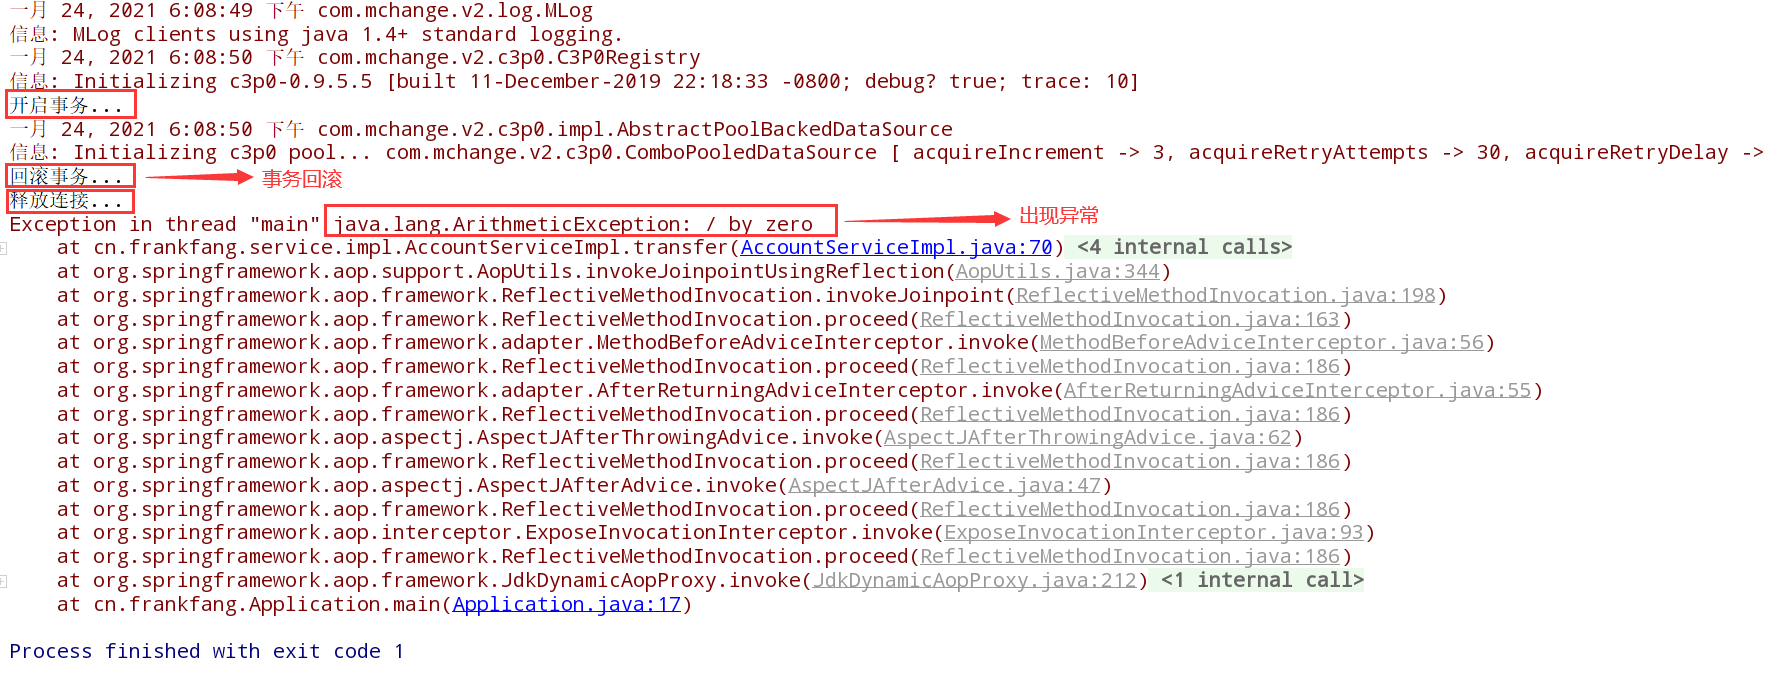
通过控制台可以观察到程序捕获到了异常并且事务进行了回滚(这里可以打印事务执行的信息是因为我在原有代码的基础上添加了控制台输出的代码)。
三、切入点表达式
在上面配置Spring AOP的过程中我们使用了切入点表达式,接下来我们将对切入点表达式进行详细介绍。
1、格式
切入点表达式的格式如下:
访问修饰符 返回值 包名.包名.包名...类名.方法名(参数列表)
其中参数列表直接写数据类型,多个参数之间用,隔开,下面说明对于基本数据类型和引用类型数据的写法:
- 基本数据类型:直接写类型名称即可,如
int、boolean等 - 引用数据类型:使用全限定类名,如
java.lang.String等
2、通配符
切入点表达式支持两种通配符*和..,下面将介绍如何在切入点表达式中使用通配符:
- 访问修饰符可以省略
- 返回值可以使用通配符
*,表示任意返回值 - 包名可以使用通配符,表示任意包,但有几级包就需要写几个
* - 包名可以使用
..当前包及其子包 - 类名和方法名都可以使用通配符
* - 参数列表可以使用通配符
*表示任意类型,但要求方法中必须有参数 - 参数列表可以使用通配符
..表示任意类型,方法中有无参数均可
由以上规则可知,切入点表达式的全通配写法为:* *..*.*(..),不过一般不推荐在项目中使用全通配表达式,因为这会导致所有方法都会被增强,实际中一般是不会有这种需求的。
若需获取更多关于切入点表达式的内容,请参阅:Declaring a Pointcut。
四、通知类型
1、前置通知
前置通知(Before Advice)是指在切入点方法执行之前执行的方法,使用<aop:before/>标签进行配置,使用方法如下:
<!-- 前置通知 -->
<aop:before method="beginTransaction" pointcut-ref="accountServiceImplPointcut"/>
若需获取更多关于前置通知的内容,请参阅:Before Advice。
2、后置通知
后置通知(After Returning Advice)是指在切入点方法正常执行之后执行的方法,使用<aop:after-returning/>标签进行配置,使用方法如下:
<!-- 后置通知 -->
<aop:after-returning method="commit" pointcut-ref="accountServiceImplPointcut"/>
若需获取更多关于后置通知的内容,请参阅:After Returning Advice。
3、异常通知
异常通知(After Throwing Advice)是指在切入点方法产生异常后执行的方法,使用<aop:after-throwing/>标签进行配置,使用方法如下:
<!-- 异常通知 -->
<aop:after-throwing method="rollback" pointcut-ref="accountServiceImplPointcut"/>
若需获取更多关于异常通知的内容,请参阅:After Throwing Advice。
4、最终通知
最终通知(After (Finally) Advice)是指无论切入点是否正常执行都会在最后执行的方法,使用<aop:after/>标签进行配置,使用方法如下:
<!-- 最终通知 -->
<aop:after method="release" pointcut-ref="accountServiceImplPointcut"/>
若需获取更多关于最终通知的内容,请参阅:After (Finally) Advice。
5、环绕通知
在之前介绍AOP相关概念的文章中我们使用动态代理技术实现了AOP,Spring中的AOP也是用动态代理技术实现的,那么Spring中的AOP与我们自己实现的AOP之间有什么关联呢?下面我们用一张图来进行说明:

通过上图我们可以清楚地知道前置通知、后置通知、异常通知和最终通知与所执行操作的顺序关系,但其中却少了一个环绕通知(Around Advice)。那么环绕通知与所执行操作的顺序关系又是如何的呢?下面我们将继续使用前面的案例来介绍环绕通知的相关概念。
假设我们现在需要在执行AccountServiceImpl中所有的方法时打印日志,利用Spring AOP又该怎样实现这个功能呢?
我们先来写一个日志工具类,代码如下:
package cn.frankfang.utils;

public class Logger {

    /**
     * 打印日志信息
     */
    public void printLog() {
        System.out.println("Logger类中的printLog方法开始记录日志");
    }
}
在spring-config.xml配置类中添加以下内容:
<!-- 日志工具类 -->
<bean id="logger" class="cn.frankfang.utils.Logger"/>

<!-- 开始AOP的配置 -->
<aop:config>
    <aop:pointcut id="accountServiceImplPointcut"
                  expression="execution(public * cn.frankfang.service.impl.AccountServiceImpl.*(..)))"/>

    <!-- 省略其它切面的配置信息 -->

    <aop:aspect id="Logger" ref="logger">
        <!--配置环绕通知-->
        <aop:around method="printLog" pointcut-ref="accountServiceImplPointcut"/>
    </aop:aspect>

</aop:config>
上面的代码似乎没有什么问题,可当我们运行时却出现以下结果:
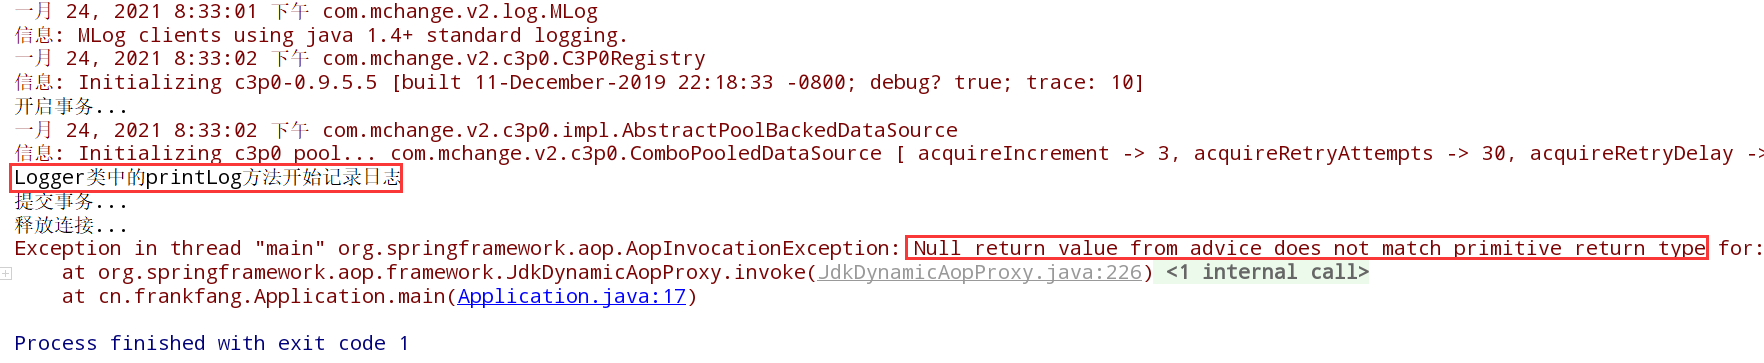
虽然日志已经打印出来了的,但却出现了一个异常:通知的Null返回值与基元返回类型不匹配。那这是什么原因导致的呢?
上面之所以会出现异常,是因为当配置了环绕通知之后,切入点方法没有执行,而通知方法执行了,所以能在控制台打印日志信息。但因为没有执行切入点方法,所以返回值为Null,与切入点方法要求返回的boolean类型不匹配。那么又该如何解决这个问题呢?
查阅官方文档,在文档中有一段对环绕通知的说明如下:
You can declare around advice by using the
aop:aroundelement. The first parameter of the advice method must be of typeProceedingJoinPoint. Within the body of the advice, callingproceed()on theProceedingJoinPointcauses the underlying method to run. Theproceedmethod may also be called with anObject[]. The values in the array are used as the arguments to the method execution when it proceeds.
简单来说,就是通知方法中必须要有一个ProceedingJoinPoint类型的参数,且必须为第一个参数。除此之外还需要在通知方法中调用ProceedingJoinPoint类中的proceed()方法。
下面针对文档中提到的相关概念进行解释:
ProceedingJoinPoint:这是AspectJ提供的一个接口,可以获取到切入点的相关信息proceed():是ProceedingJoinPoint接口中的一个方法,可通过该方法调用切入点方法,该方法可传入Object[]类型的参数,并返回Object类型的结果
根据官方文档的要求,我们对printLog方法进行如下改写:
public Object printLog(ProceedingJoinPoint joinPoint) {
    Object result = null;
    // 明确调用切入点方法
    try {
        // 前置通知
        System.out.println("Logger类中的printLog方法开始记录日志");
        // 获取切入点方法所需的参数
        Object[] args = joinPoint.getArgs();
        // 调用切入点方法并接收结果
        result = joinPoint.proceed(args);
        // 后置通知
        System.out.println("Logger类中的printLog方法开始记录日志");
    } catch (Throwable throwable) {
        // 异常通知
        System.out.println("Logger类中的printLog方法开始记录日志");
        throw new RuntimeException(throwable);
    } finally {
        // 最终通知
        System.out.println("Logger类中的printLog方法开始记录日志");
    }
    return result;
}
之后启动程序便可正确地输出结果了。
注意:在上面的代码中,根据通知与切入点方法的顺序关系可以确定不同的通知类型。在调用切入点方法之前的就是前置通知;在调用切入点方法之后的就是后置通知;在
catch块中就是异常通知;在finally块中就是最终通知。
由此我们可以知道环绕通知是Spring框架为我们提供的一种可以在代码中手动控制增强方法何时执行的方式。
若需获取更多关于环绕通知的内容,请参阅:Around Advice。