一、SVG的世界、视野(viewBox)、视窗(viewPort)
1、基本概念
- SVG的世界是无限大的。
- SVG的视野viewBox是观察世界的矩形区域。
2、控制方法
- 使用<svg>标签的width,height 属性用来控制视窗。
- 使用<svg>其他代码用来定义svg世界
- 使用<svg>的viewBox,preserveAspectRatio属性来控制视野。
-
<svg xmlns="http://www.w3.org/2000/svg" version="1.1"
    width="800" height="500"
    viewBox="0 0 400 300"
    preservAspectRatio="xMidYMid meet">
        <!--SVG Content-->
</svg>
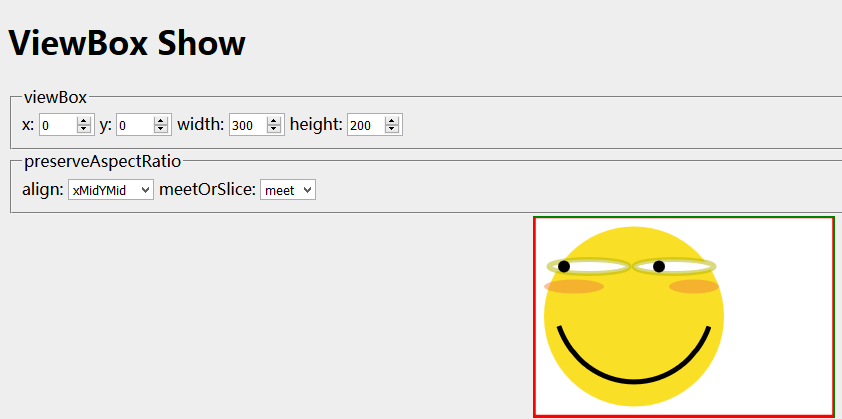
3、viewBox演示
- viewBox写法:
viewBox="x y width height"
- preserveAspectRatio包含两个值:第一个值为viewBox和viewPort的对齐方式,第二个值为维持高宽比的方式:
preservAspectRatio="align meetOrSlice"
align又由两个值组合而成:

x和y值自由组合即可。
- 上面每种组合都会有不同的效果,不必死记硬背,为了方便理解,这里给出一个演示代码:
 1 <!DOCTYPE html>
 2 <html>
 3     <head>
 4         <title>ViewBox Show</title>
 5         <style>
 6             body {
 7                 background: #eee;
 8             }
 9             svg {
10                 position: absolute;
11                 border: 1px solid green;
12                 width: 300px;
13                 height: 200px;
14                 left: 50%;
15                 top: 50%;
16                 margin-top: -100px;
17                 margin-left: -150px;
18                 background: white;
19             }
20             input[type=number] {
21                 width: 50px;
22             }
23         </style>
24     </head
25 <body>
26     <h1>ViewBox Show</h1>
27         <form id="form">
28             <!--fieldset控件-->
29             <fieldset>
30                 <legend>viewBox</legend>
31                 <label>x: <input id="vx" type="number" value="0"></label>
32                 <label>y: <input id="vy" type="number" value="0"></label>
33                 <label> <input id="vw" type="number" value="300"></label>
34                 <label>height: <input id="vh" type="number" value="200"></label>
35             </fieldset>
36             <fieldset>
37                 <legend>preserveAspectRatio</legend>
38                 <label>align: <select id="align">
39                     <option value="none">none</option>
40                     <option value="xMinYMin">xMinYMin</option>
41                     <option value="xMidYMin">xMidYMin</option>
42                     <option value="xMaxYMin">xMaxYMin</option>
43                     <option value="xMinYMid">xMinYMid</option>
44                     <option value="xMidYMid" selected>xMidYMid</option>
45                     <option value="xMaxYMid">xMaxYMid</option>
46                     <option value="xMinYMax">xMinYMax</option>
47                     <option value="xMidYMax">xMidYMax</option>
48                     <option value="xMaxYMax">xMaxYMax</option>
49                 </select></label>
50                 <label>meetOrSlice: <select id="meetOrSlice">
51                     <option value="meet">meet</option>
52                     <option value="slice">slice</option>
53                     <option value="none">none</option>
54                 </select></label>
55             </fieldset>
56         </form>
57     <p>
58         <svg id="svg" xmlns="http://www.w3.org/2000/svg">
59             <!--face-->
60             <circle cx="100" cy="100" r="90" style="fill: #f8dc0ee6;" />
61             <!--eyes-->
62             <ellipse style="fill: white;stroke: #b4b40180;stroke-5;" cy="50" rx="40" cx="55" ry="7" />
63             <ellipse style="fill: white;stroke: #b4b40180;stroke-5;" cy="50" rx="40" cx="140" ry="7" />
64             <circle fill="black" cx="30" cy="50" r="6" />
65             <circle cx="125" fill="black" cy="50" r="6" />
66             <ellipse style="fill: #f2863880;" cy="70" rx="30" cx="40" ry="7" />
67             <ellipse style="fill: #f2863880;" cy="70" cx="160" rx="25" ry="7" />
68             <!--smile-->
69             <path fill="none" stroke="black" d="M 25 110 A 80 85 0 0 0 175 110" stroke-width="5"></path>
70             <rect id="viewBoxIndicator" stroke="red" stroke-width="3.5" fill="none" />
71         </svg>
72     </p>
73     <script>
74         function update() {
75             var viewBox =  [vx.value, vy.value, vw.value, vh.value].join(' ');
76             var preserveAspectRatio = [align.value, meetOrSlice.value].join(' ');
77             svg.setAttribute('viewBox', viewBox);
78             svg.setAttribute('preserveAspectRatio', preserveAspectRatio);
79
80             var rect = viewBoxIndicator;
81             rect.setAttribute('x', vx.value);
82             rect.setAttribute('y', vy.value);
83             rect.setAttribute('width', vw.value);
84             rect.setAttribute('height', vh.value);
85         }
86         form.addEventListener('input', update);
87         update();
88     </script>
89 </body>
90 </html>
调整相应的属性值即可查看变化效果:
二、SVG坐标系统概述
我们常见的笛卡尔直角坐标系如下,这是我们经常在数学上使用的直角坐标系:
而在浏览器中,我们这样来使用坐标系:很明显,SVG世界的坐标系中Y轴的正方向是向下的。
三、四种坐标系
1、用户坐标系(User Coordinate)
即SVG标签的坐标系。
2、自身坐标系(Current Coordinate)
即SVG标签中各个标签自身的坐标系,是与生俱来的。
3、前驱坐标系(Previous Coordinate)
父容器的坐标系,图形进行坐标变换都是基于前驱坐标系的。
看一个自身坐标系和前驱坐标系的例子:
其中,OA、OB、OC、OD四个坐标系分别是标签svg、g、rect、rect的自身坐标系。而OA又是OB的前驱坐标系,OB又是OC和OD的前驱坐标系。
4、参考坐标系(Reference Coordinate)
5、总结
四、坐标变换
1、坐标变换
在SVG中,坐标变换是对一个坐标变化到到另一个坐标的描述。这些变换都是在平面中的,所以我们使用线性变换来满足变换需求,在SVG中使用transform属性来实现具体的变换操作。一般包括平移、旋转、缩放等变换。
2、线性变换
线性变换原理:
线性变换之平移:
线性变换之旋转:
线性变换之缩放:
线性变换之变换列表:
3、transform属性
- 平移使用translate()方法
- 旋转使用rotate()方法
- 缩放使用scale()方法
- matrix()方法:所有上面的变形可以表达为一个2*3的变形矩阵。组合一些变形,可以直接用
matrix(a, b, c, d, e, f)变形设置结果矩阵,利用下面的矩阵,它把来自上一个坐标系统的坐标映射到新的坐标系统:
- 下面是transfrom属性的演示代码:可以属于t x y,r d ,s x y ,m a b c d e f来进行演示:
-
<!DOCTYPE html> <html> <head> <meta charset="utf-8"> <title>Transform演示</title> <style type="text/css"> svg{ background:#fcfcfc; display: block; margin:20px auto; border:1px solid #ccc; } #transform{ width:300px; } </style> </head> <body> <!--控件--> <fieldset> <legend>设置</legend> <label>分组: <select id="group"> <option value="a">a</option> <option value="b">└b</option> <option value="c"> └c</option> <option value="d">└d</option> </select> </label> <label>变换: <input id="tc" type="text"> <!--提示信息--> <span id="ts"></span> </label> </fieldset> <svg xmlns="http://www.w3.org/2000/svg" width="1000" height="600" viewBox="-200.5 -100.5 1000 600"> <!--预定义:SVG的<defs>元素用于预定义一个元素使其能够在SVG图像中重复使用。--> <defs> <g id="coord"> <line x1="0" y1="0" x2="300" y2="0"></line> <line x1="0" y1="0" x2="0" y2="300"></line> <circle cx="0" cy="0" r=2></circle> <circle cx=100"0" cy="0" r=2></circle> <circle cx="200" cy="0" r=2></circle> <circle cx="0" cy="100" r=2></circle> <circle cx="0" cy="200" r=2></circle> </g> </defs> <!--引用:要显示defs中的内容需要使用<use>元素来引入它们。--> <use xlink:href="#coord" stroke="black" fill="black" /> <text fill="black" x="5" y="20">World</text> <g id="a" stroke="red" fill="red"> <use xlink:href="#coord"/> <text fill="black" x="5" y="20">a</text> <g id="b" stroke="blue" fill="blue"> <use xlink:href="#coord"/> <text fill="black" x="5" y="20">b</text> <g id="c" stroke="green" fill="green"> <use xlink:href="#coord"/> <text fill="black" x="5" y="20">c</text> </g> </g> <g id="d" stroke="pink" fill="pink"> <use xlink:href="#coord"/> <text fill="black" x="5" y="20">d</text> </g> </g> </svg> </body> <script type="text/javascript"> //获得目标 function target(){ return document.getElementById(group.value);//group是id=group的select } //把变换命令转换为变换字符串 //‘t 10 10 r 30 s 0.7’ => ‘transform(10,10) rotate(30) scale(0.7)’ function tc2ts(tc){ var arr = (tc || '').split(' '); var ts = ''; var elem,lastElemType; var cmd = { 't':'translate(', 'r':'rotate(', 's':'scale(', 'm':'matrix(', }; //shfit()方法用于删除并返回数组的第一个元素 while(elem = arr.shift()){ if(cmd[elem]){ //判断是否是最后一个元素 if(lastElemType == 'number') ts += ')'; ts += cmd[elem]; lastElemType = 'command'; }else{ if(lastElemType == 'number') ts += ', '; ts += elem; lastElemType = 'number'; } } if(ts.length) ts += ')'; return ts; } //oninput事件:当用户进行表单输入时触发 group.oninput = function(){ //tc.value = target().tc || ''; ts.innerHTML = tc2ts(tc.value); }; tc.oninput = function(){ //target().tc = tc.value; target().setAttribute('transform',ts.innerHTML = tc2ts(tc.value)); }; </script> </html>
