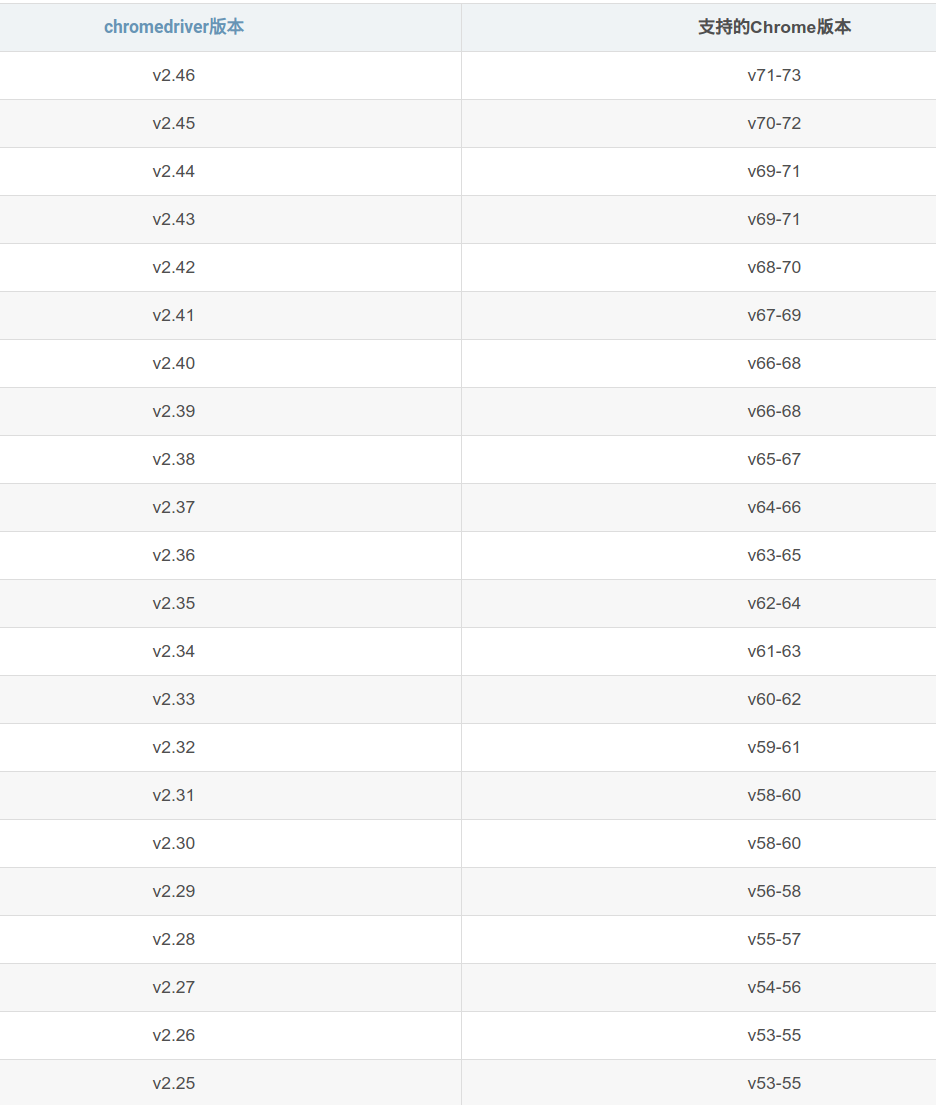
谷歌浏览器驱动版本对照
https://sites.google.com/a/chromium.org/chromedriver/
https://sites.google.com/a/chromium.org/chromedriver/downloads/version-selection
http://chromedriver.storage.googleapis.com/index.html
chromedriver可在下面链接中下载到(官网链接):
http://chromedriver.storage.googleapis.com/index.html
或者使用国内镜像地址:
http://npm.taobao.org/mirrors/chromedriver/
Chrome历史版本的安装包下载地址:
https://www.slimjet.com/chrome/google-chrome-old-version.php#
谷歌浏览器无头模式
Headless模式是Chrome 59中的新特征。
使用方式:
from selenium import webdriver
from selenium.webdriver.chrome.options import Options

chrome_options = Options()
chrome_options.add_argument('--headless')
chrome_options.add_argument('--disable-gpu')
driver = webdriver.Chrome(chrome_options=chrome_options)
driver.get("https://cnblogs.com/")
-------------几乎无关-----------------------------------------------------
基础环境安装
需要安装的基础设施
firefox 浏览器,火狐浏览器的驱动geckodriver,以及必备神器Selenium
之前使用是谷歌浏览器,有个需求是截取网页内单个元素生成图片,测试总不成功,后来使用Firefox可以正常生成,后续可以使用无头浏览器以便程序运行时不用再显示浏览器的操作界面。
##1,火狐(版本未测试,使用ubuntu1604 默认版本
##2,驱动

https://github.com/mozilla/geckodriver/releases/
https://github.com/mozilla/geckodriver/releases/download/v0.26.0/geckodriver-v0.26.0-linux64.tar.gz
解压可执行文件到PATH路径下:/usr/bin/

##3,在python3.X下pip  安装Selenium
详细安装略。
测试使用
测试使用可以大概看出操作的步骤,更多详细需要参考官网文档。
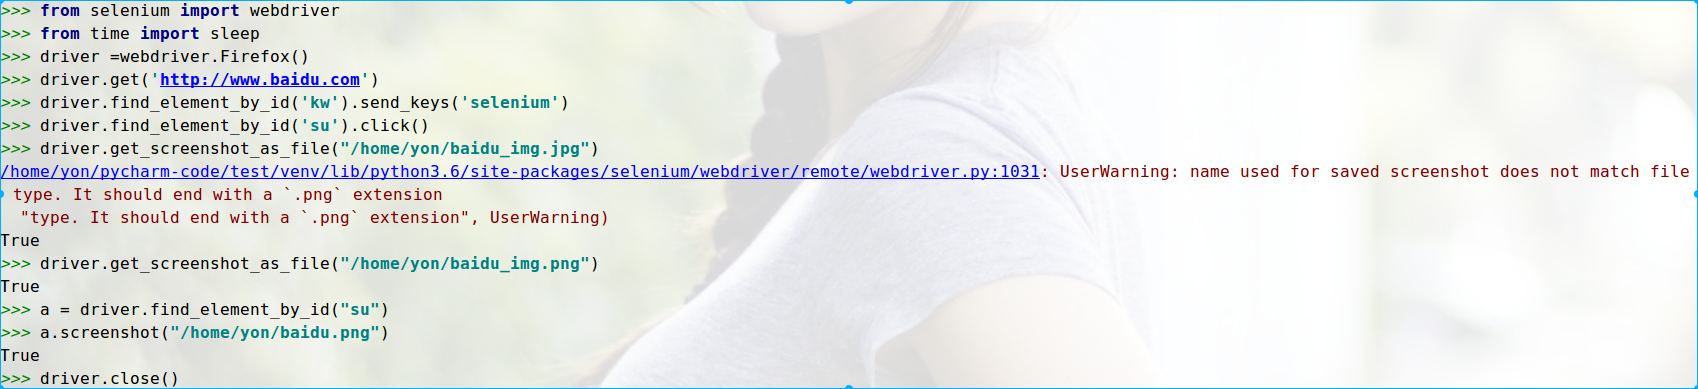
from selenium import webdriver
from time import sleep
driver =webdriver.Firefox()
driver.get('http://www.baidu.com')
driver.find_element_by_id('kw').send_keys('selenium')
driver.find_element_by_id('su').click()
##生成的图片扩展格式应该为png,不然报错。
driver.get_screenshot_as_file("/home/yon/baidu_img.jpg")
/home/yon/pycharm-code/test/venv/lib/python3.6/site-packages/selenium/webdriver/remote/webdriver.py:1031: UserWarning: name used for saved screenshot does not match file type. It should end with a `.png` extension
  "type. It should end with a `.png` extension", UserWarning)
True
##成功返回True
driver.get_screenshot_as_file("/home/yon/baidu_img.png")
True
a = driver.find_element_by_id("su")

##成功返回True
a.screenshot("/home/yon/baidu.png")
True
driver.close()
selinum的使用方法
selenium:
https://selenium-python.readthedocs.io/
暂略
-------------------无关结束------------------------------------------------
Selenium+PhantomJS
抓取某音乐评论生成图片
环境搭建
通过selenium + google 或 firefox 通过指定元素进行截图,会发现截图的位置错误,即一个网页的显示必定超过显示器的高度,通过定位元素后截取的图片只是相对与当前显示的页面,如果将页面下拉,再执行截取操作,会发现图片又不一样。
通过搜索,发现可以使用无头浏览器 PhantomJS 先保存整个网页为图片,然后定位需要截取元素的相对位置,然后获取该匀元素在整个已保存图片的坐标轴的绝对位置,通过图片工具Image包工具进行截取即可。
安装注意:因为高版本selenium 在支持无头浏览器上功能丢弃,所以需要安装低版本的selenium. python 版本使用3.6
报错:
warnings.warn('Selenium support for PhantomJS has been deprecated, please use headless '

##原因
selenium已经放弃PhantomJS,了,建议使用火狐或者谷歌无界面浏览器。

##解决
pip uninstall selenium
pip install selenium==2.48.0

##参考
https://blog.csdn.net/u010358168/article/details/79749149
安装其他:
##1,phantomjs
https://phantomjs.org/

##下载链接
https://phantomjs.org/download.html

##快速上手,但是我们使用selenium  API 调用phantomjs
https://phantomjs.org/quick-start.html


##2,安装pillow
PIL(Python Imaging Library)是Python一个强大方便的图像处理库,名气也比较大。不过只支持到Python 2.7
Pillow是PIL的一个派生分支,但如今已经发展成为比PIL本身更具活力的图像处理库
Python 3.x 安装Pillow

pip install Pillow


## from PIL import Image 引用使用库
from PIL import Image
im = Image.open("xxx.jpg")
im.rotate(45).show()
使用
使用案例1
from selenium import webdriver
import time

#PhantomJS是一个无头界面的浏览器
#!!!!注意这里的路径是PhantomJS存放的路径
browser = webdriver.PhantomJS(r'C:pacong_dataday3phantomjs-2.1.1-windowsinphantomjs.exe')

url ='http://www.baidu.com/'
browser.get(url)
time.sleep(3)

#进入百度界面    然后截屏
browser.save_screenshot(r'phantomjsaidu.png')


bd_input = browser.find_element_by_id('kw').send_keys('小猪配齐')
#在此截屏
browser.save_screenshot(r'phantomjsxiaozhu.png')
time.sleep(3)

bd_sous = browser.find_element_by_id('su').click()
在此截屏
browser.save_screenshot(r'phantomjssous.png')
time.sleep(3)

browser.quit()
使用案例2
from selenium import webdriver
from PIL import Image

driver = webdriver.PhantomJS()
driver.get('https://music.163.com/#/song?id=521784134')
##涉及到内嵌的iframe切换,不然无法定位到指定元素(还有切换窗口)
driver.switch_to.frame('g_iframe')
# driver.save_screenshot('/home/yon/src.png')

element = driver.find_elements_by_class_name("itm")[2]
## 位置+35 是为了调整元素绝对位置,不然显示
left = element.location['x'] + 35
top = element.location['y']
right = element.location['x'] + element.size['width'] + 35
bottom = element.location['y'] + element.size['height']
print(left,top, right, bottom)
##保存的图片路径需要为绝对路径
im = Image.open('/home/yon/src.png')
im = im.crop((left, top, right, bottom))
im.save('/home/yon/shortscreens5.png')
获取指定url的评论图片
获取前10页
#!/usr/bin/env python3.6
# -*- coding: utf-8 -*-
# @Time    : 2020/1/31 下午9:15
# @Author  : yon
# @Email   : xxxxxxx@qq.com
# @File    : zhilian.py

from selenium import webdriver
from PIL import Image
import time , random


def get_small_pic(url):
    driver = webdriver.PhantomJS()
    # driver.get('https://music.163.com/#/song?id=521784134')
    driver.get(url)
    driver.switch_to.frame('g_iframe')
    time.sleep(random.randint(3, 5))
    for i in range(1, 11):
        src_pic_save = "/home/yon/Desktop/netease/"
        src_pic_target = "{}src{}.png".format(src_pic_save, i)
        # print(src_pic_target)
        if i < 6:
            button = driver.find_elements_by_class_name("zpg{}".format(i))
            button[0].click()
        else:
            button = driver.find_elements_by_class_name("zpg5")
            button[0].click()
        time.sleep(random.randint(3, 5))
        driver.save_screenshot(src_pic_target)
        element = driver.find_elements_by_class_name("itm")
        cut_every_pic(src_pic_target, element, src_pic_save, i)


def  cut_every_pic(sourcepath, elments, savepath, src_index):
    for index, cut_element in enumerate(elments):
        small_pic_path = "{}pic{}x{}.png".format(savepath, src_index, index)
        left = cut_element.location['x'] + 35
        top = cut_element.location['y']
        right = cut_element.location['x'] + cut_element.size['width'] + 35
        bottom = cut_element.location['y'] + cut_element.size['height']
        # print(left, top, right, bottom)
        im = Image.open(sourcepath)
        im = im.crop((left, top, right, bottom))
        im.save(small_pic_path)


if __name__ == '__main__':
    get_small_pic("https://music.163.com/#/song?id=521784134")
----------------------------
整体示例
#-*-  coding:utf-8 -*-
#主要用来测试selenium使用phantomJs

#导入webdriver
from selenium import webdriver
import time

#要想调用键盘按键操作需要引入keys包
from selenium.webdriver.common.keys import Keys

#调用环境变量指定的PhantomJS浏览器创建浏览器对象
driver = webdriver.PhantomJS()
driver.set_window_size(1366, 768)
#如果没有在环境变量指定PhantomJS位置
#driver = webdriver.PhantomJS(executable_path = "./phantomjs")

#get方法会一直等到页面加载,然后才会继续程序,通常测试会在这里选择time.sleep(2)

driver.get("http://www.baidu.com/")

#获取页面名为wraper的id标签的文本内容
data = driver.find_element_by_id('wrapper').text

#打印数据内容
print(data)

print driver.title

#生成页面快照并保存
driver.save_screenshot("baidu.png")

# id="kw"是百度搜索输入框,输入字符串"长城"
driver.find_element_by_id('kw').send_keys(u'长城')

# id="su"是百度搜索按钮,click()是模拟点击
driver.find_element_by_id('su').click()

#获取新的页面快照
driver.save_screenshot("ww.png")

#打印网页渲染后的源代码
print(driver.page_source)

#获取当前页面Cookie
print(driver.get_cookies())

#ctrl+a全选输入框内容
driver.find_element_by_id('kw').send_keys(Keys.CONTROL, 'a')
#ctrl+x剪切输入框内容
driver.find_element_by_id('kw').send_keys(Keys.CONTROL, 'x')

#输入框重新输入内容
driver.find_element_by_id('kw').send_keys('itcast')

#模拟Enter回车键
driver.find_element_by_id('su').send_keys(Keys.RETURN)
time.sleep(5)

#清空输入框内容
driver.find_element_by_id('kw').clear()

#生成新的页面快照
driver.save_screenshot('xx.png')

#获取当前url
print(driver.current_url)

driver.quit()
定位元素
查找单个元素
from selenium import webdriver

browser = webdriver.Chrome()

browser.get("http://www.taobao.com")
input_first = browser.find_element_by_id("q")
input_second = browser.find_element_by_css_selector("#q")
input_third = browser.find_element_by_xpath('//*[@id="q"]')
print(input_first)
print(input_second)
print(input_third)
browser.close()
#通过三种不同的方式去获取响应的元素,第一种是通过id的方式,第二个中是CSS选择器,第三种是xpath选择器,结果都是相同的
常用的查找元素方法:
find_element_by_name (标签名称)
<imput name="cheese" type="text" />


cheese = driver.find_element_by_name("cheese")

-------------or-------------------------
from selenium.webdrier.common.by import By
cheese = driver.find_element(By.NAME, "cheese")
find_element_by_id
<div id="coolesWidgeEvah">...</div>

element = driver.find_element_by_id("coolesWidgetEvah")

---------or-------
from selenium.webdriver.common.by import By
element = driver.find_element(by=By.ID, value="coolesWidgetEvah")
find_element_by_xpath
<input type="text" name="example" / >
<input type="text" name="other" / >

inputs = driver.find_elements_by_xpath("input")
-------------------or------------------
from selenium.webdriver.common.by import By
inputs = driver.find_elements(By.XPATH, "//input")
find_element_by_link_text
<a href="http://www.google.com/search?q=cheese">cheese</a>

cheese = driver.find_element_by_link_text("cheese")
---------------------or-----------------------
from selenium.webdriver.common.by import By
cheese = driver.find_element(By.LINK_TEXT, "cheese")
find_element_by_partial_link_text
<a href="http://www.google.com/search?q=cheese">search for cheese</a>

cheese = driver.find_element_by_partial_link_text("cheese")

-----------------or-----------------
from selenium.webdriver.common.by import By
cheese = driver.find_element(By.PARTIAL_LINK_TEXT, "cheese")
find_element_by_tag_name
<iframe src="..."></iframe>

frame = driver.find_element_by_tag_name("iframe")
------------------------or---------------
from selenium.webdriver.common.by import By
frame = driver.find_element(By.TAG_NAME, "iframe")
find_element_by_class_name
<div class="cheese"><span>Cheddar</span></div><div class="cheese"><span>Gouda</span></div>

cheese = driver.find_element_by_class_name('cheese')

----------------or--------------------
from selenium.webdriver.common.by import By
cheese = driver.find_elements(By.CLASS_NAME, "cheese")
find_element_by_css_selector
<div id="food"><span class="dairy">milk</span><span class="dairy">cheese</span></div>

cheese = driver.find_element_by_css_selector("#food span.dairy.aged")
----------------or-------------------------------
from selenium.webdriver.common.by import By
cheese = driver.find_element(By.CSS_SELECTOR, "#food span.dairy.aged")
比较通用的一种方式:这里需要记住By模块所以需要导入
from selenium.webdriver.common.by import By
from selenium import webdriver

from selenium.webdriver.common.by import By

browser = webdriver.Chrome()

browser.get("http://www.taobao.com")
input_first = browser.find_element(By.ID,"q")
print(input_first)
browser.close()
#browser.find_element(By.ID,"q")这里By.ID中的ID可以替换为其他几个
多个元素查找
多个元素和单个元素的区别,举个例子:find_elements,单个元素是find_element,其他使用上没什么区别
from selenium import webdriver


browser = webdriver.Chrome()
browser.get("http://www.taobao.com")
lis = browser.find_elements_by_css_selector('.service-bd li')
print(lis)
browser.close()
或者:
#可以通过导入from selenium.webdriver.common.by import By
lis = browser.find_elements(By.CSS_SELECTOR,'.service-bd li')
同样的在单个元素中查找的方法在多个元素查找中同样存在:
find_elements_by_name
find_elements_by_id
find_elements_by_xpath
find_elements_by_link_text
find_elements_by_partial_link_text
find_elements_by_tag_name
find_elements_by_class_name
find_elements_by_css_selector
元素交互操作
对于获取的元素调用交互方法
from selenium import webdriver

import time

browser = webdriver.Chrome()
browser.get("http://www.taobao.com")
input_str = browser.find_element_by_id('q')
input_str.send_keys("ipad")
time.sleep(1)
input_str.clear()
input_str.send_keys("MakBook pro")
button = browser.find_element_by_class_name('btn-search')
button.click()
运行的结果可以看出程序会自动打开Chrome浏览器并打开淘宝输入ipad,然后删除,重新输入MakBook pro,并点击搜索Selenium所有的api文档:http://selenium-python.readthedocs.io/api.html#module-selenium.webdriver.common.action_chains
交互动作
将动作附加到动作链中串行执行
#导入ActionChains类
from selenium.webdrive import ActionChains

#鼠标移动到ac位置
ac = driver.find_elenemt_by_xpath('element')
ActionChains(driver).move_to_element(ac).perform()

#在ac位置单击
ac = driver.find_element_by_xpath('elementA')
ActionChains(driver).move_to_element(ac).click(ac).perform()

#在ac位置双击
ac = driver.find_element_by_xpath("elementB")
ActionChains(driver).move_to_element(ac).double_click(ac).perform()

#在ac位置右击
ac = driver.find_element_by_xpath('elementC')
ActionChains(driver).move_to_element(ac).context_click(ac).perform()

#在ac位置左键单击hold住
ac = driver.find_element_by_xpath('elementF')
ActionChains(driver).move_to_element(ac).click_and_hold(ac).perform()

#将ac1拖拽到ac2位置
ac1 = driver.find_element_by_xpath('elementD')
ac2 = driver.find_element_by_xpath('elementE')
ActionChains(driver).drag_and_drop(ac1, ac2).perform()
更多操作参考:http://selenium-python.readthedocs.io/api.html#module-selenium.webdriver.common.action_chains
填充表单
选择下拉框处理
#导入Select类
from selenium.webdriver.support.ui import Select

#找到name的选项卡
select = Select(driver.find_element_by_name('status'))

#s
select.select_by_index(1)
select.select_by_value("0")
select.select_by_visible_text(u'未审核')
#三种选择下拉框的方式,它可以根据索引来选择,可以根据值来选择,可以根据文字来选择

index索引从0开始
value是option标签的一个属性值,并不是显示在下拉框中的值
visible_text实在option标签文本的值,是显示在下拉框的值


#全部取消选择
select.deselect_all()
弹窗处理
#触发了某个事件之后,页面出现了弹窗提示,处理这个提示或者获取提示信息方法
alert = driver.switch_to_alert()
执行JavaScript
这是一个非常有用的方法,这里就可以直接调用js方法来实现一些操作,
下面的例子是通过登录知乎然后通过js翻到页面底部,并弹框提示
from selenium import webdriver
browser = webdriver.Chrome()
browser.get("http://www.zhihu.com/explore")
browser.execute_script('window.scrollTo(0, document.body.scrollHeight)')
browser.execute_script('alert("To Bottom")')
获取元素属性
get_attribute('class')
from selenium import webdriver

browser = webdriver.Chrome()
url = 'https://www.zhihu.com/explore'
browser.get(url)
logo = browser.find_element_by_id('zh-top-link-logo')
print(logo)
print(logo.get_attribute('class'))
获取文本值
text
from selenium import webdriver

browser = webdriver.Chrome()
url = 'https://www.zhihu.com/explore'
browser.get(url)
input = browser.find_element_by_class_name('zu-top-add-question')
print(input.text)
获取ID,位置,标签名
id
location
tag_name
size
from selenium import webdriver

browser = webdriver.Chrome()
url = 'https://www.zhihu.com/explore'
browser.get(url)
input = browser.find_element_by_class_name('zu-top-add-question')
print(input.id)
print(input.location)
print(input.tag_name)
print(input.size)
页面切换
浏览器会有很多窗口
driver.switch_to_window('this is window name')

#或
for handle in driver.window_handles:
    driver.switch_to_window(handle)
Frame
在很多网页中都是有Frame标签,所以我们爬取数据的时候就涉及到切入到frame中以及切出来的问题,通过下面的例子演示这里常用的是switch_to.from()和switch_to.parent_frame()
import time
from selenium import webdriver
from selenium.common.exceptions import NoSuchElementException

browser = webdriver.Chrome()
url = 'http://www.runoob.com/try/try.php?filename=jqueryui-api-droppable'
browser.get(url)
browser.switch_to.frame('iframeResult')
source = browser.find_element_by_css_selector('#draggable')
print(source)
try:
    logo = browser.find_element_by_class_name('logo')
except NoSuchElementException:
    print('NO LOGO')
browser.switch_to.parent_frame()
logo = browser.find_element_by_class_name('logo')
print(logo)
print(logo.text)
页面前进后退
driver.forward()  #前进
driver.back()    #后退
页面等待
网页采用了Ajax技术,不能确定何时某个元素完全加载出来,如果实际页面等待事件过长导出某个dom元素还没出来,但是你的代码直接使用了这个WebElement,那么就会抛出NullPointer的异常
当使用了隐式等待执行测试的时候,如果 WebDriver没有在 DOM中找到元素,将继续等待,超出设定时间后则抛出找不到元素的异常, 换句话说,当查找元素或元素并没有立即出现的时候,隐式等待将等待一段时间再查找 DOM,默认的时间是0
隐式等待
到了一定的时间发现元素还没有加载,则继续等待我们指定的时间,如果超过了我们指定的时间还没有加载就会抛出异常,如果没有需要等待的时候就已经加载完毕就会立即执行
from selenium import webdriver

browser = webdriver.Chrome()
browser.implicitly_wait(10)  ##seconds
browser.get('https://www.zhihu.com/explore')
input = browser.find_element_by_class_name('zu-top-add-question')
print(input)
显示等待
指定一个等待条件,并且指定一个最长等待时间,会在这个时间内进行判断是否满足等待条件,如果成立就会立即返回,如果不成立,就会一直等待,直到等待你指定的最长等待时间,如果还是不满足,就会抛出异常,如果满足了就会正常返回
from selenium import webdriver
from selenium.webdriver.common.by import By
from selenium.webdriver.support.ui import WebDriverWait
from selenium.webdriver.support import expected_conditions as EC

browser = webdriver.Chrome()
browser.get('https://www.taobao.com/')
wait = WebDriverWait(browser, 10)
input = wait.until(EC.presence_of_element_located((By.ID, 'q')))
button = wait.until(EC.element_to_be_clickable((By.CSS_SELECTOR, '.btn-search')))
print(input, button)

# EC.presence_of_element_located()是确认元素是否已经出现了
# EC.element_to_be_clickable()是确认元素是否是可点击的

###########################################
from selenium import webdriver
from selenium.webdriver.common.by import By

#WebDriverWait库,负责循环等待
from selenium.webdriver.support.ui import WebDriverWait
#expected_conditions类,负责条件触发
from selenium.webdriver.support import expected_conditions as EC

driver = webdriver.Chrome()

driver.get("http://www.xxxx.com/loading")

try:
    #页面一直循环,知道id="myDynamicElement"出现
    element = WebDriverWait(driver, 10).until(
            EC.presence_of_element_located((By.ID, "myDynamicElement"))
        )
finally:
    driver.quit()
常用的判断条件:
title_is 标题是某内容
title_contains 标题包含某内容
presence_of_element_located 元素加载出,传入定位元组,如(By.ID, 'p')
visibility_of_element_located 元素可见,传入定位元组
visibility_of 可见,传入元素对象
presence_of_all_elements_located 所有元素加载出
text_to_be_present_in_element 某个元素文本包含某文字
text_to_be_present_in_element_value 某个元素值包含某文字
frame_to_be_available_and_switch_to_it frame加载并切换
invisibility_of_element_located 元素不可见
element_to_be_clickable 元素可点击
staleness_of 判断一个元素是否仍在DOM,可判断页面是否已经刷新
element_to_be_selected 元素可选择,传元素对象
element_located_to_be_selected 元素可选择,传入定位元组
element_selection_state_to_be 传入元素对象以及状态,相等返回True,否则返回False
element_located_selection_state_to_be 传入定位元组以及状态,相等返回True,否则返回False
alert_is_present 是否出现Alert
更多操作参考:http://selenium-python.readthedocs.io/api.html#module-selenium.webdriver.support.expected_conditions
浏览器的前进和后退
back()
forward()
import time
from selenium import webdriver

browser = webdriver.Chrome()
browser.get('https://www.baidu.com/')
browser.get('https://www.taobao.com/')
browser.get('https://www.python.org/')
browser.back()
time.sleep(1)
browser.forward()
browser.close()
cookie操作
get_cookies()
delete_all_cookes()
add_cookie()
from selenium import webdriver

browser = webdriver.Chrome()
browser.get('https://www.zhihu.com/explore')
print(browser.get_cookies())
browser.add_cookie({'name': 'name', 'domain': 'www.zhihu.com', 'value': 'zhaofan'})
print(browser.get_cookies())
browser.delete_all_cookies()
print(browser.get_cookies())

##获取
for cookie in driver.get_cookies():
    print("%s -> %s"%(cookie['name'], cookie['value']))

#删除
#By name
driver.delete_cookie('CookieName')

#all
driver.delete_all_cookies()
选项卡管理
通过执行js命令实现新开选项卡window.open()
不同的选项卡是存在列表里browser.window_handles
通过browser.window_handles[0]就可以操作第一个选项卡
import time
from selenium import webdriver

browser = webdriver.Chrome()
browser.get('https://www.baidu.com')
browser.execute_script('window.open()')
print(browser.window_handles)
browser.switch_to_window(browser.window_handles[1])
browser.get('https://www.taobao.com')
time.sleep(1)
browser.switch_to_window(browser.window_handles[0])
browser.get('https://python.org')
异常处理
这里的异常比较复杂,官网的参考地址:
http://selenium-python.readthedocs.io/api.html#module-selenium.common.exceptions
这里只进行简单的演示,查找一个不存在的元素
from selenium import webdriver
from selenium.common.exceptions import TimeoutException, NoSuchElementException

browser = webdriver.Chrome()
try:
    browser.get('https://www.baidu.com')
except TimeoutException:
    print('Time Out')
try:
    browser.find_element_by_id('hello')
except NoSuchElementException:
    print('No Element')
finally:
    browser.close()