1.Service(服务)是一个一种可以在后台执行长时间运行操作而没有用户界面的应用组件。服务可由其他应用组件启动(如Activity),服务一旦被启动将在后台一直运行,即使启动服务的组件(Activity)已销毁也不受影响。
2.Service的创建
public class MyService extends Service {

    private static final String TAG = "MyService";
public MyService() {
    }


    @Override
    public IBinder onBind(Intent intent) {

        Log.i(TAG, "onBind: ");
        throw new UnsupportedOperationException("Not yet implemented");
    }
@Override
public void onCreate() {
    super.onCreate();
    Log.i(TAG, "onCreate: ");

}

@Override
public void onDestroy() {
    super.onDestroy();
    Log.i(TAG, "onDestroy1: ");
}

@Override
public int onStartCommand(Intent intent, int flags, int startId) {
    Log.i(TAG, "onStartCommand: ");
    return super.onStartCommand(intent, flags, startId);

}
}
配置:exported="true"表示允许当前程序之外的程序访问该服务。 enabled="true"表示是否启用该服务。
   <service
            android:name=".MyService"
            android:enabled="true"
            android:exported="true"></service>
服务的2个启动方式:
<1>启动状态
当应用组件(如 Activity)通过调用 startService() 启动服务时,服务即处于“启动”状态。一旦启动,服务即可在后台无限期运行,即使启动服务的组件已被销毁也不受影响,除非手动调用才能停止服务, 已启动的服务通常是执行单一操作,而且不会将结果返回给调用方。
 Intent intent=new Intent(this,MyService.class);
 startService(intent);
 // stopService(intent);
运行程序时会调用程序的 onCreate, onStartCommand
当退出程序再次进入时,会调用onStartCommand,服务创建后再次启动,不会再次调用OnCreate方法。
<2>绑定状态
当应用组件通过调用 bindService() 绑定到服务时,服务即处于“绑定”状态。绑定服务提供了一个客户端-服务器接口,允许组件与服务进行交互、发送请求、获取结果,甚至是利用进程间通信 (IPC) 跨进程执行这些操作。 仅当与另一个应用组件绑定时,绑定服务才会运行。 多个组件可以同时绑定到该服务,但全部取消绑定后,该服务即会被销毁。
public class MyService extends Service {

    private static final String TAG = "MyService";
    private DownloadBinder mBinder=new DownloadBinder();
    public MyService() {
    }

    class DownloadBinder extends Binder{

        public void startDown(){
            Log.i(TAG, "startDown: ");
        // 这里添加操作

        }
    }

    @Override
    public IBinder onBind(Intent intent) {
        // TODO: Return the communication channel to the service.
        Log.i(TAG, "onBind: ");

        return mBinder;
    }

    @Override
    public void onCreate() {
        super.onCreate();
        Log.i(TAG, "onCreate: ");

    }

    @Override
    public void onDestroy() {
        super.onDestroy();
        Log.i(TAG, "onDestroy1: ");
    }

    @Override
    public int onStartCommand(Intent intent, int flags, int startId) {
        Log.i(TAG, "onStartCommand: ");
        return super.onStartCommand(intent, flags, startId);

    }
}
public class MainActivity extends AppCompatActivity {

    private MyService.DownloadBinder downloadBinder;
    private ServiceConnection connection=new ServiceConnection() {
        @Override
        public void onServiceConnected(ComponentName name, IBinder service) {
            downloadBinder= (MyService.DownloadBinder) service;
            downloadBinder.startDown();
        }

        @Override
        public void onServiceDisconnected(ComponentName name) {

        }
    };
    @Override
    protected void onCreate(Bundle savedInstanceState) {
        super.onCreate(savedInstanceState);
        setContentView(R.layout.activity_main);

        Intent intent=new Intent(this,MyService.class);

        bindService(intent,connection,BIND_AUTO_CREATE);

    }

    @Override
    protected void onDestroy() {
        super.onDestroy();
        unbindService(connection);

    }
}
运行启动程序会调用:onCreate onBind (downloadBinder.startDown()) 由于使用的bind启动方式,当activity销毁时,Service也会被销毁。
3.使用前台服务
Service几乎都是在后台运行的,但是服务的优先级比较低,当系统出现内存不足的情况时,就有可能会被回收掉。如果希望服务可以一直保持运行状态,而不会被系统内存不足的原因导致回收,我们可以考虑使用前天服务。前台服务与后台服务的不同在于,前台服务会一直有一个运行的图标在系统的状态栏显示。下拉状态栏时可以看到更多的信息。类似通知的效果。
创建一个前台服务:
在Service中的onCreate中,创建通知。
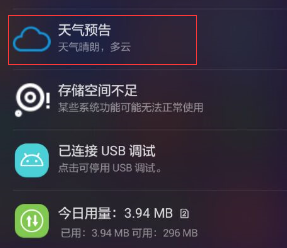
   @Override
    public void onCreate() {
        super.onCreate();
        Log.i(TAG, "onCreate: ");
        Intent intent1=new Intent(this,MainActivity.class);
        PendingIntent pi=PendingIntent.getActivity(this,0, intent1,0);
        Notification notification=new Notification.Builder(this)
                .setContentTitle("天气预告")
                .setContentText("天气晴朗,多云")
                .setWhen(System.currentTimeMillis())
                .setSmallIcon(R.mipmap.yun)
               .setLargeIcon(BitmapFactory.decodeResource(getResources(),R.mipmap.yun))
                .setContentIntent(pi)
                .build();
        startForeground(1,notification);


    }
使用Inten启动Service,调用,onCreate,onStartCommand。当删去该通知时并没有销毁Service,没有走onDestory。
 Intent intent=new Intent(this,MyService.class);
 startService(intent);
4. IntentService 类
Service中的代码默认是运行在主线程中的,因此不能直接在Service中处理一些耗时操作。而IntentService很好的帮助我们可以在其中进行操作,并会自动停止服务。
public class MyIntentService extends IntentService {

    private static final String TAG = "MyIntentService";
    public MyIntentService() {
        /**
         * 必须实现父类的有参构造
         */
        super("MyIntentService");
    }


    @Override
    protected void onHandleIntent(Intent intent) {
        /**
         *   Intent是从Activity发过来的,携带识别参数,根据参数不同执行不同的任务
         */

        String action = intent.getExtras().getString("param");
        if(action.equals("100")){
            Log.i(TAG, "onHandleIntent: 100");
        }else{
                Log.i(TAG, "onHandleIntent: 200");
            }

        try {
            Thread.sleep(2000);

        } catch (InterruptedException e) {
            e.printStackTrace();
        }
    }


}
     Intent startServiceIntent = new Intent(this,MyIntentService.class);

        Bundle bundle = new Bundle();

        bundle.putString("param", "200");

        startServiceIntent.putExtras(bundle);

        startService(startServiceIntent);
5.生命周期
<1>通过startService启动服务
Intent intent=new Intent(MainActivity.this,MyService.class); startService(intent);
第一次调用onCreate ,onStartCommand 再次多次启动只会走onStartCommand方法,而不会再走onCreate方法。
<2>通过stopService停止服务
  Intent intent=new Intent(MainActivity.this,MyService.class);
  stopService(intent);
调用方法:onDestroy
<3>通过bindService启动服务:
调用方法: onCreate onBind,当多次启动bindService时 onCreate onBind都不会再调用,都是只执行一次。
<4>通过unbindService(connection)停止:
调用方法 onUnbind onDestroy 多次调用unbindService也是只走一次 onUnbind onDestroy 。