iptables |
作者:高波 归档:学习笔记 2018年1月16日21:06:46 |
快捷键: Ctrl + 1 标题1 Ctrl + 2 标题2 Ctrl + 3 标题3 Ctrl + 4 实例 Ctrl + 5 程序代码 Ctrl + 6 正文 |
格式说明: 蓝色字体:注释 黄色背景:重要 绿色背景:注意 |
目
录
1.1.4 防火墙setup无法启用. 开启debus-daemon --system 1
第一章
iptables介绍
iptables 主要工作在OSI的二三四层.重新编译内核也可以工作在七层.
iptables:术语说明
iptables 表tables 链chains rule 规则
centos6 iptables centos7 firewalld
iptables工作流程.
iptables 是采用数据包过滤机制工作,所以它会请求的数据包的包头进行数据分析,
并根据我们预先设定的规则来匹配是否可以进入主机.
iptables工作流程总结:
- 防火墙是一层层过滤的.实际是按照配置规则顺序从上到下,从前到后进行过滤的.
- 如果匹配上了规则,即明确表明是阻止还是通过,此时数据包就不在向下匹配新规则了
- 如果所有的规则中没有明确阻止还是通过这个数据包,也就是没有匹配上规则,向下进行匹配.
知道所有的匹配默认规则得到明确的阻止还是通过.
- 防火墙的默认规则是对应链的所有规则执行完才会执行的.(执行最后的规则)
四表五链的概念
iptables 表和链chains
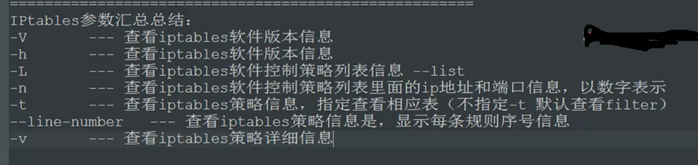
iptables -L #查看默认规则的配置
防火墙setup无法启用. 开启debus-daemon --system
开启dbus-daemon --system
iptables -nL -v --line-numbers
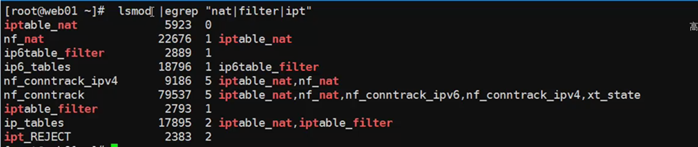
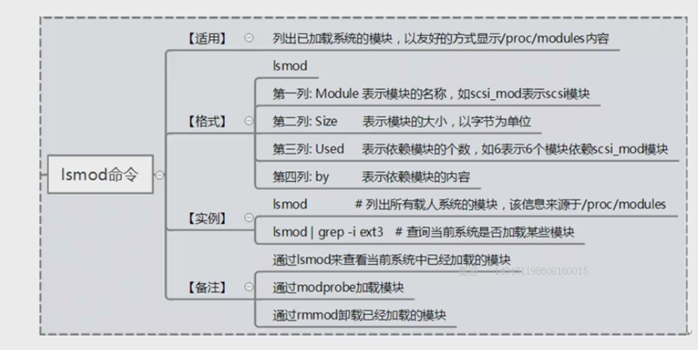
防火墙使用的内核模块.
iptables清除默认的规则.

iptables -X 删除用户自定义的链
iptables -F清除所有的规则,不会处理默认的规则
iptables -Z 链的计数清零 数据包计算器和数据包字节计算器.
除了10.0.0.7 以外的tcp都可以连接
[root@web01 ~]# iptables -A INPUT ! -s 10.0.0.7 -p tcp -d 10.0.0.8 -j ACCEPT
[root@web01 ~]# iptables -A INPUT -p tcp -j DROP # 拒绝所有TCP
iptables连续地址过滤 地址不在7到8范围内的就不能连接 iprange --src-range
iptables -A INPUT -p tcp -m iprange ! --src-range 10.0.0.7-10.0.0.8 -j DROP
过滤源地址范围:
iptables -A INPUT -m iprange
					--src-range 192.168.1.2-192.168.1.7  -j DROP
过滤目标地址范围:
iptables -A INPUT -m iprange --dst-range 192.168.1.2-192.168.1.7  -j DROP
ipset 封单个不相连的IP
1、ipset安装
yum安装: yum install ipset
源代码安装:进官网下载ipset-6.30.tar.bz2 ,
yum -y install libmnl-devel libmnl
tar -jxvf ipset-6.30.tar.bz2 && cd ipset-6.30 && ./configure --prefix=/usr/local/ipset && make && make install 完成安装
2、创建一个ipset
ipset create allset hash:net (也可以是hash:ip ,这指的是单个ip)
2.1、查看已创建的ipset
2.2、ipset默认可以存储65536个元素,使用maxelem指定数量
ipset create openapi hash:net maxelem 1000000
ipset list
3、加入一个黑名单ip
ipset add allset 145.201.56.109
4、创建防火墙规则,与此同时,allset这个IP集里的ip都无法访问80端口(如:CC攻击可用)
iptables -I INPUT -m set --match-set allset src -p tcp --destination-port 80 -j DROP
service iptables save
5、去除黑名单,与此同时,又可以访问了
ipset del allset 145.201.56.109
6、将ipset规则保存到文件
ipset save allset -f allset.txt
7、删除ipset
ipset destroy allset
8、导入ipset规则
ipset restore -f allset.txt
禁止10.0.0.7的上面的端口22到88端口的连接
iptables -A INPUT -p tcp -s 10.0.0.7 --dport 22:88 -j DROP
不连续端口禁用 使用 -m multiport --dport 22 禁止访问22和80端口
iptables -A INPUT -s 10.0.0.6 -p tcp -m multiport --dport 22 -j DROP
iptables -A INPUT -s 10.0.0.6 -p tcp -m multiport --dport 22,80 -j DROP
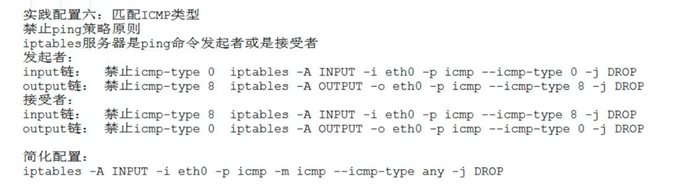
禁止PING,INPUT 相对于配置的主机进入的
下面两个配置的是主机出去的.
[root@web01 ~]# iptables -A INPUT -s 10.0.0.6 -i eth0 -p icmp --icmp-type 0 -j DROP
[root@web01 ~]# ping 10.0.0.6
PING 10.0.0.6 (10.0.0.6) 56(84) bytes of data.
^C
--- 10.0.0.6 ping statistics ---
9 packets transmitted, 0 received, 100% packet loss, time 8616ms
相对于配置的主机出去的到不了10.0.0.8
[root@web01 ~]# iptables -I OUTPUT -o eth0 -p icmp --icmp-type 8 -j DROP
[root@web01 ~]# ping 10.0.0.6 #在10.0.0.8上面ping的
PING 10.0.0.6 (10.0.0.6) 56(84) bytes of data.
ping: sendmsg: Operation not permitted
ping: sendmsg: Operation not permitted
^C
--- 10.0.0.6 ping statistics ---
5 packets transmitted, 0 received, 100% packet loss, time 4557ms
下面是常用的禁止进入的: 禁止ping服务器,禁止进入
iptables -A INPUT -s 10.0.0.6 -i eth0 -p icmp --icmp-type 8 -j DROP
INPUT -i --icmp-type 8