1.戴尔AL安装Ubuntu16.04问题总结
1).找不到固态硬盘
由于dell电脑的出厂设置,在BIOS里面都统一把硬盘模式设为RAID ON,但这种模式下可能会导致不能正确识别或者完全发挥处SSD的性能。下面是把RAID模式更改位AHCI的方法。
进入wins之后,按下WIN键+R键,输入msconfig,进入如下引导界面,安全引导打钩,最小打钩,如下所示
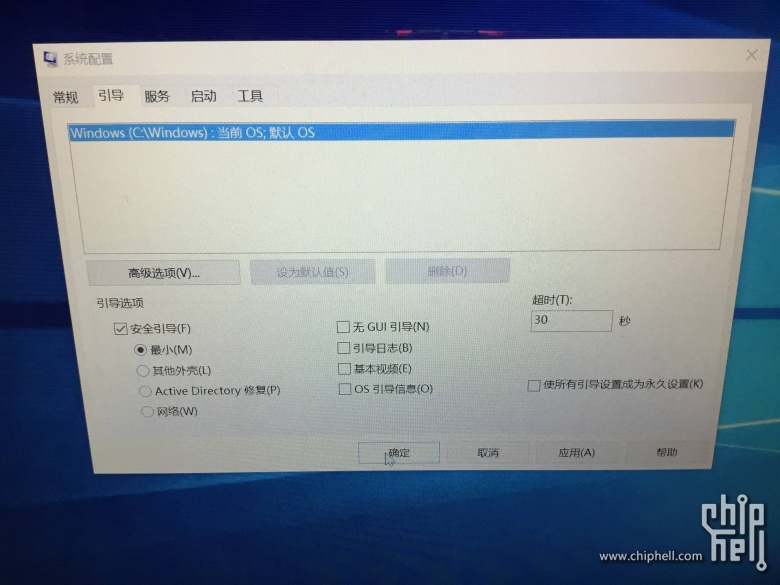
之后,点击重新启动;在启动之后,按下F2键进入BIOS依次找到Advanced界面,选中SATA operation,并按下回车键,选择AHCI模式,这里提示要重新装系统,不用理会,点击YES即可,然后按F10,选择YES,重启电脑。重启之后,进入windows的安全模式,再次按下WIN键和R键,并输入msconfig,在引导界面,把之前的安全引导的勾全部去掉,
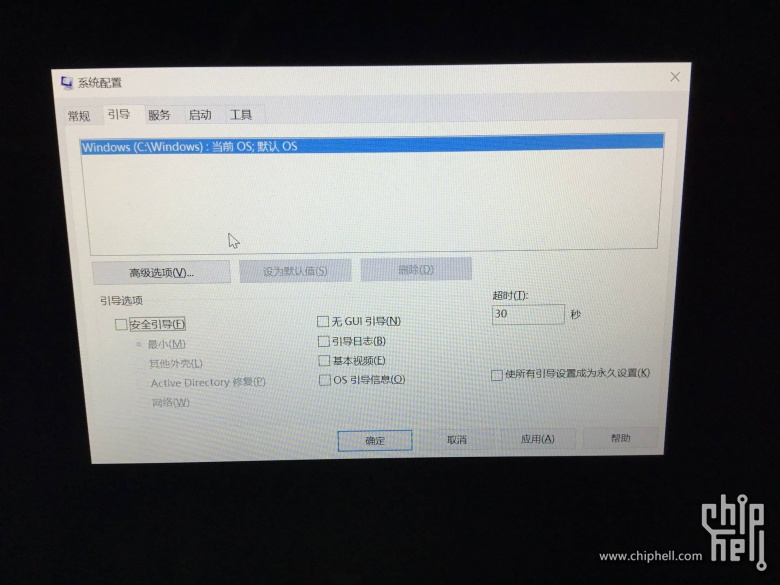
然后点击下面的确定,最后选择重新启动。开机成功,证明我们开启了AHCI模式。
2)触摸屏驱动不对
sudo su
echo 'blacklist i2c_hid' >> /etc/modprobe.d/blacklist.conf
depmod -a
update-initramfs -u

and reboot
3)黑屏
安装完ubuntu16.04之后,可能会出现黑屏的现象,解决方法:
一、
- 开机在系统选择时按”e”进入grub的编辑模式
- 找到“quite splash”并在后面加上对nvidia显卡的驱动支持”nomodeset”
- 按 Ctrl+X或F10启动系统
- 以管理员权限编辑/etc/default/grub
- 找到GRUB_CMDLINE_LINUX_DEFAULT=”quiet splash”,修改为:GRUB_CMDLINE_LINUX_DEFAULT=”quiet splash nomodeset”
- 更新grub:sudo update-grub,并重新开机
二、安装完系统后,可能会进入系统,进入之后执行如下
sudo nano /etc/default/grub
找到这一行:
GRUB_CMDLINE_LINUX_DEFAULT="quiet splash"修改为GRUB_CMDLINE_LINUX_DEFAULT="quiet splash nomodeset"
貌似Ctrl+o, ctrl +x后(具体看下面提示)更新GRUB,输入:sudo update-grub
环境搭建
1.安装依赖包
sudo apt-get install libprotobuf-dev libleveldb-dev libsnappy-dev libopencv-dev libhdf5-serial-dev protobuf-compiler

sudo apt-get install --no-install-recommends libboost-all-dev

sudo apt-get install libopenblas-dev liblapack-dev libatlas-base-dev

sudo apt-get install libgflags-dev libgoogle-glog-dev liblmdb-dev

sudo apt-get install git cmake build-essential
2.安装显卡驱动
由于16.04默认安装的是nouveau显卡驱动,而它不能用于CUDA的,需要卸载并重新安装
1)首先禁用Ubuntu16.04自带的显卡驱动nouveau,禁用方法就是在 /etc/modprobe.d/blacklist-nouveau.conf 文件中添加一条禁用命令,如下
sudo gedit /etc/modprobe.d/blacklist-nouveau.conf
打开后发现该文件中没有任何内容,写入:
    blacklist nouveau
    options nouveau modeset=0
保存后关闭文件,注意此时还需执行以下命令使禁用 nouveau 真正生效:
sudo update-initramfs -u
检测禁用生效了没,使用如下
lsmod | grep nouveau
下面就开始重装显卡驱动:
我的驱动下载的是NVIDIA_Linux-x86_64-415.13.run,放到自己的用户名home目录下
下面进入文本模式,ctrl+alt+f1,在文本模式下关闭桌面服务:sudo service lightdm stop,(如果要下载之前安装的英伟达驱动可以使用sudo apt-get purge nvidia* ),进入到存放驱动的目录下,执行如下命令:
sudo sh NVIDIA_Linux-x86_64-415.13.run --no-opengl-files #run文件的文件名根据自己下的文件名修改,默认是我提供的文件
期间出现如下:
- Install NVIDIA Accelerated Graphics Driver for Linux-x86_64 387.26?
- (y)es/(n)o/(q)uit: y
- do you want to run nvidia-xconfig?
- (y)es/(n)o/(q)uit: n
- Install the CUDA 9.1 Samples?
- (y)es/(n)o/(q)uit: n
- Install the CUDA 9.1 Toolkit?
- (y)es/(n)o/(q)uit: n
然后重新启动系统reboot就可以了,在此驱动安装完毕。使用如下命令nvidia-settings和nvidia-smi来验证。
下面安装cuda10(通过命令nvidia-smi来查看到的),下载之,名字叫cuda_10.0.130_410.48_linux.run。
执行如下
sudo sh cuda_9.1.85_387.26_linux.run --no-opengl-libs
Install NVIDIA Accelerated Graphics Driver for Linux-x86_64 387.26?
(y)es/(n)o/(q)uit: n

Install the CUDA 9.1 Toolkit?
(y)es/(n)o/(q)uit: y

Enter Toolkit Location
 [ default is /usr/local/cuda-9.1 ]:

Do you want to install a symbolic link at /usr/local/cuda?
(y)es/(n)o/(q)uit: y

Install the CUDA 9.1 Samples?
(y)es/(n)o/(q)uit: y

Enter CUDA Samples Location
 [ default is /home/ccem ]:

Installing the CUDA Toolkit in /usr/local/cuda-9.1 ...
Installing the CUDA Samples in /home/ccem ...
Copying samples to /home/ccem/NVIDIA_CUDA-9.1_Samples now...
Finished copying samples.

===========
= Summary =
===========

Driver:   Not Selected
Toolkit:  Installed in /usr/local/cuda-9.1
Samples:  Installed in /home/ccem

Please make sure that
 -   PATH includes /usr/local/cuda-9.1/bin
 -   LD_LIBRARY_PATH includes /usr/local/cuda-9.1/lib64, or, add /usr/local/cuda-9.1/lib64 to /etc/ld.so.conf and run ldconfig as root

To uninstall the CUDA Toolkit, run the uninstall script in /usr/local/cuda-9.1/bin

Please see CUDA_Installation_Guide_Linux.pdf in /usr/local/cuda-9.1/doc/pdf for detailed information on setting up CUDA.

***WARNING: Incomplete installation! This installation did not install the CUDA Driver. A driver of version at least 384.00 is required for CUDA 9.1 functionality to work.
To install the driver using this installer, run the following command, replacing <CudaInstaller> with the name of this run file:
 sudo <CudaInstaller>.run -silent -driver

Logfile is /tmp/cuda_install_36731.log
如果出现如下,则说明缺少依赖库
Installing the CUDA Toolkit in /usr/local/cuda-9.1 …
Missing recommended library: libGLU.so
Missing recommended library: libX11.so
Missing recommended library: libXi.so
Missing recommended library: libXmu.so
则对应安装依赖库
sudo apt-get install freeglut3-dev build-essential libx11-dev libxmu-dev libxi-dev libgl1-mesa-glx libglu1-mesa libglu1-mesa-dev
安装完后,配置cuda的环境变量下面是为当前用户配置
sudo gedit ~/.bashrc
export PATH=/usr/local/cuda/bin:$PATH     #/usr/local/cuda和/usr/local/cuda-10.0是同一个文件夹,前者是后者的镜像

export LD_LIBRARY_PATH=/usr/local/cuda/lib64:$LD_LIBRARY_PATH
source ~/.bashrc使之生效;下面是为所有用户配置环境变量
$ sudo vim /etc/profileexport PATH=/usr/local/cuda/bin:${PATH} # 必须
export LD_LIBRARY_PATH=/usr/local/cuda/lib64:${LD_LIBRARY_PATH} # 非必须,可以用前面介绍的方式检验CUDA 是否安装成功,输入:
cd /usr/local/cuda-10.0/samples/1_Utilities/deviceQuery

sudo make

./deviceQuery
下面是安装cuDNN v7,我下载的版本是cudnn-10.0-linux-x64-v7.4.1.5.tgz。把他解压到任何路径,我的解压路径位/usr/local/cudnn下面(tar zxvf ./cudnn-10.0-linux-x64-v7.4.1.5.tgz -C /usr/local/cudnn),解压后的文件夹名为cuda,文件夹中包含两个文件夹:一个为include,另一个为lib64。将解压后的文件中的lib64文件夹关联到环境变量中。这一步很重要,sudo gedit ~/.bashrc,输入如下内容
export LD_LIBRARY_PATH=/your/path/to/cudnn/lib64:$LD_LIBRARY_PATH其中/your/path/to/cudnn/lib64是指.tgz解压后的文件所在路径中的lib64文件夹。保存,退出并source一下,再重启一下Terminal(终端),该步骤可以成功的配置cuDNN的Lib文件,配置cuDNN的最后一步就是将解压后的cuDNN文件夹(一般该文件名为cuda)中的include文件夹(/your/path/to/cudnn/include)中的cudnn.h文件拷贝到/usr/local/cuda/include中,由于进入了系统路径,因此执行该操作时需要获取管理员权限。
   cd cuda/include
   sudo cp *.h /usr/local/cuda/include/
之后,再重置cudnn.h文件的读写权限: sudo chmod a+r /usr/local/cuda/include/cudnn.h,至此,cuDNN的配置就全部安装完成了。下面安装tensorflow,我选择的源码安装方式,参考https://github.com/jikexueyuanwiki/tensorflow-zh/blob/master/SOURCE/get_started/os_setup.md以及https://blog.csdn.net/a446712385/article/details/79149977
在终端输入以下命令:
$ git clone --recurse-submodules https://github.com/tensorflow/tensorflow
–recurse-submodules 参数是必须得, 用于获取 TesorFlow 依赖的 protobuf 库.放入home目录下,下面下载Bazel并安装之
下载的名字为bazel-0.15.2-installer-linux-x86_64.sh
安装其他依赖:
sudo apt-get update
sudo apt-get install python-pip python-numpy swig python-dev python-wheel
sudo apt-get install pkg-config zip g++ zlib1g-dev unzip
sudo apt-get install default-jdk//For Python 2.7:
sudo apt-get install python-numpy swig python-dev python-wheel//For Python 3.x:
$ sudo apt-get install python3-numpy swig python3-dev python3-wheel
在这里使用python3.
export PATH=/usr/bin:$PATH,这是python环境变量的配置
./bazel-0.15.2-installer-linux-x86_64.sh --user
将执行路径output/bazel 添加到$PATH环境变量后bazel工具就可以使用了,环境变量配置
~/.bashrc下面输入
export PATH=$HOME/bin:$PATH
下面去配置tensorflow,
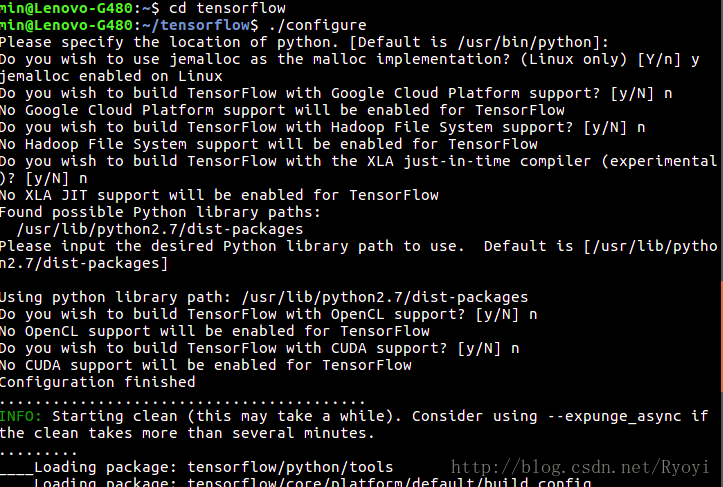
进入到它的文件夹下面,执行./configure
这部分是配置tensorflow,然后再生成whl安装tensorflow。
直接pip安装就是安装官网提供的已经配置好的whl包,而源码安装就是利用bazel编译后,生成whl包,再进行安装。
(如果是需要开启GPU,在这里需要配置cuda和cudnn)
1)配置


You have bazel 0.17.2 installed.
Please specify the location of python. [Default is /usr/bin/python]: /usr/bin/python3.5


Found possible Python library paths:
  /usr/local/lib/python3.5/dist-packages
  /usr/lib/python3/dist-packages
Please input the desired Python library path to use.  Default is [/usr/local/lib/python3.5/dist-packages]

Do you wish to build TensorFlow with Apache Ignite support? [Y/n]: n
No Apache Ignite support will be enabled for TensorFlow.

Do you wish to build TensorFlow with XLA JIT support? [Y/n]: n
No XLA JIT support will be enabled for TensorFlow.

Do you wish to build TensorFlow with OpenCL SYCL support? [y/N]: n
No OpenCL SYCL support will be enabled for TensorFlow.

Do you wish to build TensorFlow with ROCm support? [y/N]: n
No ROCm support will be enabled for TensorFlow.

Do you wish to build TensorFlow with CUDA support? [y/N]: y
CUDA support will be enabled for TensorFlow.

Please specify the CUDA SDK version you want to use. [Leave empty to default to CUDA 9.0]:


Please specify the location where CUDA 9.0 toolkit is installed. Refer to README.md for more details. [Default is /usr/local/cuda]:


Please specify the cuDNN version you want to use. [Leave empty to default to cuDNN 7]:


Please specify the location where cuDNN 7 library is installed. Refer to README.md for more details. [Default is /usr/local/cuda]:


Do you wish to build TensorFlow with TensorRT support? [y/N]: n
No TensorRT support will be enabled for TensorFlow.

Please specify the locally installed NCCL version you want to use. [Default is to use https://github.com/nvidia/nccl]:


Please specify a list of comma-separated Cuda compute capabilities you want to build with.
You can find the compute capability of your device at: https://developer.nvidia.com/cuda-gpus.
Please note that each additional compute capability significantly increases your build time and binary size. [Default is: 6.1]:


Do you want to use clang as CUDA compiler? [y/N]: n
nvcc will be used as CUDA compiler.

Please specify which gcc should be used by nvcc as the host compiler. [Default is /usr/bin/gcc]:


Do you wish to build TensorFlow with MPI support? [y/N]: n
No MPI support will be enabled for TensorFlow.

Please specify optimization flags to use during compilation when bazel option "--config=opt" is specified [Default is -march=native]:


Would you like to interactively configure ./WORKSPACE for Android builds? [y/N]: n
Not configuring the WORKSPACE for Android builds.

Preconfigured Bazel build configs. You can use any of the below by adding "--config=<>" to your build command. See .bazelrc for more details.
    --config=mkl            # Build with MKL support.
    --config=monolithic     # Config for mostly static monolithic build.
    --config=gdr            # Build with GDR support.
    --config=verbs          # Build with libverbs support.
    --config=ngraph         # Build with Intel nGraph support.
Configuration finished
CUDA 9.0 : 10.0
上面的部分代码是参考https://www.cnblogs.com/seniusen/p/9756302.html
以上在配置的过程中可能会出错,在这里我把系统默认的Python2改为了python3.5,使用方法如下
备份原来的python2软链接,sudo cp /usr/bin/python /usr/bin/python_bak, sudo rm /usr/bin/python 然后执行sudo ln -s /usr/bin/python3.5 /usr/bin/python,使用python --version测试成功,return back to python2.7 sudo rm /usr/bin/python sudo ln -s /usr/bin/python2.7 /usr/bin/python但是在编译tensorflow的时候会出现一些问题,NO module named keras.preprocessing,解决方法sudo pip install keras,但是又出现其他的错误ModuleNotFoundError: No module named 'pip._internal',解决方法
 wget https://bootstrap.pypa.io/get-pip.py  --no-check-certificate
sudo python get-pip.py
然后测试,pip -V,即可解决。
下面进行编译
在tensorflow目录下,输入以下三个命令:
bazel build -c opt --config=cuda //tensorflow/tools/pip_package:build_pip_package
编译很久,结束之后,执行
bazel-bin/tensorflow/tools/pip_package/build_pip_package /tmp/tensorflow_pkg
tmp/tensorflow_pkg目录下找到(whl包的名字可能不一样,和电脑属性或者当前tensorflow版本之类的有关),我的名字为tensorflow-1.12.0rc0-cp35-cp35m-linux_x86_64.whl
将其复制到主文件夹,以便安装
sudo pip install tensorflow-1.12.0rc0-cp35-cp35m-linux_x86_64.whl

等待安装完成后,输入以下命令,不报错即安装成功.
测试是否安装成功
python
#这里会输出python的版本信息,见下图
>>> import tensorflow as tf
>>> hello = tf.constant('Hello, TensorFlow!')
>>> sess = tf.Session()
#这里会输出GPU的相关信息,表明TensorFlow是在GPU上运行的,见下图
>>> sess.run(hello)
b'Hello, TensorFlow!'
>>> a = tf.constant(10)
>>> b = tf.constant(22)
>>> sess.run(a+b)
32
>>>
以下是tensorflow c++的接口设置https://www.cnblogs.com/seniusen/p/9756302.html