通读Spring IoC容器官方文档,对IoC容器有一个大致的了解。
环境
- JDK1.8
- Spring Framework Version :4.3.18.RELEASE
容器概述
接口
org.springframework.context.ApplicationContext代表Spring IoC容器,负责实例化,配置和组装bean。
在独立应用程序中,通常会创建一个ClassPathXmlApplicationContext或者FileSystemXmlApplicationContext的实例。
Spring工作原理的高级视图
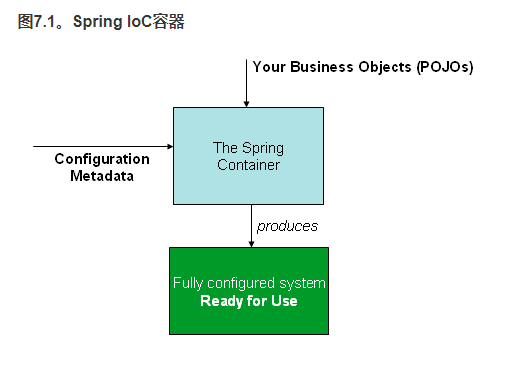
1.配置元数据
创建SimpleBean
public class SimpleBean {
    public void send() {
        System.out.println("Hello Spring Bean!");
    }
}
config.xml
<?xml version="1.0" encoding="UTF-8"?>
<beans xmlns="http://www.springframework.org/schema/beans"
       xmlns:xsi="http://www.w3.org/2001/XMLSchema-instance"
       xmlns:context="http://www.springframework.org/schema/context"
       xsi:schemaLocation="http://www.springframework.org/schema/beans
						http://www.springframework.org/schema/beans/spring-beans.xsd
						http://www.springframework.org/schema/context
						http://www.springframework.org/schema/context/spring-context.xsd">
    <bean id="simple" class="base.SimpleBeanFactoryBean"/>
</beans>
2.实例化容器
ApplicationContext context = new ClassPathXmlApplicationContext("config.xml");
3.使用容器
// 检索Spring容器中的bean
SimpleBean simpleBean = context.getBean(SimpleBean.class);
// 使用bean
simpleBean.send();
还有更灵活的方式来从配置文件获取bean,使用GenericApplicationContext与BeanDefinitionReader结合,直接读取bean定义
GenericApplicationContext context = new GenericApplicationContext();
new XmlBeanDefinitionReader(context).loadBeanDefinitions("config.xml");
context.refresh();
SimpleBean simpleBean = (SimpleBean) context.getBean("simple");
simpleBean.send();
Bean概述
Spring IoC容器管理一个或多个bean。这些bean是使用您提供给容器的配置元数据创建的,例如,以XML
<bean/>定义的形式 。
在容器本身内,这些bean定义表示为BeanDefinition对象。
除了创建配置好的bean之外,ApplicationContext还允许用户注册在容器外部创建的现有对象。通过getBeanFactory()获得DefaultListableBeanFactory,然后使用registerSingleton()或者registerBeanDefinition()来注册bean。
DefaultListableBeanFactory beanFactory = new DefaultListableBeanFactory();
ClassPathXmlApplicationContext applicationContext = new ClassPathXmlApplicationContext("config.xml");
User user = new User();
user.setId(1L);
user.setName("xiaoming");
beanFactory.registerSingleton("user", user);

User bean = (User) applicationContext.getBean("user");
System.out.println(bean);
或者是以下做法:
ClassPathXmlApplicationContext applicationContext = new ClassPathXmlApplicationContext("config.xml");
DefaultListableBeanFactory beanFactory = (DefaultListableBeanFactory) applicationContext.getBeanFactory();
BeanDefinitionBuilder builder = BeanDefinitionBuilder.genericBeanDefinition(User.class);
builder.addPropertyValue("id", 1);
builder.addPropertyValue("name", "xiaoming");
AbstractBeanDefinition beanDefinition = builder.getBeanDefinition();
beanFactory.registerBeanDefinition("user", beanDefinition);

User bean = (User) applicationContext.getBean("user");
System.out.println(bean);
命名bean
每个bean都有一个或多个标识符。这些标识符在托管bean的容器中必须是唯一的。bean通常只有一个标识符,但如果它需要多个标识符,则额外的标识符可以被视为别名。
在基于XML的配置元数据中,使用id和/或name属性指定bean标识符。
实例化bean
1.构造函数实例化
<bean id="exampleBean" class="examples.ExampleBean"/>
<bean name="anotherExample" class="examples.ExampleBeanTwo"/>
2.静态工厂方法实例化
<bean id="clientService"
    class="examples.ClientService"
    factory-method="createInstance"/>
public class ClientService {
    private static ClientService clientService = new ClientService();
    private ClientService() {}

    public static ClientService createInstance() {
        return clientService;
    }
}
3.实例工厂方法实例化
<!-- the factory bean, which contains a method called createInstance() -->
<bean id="serviceLocator" class="examples.DefaultServiceLocator">
    <!-- inject any dependencies required by this locator bean -->
</bean>

<!-- the bean to be created via the factory bean -->
<bean id="clientService"
    factory-bean="serviceLocator"
    factory-method="createClientServiceInstance"/>
public class DefaultServiceLocator {

    private static ClientService clientService = new ClientServiceImpl();

    public ClientService createClientServiceInstance() {
        return clientService;
    }
}
一个工厂类也可以包含多个工厂方法:
<bean id="serviceLocator" class="examples.DefaultServiceLocator">
    <!-- inject any dependencies required by this locator bean -->
</bean>

<bean id="clientService"
    factory-bean="serviceLocator"
    factory-method="createClientServiceInstance"/>

<bean id="accountService"
    factory-bean="serviceLocator"
    factory-method="createAccountServiceInstance"/>
public class DefaultServiceLocator {

    private static ClientService clientService = new ClientServiceImpl();

    private static AccountService accountService = new AccountServiceImpl();

    public ClientService createClientServiceInstance() {
        return clientService;
    }

    public AccountService createAccountServiceInstance() {
        return accountService;
    }
}
依赖注入
构造器注入
基于构造函数的 DI由容器调用具有多个参数的构造函数来完成,每个参数表示一个依赖项。
public class SimpleMovieLister {

    // SimpleMovieLister依赖于MovieFinder
    private MovieFinder movieFinder;

    // 一个构造函数,以便Spring容器可以注入一个MovieFinder
    public SimpleMovieLister(MovieFinder movieFinder) {
        this.movieFinder = movieFinder;
    }

    // business logic that actually uses the injected MovieFinder is omitted...
}
构造函数参数解析
package x.y;

public class Foo {

    public Foo(Bar bar, Baz baz) {
        // ...
    }
}
<beans>
    <bean id="foo" class="x.y.Foo">
        <constructor-arg ref="bar"/>
        <constructor-arg ref="baz"/>
    </bean>

    <bean id="bar" class="x.y.Bar"/>

    <bean id="baz" class="x.y.Baz"/>
</beans>
显式指定构造函数参数的类型:
<bean id="exampleBean" class="examples.ExampleBean">
    <constructor-arg type="int" value="7500000"/>
    <constructor-arg type="java.lang.String" value="42"/>
</bean>
使用index属性显式指定构造函数参数的索引:
<bean id="exampleBean" class="examples.ExampleBean">
    <constructor-arg index="0" value="7500000"/>
    <constructor-arg index="1" value="42"/>
</bean>
或者指定构造函数参数名称:
<bean id="exampleBean" class="examples.ExampleBean">
    <constructor-arg name="years" value="7500000"/>
    <constructor-arg name="ultimateAnswer" value="42"/>
</bean>
setter注入
基于setter的 DI是在调用无参数构造函数或无参数static工厂方法来实例化bean之后,通过容器调用bean上的setter方法来完成的。
public class SimpleMovieLister {

    // SimpleMovieLister依赖于MovieFinder
    private MovieFinder movieFinder;

    // 一个setter方法,以便Spring容器可以注入一个MovieFinder
    public void setMovieFinder(MovieFinder movieFinder) {
        this.movieFinder = movieFinder;
    }

    // business logic that actually uses the injected MovieFinder is omitted...
}
小结
ApplicationContext的依赖注入支持构造器注入和setter注入两种方式。在通过构造函数方法注入了一些依赖项之后,它还支持基于setter的依赖注入。可以用BeanDefinition与PropertyEditor实例结合使用的方式来配置依赖项。 不过,我们一般不直接使用BeanDefinition与PropertyEditor,而是用XML 定义bean或者是注解方式(@Component, @Controller等等),或者是直接编写@Configuration类。然后,这些类在内部转换为实例BeanDefinition并用于加载整个Spring IoC容器实例。
解决循环依赖
如果主要使用构造函数注入,则可能出现无法解析的循环依赖关系场景。
例如:类A通过构造函数注入需要类B的实例,而类B通过构造函数注入类A的实例。如果将A类和B类的bean配置为相互注入,则Spring IoC容器会在运行时检测到此循环引用,并抛出BeanCurrentlyInCreationException异常。
一种可行的解决方案是仅使用setter注入。
与典型情况(没有循环依赖)不同,bean A和bean B之间的循环依赖强制其中一个bean在完全初始化之前被注入另一个bean(一个经典的鸡/蛋场景)。
使用 depends-on
depends-on可以在初始化bean之前,显式地强制初始化一个或多个bean。下面的例子,在初始化beanOne之前,将强制初始化manager
<bean id="beanOne" class="ExampleBean" depends-on="manager"/>
<bean id="manager" class="ManagerBean" />
懒加载的bean
默认情况下,ApplicationContext会立即配置并初始化所有单例bean,但是我们可以使用lazy-init="true"将其设置为按需加载。
<bean id="lazy" class="com.foo.ExpensiveToCreateBean" lazy-init="true"/>
<bean name="not.lazy" class="com.foo.AnotherBean"/>
注意:懒加载不要使用在数据库连接池上,因为无法立即获知数据库连接状态,将导致运行时创建连接池失败,不可预知的后果。
自动装配协作者
Spring容器可以自动连接协作bean之间的关系。您可以通过检查ApplicationContext的内容,允许Spring自动为您的bean解析协作者(其他bean)。
自动装配模式
- no:无自动装配,必须使用ref来定义Bean引用。
- byName:按属性名称自动装配。
- byType:按属性类型自动装配,如果存在多个同类型Bean,则抛出致命异常。
- constructor:类似于byType,如果容器中没有构造函数参数类型的一个bean,则抛出致命异常。
Bean 作用域
singleton
Spring IoC容器只创建该bean定义的对象的一个实例。此单个实例存储在此类单例bean的缓存中,并且该Bean的所有后续请求和引用都将返回缓存对象。
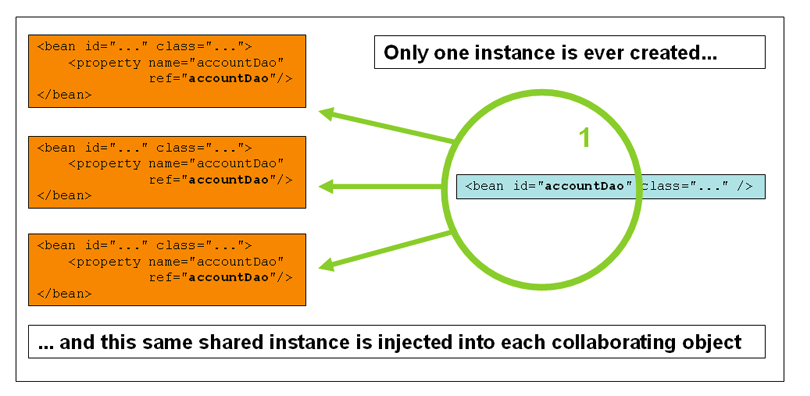
<bean id="accountService" class="com.foo.DefaultAccountService"/>

<!-- the following is equivalent, though redundant (singleton scope is the default) -->
<bean id="accountService" class="com.foo.DefaultAccountService" scope="singleton"/>
prototype
和单例对立,通常,对所有有状态bean使用原型范围,对无状态bean使用单例范围。
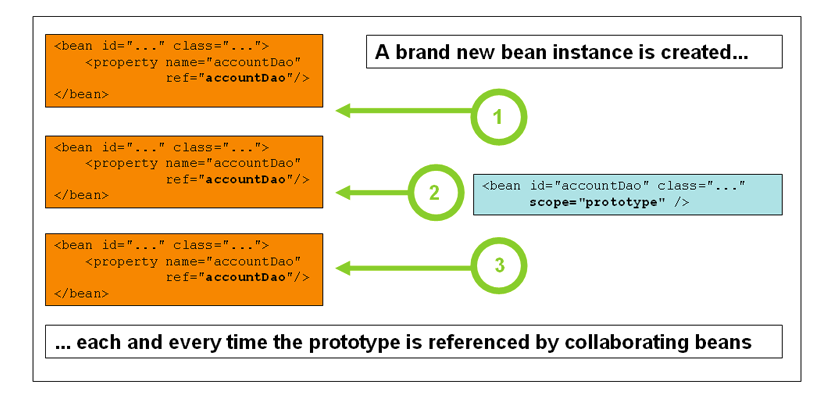
<bean id="accountService" class="com.foo.DefaultAccountService" scope="prototype"/>
Request, session, global session, application, and WebSocket
在web程序中使用,对应于HTTP请求作用域
自定义bean的性质
生命周期回调
初始化回调
实现org.springframework.beans.factory.InitializingBean接口,可以为bean设置初始化方法,该接口定义了一个方法:
void afterPropertiesSet() throws Exception;
官方不建议使用该接口,因为会增加与Spring的耦合度。可以使用@PostConstruct或指定bean的初始化方法。
- 使用xml配置文件
<bean id="exampleInitBean" class="examples.ExampleBean" init-method="init"/>
- 使用Java @Bean注解
@Bean(initMethod = "init")
销毁回调
实现org.springframework.beans.factory.DisposableBean可以为bean设置销毁回调方法,该接口定义了一个方法:
void destroy() throws Exception;
同样的,不建议实现该接口,可以使用@PreDestroy或指定bean的初始化方法。
- 使用xml配置文件
<bean id="exampleInitBean" class="examples.ExampleBean" destroy-method="cleanup"/>
- 使用Java @Bean注解
@Bean(destroyMethod = "cleanup")
从Spring 2.5开始,您有三个控制bean生命周期行为的选项:
InitializingBean和DisposableBean回调接口- init()和destroy()方法
@PostConstruct和@PreDestroy注解
如果为一个bean同时配置了上述方法,则执行方法顺序为:
@PostConstruct定义的方法InitializingBean回调接口定义的afterPropertiesSet()- 自定义配置的
init()方法
销毁:
@PreDestroy定义的方法DisposableBean回调接口 定义的destroy()- 自定义配置的
destroy()方法
ApplicationContextAware和BeanNameAware
ApplicationContextAware:实现该接口,将注入ApplicationContext实例的引用BeanNameAware:实现该接口,将注入BeanName
除了ApplicationContextAware和BeanNameAware,Spring还提供了一系列Aware接口,这些接口将为实现类注入对应的实例。
- ApplicationContextAware:声明 ApplicationContext
- ApplicationEventPublisherAware:ApplicationContext的事件发布者
- BeanClassLoaderAware:用于加载bean类的类加载器。
- BeanFactoryAware:声明 BeanFactory
- BeanNameAware:声明bean的名称
- BootstrapContextAware
- LoadTimeWeaverAware
- MessageSourceAware
- NotificationPublisherAware:Spring JMX通知发布者
- PortletConfigAware:当前PortletConfig容器
- PortletContextAware:当前PortletContext容器
- ResourceLoaderAware:配置的加载程序,用于对资源进行低级访问
- ServletConfigAware:当前ServletConfig容器
- ServletContextAware:当前ServletContext容器
Bean的继承
在xml配置文件里,我们可以定义bean的继承体系,使用parent属性定义父类。
<bean id="inheritedTestBean" abstract="true"
        class="org.springframework.beans.TestBean">
    <property name="name" value="parent"/>
    <property name="age" value="1"/>
</bean>

<bean id="inheritsWithDifferentClass"
        class="org.springframework.beans.DerivedTestBean"
        parent="inheritedTestBean" init-method="initialize">
    <property name="name" value="override"/>
    <!-- the age property value of 1 will be inherited from parent -->
</bean>
在源码里,子类是通过ChildBeanDefinition来定义的。
容器扩展点
一般来说,我们不需要去继承ApplicationContext实现类,不过Spring预留了一些接口,让我们可以扩展Spring IoC容器。
BeanPostProcessor
public interface BeanPostProcessor {
//在每个bean初始化之前调用
Object postProcessBeforeInitialization(Object bean, String beanName) throws BeansException;
//在每个bean初始化完毕后调用
Object postProcessAfterInitialization(Object bean, String beanName) throws BeansException;
}
可以定义多个`BeanPostProcessor`,然后实现`Ordered`接口并修改属性order来控制`BeanPostProcessor`的执行顺序。
注意:`ConfigurableBeanFactory`提供
```java
void addBeanPostProcessor(BeanPostProcessor beanPostProcessor);
来手动注册BeanPostProcessor,这些BeanPostProcessor不需要遵循Orderd排序规则,总是在自动注入的BeanPostProcessor之前执行。
一个BeanPostProcessor的实现例子RequiredAnnotationBeanPostProcessor
使用BeanFactoryPostProcessor自定义配置元数据
public interface BeanFactoryPostProcessor {
	void postProcessBeanFactory(ConfigurableListableBeanFactory beanFactory) throws BeansException;
}
类似于BeanPostProcessor,不同的是,BeanFactoryPostProcessor操作配置元数据。也就是说,Spring容器允许BeanFactoryPostProcessor读取配置并更改。
这些BeanPostProcessor将在每个bean初始化时自动执行,以便将更改应用于定义容器的配置元数据。Spring包含许多预定义的BeanPostProcessor,例如PropertyOverrideConfigurer和PropertyPlaceholderConfigurer。
使用FactoryBean自定义实例化逻辑
public interface FactoryBean<T> {
    // 自定义bean的初始化逻辑
	T getObject() throws Exception;
	Class<?> getObjectType();
	boolean isSingleton();
}
配置实现FactoryBean<T>的bean是,返回的是getObject()生成的bean,如果要返回 FactoryBean实例本身,应该使用getBean("&myBean")
基于注解的容器配置
- @Required
- @Autowired
- @Resource
- @Qualifier
- @PostConstruct and @PreDestroy
类路径扫描和托管组件
- @Component,@Controller,@Repository,@Service
- @Scope,@SessionScope
- @ComponentScan
JSR 330标准注解和Spring注解对照
| Spring | javax.inject.* |
|---|---|
| @Autowired | @Inject |
| @Component | @Named / @ManagedBean |
| @Scope("singleton") | @Singleton |
| @Qualifier | @Qualifier / @Named |
| @Value | - |
| @Required | - |
| @Lazy | - |
| ObjectFactory | Provider |
Environment 抽象
主要包含两个方面:profiles(多环境) and properties(配置).
多环境配置
- 代码方式
AnnotationConfigApplicationContext ctx = new AnnotationConfigApplicationContext();
ctx.getEnvironment().setActiveProfiles("development");
ctx.register(SomeConfig.class, StandaloneDataConfig.class, JndiDataConfig.class);
ctx.refresh();
- 配置方式
spring.profiles.active
配置抽象
代码演示下:
ApplicationContext ctx = new GenericApplicationContext();
Environment env = ctx.getEnvironment();
// 是否包含foo的配置
boolean containsFoo = env.containsProperty("foo");
System.out.println("Does my environment contain the 'foo' property? " + containsFoo);
// 向环境中添加配置
MutablePropertySources sources = ctx.getEnvironment().getPropertySources();
sources.addFirst(new MyPropertySource());
使用@PropertySource添加配置
@Configuration
@PropertySource("classpath:/com/myco/app.properties")
public class AppConfig {

    @Autowired
    Environment env;

    @Bean
    public TestBean testBean() {
        TestBean testBean = new TestBean();
        testBean.setName(env.getProperty("testbean.name"));
        return testBean;
    }
}
BeanFactory还是ApplicationContext?
尽量使用ApplicationContext,因为ApplicationContext包含BeanFactory的所有功能:
| 功能 | BeanFactory | ApplicationContext |
|---|---|---|
| bean初始化/编辑 | 支持 | 支持 |
自动注册BeanPostProcessor |
不支持 | 支持 |
自动注册BeanFactoryPostProcessor |
不支持 | 支持 |
| 方便的MessageSource访问(适用于i18n) | 不支持 | 支持 |
发布ApplicationEvent |
不支持 | 支持 |
要使用BeanFactory实现显式注册bean后置处理器,您需要编写如下代码:
DefaultListableBeanFactory factory = new DefaultListableBeanFactory();
// populate the factory with bean definitions

// now register any needed BeanPostProcessor instances
MyBeanPostProcessor postProcessor = new MyBeanPostProcessor();
factory.addBeanPostProcessor(postProcessor);

// now start using the factory
要使用BeanFactory实现时显式注册BeanFactoryPostProcessor,您必须编写如下代码:
DefaultListableBeanFactory factory = new DefaultListableBeanFactory();
XmlBeanDefinitionReader reader = new XmlBeanDefinitionReader(factory);
reader.loadBeanDefinitions(new FileSystemResource("beans.xml"));

// bring in some property values from a Properties file
PropertyPlaceholderConfigurer cfg = new PropertyPlaceholderConfigurer();
cfg.setLocation(new FileSystemResource("jdbc.properties"));

// now actually do the replacement
cfg.postProcessBeanFactory(factory);