简要:本系列文章讲会对expo进行全面的介绍,本人从2017年6月份接触expo以来,对expo的研究断断续续,一路走来将近10个月,废话不多说,接下来你看到内容,讲全部来与官网
我猜去全部机翻+个人修改补充+demo测试的形式,对expo进行一次大补血!欢迎加入expo兴趣学习交流群:597732981
【之前我写过一些列关于expo和rn入门配置的东i西,大家可以点击这里查看:从零学习rn开发】
相关文章:
Expo大作战(一)--什么是expo,如何安装expo clinet和xde,xde如何使用
Expo大作战(二)--expo的生命周期,expo社区交流方式,expo学习必备资源,开发使用expo时关注的一些问题
Expo大作战(三)--针对已经开发过react native项目开发人员有针对性的介绍了expo,expo的局限性,开发时项目选型注意点等
Expo大作战(四)--快速用expo构建一个app,expo中的关键术语
Expo大作战(五)--expo中app.json 文件的配置信息
Expo大作战(六)--expo开发模式,expo中exp命令行工具,expo中如何查看日志log,expo中的调试方式
Expo大作战(七)--expo如何使用Genymotion模拟器
Expo大作战(八)--expo中的publish以及expo中的link,对link这块东西没有详细看,大家可以来和我交流
写在二十三章以后的话,之前的翻译,不管shen'ru好与不好,终究是告一段落,也把expo基础理论的东西又深入的理解了一遍,后续expo大作战系列将主要介绍expo sdk的api。
SDK API参考
Expo SDK提供对系统功能的访问,如联系人,相机和社交登录。 它由npm package expo提供。 通过在项目的根目录中运行npm install --save expo来安装它。 然后你可以在你的JavaScript代码中从它导入模块,如下所示:
import { Contacts } from 'expo';您还可以导入所有Expo SDK模块:
import Expo from 'expo';例如,这允许您编写Expo.Contacts.getContactsAsync()。
SDK版本
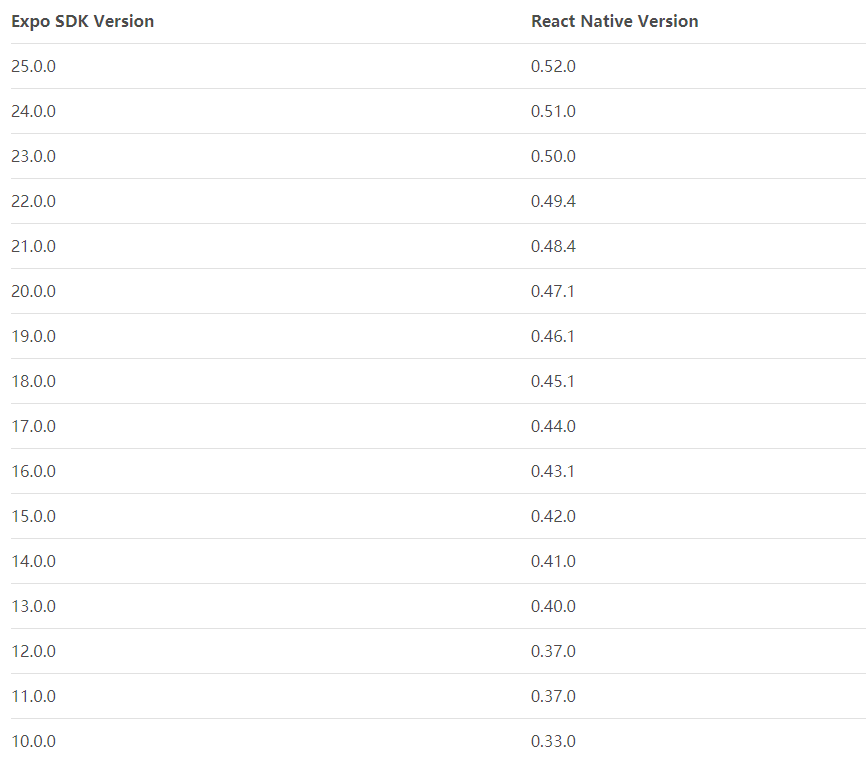
每个月都会有一个新的Expo SDK版本,通常更新为最新版本的React Native,并包含各种对expo API的错误修正,功能和改进。 了解您的Expo项目正在运行的React Native版本通常很有用,因此下表将expoSDK版本映射到其包含的React Native版本。
加速度计(Accelerometer)
访问设备加速计传感器以响应三维空间中加速度的变化。
Expo.Accelerometer.addListener(listener)订阅加速计的更新。
参数
- 侦听器(函数)(listener (function)) - 加速度计更新可用时调用的回调函数。 当被调用时,监听器被提供一个包含键x,y,z的对象的单个参数。
返回
- 一个EventSubscription对象,当您想要取消订阅侦听器时,您可以调用remove()。
Expo.Accelerometer.removeAllListeners()删除所有听众(监听器)。
Expo.Accelerometer.setUpdateInterval(intervalMs)订阅加速计的更新。
参数
- intervalMs(数字)加速度计更新之间的期望间隔(以毫秒为单位)。
例如:基本订阅(可以运行这段代码看看效果)
import React from 'react';
import { StyleSheet, Text, TouchableOpacity, View } from 'react-native';
import { Accelerometer } from 'expo';

export default class AccelerometerSensor extends React.Component {
  state = {
    accelerometerData: {},
  }

  componentDidMount() {
    this._toggle();
  }

  componentWillUnmount() {
    this._unsubscribe();
  }

  _toggle = () => {
    if (this._subscription) {
      this._unsubscribe();
    } else {
      this._subscribe();
    }
  }

  _slow = () => {
    Accelerometer.setUpdateInterval(1000);
  }

  _fast = () => {
    Accelerometer.setUpdateInterval(16);
  }

  _subscribe = () => {
    this._subscription = Accelerometer.addListener(accelerometerData => {
      this.setState({ accelerometerData });
    });
  }

  _unsubscribe = () => {
    this._subscription && this._subscription.remove();
    this._subscription = null;
  }

  render() {
    let { x, y, z } = this.state.accelerometerData;

    return (
      <View style={styles.sensor}>
        <Text>Accelerometer:</Text>
        <Text>x: {round(x)} y: {round(y)} z: {round(z)}</Text>

        <View style={styles.buttonContainer}>
          <TouchableOpacity onPress={this._toggle} style={styles.button}>
            <Text>Toggle</Text>
          </TouchableOpacity>
          <TouchableOpacity onPress={this._slow} style={[styles.button, styles.middleButton]}>
            <Text>Slow</Text>
          </TouchableOpacity>
          <TouchableOpacity onPress={this._fast} style={styles.button}>
            <Text>Fast</Text>
          </TouchableOpacity>
        </View>
      </View>
    );
  }
}

function round(n) {
  if (!n) {
    return 0;
  }

  return Math.floor(n * 100) / 100;
}

const styles = StyleSheet.create({
  container: {
    flex: 1
  },
  buttonContainer: {
    flexDirection: 'row',
    alignItems: 'stretch',
    marginTop: 15,
  },
  button: {
    flex: 1,
    justifyContent: 'center',
    alignItems: 'center',
    backgroundColor: '#eee',
    padding: 10,
  },
  middleButton: {
    borderLeftWidth: 1,
    borderRightWidth: 1,
    borderColor: '#ccc',
  },
  sensor: {
    marginTop: 15,
    paddingHorizontal: 10,
  },
});
下一张继续介绍,这一篇主要介绍了:expo sdk api之Accelerometer,欢迎大家关注我的微信公众号,这篇文章是否被大家认可,我的衡量标准就是公众号粉丝增长人数。欢迎大家转载,但必须保留本人博客链接!