1、前端页面代码:
主要以jQuery的ajax异步请求实现。
1 ... 2 <script type="text/javascript" src="${pageContext.request.contextPath }/js/jquery-1.11.3.min.js"></script> 3 <script type="text/javascript"> 4 $(function () { 5 //验证码图片刷新 6 $("#vcode").click(function () { 7 $(this).prop("src","${pageContext.request.contextPath }/user_createVerificationCode?"+new Date()); 8 9 }); 10 //验证码校验 11 $("#txtcode").blur(function () { 12 var url = "${pageContext.request.contextPath }/user_checkVerificationCode" 13 var code = $(this).val(); 14 $.get(url,{"code":code},function (result) { 15 if(result != ""){ 16 $("#tip").html(result); 17 //验证码错误,登录按钮失效 18 $("#btn").prop("disabled","disabled"); 19 }else{ 20 $("#tip").html(""); 21 $("#btn").removeAttr("disabled"); 22 } 23 }); 24 }); 25 }) 26 </script> 27 ... 28 <tr> 29 <td style="HEIGHT: 28px">验证码:</td> 30 <td style="HEIGHT: 28px"><input id=txtcode style="WIDTH: 130px" name=txtcode required></td> 31 <td style="HEIGHT: 18px"><img id="vcode" src="${pageContext.request.contextPath }/user_createVerificationCode" /></td> 32 <td style="HEIGHT: 28px"> <span id="tip" style="color: red"></span></td> 33 <tr> 34 <td></td> 35 <td> 36 <input id="btn" value="登录"> 37 </td> 38 </tr> 39 ...
2、struts.xml
<package name="user" extends="struts-default" namespace="/">
    <action name="user_*" class="userAction" method="{1}"></action>
</package>
3、applicationContext.xml
<bean id="userAction" class="com.pri.web.action.UserAction" scope="prototype">
        <property name="validateCode" ref="validateCode"/>
</bean>
<!-- 生成验证图片需要为多例,默认情况为单例 -->
<bean id="validateCode" class="cn.dsna.util.images.ValidateCode" scope="prototype">
     <constructor-arg index="0">
         <value>80</value>
     </constructor-arg>
     <constructor-arg index="1">
         <value>20</value>
     </constructor-arg>
     <constructor-arg index="2">
         <value>4</value>
     </constructor-arg>
     <constructor-arg index="3">
         <value>10</value>
     </constructor-arg>
</bean>
4、Action.java
public class UserAction extends ActionSupport implements ModelDriven<User>{private String code;
    public String getCode() { return code;}
    public void setCode(String code) {this.code = code;}
    private ValidateCode validateCode;
    public void setValidateCode(ValidateCode validateCode) {
        this.validateCode = validateCode;
    }
   public String createVerificationCode(){
        String vcode = validateCode.getCode ();
        HttpSession session = ServletActionContext.getRequest().getSession();
        session.setAttribute("vcode",vcode);
        try {
            validateCode.write (ServletActionContext.getResponse().getOutputStream ());//将服务器生成的验证码,以流的形式写给客户端(变成图片)
        } catch (IOException e) {
            e.printStackTrace();
        }
        return NONE;
    }
    public String checkVerificationCode() throws IOException {
        HttpSession session = ServletActionContext.getRequest().getSession();
        String vcode = (String) session.getAttribute("vcode");
        if (!code.equalsIgnoreCase(vcode)){
            HttpServletResponse response = ServletActionContext.getResponse();
            response.setContentType("text/html;charset=utf-8");
            response.getWriter().println("验证码输入有误!");
        }else{
       HttpServletResponse response = ServletActionContext.getResponse();
      response.setContentType("text/html;charset=utf-8");
      response.getWriter().print("");
     }
    return NONE;
  }
}
5、ValidateCode.java
package cn.dsna.util.images;

import java.awt.Color;
import java.awt.Font;
import java.awt.Graphics2D;
import java.awt.image.BufferedImage;
import java.io.FileOutputStream;
import java.io.IOException;
import java.io.OutputStream;
import java.util.Random;
import javax.imageio.ImageIO;

public class ValidateCode {
    private int width = 160;
    private int height = 40;
    private int codeCount = 5;
    private int lineCount = 150;
    private String code = null;
    private BufferedImage buffImg = null;
    private char[] codeSequence = new char[]{'A', 'B', 'C', 'D', 'E', 'F', 'G', 'H', 'I', 'J', 'K', 'L', 'M', 'N', 'P', 'Q', 'R', 'S', 'T', 'U', 'V', 'W', 'X', 'Y', 'Z', '1', '2', '3', '4', '5', '6', '7', '8', '9'};

    public ValidateCode() {
        this.createCode();
    }

    public ValidateCode(int width, int height) {
        this.width = width;
        this.height = height;
        this.createCode();
    }

    public ValidateCode(int width, int height, int codeCount, int lineCount) {
        this.width = width;
        this.height = height;
        this.codeCount = codeCount;
        this.lineCount = lineCount;
        this.createCode();
    }

    public void createCode() {
        int x = false;
        int fontHeight = false;
        int codeY = false;
        int red = false;
        int green = false;
        int blue = false;
        int x = this.width / (this.codeCount + 2);
        int fontHeight = this.height - 2;
        int codeY = this.height - 4;
        this.buffImg = new BufferedImage(this.width, this.height, 1);
        Graphics2D g = this.buffImg.createGraphics();
        Random random = new Random();
        g.setColor(Color.WHITE);
        g.fillRect(0, 0, this.width, this.height);
        ImgFontByte imgFont = new ImgFontByte();
        Font font = imgFont.getFont(fontHeight);
        g.setFont(font);

        int i;
        int red;
        int green;
        int blue;
        for(int i = 0; i < this.lineCount; ++i) {
            i = random.nextInt(this.width);
            int ys = random.nextInt(this.height);
            int xe = i + random.nextInt(this.width / 8);
            int ye = ys + random.nextInt(this.height / 8);
            red = random.nextInt(255);
            green = random.nextInt(255);
            blue = random.nextInt(255);
            g.setColor(new Color(red, green, blue));
            g.drawLine(i, ys, xe, ye);
        }

        StringBuffer randomCode = new StringBuffer();

        for(i = 0; i < this.codeCount; ++i) {
            String strRand = String.valueOf(this.codeSequence[random.nextInt(this.codeSequence.length)]);
            red = random.nextInt(255);
            green = random.nextInt(255);
            blue = random.nextInt(255);
            g.setColor(new Color(red, green, blue));
            g.drawString(strRand, (i + 1) * x, codeY);
            randomCode.append(strRand);
        }
        this.code = randomCode.toString();
    }

    public void write(String path) throws IOException {
        OutputStream sos = new FileOutputStream(path);
        this.write((OutputStream)sos);
    }

    public void write(OutputStream sos) throws IOException {
        ImageIO.write(this.buffImg, "png", sos);
        sos.close();
    }

    public BufferedImage getBuffImg() {
        return this.buffImg;
    }

    public String getCode() {
        return this.code;
    }
}
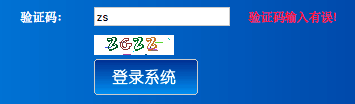
效果显示: