1. 前提:
安装前服务器情况,已经安装好了:
-
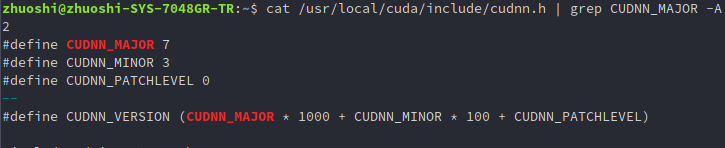
CUDNN=7.3.0
-
CUDA=10.0.130

-
Opencv 2.4.13

相应命令为:
cuda 版本
cat /usr/local/cuda/version.txt
cudnn 版本
cat /usr/local/cuda/include/cudnn.h | grep CUDNN_MAJOR -A 2
opencv版本
pkg-config opencv --modversion
2. 准备caffe, python环境
- 从
https://github.com/BVLC/caffe下载caffe, 用unzip命令解压. - python我使用的是Anaconda虚拟环境, 最后附上environment_caffe_27.yml文件, 如果需要可以直接使用下面的命令安装,或者手动安装.
```
conda env create -f environment_caffe_27.yml
```
environment_caffe_27.yml文件内容如下,复制重命名即可:
name: caffe_27
channels:
  - defaults
dependencies:
  - backports=1.0=py27_1
  - backports.functools_lru_cache=1.5=py27_1
  - backports.shutil_get_terminal_size=1.0.0=py27_2
  - backports_abc=0.5=py27_0
  - blas=1.0=mkl
  - ca-certificates=2019.1.23=0
  - certifi=2019.3.9=py27_0
  - cloudpickle=0.8.0=py27_0
  - cycler=0.10.0=py27_0
  - cytoolz=0.9.0.1=py27h14c3975_1
  - dask-core=1.1.5=py_0
  - dbus=1.13.6=h746ee38_0
  - decorator=4.4.0=py27_1
  - enum34=1.1.6=py27_1
  - expat=2.2.6=he6710b0_0
  - fontconfig=2.13.0=h9420a91_0
  - freetype=2.9.1=h8a8886c_1
  - functools32=3.2.3.2=py27_1
  - futures=3.2.0=py27_0
  - glib=2.56.2=hd408876_0
  - gst-plugins-base=1.14.0=hbbd80ab_1
  - gstreamer=1.14.0=hb453b48_1
  - h5py=2.9.0=py27h7918eee_0
  - hdf5=1.10.4=hb1b8bf9_0
  - icu=58.2=h9c2bf20_1
  - imageio=2.5.0=py27_0
  - intel-openmp=2019.3=199
  - ipython=5.8.0=py27_0
  - ipython_genutils=0.2.0=py27_0
  - jpeg=9b=h024ee3a_2
  - kiwisolver=1.0.1=py27hf484d3e_0
  - leveldb=1.20=hf484d3e_1
  - libedit=3.1.20181209=hc058e9b_0
  - libffi=3.2.1=hd88cf55_4
  - libgcc-ng=8.2.0=hdf63c60_1
  - libgfortran-ng=7.3.0=hdf63c60_0
  - libpng=1.6.36=hbc83047_0
  - libprotobuf=3.2.0=0
  - libstdcxx-ng=8.2.0=hdf63c60_1
  - libtiff=4.0.10=h2733197_2
  - libuuid=1.0.3=h1bed415_2
  - libxcb=1.13=h1bed415_1
  - libxml2=2.9.9=he19cac6_0
  - linecache2=1.0.0=py27_0
  - matplotlib=2.2.3=py27hb69df0a_0
  - mkl=2019.3=199
  - mkl_fft=1.0.10=py27ha843d7b_0
  - mkl_random=1.0.2=py27hd81dba3_0
  - ncurses=6.1=he6710b0_1
  - networkx=2.2=py27_1
  - nose=1.3.7=py27_2
  - numpy=1.16.2=py27h7e9f1db_0
  - numpy-base=1.16.2=py27hde5b4d6_0
  - olefile=0.46=py27_0
  - openssl=1.1.1b=h7b6447c_1
  - pandas=0.24.2=py27he6710b0_0
  - pathlib2=2.3.3=py27_0
  - pcre=8.43=he6710b0_0
  - pexpect=4.6.0=py27_0
  - pickleshare=0.7.5=py27_0
  - pillow=5.4.1=py27h34e0f95_0
  - pip=19.0.3=py27_0
  - prompt_toolkit=1.0.15=py27_0
  - protobuf=3.2.0=py27_0
  - ptyprocess=0.6.0=py27_0
  - pygments=2.3.1=py27_0
  - pyparsing=2.3.1=py27_0
  - pyqt=5.9.2=py27h05f1152_2
  - python=2.7.16=h9bab390_0
  - python-dateutil=2.8.0=py27_0
  - python-gflags=3.1.2=py27_0
  - pytz=2018.9=py27_0
  - pywavelets=1.0.2=py27hdd07704_0
  - pyyaml=5.1=py27h7b6447c_0
  - qt=5.9.7=h5867ecd_1
  - readline=7.0=h7b6447c_5
  - scandir=1.10.0=py27h7b6447c_0
  - scikit-image=0.14.2=py27he6710b0_0
  - scipy=1.2.1=py27h7c811a0_0
  - setuptools=40.8.0=py27_0
  - simplegeneric=0.8.1=py27_2
  - singledispatch=3.4.0.3=py27_0
  - sip=4.19.8=py27hf484d3e_0
  - six=1.12.0=py27_0
  - snappy=1.1.7=hbae5bb6_3
  - sqlite=3.27.2=h7b6447c_0
  - subprocess32=3.5.3=py27h7b6447c_0
  - tk=8.6.8=hbc83047_0
  - toolz=0.9.0=py27_0
  - tornado=5.1.1=py27h7b6447c_0
  - traceback2=1.4.0=py27_0
  - traitlets=4.3.2=py27_0
  - unittest2=1.1.0=py27_0
  - wcwidth=0.1.7=py27_0
  - wheel=0.33.1=py27_0
  - xz=5.2.4=h14c3975_4
  - yaml=0.1.7=had09818_2
  - zlib=1.2.11=h7b6447c_3
  - zstd=1.3.7=h0b5b093_0
  - pip:
    - cython==0.29.6
    - dask==1.1.5
prefix: /opt/anaconda/envs/caffe_27
关于环境需要说明一下:
- 在下载的caffe-master中, 有requirements.txt, 也可以先新建虚拟环境, 然后激活后使用
pip install -r python/requirements.txt安装包. - protobuf版本在requirements.txt中值写了最小值,实测最新版的protobuf不知此, 建议安装3.2版本, 即使用
conda install protobuf=3.2 - requirements.txt中,要求
python-dateutil>=1.4,<2, 但是这个版本太老了找不到, 我安装的了2.8版本,实测编译通过,调用正常.
3. 复制修改Makefileconfig文件
cp Makefile.config.example Makefile.config
`vim Makefileconfig.config', 附上我的文件内容, 可根据实际情况修改:
## Refer to http://caffe.berkeleyvision.org/installation.html
# Contributions simplifying and improving our build system are welcome!

# cuDNN acceleration switch (uncomment to build with cuDNN). #使用cudnn
USE_CUDNN := 1

# CPU-only switch (uncomment to build without GPU support).
# CPU_ONLY := 1

# uncomment to disable IO dependencies and corresponding data layers
# USE_OPENCV := 0
# USE_LEVELDB := 0
# USE_LMDB := 0
# This code is taken from https://github.com/sh1r0/caffe-android-lib
# USE_HDF5 := 0

# uncomment to allow MDB_NOLOCK when reading LMDB files (only if necessary)
#	You should not set this flag if you will be reading LMDBs with any
#	possibility of simultaneous read and write
# ALLOW_LMDB_NOLOCK := 1

# Uncomment if you're using OpenCV 3, 我的版本是2
OPENCV_VERSION := 2

# To customize your choice of compiler, uncomment and set the following.
# N.B. the default for Linux is g++ and the default for OSX is clang++
# CUSTOM_CXX := g++

# CUDA directory contains bin/ and lib/ directories that we need.
CUDA_DIR := /usr/local/cuda-10.0
# On Ubuntu 14.04, if cuda tools are installed via
# "sudo apt-get install nvidia-cuda-toolkit" then use this instead:
# CUDA_DIR := /usr

# CUDA architecture setting: going with all of them.
# For CUDA < 6.0, comment the *_50 through *_61 lines for compatibility.
# For CUDA < 8.0, comment the *_60 and *_61 lines for compatibility.
# For CUDA >= 9.0, comment the *_20 and *_21 lines for compatibility.    # 此处我使用的是cuda10
CUDA_ARCH :=    -gencode arch=compute_30,code=sm_30
                -gencode arch=compute_35,code=sm_35
                -gencode arch=compute_37,code=sm_37
                -gencode arch=compute_50,code=sm_50
                -gencode arch=compute_50,code=compute_50
                -gencode arch=compute_61,code=compute_61
                -gencode arch=compute_70,code=compute_70
                -gencode arch=compute_75,code=compute_75


# BLAS choice:
# atlas for ATLAS (default)
# mkl for MKL
# open for OpenBlas
BLAS := open
# Custom (MKL/ATLAS/OpenBLAS) include and lib directories.
# Leave commented to accept the defaults for your choice of BLAS
# (which should work)!
BLAS_INCLUDE := /opt/OpenBLAS/include
BLAS_LIB := /opt/OpenBLAS/lib

# Homebrew puts openblas in a directory that is not on the standard search path
# BLAS_INCLUDE := $(shell brew --prefix openblas)/include
# BLAS_LIB := $(shell brew --prefix openblas)/lib

# This is required only if you will compile the matlab interface.
# MATLAB directory should contain the mex binary in /bin.
# MATLAB_DIR := /usr/local
# MATLAB_DIR := /Applications/MATLAB_R2012b.app

# NOTE: this is required only if you will compile the python interface.
# We need to be able to find Python.h and numpy/arrayobject.h.
# PYTHON_INCLUDE := /usr/include/python2.7
		/usr/lib/python2.7/dist-packages/numpy/core/include
# Anaconda Python distribution is quite popular. Include path:
# Verify anaconda location, sometimes it's in root. # 重要, 这里指定虚拟环境路径
ANACONDA_HOME := /opt/anaconda/envs/caffe/caffe_27
PYTHON_INCLUDE := $(ANACONDA_HOME)/include
		$(ANACONDA_HOME)/include/python2.7
		$(ANACONDA_HOME)/lib/python2.7/site-packages/numpy/core/include

# Uncomment to use Python 3 (default is Python 2)
# PYTHON_LIBRARIES := boost_python3 python3.5m
# PYTHON_INCLUDE := /usr/include/python3.5m
#                 /usr/lib/python3.5/dist-packages/numpy/core/include

# We need to be able to find libpythonX.X.so or .dylib.
# PYTHON_LIB := /usr/lib
PYTHON_LIB := $(ANACONDA_HOME)/lib

# Homebrew installs numpy in a non standard path (keg only)
# PYTHON_INCLUDE += $(dir $(shell python -c 'import numpy.core; print(numpy.core.__file__)'))/include
# PYTHON_LIB += $(shell brew --prefix numpy)/lib

# Uncomment to support layers written in Python (will link against Python libs)
# WITH_PYTHON_LAYER := 1

# Whatever else you find you need goes here.
INCLUDE_DIRS := $(PYTHON_INCLUDE) /usr/local/include /usr/include/hdf5/serial/
LIBRARY_DIRS := $(PYTHON_LIB) /usr/local/lib /usr/lib /usr/lib/x86_64-linux-gnu/hdf5/serial

# If Homebrew is installed at a non standard location (for example your home directory) and you use it for general dependencies
# INCLUDE_DIRS += $(shell brew --prefix)/include
# LIBRARY_DIRS += $(shell brew --prefix)/lib

# NCCL acceleration switch (uncomment to build with NCCL)
# https://github.com/NVIDIA/nccl (last tested version: v1.2.3-1+cuda8.0)
# USE_NCCL := 1

# Uncomment to use `pkg-config` to specify OpenCV library paths.
# (Usually not necessary -- OpenCV libraries are normally installed in one of the above $LIBRARY_DIRS.)
# USE_PKG_CONFIG := 1

# N.B. both build and distribute dirs are cleared on `make clean`
BUILD_DIR := build
DISTRIBUTE_DIR := distribute

# Uncomment for debugging. Does not work on OSX due to https://github.com/BVLC/caffe/issues/171
# DEBUG := 1

# The ID of the GPU that 'make runtest' will use to run unit tests.
TEST_GPUID := 0

# enable pretty build (comment to see full commands)
Q ?= @
4. 虚拟环境添加到环境变量,不然报错(亲自踩坑,但是不解)
参考链接找不到了, 但是店家内容如下:
export PATH="/opt/anaconda/envs/bin:$PATH"
5. 开始编译
make all –j8
make test –j8
make runtest –j8
make pycaffe  -j8
详细参考博文: Ubuntu16.04 14.04安装配置Caffe(GPU版), 解释很详细,如果用我的python环境,不需要按照博文再安装其他的包,直接编译即可.
6. 测试
source activate caffe_27, 其中caffe_27是我的虚拟环境名称, 然后输入python:
再输入import caffe 导入成功~,,,(折腾了一天,心累)
