
目录Outline
1. prerequisites
2. steps to follow
3. configuring the cluster
4. a little test to see
1. Prerequisites
Suppose:
(1) you have deploy a functioning network to install mongodb cluster.
(2) you have gained the latest releases of MongoDB from 10gen.
(3) you have installed mongodb in the path $MongoHome.
(4) there are three folders, that are bin,dbs,logs, in $MongoHome folder.
(5) there are four servers here to make four shards in the cluster.
(6) their IP4 addresses are:
+pc3:192.168.0.104
+pc2:192.168.0.103
+pc1:192.168.0.102
host:192.168.0.100
2. Steps to follow
#1 biuld up mongod instance on every node.
using the following CMD in Terminal on every shard marchine:
-bash bash-install-shard...files.


bash-install-shard#!/bin/bash

mongo=/root/mongodb
data=$mongo/data
logs=$mongo/logs


if ! [ -d $data ]
then
        mkdir -p $data
fi

if ! [ -d $logs ]
then
        mkdir -p $logs
fi

read -p "input a shard name :" shard
echo $shard
read -p "input a port :" port
echo $port

mongod  --shardsvr --replSet $shard --port $port --dbpath $data --oplogSize 100 --logpath $logs/shrd.log --logappend --profile=1 --slowms=5 --rest --smallfiles
#2 set up mongod instance of config server
using the following CMD in Terminal on every config server marchine:
-bash bash-install-config


bash-install-config#!/bin/bash

mongo=/root/mongodb
cfg=$mongo/config
data=$mongo/data
logs=$mongo/logs

if ! [ -d $logs ]
then
        mkdir -p $logs
fi

if ! [ -d $cfg ]
then
        mkdir -p $cfg
fi

echo config server path: $cfg ,port:27018
mongod --configsvr --dbpath $cfg --port 27018 --logpath $logs/config.log --logappend
#3 initiate every replica set
ssh every shard server, run mongo to login its local mongod instance,
then write a config file for the relica set, and run rs.initate(config).
see "shard initialize"file for more information.


shard-initializeshard1:
config = {_id: 'shard1', members: [ {_id: 0, host: '192.168.0.100:27020'}, {_id: 1, host: '192.168.0.102:27020'}]}

shard2:
config = {_id: 'shard2', members: [ {_id: 0, host: '192.168.0.102:27021'}, {_id: 1, host: '192.168.0.103:27021'}]}

shard3:
config= {_id: 'shard3', members: [ {_id: 0, host: '192.168.0.103:27022'}, {_id: 1, host: '192.168.0.104:27022'}]}

shard4:
config = {_id: 'shard4', members: [ {_id: 0, host: '192.168.0.104:27023'}, {_id: 1, host: '192.168.0.100:27023'}]}

rs.initiate(config)
#4 start mongos server
using the following CMD in Terminal on every mongos server marchine:
-bash bash-install-mongos


bash-install-mongos#!/bin/bash

configsvr1=192.168.0.115:27018
configsvr2=192.168.0.112:27018
configsvr3=192.168.0.110:27018

mongo=/root/mongodb
data=$mongo/data
logs=$mongo/logs

if ! [ -d $logs ]
then
        #mkdir -p $data
        mkdir -p $logs
fi

mongos --configdb $configsvr1,$configsvr2,$configsvr3 --port 27017 --chunkSize 5 --logpath $logs/mongos.log --logappend
#5 add shards to the cluster
login one of the mongos, use sh.addShard("shard1/192.168.0.100:27020") CMD to add every shard.
see "Add shards to the cluster" file for more information.


Add-shards-to-the-cluster#Add shards to the cluster

mongos> sh.addShard("shard1/192.168.0.100:27020")
{ "shardAdded" : "shard1", "ok" : 1 }

mongos> sh.addShard("shard2/192.168.0.102:27021")
{ "shardAdded" : "shard2", "ok" : 1 }

mongos> sh.addShard("shard3/192.168.0.103:27022")
{ "shardAdded" : "shard3", "ok" : 1 }

mongos> sh.addShard("shard4/192.168.0.104:27023")
{ "shardAdded" : "shard4", "ok" : 1 }
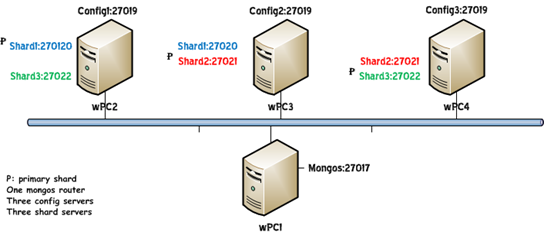
Up to now a distributed MongoDB cluster with replica set has established, and its architecture may go like this:

3. Configuring your cluster to make it sharded
