本文内容与路径([js高手之路] html5 canvas系列教程 - 开始路径beginPath与关闭路径closePath详解)是canvas中比较重要的概念。掌握理解他们是做出复杂canvas动画必要的基础之一.
再谈clip函数,这个函数在这篇文章[js高手之路] html5 canvas系列教程 - 图片操作(drawImage,clip,createPattern)已经有讲到过他的基本用法,我们来两个简单的例子复习一下:
 1 <meta charset='utf-8' />
 2 <style>
 3 #canvas,#canvas2{
 4     border:1px dashed #aaa;
 5 }
 6 </style>
 7 <script>
 8 window.onload = function(){
 9     var oCanvas = document.querySelector( "#canvas" ),
10         oGc = oCanvas.getContext( '2d' );
11     var oCanvas2 = document.querySelector( "#canvas2" ),
12         oGc2 = oCanvas2.getContext( '2d' );
13
14     oGc.beginPath();
15     oGc.strokeStyle = '#09f';
16     oGc.arc( 100, 100, 100, 0, 360 * Math.PI / 180, false );
17     oGc.stroke();
18     oGc.closePath();
19
20     oGc.clip();
21
22     oGc.beginPath();
23     oGc.fillStyle = 'red';
24     oGc.fillRect( 100, 100, 200, 100 );
25     oGc.closePath();
26
27     oGc2.beginPath();
28     oGc2.strokeStyle = '#09f';
29     oGc2.rect( 0, 0, 100, 100 );
30     oGc2.stroke();
31     oGc2.closePath();
32
33     oGc2.clip();
34
35     oGc2.beginPath();
36     oGc2.fillStyle = 'red';
37     oGc2.arc( 100, 100, 100, 0, 360 * Math.PI / 180, false );
38     oGc2.fill();
39     oGc2.closePath();
40 }
41 </script>
42 </head>
43 <body>
44 <canvas id="canvas" width="500" height="400"></canvas>
45 <canvas id="canvas2" width="500" height="400"></canvas>
46 </body>
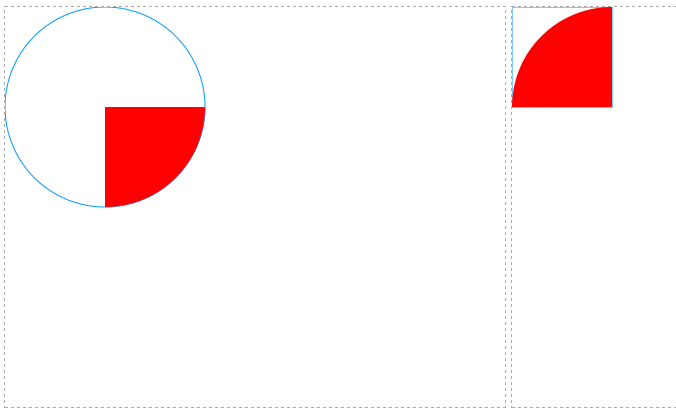
请注意,如果用矩形作为裁剪区域,用使用rect,不能使用strokeRect和fillRect,即下面这段代码不能改成strokeRect或者fillRect
oGc2.beginPath();
oGc2.strokeStyle = '#09f';
oGc2.rect( 0, 0, 100, 100 );
oGc2.stroke();
oGc2.closePath();
如果想在已经裁剪的区域中再加载一张新的图片,怎么做?
 1 <meta charset='utf-8' />
 2 <style>
 3 #canvas{
 4     border:1px dashed #aaa;
 5 }
 6 </style>
 7 <script>
 8 window.onload = function(){
 9     var oCanvas = document.querySelector( "#canvas" ),
10         oGc = oCanvas.getContext( '2d' ),
11         oBtn = document.querySelector( "input" );
12
13     oGc.beginPath();
14     oGc.strokeStyle = '#09f';
15     oGc.arc( 100, 100, 100, 0, 360 * Math.PI / 180, false );
16     oGc.stroke();
17     oGc.closePath();
18
19     oGc.clip();
20     function loadImg( imgPath ){
21         var oImg = new Image();
22         oImg.src = imgPath;
23         oImg.onload = function(){
24             oGc.drawImage( oImg, 0, 0 );
25         }
26     }
27     loadImg( './img/mv.jpg' );
28     oBtn.onclick = function(){
29         loadImg( './img/mv2.jpg' );
30     }
31 }
32 </script>
33 </head>
34 <body>
35 <canvas id="canvas" width="500" height="400"></canvas>
36 <br/><input type="button" value="加载另一张图片">
37 </body>
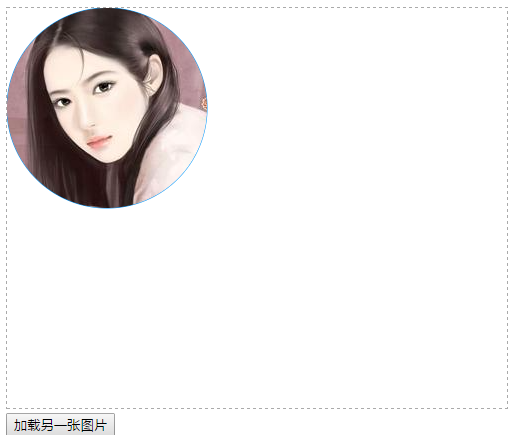
当点击按钮的时候,加载一张新的图片,但是加载后的图片,也产生了裁剪效果.
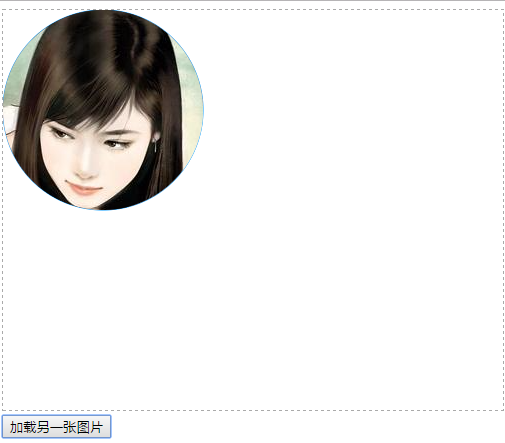
如果,不需要保留裁剪效果怎么做呢?利用save方法保存最初的状态,再加载图片的使用,用restore来恢复
 1 <meta charset='utf-8' />
 2 <style>
 3 #canvas{
 4     border:1px dashed #aaa;
 5 }
 6 </style>
 7 <script>
 8 window.onload = function(){
 9     var oCanvas = document.querySelector( "#canvas" ),
10         oGc = oCanvas.getContext( '2d' ),
11         oBtn = document.querySelector( "input" );
12
13     oGc.save(); //保存画布最初的状态,即没有产生裁剪效果的
14     oGc.beginPath();
15     oGc.strokeStyle = '#09f';
16     oGc.arc( 100, 100, 100, 0, 360 * Math.PI / 180, false );
17     oGc.stroke();
18     oGc.closePath();
19
20     oGc.clip();
21     function loadImg( imgPath ){
22         var oImg = new Image();
23         oImg.src = imgPath;
24         oImg.onload = function(){
25             oGc.drawImage( oImg, 0, 0 );
26         }
27     }
28     loadImg( './img/mv.jpg' );
29     oBtn.onclick = function(){
30         oGc.restore(); //恢复画布最初始的状态
31         loadImg( './img/mv2.jpg' );
32     }
33 }
34 </script>
35 </head>
36 <body>
37 <canvas id="canvas" width="500" height="400"></canvas>
38 <br/><input type="button" value="加载另一张图片">
39 </body>
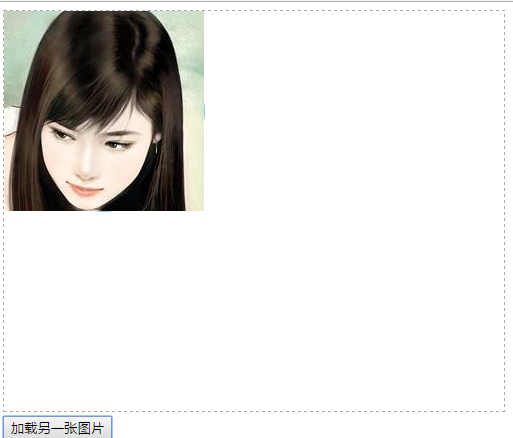
再次点击之后,就没有产生裁剪效果了
保存与恢复变形状态,如果一个形状产生多次平移效果,如果没有保存和恢复状态,那么平移相对的是他上一次变化后的状态
 1 <meta charset='utf-8' />
 2 <style>
 3 #canvas{
 4     border:1px dashed #aaa;
 5 }
 6 </style>
 7 <script>
 8 window.onload = function(){
 9     var oCanvas = document.querySelector( "#canvas" ),
10         oGc = oCanvas.getContext( '2d' ),
11         oBtn = document.querySelector( "input" );
12
13     // oGc.save();
14     oGc.beginPath();
15     oGc.fillStyle = '#09f';
16     oGc.fillRect( 50, 50, 100, 100 );
17     oGc.translate( 100, 100 );
18     oGc.fillRect( 50, 50, 100, 100 );
19     oGc.closePath();
20
21     oGc.beginPath();
22     // oGc.restore();
23     oGc.fillStyle = 'red';
24     oGc.translate( 150, 150 );
25     oGc.fillRect( 50, 50, 100, 100 );
26     oGc.closePath();
27 }
28 </script>
29 </head>
30 <body>
31 <canvas id="canvas" width="500" height="400"></canvas>
32 </body>
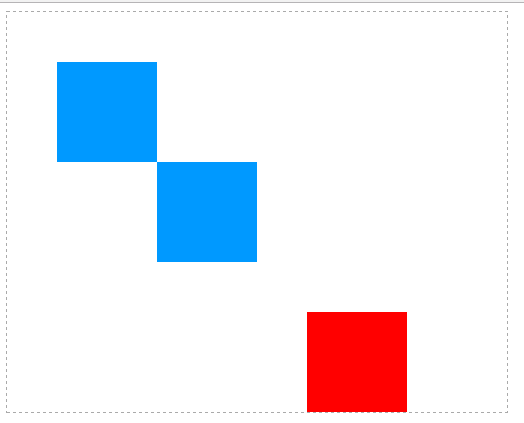
把save()和restore打开,红色的方块将是针对第一次绘制的蓝色方块平移,而不是针对平移后的状态平移【关于平移,后面会有文章,如果你有css3的基础。这个跟css3是一样的,就是相对原来的位置进行平移, 不过这里要注意一点,平移这个动作是写在渲染(fillRect)之前】

保存与恢复字体相关样式
 1 <meta charset='utf-8' />
 2 <style>
 3 #canvas{
 4     border:1px dashed #aaa;
 5 }
 6 </style>
 7 <script>
 8 window.onload = function(){
 9     var oCanvas = document.querySelector( "#canvas" ),
10         oGc = oCanvas.getContext( '2d' ),
11         oBtn = document.querySelector( "input" ),
12         text = '跟着ghostwu学习html5 canvas';
13
14     oGc.font = 'bold 30px 微软雅黑';
15     oGc.fillStyle = '#09f';
16     // oGc.save();
17     oGc.fillText( text, 12, 60 );
18
19     oGc.fillStyle = 'red';
20     oGc.fillText( text, 12, 160 );
21
22     // oGc.restore();
23     oGc.fillText( text, 12, 260 );
24 }
25 </script>
26 </head>
27 <body>
28 <canvas id="canvas" width="500" height="400"></canvas>
29 </body>
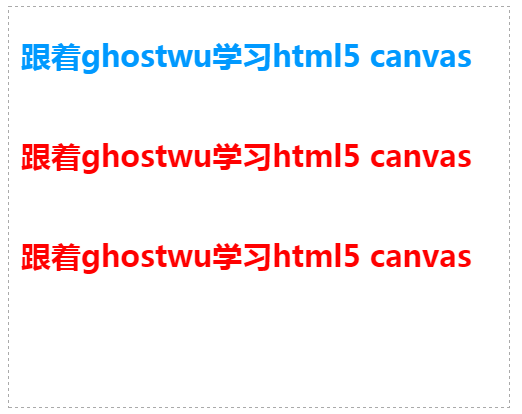
打开注释的save和restore状态之后,第三行文字就会应用到保存之前的状态(天蓝色:oGc.fillStyle = '#09f';)
