本文已列出大部分常用的命令,其余命令可参考链接:
[https://blog.csdn.net/weixin_39951988/article/details/87613816#2.5 which命令](https://blog.csdn.net/weixin_39951988/article/details/87613816#2.5 which命令)
一、修改主机名
[root@localhost ~]# hostnamectl set-hostname 名字  #修改名称
[root@localhost ~]# reboot -f   #重启虚拟机
二、linux系统目录结构详解
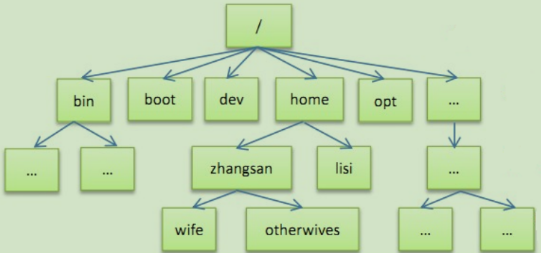
2.1 /bin
存放经常使用的指令,比如ls,cp,rm
2.2 /sbin
系统管理员使用的系统管理命令
2.3 /home
存放普通用户的主目录,在linux中每个用户都有一个自己的目录,一般该目录是以该用户的账号名为目录名
2.4 /root
系统管理员的用户主目录
2.5 /boot
存放的是启动linux是的核心文件
2.6 /lib
存放库文件的目录
2.7 /etc
存放所有系统管理所需要的配置文件,如果我们的网卡
2.8 /usr
用户的很多应用程序和文件都放在这个目录,有点像windows中的program files目录
2.9 /proc 别动
这是系统内存的映射
2.10 /srv ,别动
service 的缩写,存放的是一些服务启动之后所需要的数据
2.11 /sys 别动
系统相关的文件
2.12 /tmp
用来存放临时文件
2.13 /dev
类型与windows的设备管理器,把所有的硬件用文件的形式存储
2.14 /media
linux 会识别一些设备,比如u盘,光驱,linux会把这个设备挂载到这个目录底下
2.15 /mnt
用于让用户临时挂载别的文件系统,我们可以将外部的存储挂载在/mnt上,我们进入目录进行查看
2.16 /opt
这个一般用来放安装包的
2,17 /var
存放经常需要被修改的文件,比如日志文件
2,18 /usr/local
程序安装后存放的地方
三、文件系统常用命令
3.1pwd 显示当前所在的路径
pwd -->print working directory 显示打印当前所在的目录
[root@test1 sysconfig]# pwd
/etc/sysconfig
[root@test1 sysconfig]#
3.2cd 切换目录结构
解释:cd --> change directory 改变目录信息
用法:cd 你想要去的路径

绝对路径:
[root@test1 network-scripts]# cd /etc/sysconfig/network-scripts/
[root@test1 network-scripts]# pwd
/etc/sysconfig/network-scripts
[root@test1 network-scripts]# cd /tmp
[root@test1 tmp]# pwd
/tmp

相对路径的用法:
[root@test1 tmp]# cd /etc/sysconfig/
[root@test1 sysconfig]# pwd
/etc/sysconfig
[root@test1 sysconfig]# cd network-scripts/
[root@test1 network-scripts]# pwd
/etc/sysconfig/network-scripts
[root@test1 network-scripts]#

快速回到自己进过的目录:
[root@test1 sysconfig]# cd /etc/sysconfig/
[root@test1 sysconfig]# pwd
/etc/sysconfig
[root@test1 sysconfig]# cd /tmp
[root@test1 tmp]# pwd
/tmp
[root@test1 tmp]# cd -
/etc/sysconfig
[root@test1 sysconfig]# pwd
/etc/sysconfig


返回当前路径的上一级目录中:
[root@test1 sysconfig]# cd /etc/sysconfig/network-scripts/
[root@test1 network-scripts]# pwd
/etc/sysconfig/network-scripts
[root@test1 network-scripts]# cd ../
[root@test1 sysconfig]# pwd
/etc/sysconfig
[root@test1 sysconfig]# cd /etc/sysconfig/network-scripts/
[root@test1 network-scripts]# pwd
/etc/sysconfig/network-scripts
[root@test1 network-scripts]# cd ../..
[root@test1 etc]# pwd
/etc
[root@test1 etc]# cd /etc/sysconfig/network-scripts/
[root@test1 network-scripts]# cd ../../
[root@test1 etc]# pwd
/etc
[root@test1 etc]# cd /etc/sysconfig/network-scripts/
[root@test1 network-scripts]# cd ../../../../../../../../../
[root@test1 /]# pwd
/

如果返回到当前登入用户的家目录
[root@test1 /]# cd /etc/sysconfig/network-scripts/
[root@test1 network-scripts]# pwd
/etc/sysconfig/network-scripts
[root@test1 network-scripts]# cd ~
[root@test1 ~]# pwd
/root
[root@test1 ~]# cd /etc/sysconfig/network-scripts/
[root@test1 network-scripts]# pwd
/etc/sysconfig/network-scripts
[root@test1 network-scripts]# cd
[root@test1 ~]# pwd
/root
3.3mkdir 创建目录信息
mkdir ---> make directory
[root@zgh1 movie]# mkdir file2
[root@zgh1 movie]# pwd
/movie

用-p参数创建多级目录
[root@zgh1 movie]# mkdir -p file3/file3.1
[root@zgh1 movie]# cd file3/file3.1/
[root@zgh1 file3.1]# pwd
/movie/file3/file3.1
[root@zgh1 file3.1]#

我们在创建目录的时候做好是绝对路径创建
3.4创建文件touch
[root@zgh1 movie]# touch abc.txt
[root@zgh1 movie]# ls
abc.txt  file2  file3  movies
[root@zgh1 movie]# touch /test1/test.txt
touch: cannot touch ‘/test1/test.txt’: No such file or directory
[root@zgh1 movie]# ls
abc.txt  file2  file3  movies
[root@zgh1 movie]# touch /file2/file.txt
touch: cannot touch ‘/file2/file.txt’: No such file or directory
[root@zgh1 movie]# touch /movie/file2/file.txt
3.5ls检查文件或者目录是否存在,并列出目录下的文件
[root@zgh1 /]# ls
bin   etc   lib64  movie   proc  sbin  tmp
boot  home  media  movie1  root  srv   usr
dev   lib   mnt    opt     run   sys   var
[root@zgh1 /]# ls -l

#ls -l 默认是创建时间最新到最老排序
lrwxrwxrwx.   1 root root    7 Mar  5 14:15 bin -> usr/bin
dr-xr-xr-x.   5 root root 4096 Mar  5 14:23 boot
drwxr-xr-x.  20 root root 3220 Mar  6 15:17 dev
drwxr-xr-x.  80 root root 8192 Mar  7 10:29 etc
drwxr-xr-x.   3 root root   20 Mar  6 15:37 home
lrwxrwxrwx.   1 root root    7 Mar  5 14:15 lib -> usr/lib
lrwxrwxrwx.   1 root root    9 Mar  5 14:15 lib64 -> usr/li

# 如何按照时间的创建顺序反排
ls -ltr
drwxr-xr-x.   2 root root    6 Apr 11  2018 srv
drwxr-xr-x.   2 root root    6 Apr 11  2018 opt
drwxr-xr-x.   2 root root    6 Apr 11  2018 mnt
drwxr-xr-x.   2 root root    6 Apr 11  2018 media
lrwxrwxrwx.   1 root root    7 Mar  5 14:15 bin -> usr/bin
lrwxrwxrwx.   1 root root    9 Mar  5 14:15 lib64 -> usr/lib64
3.6cat查看文件信息的命令
concatenate
# cat查看文件内容
[root@zgh1 movie]# cat abc.txt
hello

# 查看多个文件的内容同时输出
[root@zgh1 movie]# cat abc.txt  abc1.txt
hello
world

#将多个文件的内容读取出来以后,放入到一个文件当中

[root@zgh1 movie]# cat abc.txt  abc1.txt > abc2.txt
[root@zgh1 movie]# cat abc2.txt
hello
world
3.7echo将信息进行输出
# 直接输出信息
[root@zgh1 movie]# echo "hai girl"
hai girl

#将echo的内容写入文件,> 是覆盖的意思,>> 是追加
# 格式:echo 内容 > 文件
# 格式:echo 内容 >> 文件

[root@zgh1 movie]# echo hai girl > abc1.txt
> 是覆盖的意思,会覆盖原来文件内的内容
[root@zgh1 movie]# cat abc1.txt
hai girl

>> 是追加
[root@zgh1 movie]# echo you are so pretty >> abc1.txt
[root@zgh1 movie]# cat abc1.txt
hai girl
you are so pretty
3.8cp复制
cp ---> cope
语法格式: cp 参数(可选) 要进行复制的信息  复制到什么位置

#复制文件

在复制文文件时,不要在文件名称后面加/,一般只能在目录后面加/
[root@zgh1 movie]# cp abc.txt abc3.txt
[root@zgh1 movie]# cat abc3.txt
hello
[root@zgh1 movie]# ls
abc1.txt  abc3.txt  file2  movies
abc2.txt  abc.txt   file3

[root@zgh1 movie]# cp abc.txt movies/
[root@zgh1 movie]# cp abc.txt movies/test.txt
[root@zgh1 movie]# cd movies/
[root@zgh1 movies]# ls
abc.txt  loveyou  test.txt


#如果存在会请求你是否覆盖
[root@zgh1 movies]# cp test.txt abc.txt
cp: overwrite ‘abc.txt’? y


#复制文件夹

[root@zgh1 movies]# cp loveyou/ loveyou1/
cp: omitting directory ‘loveyou/’
[root@zgh1 movies]# cp -r loveyou/ loveyou1/

cp  参数:
-d 和链接相关的文件
-r 进行递归复制
-p 保持属性不变
-a == -drp

#利用cp 做备份
[root@zgh1 movie]# cp abc.txt test1.txt
[root@zgh1 movie]# ls
abc1.txt  abc3.txt  file2  file4  movies
abc2.txt  abc.txt   file3  file5  test1.txt

[root@zgh1 movie]# rm -rf abc3.txt
[root@zgh1 movie]# ls
abc1.txt  abc.txt  file3  file5   test1.txt
abc2.txt  file2    file4  movies


# 多文件信息重复,会多次确认提示,如何避免
#解决方法
[root@zgh1 file4]# cp -r /movie1/movies/loveyou/one/abc/ /movie/file4/
[root@zgh1 file4]# ls
abc
3.9mv剪切命令
mv -->move
对文件或者文件夹进行剪切(移动)
语法格式 : mv 参数(可选) 要移动的文件或者文件夹  移动什么位置
可以是绝对路径也可以是相对路径(绝对路径是从根目录开始的路径)
#我们要先创建这个文件

移动文件
[root@zgh1 movie1]# mkdir test
[root@zgh1 movie1]# ls
file2.txt  test
[root@zgh1 movie1]# mv file2.txt test
[root@zgh1 movie1]# ls
test
[root@zgh1 movie1]# cd test
[root@zgh1 test]# ls
file2.txt
移动文件夹
[root@zgh1 movie1]# mkdir dir1
[root@zgh1 movie1]# ls
dir1  test
[root@zgh1 movie1]# mv test/ dir1/
[root@zgh1 movie1]# ls
dir1
[root@zgh1 movie1]# cd dir1/
[root@zgh1 dir1]# ls
test


# 利用mv 命令给文件重命名
[root@zgh1 test]# ls
file2.txt
[root@zgh1 test]# mv file2.txt file.txt
[root@zgh1 test]# ls
file.txt
3.10rm 命令(删除)
rm --->remove
语法 :rm 参数 要删除的数据信息

#删除文件
[root@zgh1 test]# ls
file.txt
[root@zgh1 test]# rm file.txt
rm: remove regular file ‘file.txt’? y
[root@zgh1 test]# ls
[root@zgh1 test]#

#删除文件夹
[root@zgh1 abc]# rm -f /movie/
rm: cannot remove ‘/movie/’: Is a directory
[root@zgh1 abc]# rm -r /movie/
rm: descend into directory ‘/movie/’? y


# 强制删除rm -rf,该命令不会询问直接删除
[root@zgh1 abc]# rm -rf /movie/
[root@zgh1 abc]# cd /
[root@zgh1 /]# ls
bin   dev  home  lib64  mnt     opt   root  sbin  sys  usr
boot  etc  lib   media  movie1  proc  run   srv   tmp  var
说明centos6.7以后对删除根目录做了保护,但是删除根目录仍然会对系统造成损坏
rm -rf /
3.11vim 编辑器
换源到阿里源 https://developer.aliyun.com/mirror/centos?spm=a2c6h.13651102.0.0.3e221b11q17Xub切换我们yum源
yum install 软件 -y 不需要征求是否同意
安装vim
命令: yum -y install vim
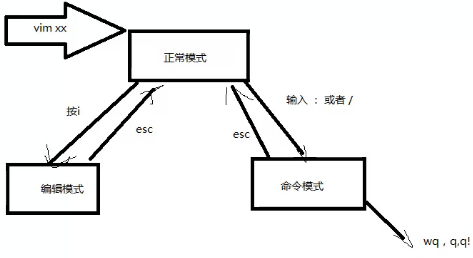
vim 有种状态
1 正常模式(我们用vim打开文件就是进入正常模式)
比如复制,粘贴等
2 插入模式
在插入模式下,我们们输入内容,编辑内容
如何从正常模式切换插入模式:i,o,a,I,O,A,R任意一个键都能重正常模式进入插入模式
正常习惯按i,因为好记,i-->insert
3 命令模式
在这个模式下,我们可以输入相关的命令,比如退出,,保存,等操作
终结:vim三种模式可以随意切换
正常模式下的命令:
拷贝:yy 粘贴:p
拷贝当前行向下2行,并粘贴
拷贝2行:2yy
拷贝几行数字就是几
粘贴:p
删除当前行
删除:dd
向下删除2行
删除:2dd
光标移到最后一行: G
光标移动了首行: gg
光标移动2行: 2gg
撤销: u
编辑模式下:进入以后就可以编辑
命令模式:
1 查找内容
:/关键字
2 取消高亮
:nohl
3 显示行数
:set nu
4 取消行号
:set nonu
5 没有修改的情况下推出
:q
6如果我们改了,但是我们不想他保存
:q!
7 如果我们改了,并想保存退出,
:wq
3.12stat命令
查看文件的访问时间,修改时间等
[root@zgh1 test]# stat file.txt
  File: ‘file.txt’
  Size: 40        	Blocks: 8          IO Block: 4096   regular file
Device: fd00h/64768d	Inode: 8420599     Links: 1
Access: (0644/-rw-r--r--)  Uid: (    0/    root)   Gid: (    0/    root)
Context: unconfined_u:object_r:default_t:s0
Access: 2020-03-07 17:30:27.457540495 +0800
Modify: 2020-03-07 17:29:21.243544671 +0800
Change: 2020-03-07 17:29:21.265544669 +0800
 Birth: -
四、关机、重启命令
shutdown 命令:
	shutdown -h now   #立即关机
	shutdown -h 1     #1分钟后关机
	shutdown -r now   # 立即重启
	shutdown -r 1     #1分钟后重启

halt 关机
reboot 重启
sync  把内存中的数据同步到硬盘中

注意:当关机或者从起的时候,一定要先执行sync命令,防止数据丢失。
五、用户 与用户主
5.1 为什么要用户
正常公司的服务器,不会给你root用户,就算给你root用户,你也不要要,权限越大风险就越大。正常情况下使用的是普通用户登入。当然可以切换用户
5.2 如何查看当前登入的用户
命令:
[root@localhost ~]# whoami
root
5.3 如何添加用户
useradd 选项 用户名
例如:
useradd lxx
说明:成功创建后,就会自动创建于用户名同名的家目录

给用户自定家目录
useradd -d 目录路径 用户名

指定用户组
useradd -g 用户主名 用户名
5.4 给指定用户添加或修改密码
passwd 用户名
密码最少要8个字符
5.5 如何删除用户
userdel 用户名                 删除用户,保留家目录
userdel -r 用户名              删除用户,不保留家目录

#一般不会删除用户的家目录
5.6如何查询用户是否存在
id 用户名

如何切换用户:su - 用户名
回到原来的用户: exit
5.7 编辑用户组
因为我们要对权限做同意的管理,运维,开发,方便权限的管理
1 如何添加一个组
groupadd  组名

2 删除组
groupdel 组名

groupdel如果该组里面有用户的话,是不能删除的,除非删除这个用户

3 如何给用户切换组
usermod -g 组名 用户名
六、文件权限
查看文件权限ls -lhi /etc 最多用的是ll
结果如下:
 4261971 -rw-r--r--.  1 root root  111 Oct 31  2018 magic
 4657110 -rw-r--r--.  1 root root 2.0K Apr 11  2018 mail.rc
 4790595 -rw-r--r--.  1 root root 5.1K Aug  8  2019 makedumpfile.conf.sample
 4916208 -rw-r--r--.  1 root root 5.1K Oct 31  2018 man_db.conf
 4937598 -rw-r--r--.  1 root root  936 Aug  9  2019 mke2fs.conf
01        02          03 04   05    06      07       08

01 文件索引节点信息 inode
02 文件的类型以及文件的权限信息
03 硬链接数
04 文件所属的用户
05 文件所属的用户组
06 文件大小
07 最后一次被修改的时间
08 文件名

*******解释02***********
d    rwx    r-x    ---
1     2      3      4

上述*******解释02***********的1,表示文件的类型
d  directory 目录类型文件
-  file   普通文件
l  softlint 链接类型

上述*******解释02***********的2,表示当前用户对当前文件权限
上述*******解释02***********的3,表示当前用户组对当前文件权限
上述*******解释02***********的4,表示其他用户对当前文件的权限
总结:
文件(你的玩具) :上述*******解释02***********的2,你自己对你的玩具有什么权限
文件(你的玩具):上述*******解释02***********的3,你的家人对你的玩具有什么权限
文件(你的玩具): 上述*******解释02***********的4,隔壁老王,陌生人对你的玩具有什么权限

一个文件的权限有3位组成:
rwx --->分别代表了读,写,执行这个三个权限
r -->read-->读权限  数值 4
w --->write--->写权限  数值 2
x ---> exwcute-->执行  数值 1
- --->没有权限          数值 0

rwx  r-x  r-x  请问属主什么权限  属主组有什么权限   其他用户有什么权限
7    5    5    读 写 执行           读 执行       读 执行

############
04 文件所属的用户 root -->该文件的属主是root
05 文件所属的用户组root  ---》该文件的属主组是root组
6.1 如何修改文件的权限
语法 : chmod 参数  权限值 文件路径
[root@zgh1 movie1]# ls -lhi dir1/
total 0
8420595 drwxr-xr-x. 2 root root 6 Mar  7 16:47 test
[root@zgh1 movie1]# chmod 777 dir1/
[root@zgh1 movie1]# ls -lhi dir1/
total 0
8420595 drwxr-xr-x. 2 root root 6 Mar  7 16:47 test


让文件夹以及子文件递归变成我们指定的权限
执行 :chomd  -R 777 /dir1
6.2 如何修改文件的属主及属主组
chown 参数 用户名.组名  文件/文件夹

让文件夹以及子文件递归变成我们指定的用户.组
执行 :chown  -R jj.sb a.txt
七、换yum源
换源到阿里源复制下面源链接直接执行即可
https://developer.aliyun.com/mirror/centos?spm=a2c6h.13651102.0.0.3e221b11q17Xub
yum安装软件的方法:yum install 软件 -y 不需要征求是否同意