经常搞wcf的基友们肯定会知道,当你的应用程序有很多的“服务引用”的时候,是不是有一种疯狂的感觉。。。从一个环境迁移到另外一个环境,你需要改变的
endpoint会超级tmd的多,简直就是搞死了人。。。好了,这篇我们来看看如何最小化配置。
一:精简service的config配置
就像上一篇的代码一样,我的service端的config配置如下:

 1 <?xml version="1.0" encoding="utf-8" ?>
 2 <configuration>
 3 <system.servicemodel>
 4 <behaviors>
 5 <servicebehaviors>
 6 <behavior name="mxbehavior">
 7 <servicemetadata httpgetenabled="true" />
 8 <servicedebug includeexceptiondetailinfaults="true" />
 9 </behavior>
10 </servicebehaviors>
11 </behaviors>
12 <services>
13 <service name="myservice.homeservice" behaviorconfiguration="mxbehavior">
14 <endpoint address="net.tcp://localhost:1920/homeservice" binding="nettcpbinding" contract="myservice.ihomeservice">
15 <identity>
16 <dns value="localhost" />
17 </identity>
18 </endpoint>
19 <endpoint address="mex" binding="mexhttpbinding" contract="imetadataexchange" />
20 <host>
21 <baseaddresses>
22 <add baseaddress="http://localhost:19200/homeservice"/>
23 </baseaddresses>
24 </host>
25 </service>
26 </services>
27 </system.servicemodel>
28 </configuration>
通过上面的代码,你应该知道在system.servicemodel下的所有节点都是wcf专属的节点,所有的节点数据都会被开启servicehost这个监听器时捕获到,下面我可以
通过servicehost这个监听器的源码下面找找相关的读取config节点的代码。
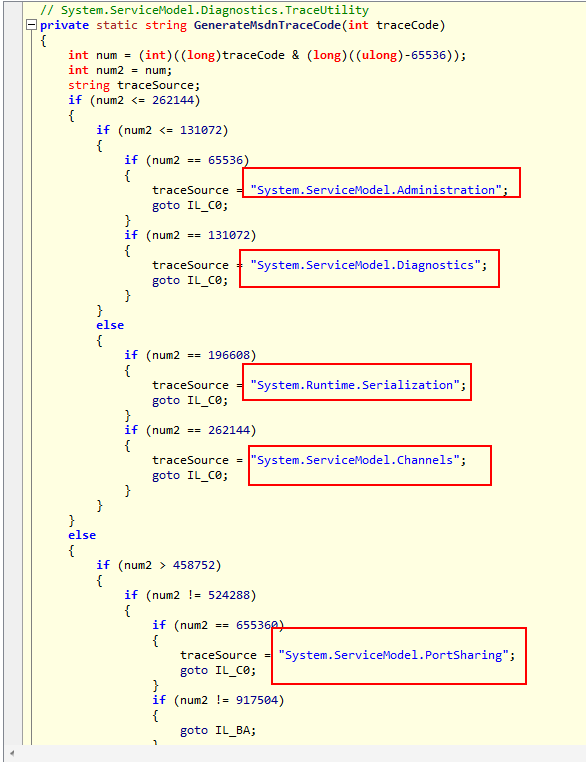
通过上面的截图,你是不是有一种感觉,就是service的底层也是通过代码动态的读取config下面的节点来获取数据,那就意味着我可以直接将代码写入到code中,
对吧,这样我就可以把我认为该配置的东西配置起来,不该配置的东西全部放到代码里面去,这样我的灵活性是不是非常的强大。。。。爽吧,说干就干。。。
 1     class Program1
 2     {
 3         static void Main(string[] args)
 4         {
 5             ServiceHost host = new ServiceHost(typeof(HomeService), new Uri("http://localhost:19200/HomeService"));
 6
 7             host.AddServiceEndpoint(typeof(IHomeService), new NetTcpBinding(), "net.tcp://localhost:1920/HomeService");
 8
 9             //公布元数据
10             host.Description.Behaviors.Add(new ServiceMetadataBehavior() { HttpGetEnabled = true });
11             host.AddServiceEndpoint(typeof(IMetadataExchange), MetadataExchangeBindings.CreateMexHttpBinding(), "mex");
12
13             host.Open();
14
15             Console.WriteLine("服务已经开启。。。");
16
17             Console.Read();
18         }
19     }
有人就要说了,地址的话肯定不能是写死的,必须变活,简单啊,我就仅仅把ip地址配置到config里面去不就完事了,对不对。
<configuration>
  <appSettings>
    <add key ="baseurl" value="http://localhost:19200/HomeService"/>
    <add key ="endpoindurl" value="net.tcp://localhost:1920/HomeService"/>
  </appSettings>
 1   class Program1
 2     {
 3         static void Main(string[] args)
 4         {
 5             ServiceHost host = new ServiceHost(typeof(HomeService), new Uri(ConfigurationManager.AppSettings["baseurl"]));
 6
 7             host.AddServiceEndpoint(typeof(IHomeService), new NetTcpBinding(), ConfigurationManager.AppSettings["endpoindurl"]);
 8
 9             //公布元数据
10             host.Description.Behaviors.Add(new ServiceMetadataBehavior() { HttpGetEnabled = true });
11             host.AddServiceEndpoint(typeof(IMetadataExchange), MetadataExchangeBindings.CreateMexHttpBinding(), "mex");
12
13             host.Open();
14
15             Console.WriteLine("服务已经开启。。。");
16
17             Console.Read();
18         }
19     }
现在看的话,是不是清楚多了,如果你觉得我的代码比较累赘,你可以封装成一个方法,然后就可以动态的配置nettcp,basic,ws*等等对吧。。。好了,说完服
务端,接下来我们看看client端如何避免。
二:精简client的config配置
就像上一节那样,如果我用“服务引用”的话,vs会偷偷的用svcutil.exe来给我们生成一个proxy类和一个config文件,proxy类也就是你看到的xxxclient。。。
可恶的是config里面会给我生成一些乱七八糟的东西,如下图:
 1 <?xml version="1.0" encoding="utf-8" ?>
 2 <configuration>
 3 <system.serviceModel>
 4 <bindings>
 5 <netTcpBinding>
 6 <binding name="NetTcpBinding_IHomeService" />
 7 </netTcpBinding>
 8 </bindings>
 9 <client>
10 <endpoint address="net.tcp://localhost:1920/HomeService" binding="netTcpBinding"
11 bindingConfiguration="NetTcpBinding_IHomeService" contract="HomeServiceReference.IHomeService"
12 name="NetTcpBinding_IHomeService">
13 <identity>
14 <dns value="localhost" />
15 </identity>
16 </endpoint>
17 </client>
18 </system.serviceModel>
19 </configuration>
同服务器端一样,如果我用code做掉,是不是非常的爽呢???那可不可以做掉呢? 我们还得看一下proxy的源码,首先你会看到其实所谓的proxy只是一个继承
自clientbase的一个类,如下图。


上面的两幅图,你会发现,最后的proxy类是通过ChannelFactory<TChannel>类来完成助攻的,那话说回来了,既然底层用了ChannelFactory<TChannel>,
那何不我在代码里面就用ChannelFactory<TChannel>不是更好吗???这样config也省了,对吧,说干就干啦。。。
1     static void Main(string[] args)
2         {
3             ChannelFactory<IHomeService> factory = new ChannelFactory<IHomeService>(new NetTcpBinding(), "net.tcp://localhost:1920/homeservice");
4
5             var channel = factory.CreateChannel();
6
7             var result = channel.GetLength("12345");
8         }
好了,代码就这么简单,现在是不是感觉自己萌萌大啦~~~