前言:
本系列文章主要为我之前所学知识的一次微小的实践,以我学校图书馆管理系统为雏形所作。
本系列文章主要参考资料:
微软文档:https://docs.microsoft.com/zh-cn/aspnet/core/getting-started/?view=aspnetcore-2.1&tabs=windows
《Pro ASP.NET MVC 5》、《锋利的 jQuery》
此系列皆使用 VS2017+C# 作为开发环境。如果有什么问题或者意见欢迎在留言区进行留言。
项目 github 地址:https://github.com/NanaseRuri/LibraryDemo
本章内容:对图书馆系统组成的简要分析。以及对域模型以及相应数据库的建立。
知识点:Code First、EF 基本使用方法、ASP.NET Core 使用 EF Core 的配置方法、EF 多对多关系的建立、取消 int 主键自动增长。
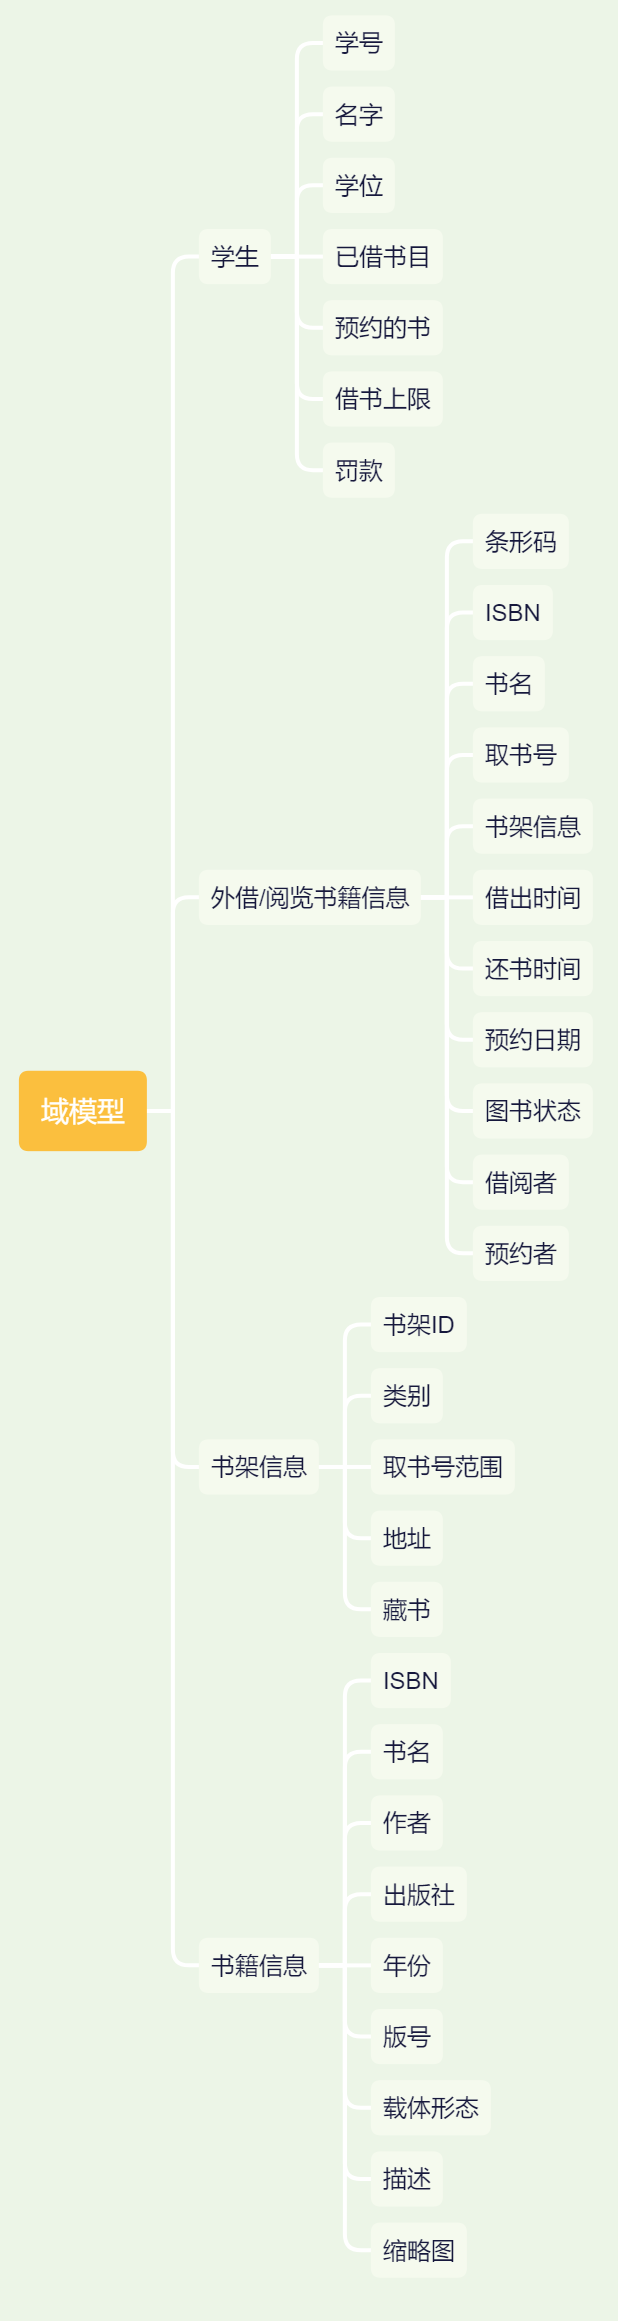
一、对图书馆系统域模型的分析
一个图书馆系统需要有管理员、 学生、书架以及书籍

域模型,即用来存储数据的模型。
在此域模型可以用以下结构创建:
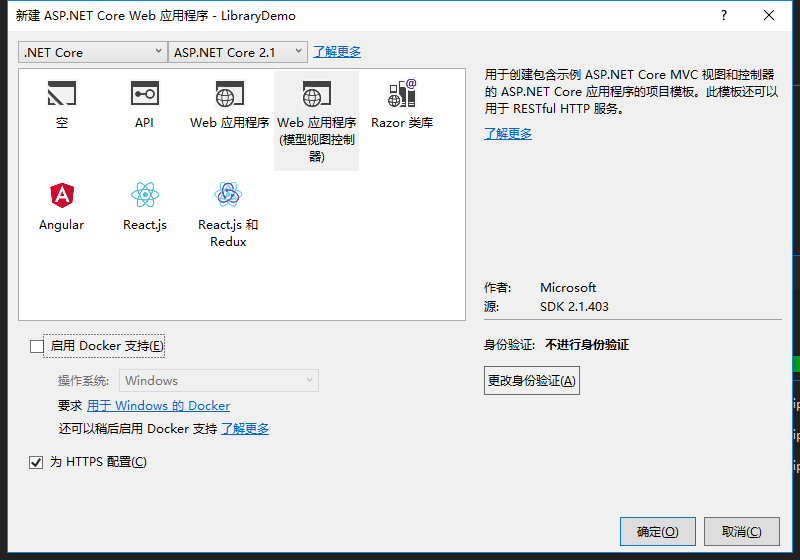
二、项目结构
然后就可以开始建立该项目了:
三、建立域模型
学位枚举:
1     public enum Degrees
2     {
3         [Display(Name = "本科生")]
4         CollegeStudent,
5         [Display(Name = "研究生")]
6         Postgraduate,
7         [Display(Name = "博士生")]
8         DoctorateDegree
9     }
图书借阅状态枚举:
 1     public enum BookState
 2     {
 3         /// <summary>
 4         /// 可借阅
 5         /// </summary>
 6         [Display(Name = "正常")]
 7         Normal,
 8
 9         /// <summary>
10         /// 馆内阅览
11         /// </summary>
12         [Display(Name = "馆内阅览")]
13         Readonly,
14
15         /// <summary>
16         /// 已借出
17         /// </summary>
18         [Display(Name = "已借出")]
19         Borrowed,
20
21         /// <summary>
22         /// 被续借
23         /// </summary>
24         [Display(Name = "被续借")]
25         ReBorrowed,
26
27         /// <summary>
28         /// 被预约
29         /// </summary>
30         [Display(Name = "被预约")]
31         Appointed,
32
33         [Display(Name = "过期")]
34         Expired
35     }
该项目准备使用一个数据库存储学生账户信息,另一个则用于存储学生借书信息:
学生账户信息:
 1     public class Student : IdentityUser
 2     {
 3         /// <summary>
 4         /// 学号
 5         /// </summary>
 6         [ProtectedPersonalData]
 7         [RegularExpression("[UIA]\\d{9}")]
 8         [Display(Name = "学号")]
 9         public override string UserName { get; set; }
10
11         [Display(Name = "手机号")]
12         [StringLength(14, MinimumLength = 11)]
13         public override string PhoneNumber { get; set; }
14
15         [Display(Name = "姓名")]
16         public string Name { get; set; }
17         [Display(Name = "学历")]
18         public Degrees Degree { get; set; }
19         [Display(Name = "最大借书数目")]
20         public int MaxBooksNumber { get; set; }
21     }
书籍信息:
 1     public class Book
 2     {
 3         /// <summary>
 4         /// 二维码
 5         /// </summary>
 6         [Key]
 7         [Display(Name = "二维码")]
 8         [Required(ErrorMessage = "未填写二维码")]
 9         public string BarCode { get; set; }
10
11         public string ISBN { get; set; }
12
13         /// <summary>
14         /// 书名
15         /// </summary>
16         [Display(Name = "书名")]
17         public string Name { get; set; }
18
19         /// <summary>
20         /// 取书号
21         /// </summary>
22         [Display(Name = "取书号")]
23         public string FetchBookNumber { get; set; }
24
25         /// <summary>
26         /// 所在书架
27         /// </summary>
28         public Bookshelf Bookshelf { get; set; }
29
30         [Display(Name = "书架号")]
31         public int BookshelfId { get; set; }
32
33         /// <summary>
34         /// 借出时间
35         /// </summary>
36         [Display(Name = "借出时间")]
37         public DateTime? BorrowTime { get; set; }
38
39         /// <summary>
40         /// 到期时间
41         /// </summary>
42         [Display(Name = "到期时间")]
43         public DateTime? MatureTime { get; set; }
44
45         /// <summary>
46         /// 预约最晚借书日期
47         /// </summary>
48         [Display(Name = "预约取书时间")]
49         public DateTime? AppointedLatestTime { get; set; }
50
51         /// <summary>
52         /// 借阅状态
53         /// </summary>
54         [Display(Name = "书籍状态")]
55         public BookState State { get; set; }
56
57         /// <summary>
58         /// 持有者,指定外键
59         /// </summary>
60         public StudentInfo Keeper { get; set; }
61         [Display(Name = "持有者学号")]
62         public string KeeperId{ get; set; }
63
64         [Display(Name = "位置")]
65         public string Location { get; set; }
66
67         [Display(Name = "分类")]
68         public string Sort { get; set; }
69
70         public ICollection<AppointmentOrLending> Appointments { get; set; }
71     }
书架信息:
由于 EF 会自动将 int 类型的主键设置为自动增长,因此自定义 Bookshelf 的 ID 在插入数据库时会报错,在此需添加修饰 [DatabaseGenerated(DatabaseGeneratedOption.None)] 告知 ef 取消该设置:
 1     public class Bookshelf
 2     {
 3         /// <summary>
 4         /// 书架ID
 5         /// </summary>
 6         [Key]
 7         //不自动增长
 8         [DatabaseGenerated(DatabaseGeneratedOption.None)]
 9         public int BookshelfId { get; set; }
10
11         /// <summary>
12         /// 书架的书籍类别
13         /// </summary>
14
15         [Required]
16         public string Sort { get; set; }
17         /// <summary>
18         /// 最小取书号
19         /// </summary>
20         [Required]
21         public string MinFetchNumber { get; set; }
22         [Required]
23         public string MaxFetchNumber { get; set; }
24
25         /// <summary>
26         /// 书架位置
27         /// </summary>
28         [Required]
29         public string Location { get; set; }
30
31         /// <summary>
32         /// 全部藏书
33         /// </summary>
34         public ICollection<Book> Books { get; set; }
35     }
由于一个学生可以借阅多本书籍,一本书籍可被多人预约,因此书籍和学生具有多对多的关系,在此引入中间类:
其中的 AppointingDateTime 用来区分中间类包含的书籍是借阅书籍还是预约书籍:
1     public class AppointmentOrLending
2     {
3         public Book Book { get; set; }
4         public string BookId { get; set; }
5         public StudentInfo Student { get; set; }
6         public string StudentId { get; set; }
7         public DateTime? AppointingDateTime { get; set; }
8     }
学生借书信息:
在 EF 中多对多关系实际上是两个多对一关系。此处 ICollection 的属性成为导航属性,用来提示 EF StudentInfo 和 AppointmentOrLending 之间存在着多对一的关系。
 1     public class StudentInfo
 2     {
 3         [Key]
 4         public string UserName { get; set; }
 5
 6         [Required]
 7         public string Name { get; set; }
 8
 9         /// <summary>
10         /// 学位,用来限制借书数目
11         /// </summary>
12         [Required]
13         public Degrees Degree { get; set; }
14
15         /// <summary>
16         /// 最大借书数目
17         /// </summary>
18         [Required]
19         public int MaxBooksNumber { get; set; }
20
21         /// <summary>
22         /// 已借图书
23         /// </summary>
24         public ICollection<AppointmentOrLending> KeepingBooks { get; set; }
25
26         public string AppointingBookBarCode { get; set; }
27
28         [StringLength(14, MinimumLength = 11)]
29         public string PhoneNumber { get; set; }
30
31         /// <summary>
32         /// 罚款
33         /// </summary>
34         public decimal Fine { get; set; }
35     }
外借/阅览书籍信息:
在约定中,若不指定主键,则 EF 会使用 (类名)+ID 的方式指定或创建主键,在此使用 [Key] 指定主键,使用 [Required] 指定字段为必须,这种可以为属性添加在数据库中的约束或者在视图中的约束的修饰称为 DataAnnotations 。
此处 ICollection 的属性成为导航属性,用来提示 EF Book 和 AppointmentOrLending 之间存在着多对一的关系。
 1     public class Book
 2     {
 3         /// <summary>
 4         /// 二维码
 5         /// </summary>
 6         [Key]
 7         [Display(Name = "二维码")]
 8         [Required(ErrorMessage = "未填写二维码")]
 9         public string BarCode { get; set; }
10
11         public string ISBN { get; set; }
12
13         /// <summary>
14         /// 书名
15         /// </summary>
16         [Display(Name = "书名")]
17         public string Name { get; set; }
18
19         /// <summary>
20         /// 取书号
21         /// </summary>
22         [Display(Name = "取书号")]
23         public string FetchBookNumber { get; set; }
24
25         /// <summary>
26         /// 所在书架
27         /// </summary>
28         public Bookshelf Bookshelf { get; set; }
29
30         [Display(Name = "书架号")]
31         public int BookshelfId { get; set; }
32
33         /// <summary>
34         /// 借出时间
35         /// </summary>
36         [Display(Name = "借出时间")]
37         public DateTime? BorrowTime { get; set; }
38
39         /// <summary>
40         /// 到期时间
41         /// </summary>
42         [Display(Name = "到期时间")]
43         public DateTime? MatureTime { get; set; }
44
45         /// <summary>
46         /// 预约最晚借书日期
47         /// </summary>
48         [Display(Name = "预约取书时间")]
49         public DateTime? AppointedLatestTime { get; set; }
50
51         /// <summary>
52         /// 借阅状态
53         /// </summary>
54         [Display(Name = "书籍状态")]
55         public BookState State { get; set; }
56
57         /// <summary>
58         /// 持有者,指定外键
59         /// </summary>
60         public StudentInfo Keeper { get; set; }
61         [Display(Name = "持有者学号")]
62         public string KeeperId{ get; set; }
63
64         [Display(Name = "位置")]
65         public string Location { get; set; }
66
67         [Display(Name = "分类")]
68         public string Sort { get; set; }
69
70         public ICollection<AppointmentOrLending> Appointments { get; set; }
71     }
四、创建 DbContext
学生账户信息数据库:
1     public class StudentIdentityDbContext:IdentityDbContext<Student>
2     {
3         public StudentIdentityDbContext(DbContextOptions<StudentIdentityDbContext> options) : base(options)
4         {
5         }
6     }
借阅信息数据库:
为了使 StudentInfo 类的 UserName 和 Book 的 BarCode 共同作为 AppointmentOrLending 中间类的主键,需覆写 OnModelCreating 方法:
至此 StudentInfo 和 Book 的多对多关系正式确立。
 1     public class LendingInfoDbContext:DbContext
 2     {
 3         public LendingInfoDbContext(DbContextOptions<LendingInfoDbContext> options) : base(options)
 4         {
 5         }
 6
 7         public DbSet<Book> Books { get; set; }
 8         public DbSet<BookDetails> BooksDetail { get; set; }
 9         public DbSet<Bookshelf> Bookshelves { get; set; }
10         public DbSet<RecommendedBook> RecommendedBooks { get; set; }
11         public DbSet<StudentInfo> Students { get; set; }
12         public DbSet<AppointmentOrLending> AppointmentOrLendings { get; set; }
13
14         protected override void OnModelCreating(ModelBuilder modelBuilder)
15         {
16             base.OnModelCreating(modelBuilder);
17             modelBuilder.Entity<AppointmentOrLending>()
18                 .HasKey(c => new { c.BookId, c.StudentId });
19         }
20     }
于是 Book 和 StudentInfo 之间的多对多关系确立完成。
五、根据约定配置数据库,进行依赖注入
在 appsettings.json 中添加数据库连接字符串。
 1 {
 2   "ConnectionStrings": {
 3     "LendingInfoDbContext": "Server=(localdb)\\mssqllocaldb;Database=LendingInfoDbContext;Trusted_Connection=True;MultipleActiveResultSets=true",
 4     "StudentIdentityDbContext": "Server=(localdb)\\mssqllocaldb;Database=StudentIdentityDbContext;Trusted_Connection=True;MultipleActiveResultSets=true"
 5   },
 6   "Logging": {
 7     "LogLevel": {
 8       "Default": "Warning"
 9     }
10   },
11   "AllowedHosts": "*"
12 }
在 Startup.cs 中的 ConfigureServices 方法中对数据库进行配置:
1             services.AddDbContext<LendingInfoDbContext>(options =>
2             {
3                 options.UseSqlServer(Configuration.GetConnectionString("LendingInfoDbContext"));
4             });
5             services.AddDbContext<StudentIdentityDbContext>(options =>
6             {
7                 options.UseSqlServer(Configuration.GetConnectionString("StudentIdentityDbContext"));
8             });
六、数据库的迁移、创建及更新
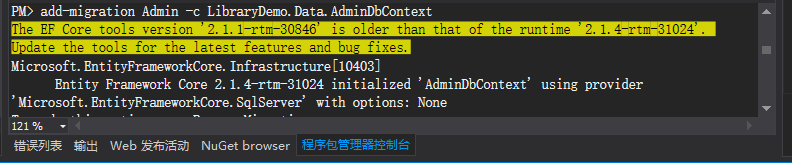
然后在 pm控制台 中添加迁移:
添加迁移的语法为 add-migration <迁移类名> -c <具体 DbContext 名>
1       cd LibraryDemo
2       add-migration LendingInfo -c LibraryDemo.Data.LendingInfoDbContext
3       add-migration StudentIdentity -c LibraryDemo.Data.StudentIdentityDbContext


运行 add-migration 命令会创建 Migrations 文件夹以及相应的迁移快照:
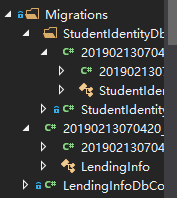
显示的类名为 <创建时间>_<迁移类名>,而实际的类名为 add-migration 后的第一个参数名。
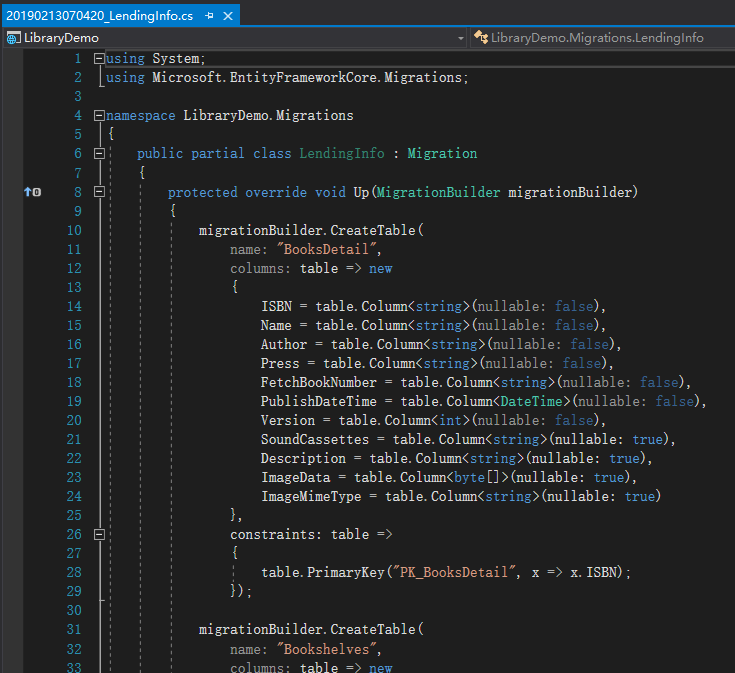
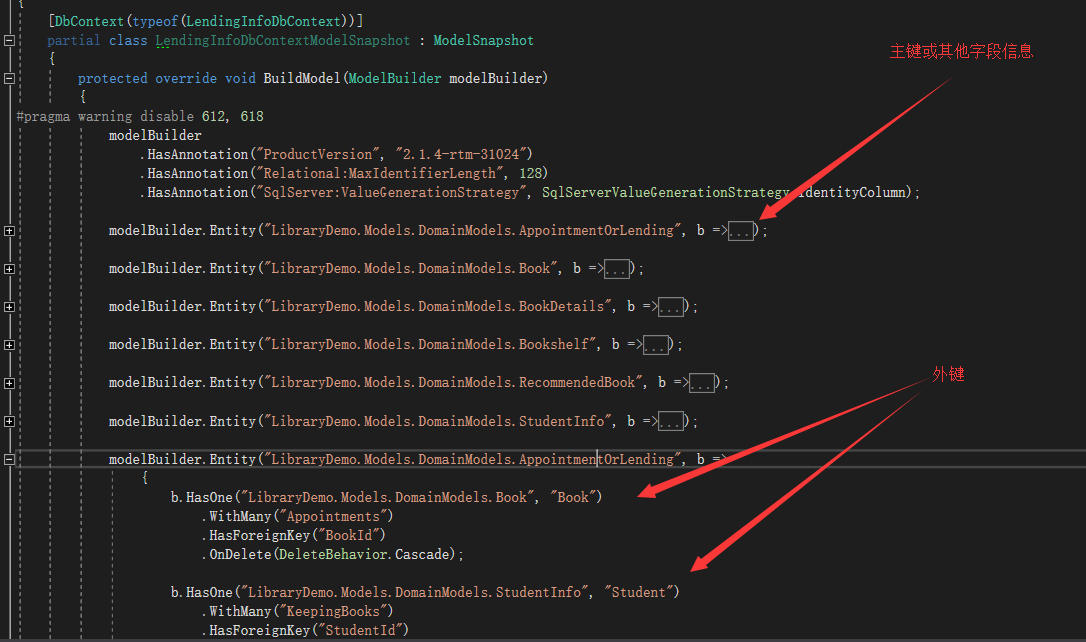
在创建迁移时,EF 会自动为我们创建或更新对应 DbContext 的快照,即其中后缀为 Snapshot 的类。其中会包含当前对应的 DbCOntext 的结构,并会以代码保留相应的约束,如 LendingInfoDbContextModelSnapshot 类:

生成的迁移类 LendingInfo 和 Account 类则有两个方法—— 用于更新数据库的 Up 方法和用以回溯数据库的 Down 方法,可以在这两个方法或者在快照的 BuildModel 方法中使用 Fluent API 对数据库做进一步的改动,并且通过对 Fluent API 的使用可以使我们的类少用 DataAnnotations 以保证类的整洁。
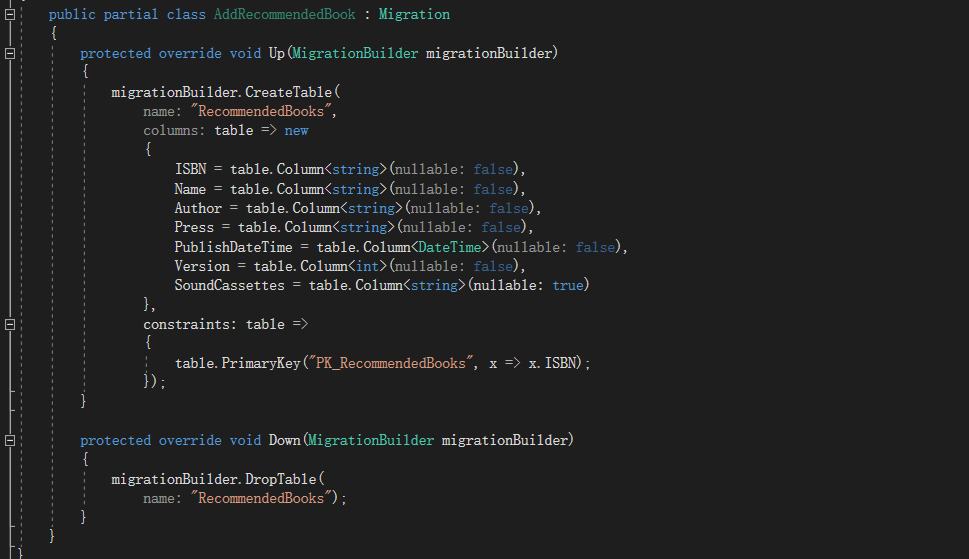
需要注意的是,生成的迁移类中的 Up 和 Down 方法是根据生成迁移之前的数据库快照生成的,如我在之后为 LendingInfoDbContext 添加 DbSet<RecommendedBook> 时,在以上的基础上运行了 add-migration AddRecommendedBook -c LibraryDemo.Data.LendingInfoDbContext ,生成的 Up 方法只包括添加表 RecommendedBooks 的行为,而 Down 方法只包括删除表 RecommendedBooks 的行为。
随后在 pm控制台 执行以下创建或更新数据库:
1      update-database -c LibraryDemo.Data.LendingInfoDbContext
2      update-database -c LibraryDemo.Data.StudentIdentityDbContext
最后在 SQL server对象管理器 中可以看见创建的数据库以及对应的表:
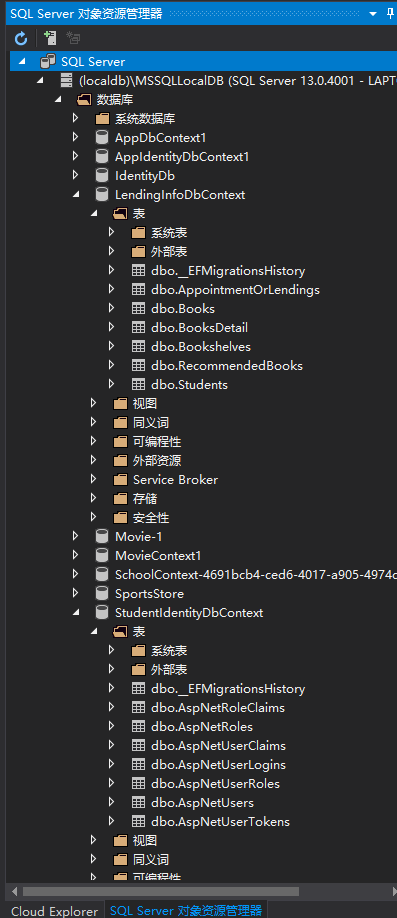
至此域模型创建工作完成。
补充:
使用命令行对数据库进行迁移及更新有两种方式:
1  dotnet ef migrations migrationName -c TargetContext
2  dotnet ef database update -c TargetContext
1  add-migration migrationName -c TargetContext
2  update-Database -c TargetContext
windows 命令行命令不区分大小写,其中 migrationName 为迁移类名,最好提供有意义的命名;而 TargetContext 为目标 DbContext 类名,需要使用带有命名空间的完全命名。
如果需要删除数据库则使用 drop 方法
drop-database -c TargetContext
而为 update 方法指定迁移类则可以回溯数据库。
Update-Database LendingInfoDbContext -TargetMigration:"20181127081115_LendingInfo.cs"